

Shortzz
A Perfect Social Media
Introducing Shortzz 2.0 — a powerful Social Media having new update that brings an unmatched set of features to elevate your experience. From multi-host live streaming and PK battles to immersive stories that combine images, videos, text, and music, Shortzz 2.0 is built for creators and communities alike. The reel and feed systems have been significantly improved, powered by a smarter algorithm with geo-location tagging. Language localization can now be managed directly from the admin panel, ensuring a more personalized experience for users around the world. New features like animated gifts, GIF comments, mentions, comment replies and likes, post sharing in chats, and a structured level system take interaction to the next level. And that’s just the beginning. Let’s explore these features one by one—check out the demo app now.
Version Details
dart: ">=3.7.2 < 4.0.0"
flutter: ">=3.29.0"
laravel/framework: "^10.48.25"
Developer Friendly
Specially built for developers to give them freedom while coding.
Clean Code
Less bulky and clean code with Getx flutter state management.
Laravel/Flutter
A great combination of techstacks, trending now in market.
Well Documented
Comes with nice documentation to help you get started fast and ASAP.
Continuous Updates
Comes with continuous updates to keep you safe from exploitable holes
Realtime Chat
Realtime chats between users regarding properties powered by Firestore.
Multiple Languages
The App Comes with multiple languages (More than 20). RTL supported.
Powerful Admin Panel
Admin dashboard to manage the data of the app and control them.
Powerful Features
Reels, Feed, Livestream, PK Battle, Gifts, Chat, Mentions, Hashtags, Stories, GIFs Etc...
Attractive UI/UX
Amazing UI/UX designed and developed by world class designers.
Active Support
Our support and developer team helps you solve any issues during installation.
Requirements
-
VPS with cPanel is required
To host backend and database
-
Domain name
Make sure that your domain is pointed to your server.
-
Files storage providers
As of now, script supports 3 storage options. AWS S3, DigitalOcean Spaces, Local storage.
• AWS S3 : https://aws.amazon.com/pm/serv-s3/
• DigitalOcean Spaces : https://www.digitalocean.com/products/spaces
• Local storage : Stores files in your server.
-
Firebase Blaze Plan : https://firebase.google.com/pricing
For Authentication, Notifications, Livestream & Chat
-
Sightengine : https://sightengine.com/
For Content Moderation
-
Google Places API : https://console.cloud.google.com/apis/library/places.googleapis.com
For Geo-tagging on posts & fetch posts by location
-
Revenuecat : https://www.revenuecat.com/
For managing In-App Subscriptions & In-App Purchases.
-
ZEGOCLOUD : https://www.zegocloud.com/
For live-streaming
-
GIPHY : https://giphy.com/
For GIF comments and messages
-
Admob (Optional) : https://admob.google.com/home/
To monetize app via Ads
-
DeepAR (Optional) : https://www.deepar.ai/
For AR Filters (Posts & Stories)
-
Google play console : https://play.google.com/console
To publish android app
-
Apple developer program : https://developer.apple.com/programs/enroll/
To publish iOS app
-
Macbook :
• Apple computer is a must need to build iOS app
• Android app can be built in windows computer (Still apple computer is recommended for Flutter).
• You can check about flutter development environment requirements here on this link https://docs.flutter.dev/get-started/install
-
Android Studio : Download
-
Flutter Sdk : Download
-
Xcode (Only Mac Users) - https://apps.apple.com/in/app/xcode/id497799835?mt=12.
Extracting the project and settings up database
-
Extract the folder you have downloaded from codecanyon and open the folder
-
Open it and find the shortzz_database.sql file
-
Then open your cPanel provided by your web hosting provider.
-
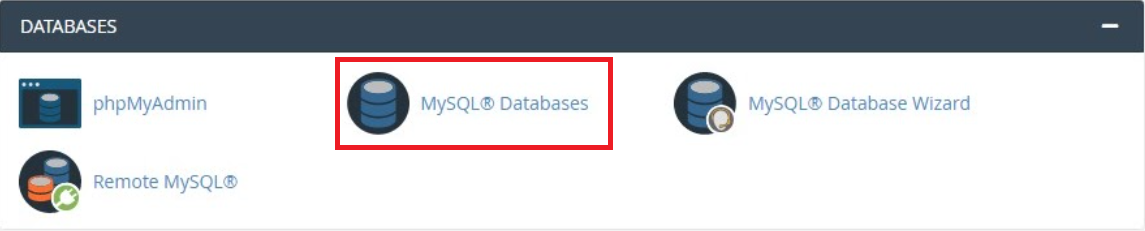
Click the MySQLDatabase option under DATABASES section and create database for your app as shown in the images below.
-
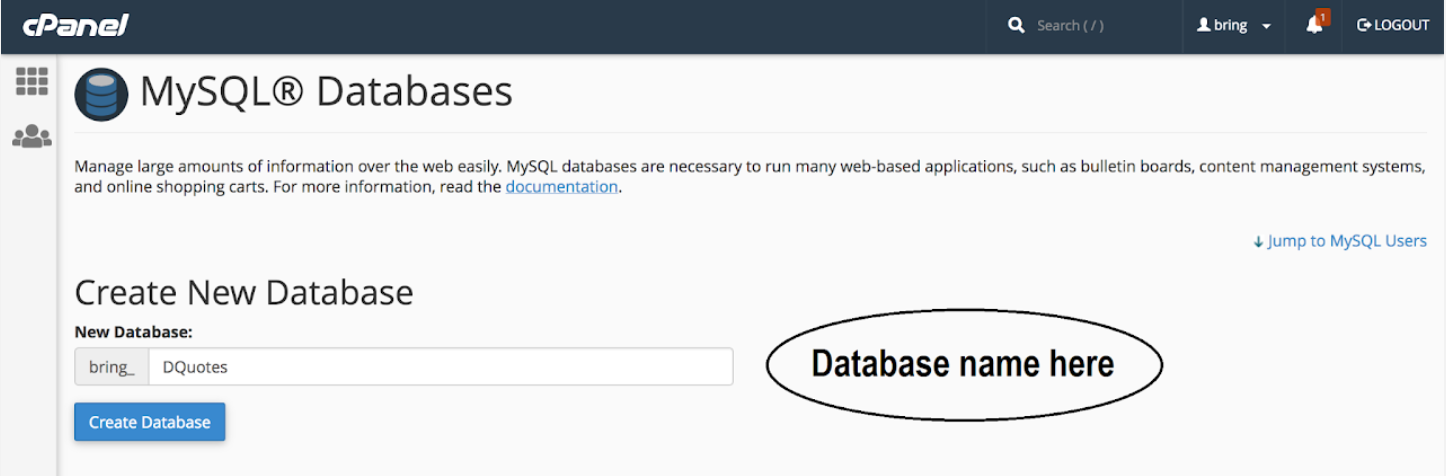
Add database name and click on create database.
-
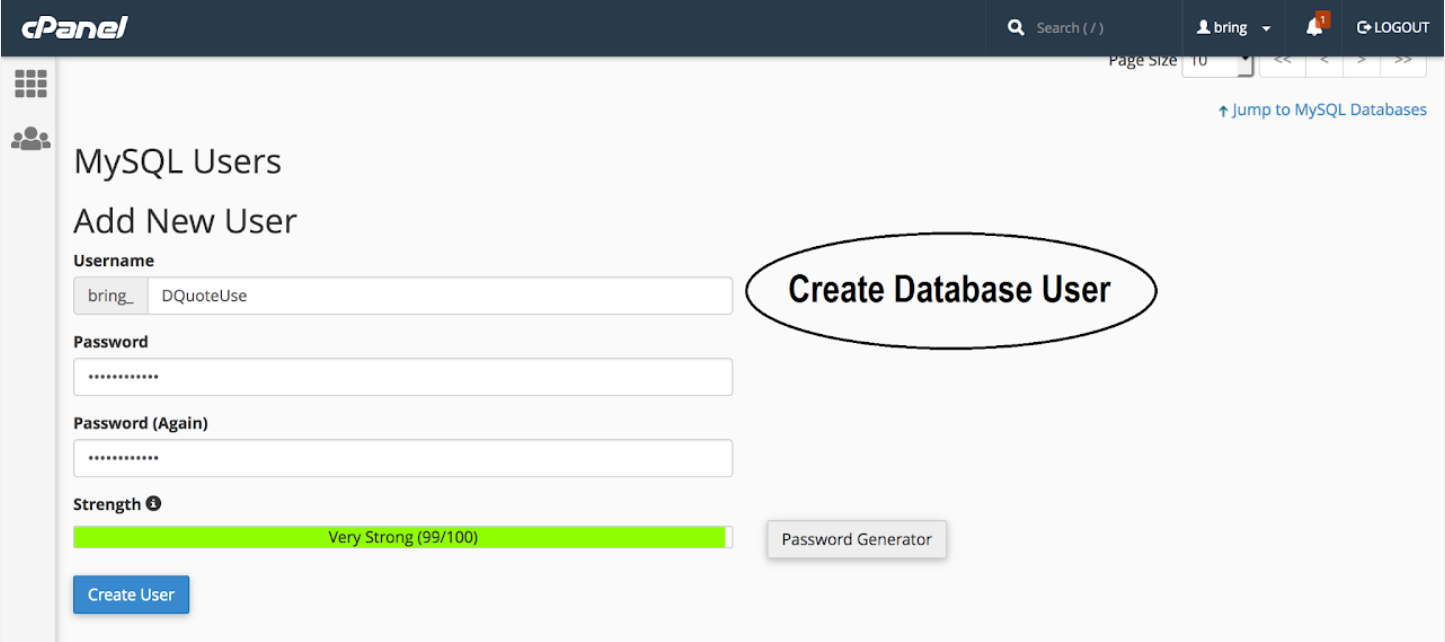
Now we will create a user to access the database
-
Like as shown in the image, enter username and password (save it to use later)
-
Click on create user and user will be created
-
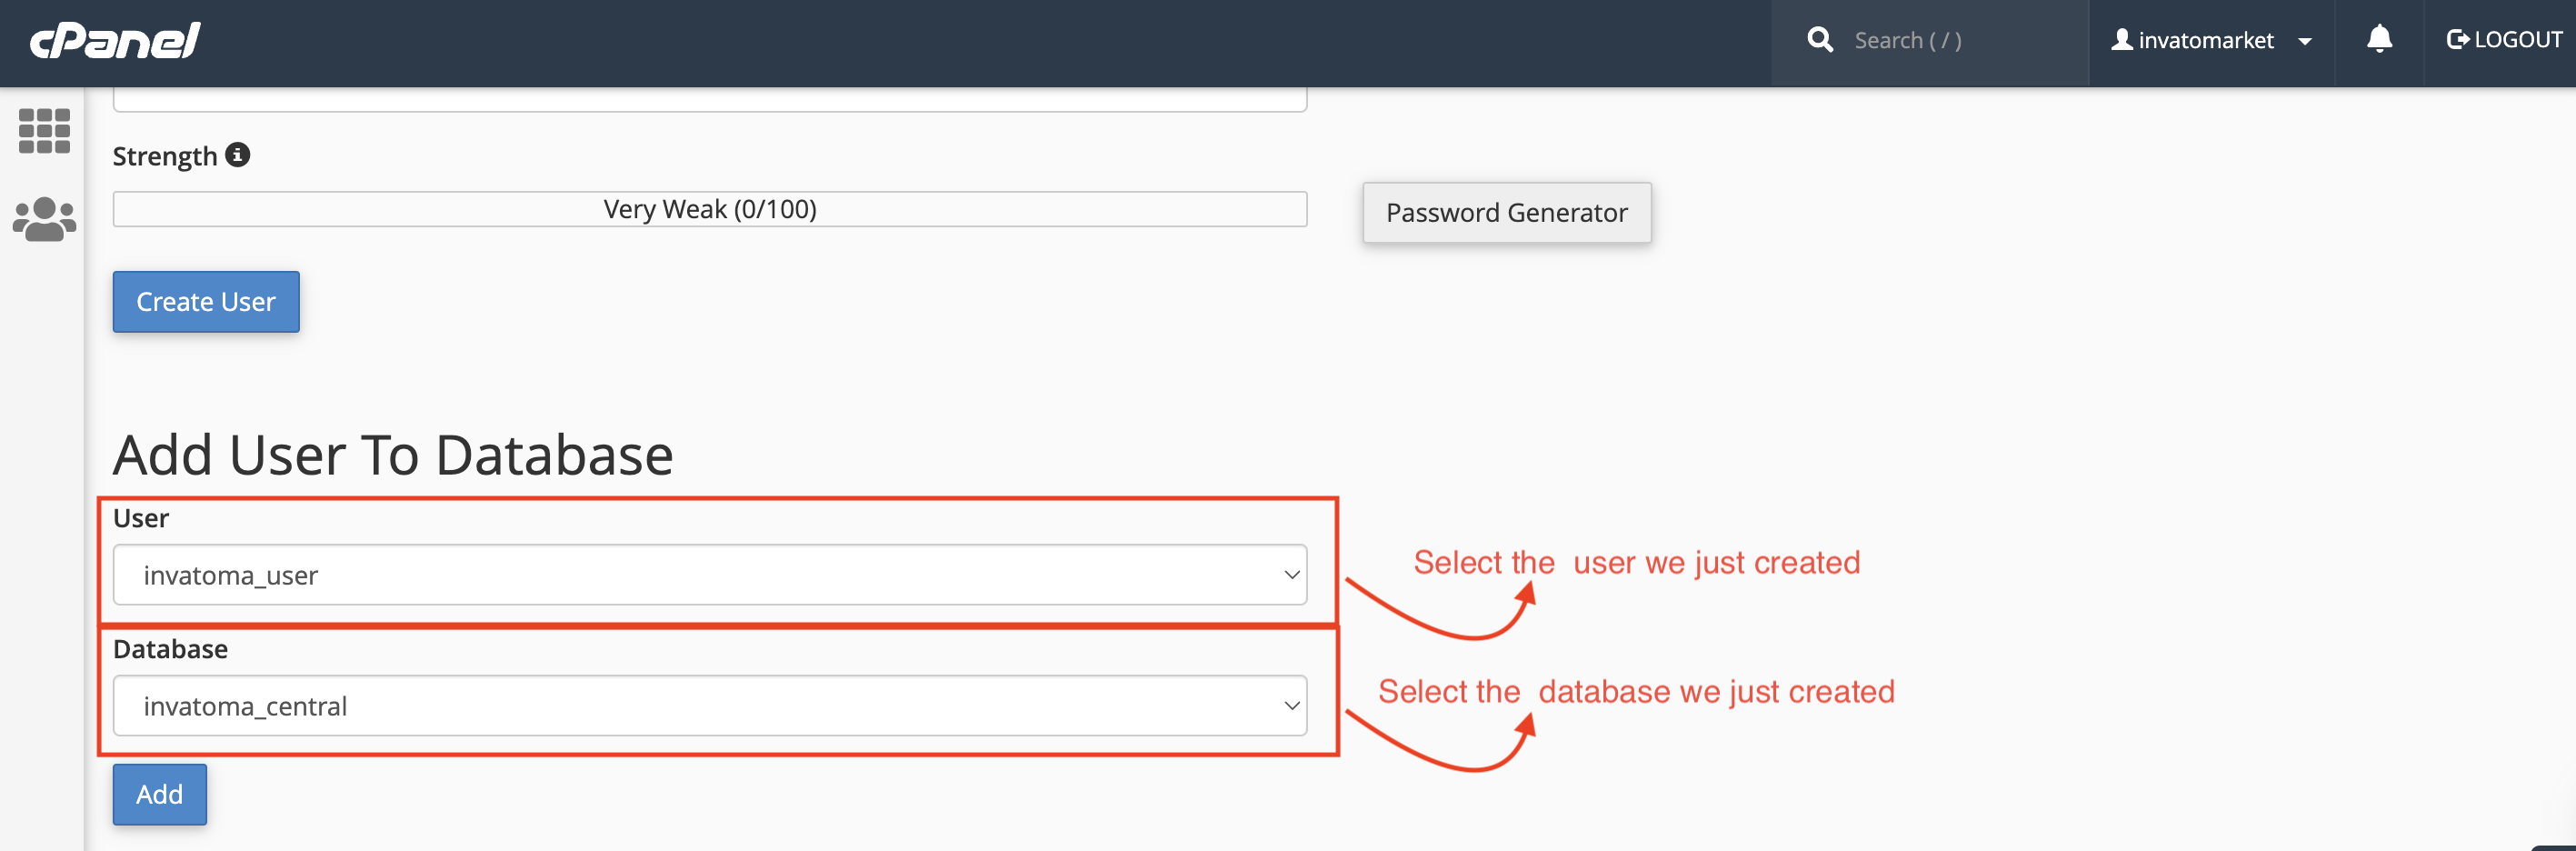
Now we have to add that created user to database. so scroll down and you can see like image below
-
Select the user from the list and select the database, and click on add button below
-
After clicking on add button you will see like below.
-
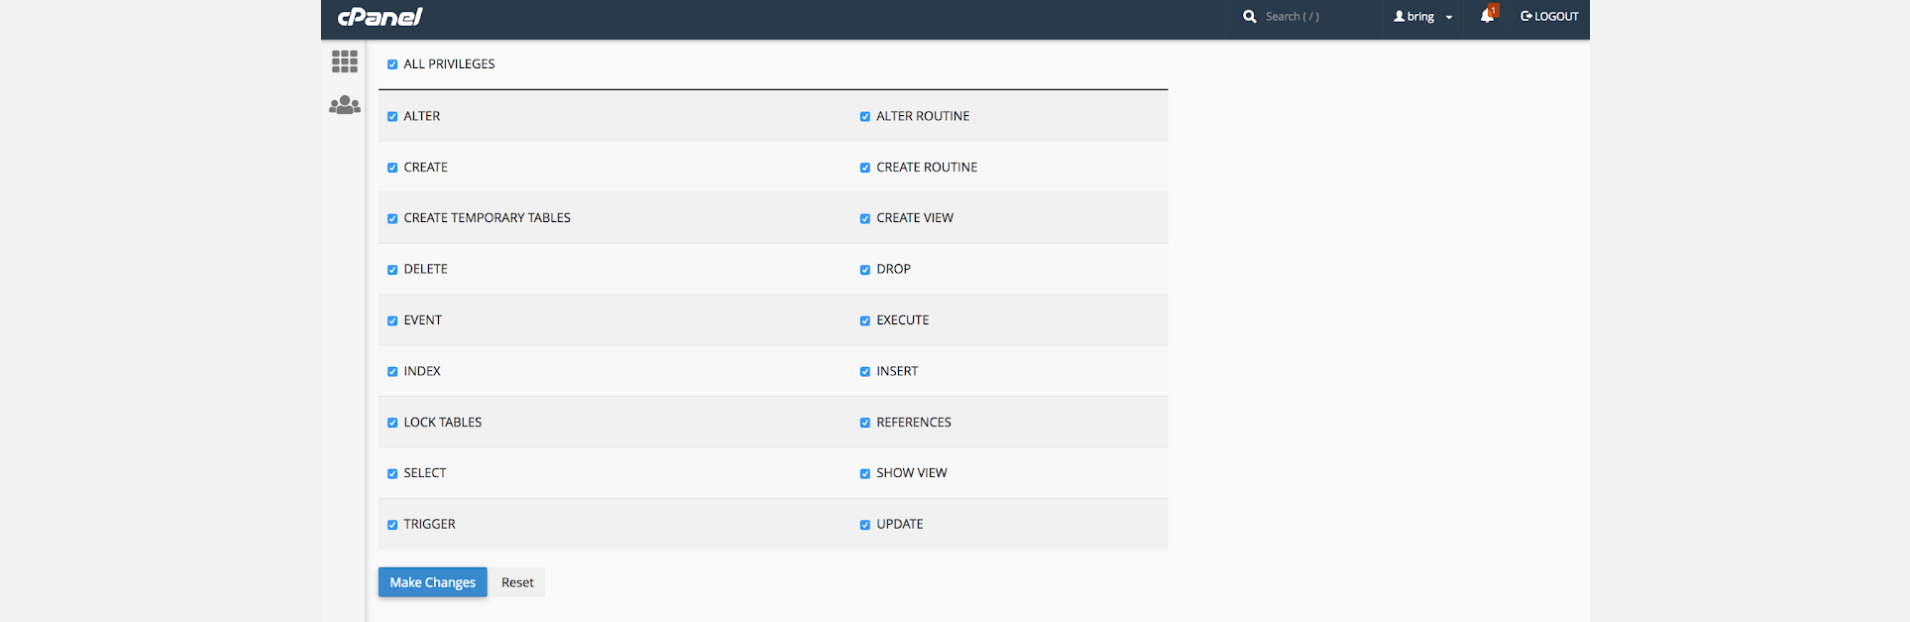
There you can see ALL PRIVILEGES option, check the box before that
-
This will tick all the boxes shown below (Check the image below). Click on make changes and you are done.
-
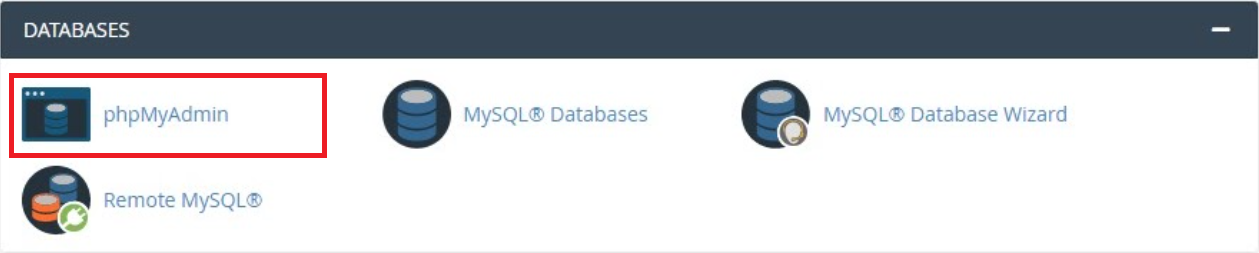
Now we have to import the database file. Search for phpMyAdmin and click on it.
-
Then system will redirect you to the phpMyAdmin where you will be able to find the database we just created
-
Click on that database
-
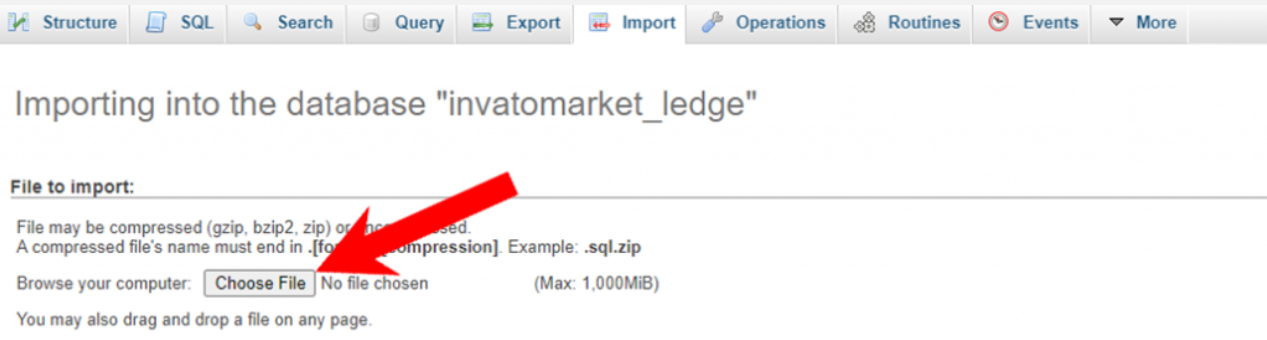
Then find the import button on the Top bar and click on it
-
It will open the page like below
-
Click on Choose File button and load the shortzz_database.sql file which will be there in the folder you have extracted.
-
Click on import button at the bottom of the page.
-
Now database is ready to use.

Setting Up Database credentials to the backend project
-
Now come back to the project folder and then extract shortzz_backend.zip file
-
In that folder, find the .env.example file and copy it to create a .env file. Then open it with any text editor and make the changes as shown below.
-
Open VS Code and and then open terminal in that and run the command
-
There in the APP_URL Replace the https://yourdomain.com/ to Your Domain
-
Make sure that your APP_URL ends with " / " as above.
-
Change Database Configuration, as shown in the example below (With the credentials you just created at cPanel)
-
APP_NAME should be without space.
-
And save the file by pressing Ctrl + s
composer install

DB_DATABASE = database_name
DB_USERNAME = database_username
DB_PASSWORD = "database_password"
Storage setting
-
The script supports 3 storage options. AWS S3, DigitalOcean Spaces, Local storage.
-
It is must that you decide your preferred storage option while setting up the project.
-
You can't change it later once the app is live. And if you still want to change it, your data will be lost.
-
Once you have selected storage option, you can set that in .env file.
-
Open .env file located at root folder of backend project.
-
And you will find the FILE STORAGE SETTINGS portion. (Check the image below)
-
Find the line FILE_STORAGE_LOCATION
-
Depending on your choice of storage location, it should look like below.
-
Now let's configure storage & get credentials. (You can follow any one from below options as per your choice)
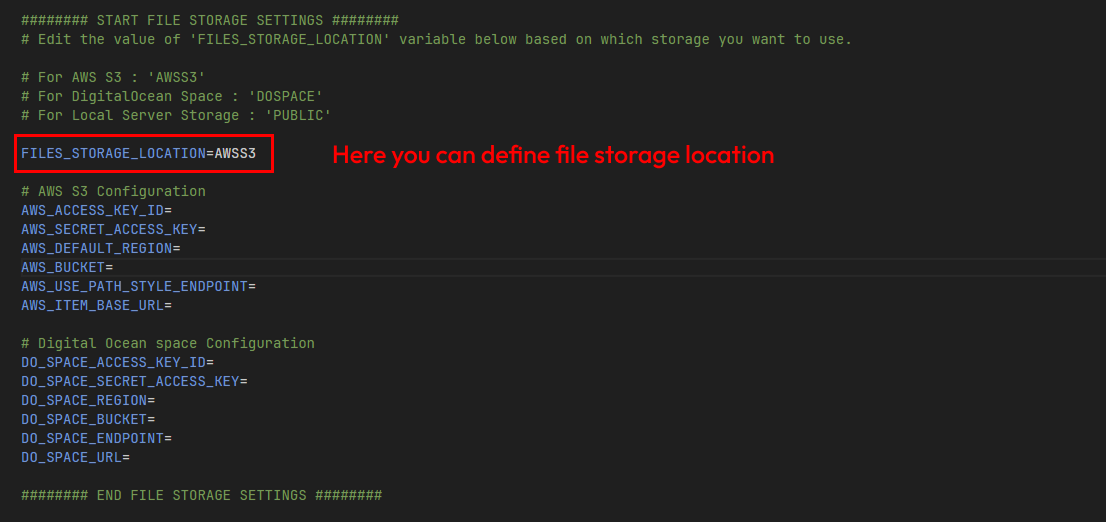
For AWS S3
FILES_STORAGE_LOCATION=AWSS3
For DigitalOcean Space
FILES_STORAGE_LOCATION=DOSPACE
For Local storage (Saves file on your server)
FILES_STORAGE_LOCATION=PUBLIC
-
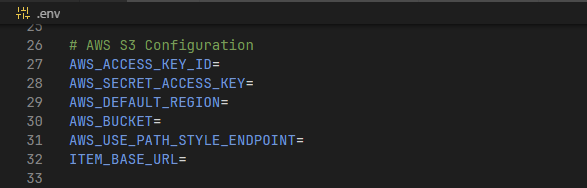
AWS S3
-
Follow This guide and create AWS S3 Bucket and get API Keys and other credentials.
-
Once you collected all credentials, open .env file and paste those credentials. you will find something like below.
-
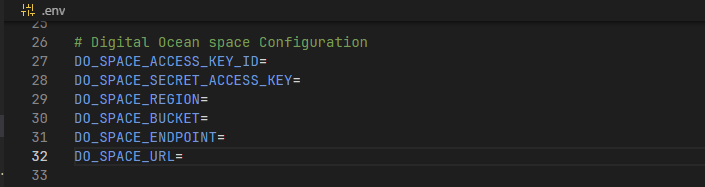
DigitalOcean
-
Follow This guide and create Digital Ocean Space Bucket and get API Keys and other credentials.
-
Once you collected all credentials, open .env file and paste those credentials. you will find something like below.
-
Local storage
-
To use local storage, You just have to define that in .env file as below. it doesn't require any additional configurations since the files will be stored at server disk.

-
Storage will work fine only if you have set the credentials correctly and made required configurations on their dashboards.
Create firebase project
-
Follow This guide and setup project at firebase and collect .json
-
Open .json file in your text editor.
-
Copy content of .json file from your text editor.
-
Create a new file named googleCredentials.json in your backend folder and paste the content in that file.
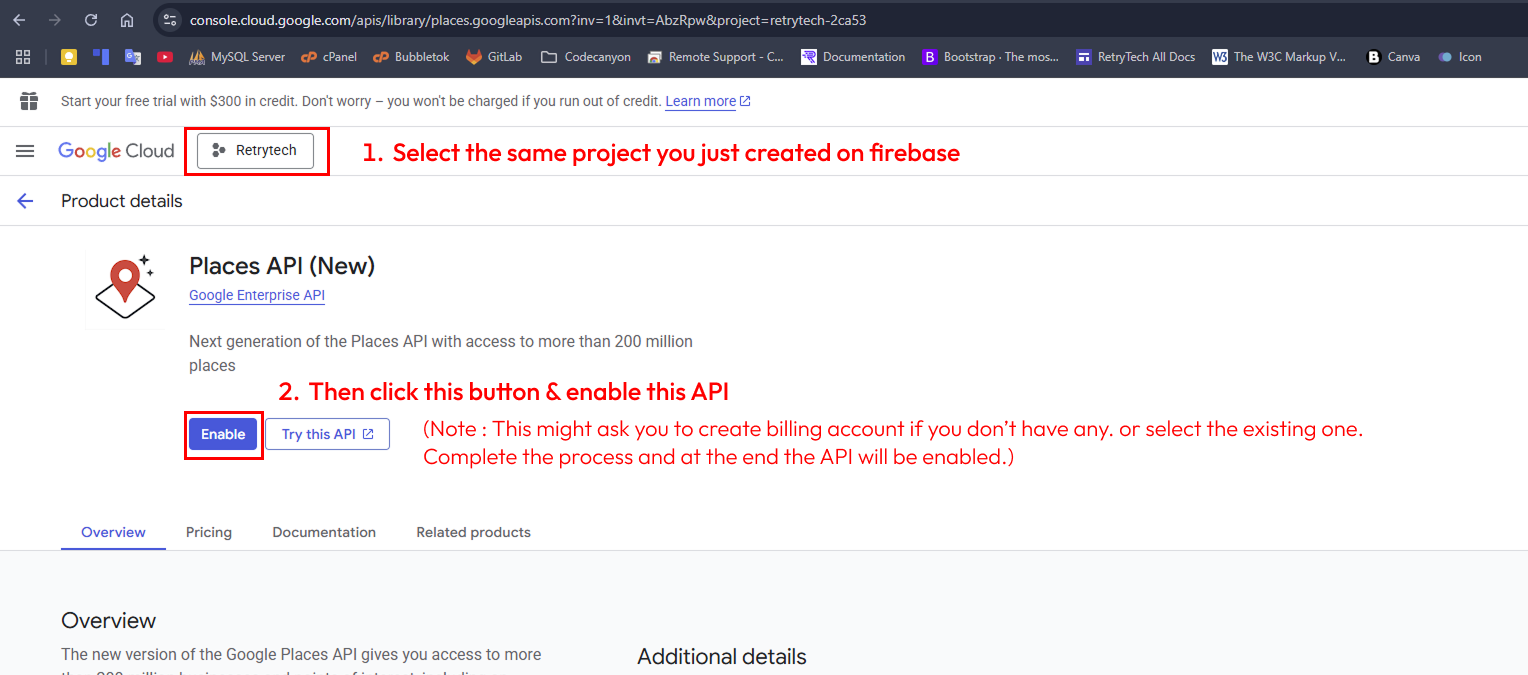
Enable google places API
-
This step is required to enable place search function & geo tagging on post function. Please follow this carefully.
-
Go to https://console.cloud.google.com/marketplace/product/google/places.googleapis.com/
-
Make sure that you are using the same google account which you have use for firebase.
-
Select the firebase project from the list & then enable the API
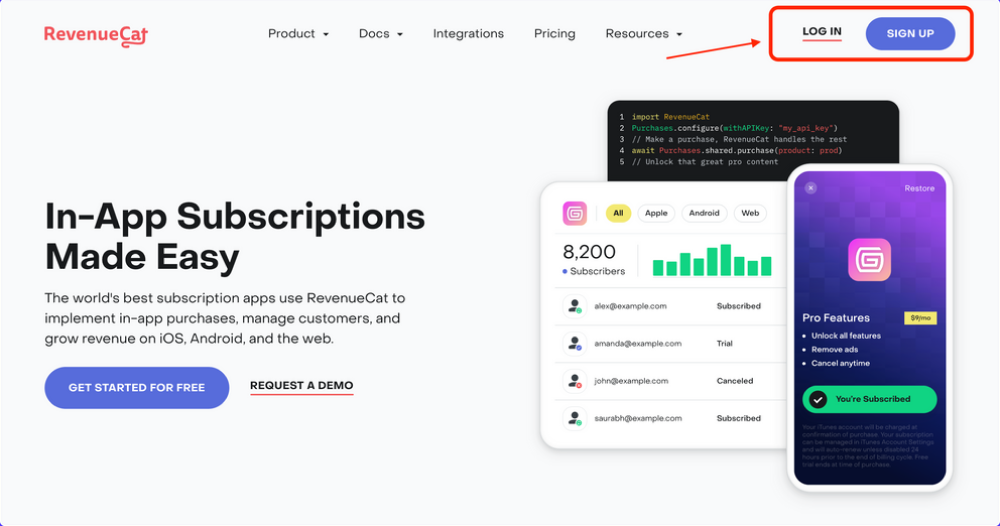
Revenuecat Configuration
-
Revenuecat has been use to manage cross platform (Android - iOS) In-App Subscriptions & coin purchase with In-App Purchase.
-
It is required to configure Revenuecat for the verification of user In-App purchases transactions & process authentic transactions only.
-
Create an account or log in to RevenueCat here to get started.
-
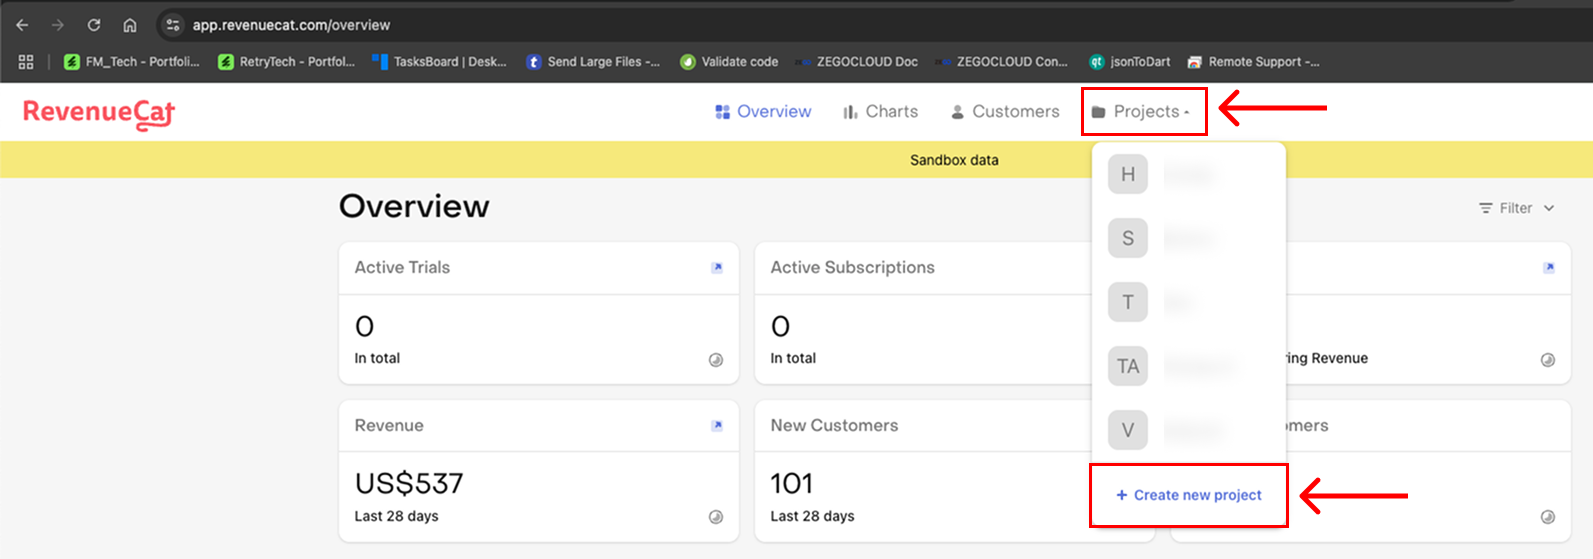
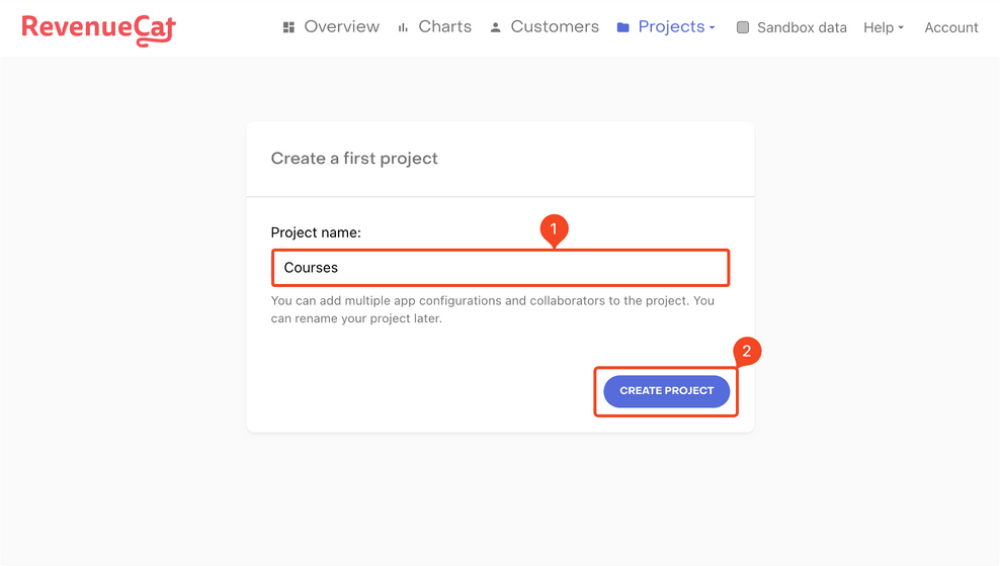
Create new project at Revenuecat.
-
If you have created a new account, you will be automatically prompted to create your first project. Enter a Project name and click "CREATE PROJECT" button.
-
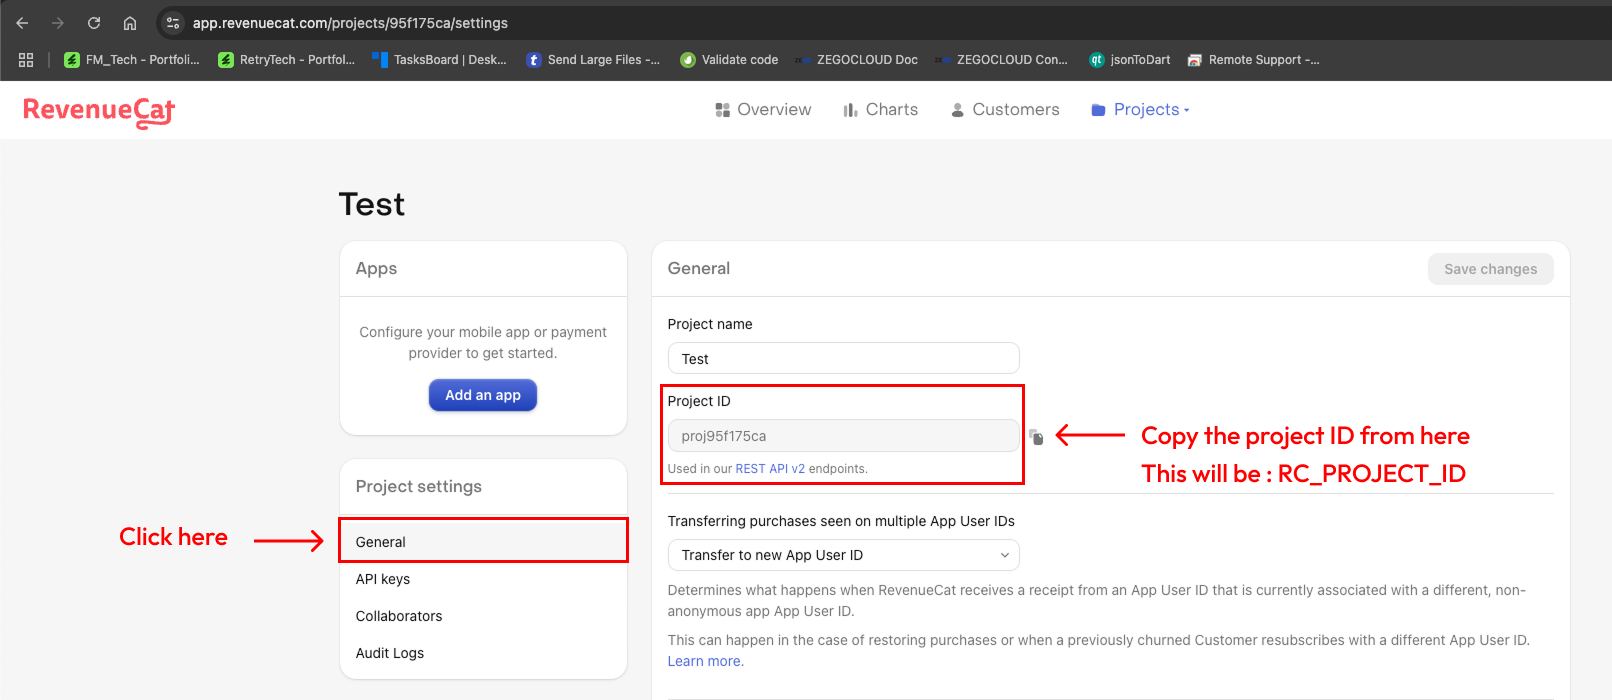
We will require 2 things from this Revenuecat project.
-
RC_PROJECT_ID
-
RC_KIT_API_KEY
-
Click on the project & it will open the page like below.
-
Click on general tab and copy the project ID
-
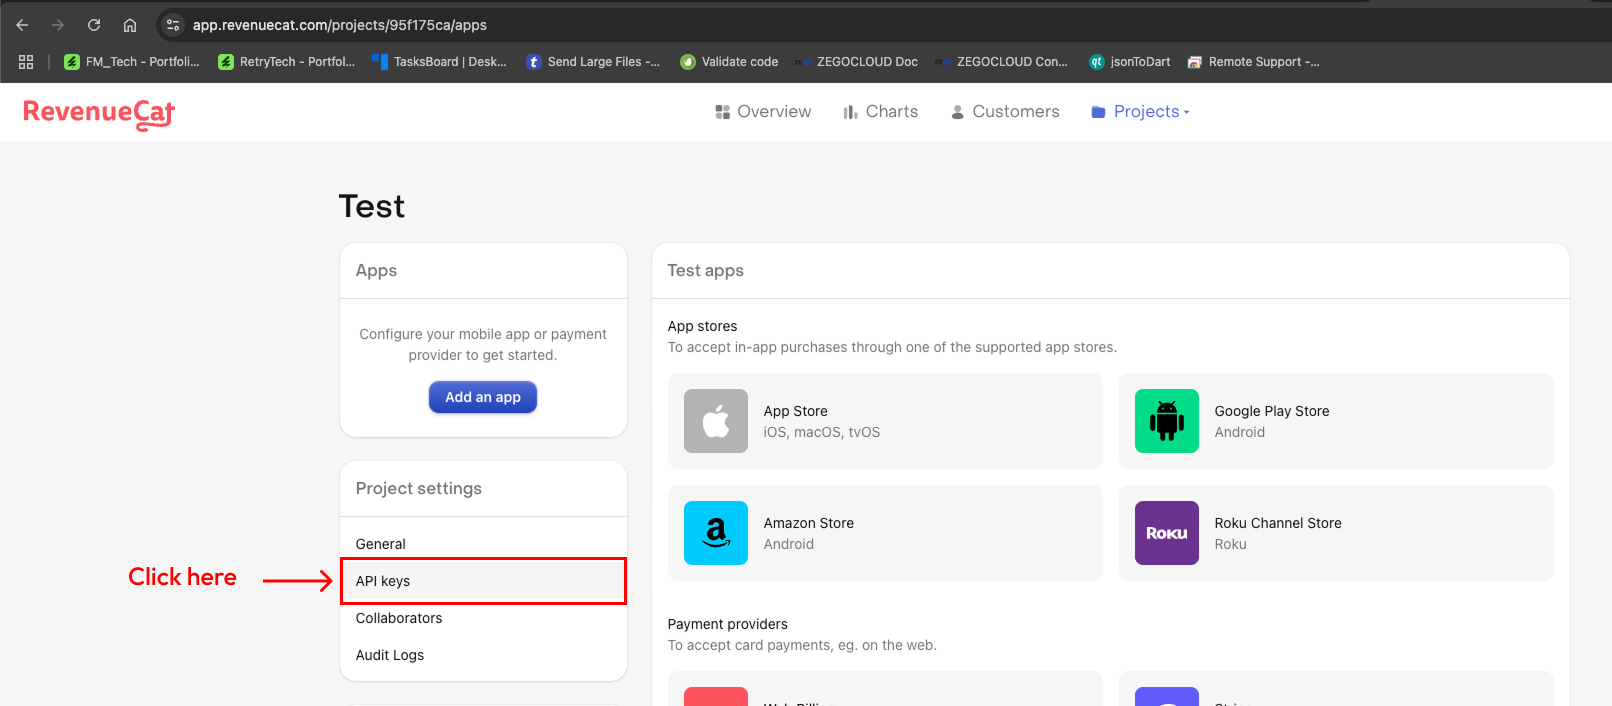
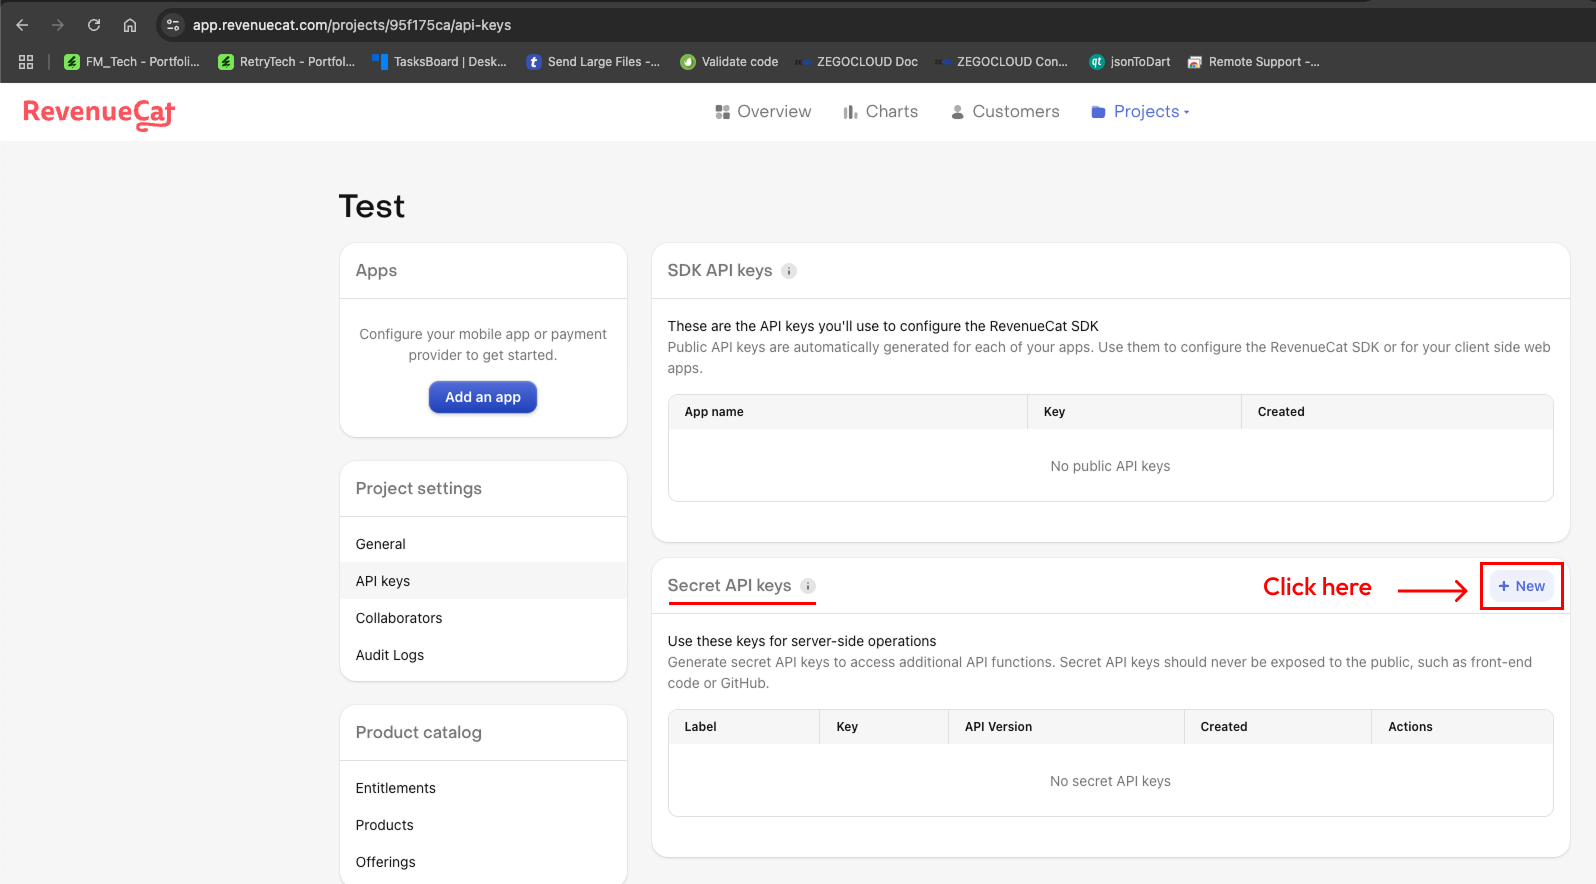
Now click on API Keys tab.
-
This will open a console to create Secret API keys, click on + New
-
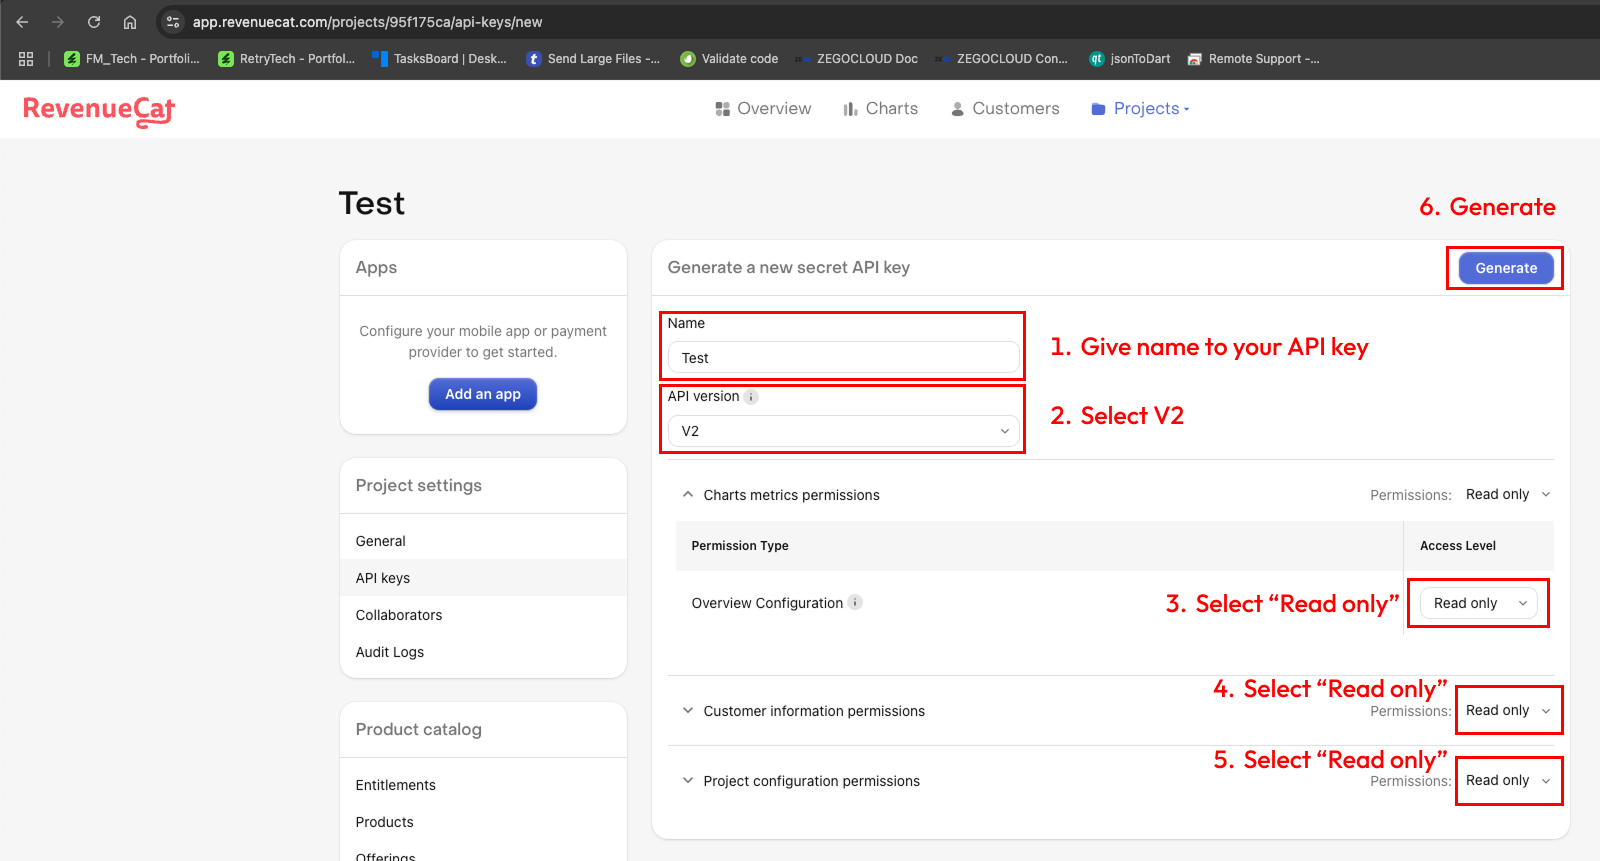
This will open a form where we can create new secret API key.
-
Fill/Select the required details (Name, Version etc..) like step by step instructions in below image.
-
Lastly, click on Generate button.
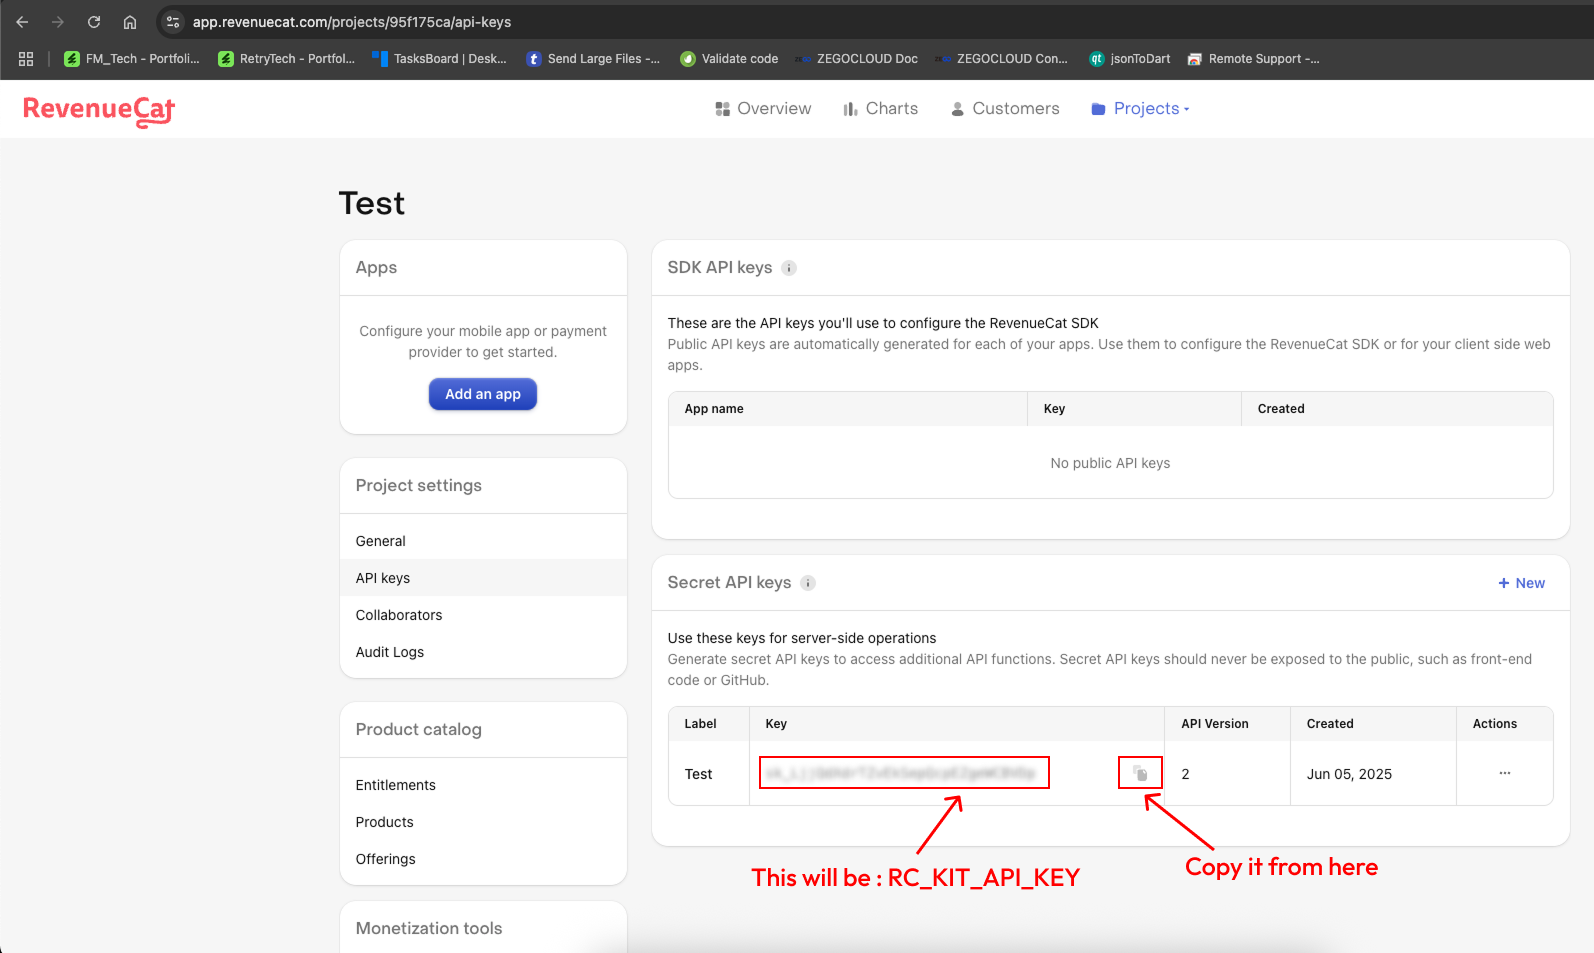
-
And new Secret API key will be created and you can copy it.
-
Now we have collected both required things from Revenuecat project, We need to add them in .env file.
-
Check the image below, find the similar keys & add values there like image below.

Host backend project on server
-
Create a zip of the shortzz_backend folder
-
Upload that folder to your domain-targeted directory on your cPanel provided by your hosting provider. and extract the zip file.
-
Make sure that your targeted directory has the project files directly, and not wrapped in a folder
-
Cheers! Now try accessing your domain, the admin panel should be live there on your domain
Now your backend is live & these are the credentials
-
Admin Panel URL : http://yourdomain.com/
-
Admin Panel User Name : admin
-
Admin Panel Password : admin123
-
apiKey : retry123
Save these credentials somewhere, They are required while setting up the flutter project.
Now continue following the documentation.
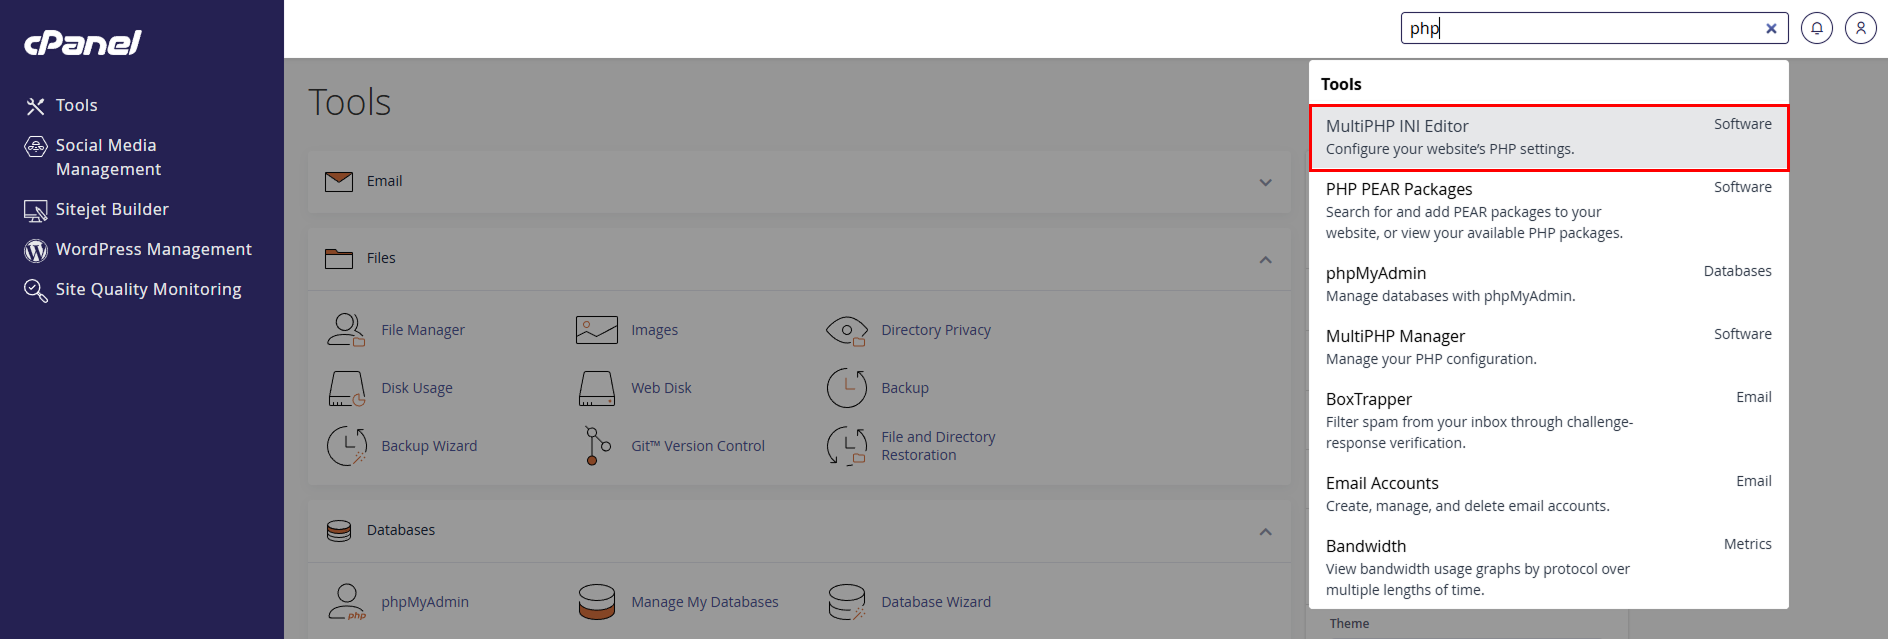
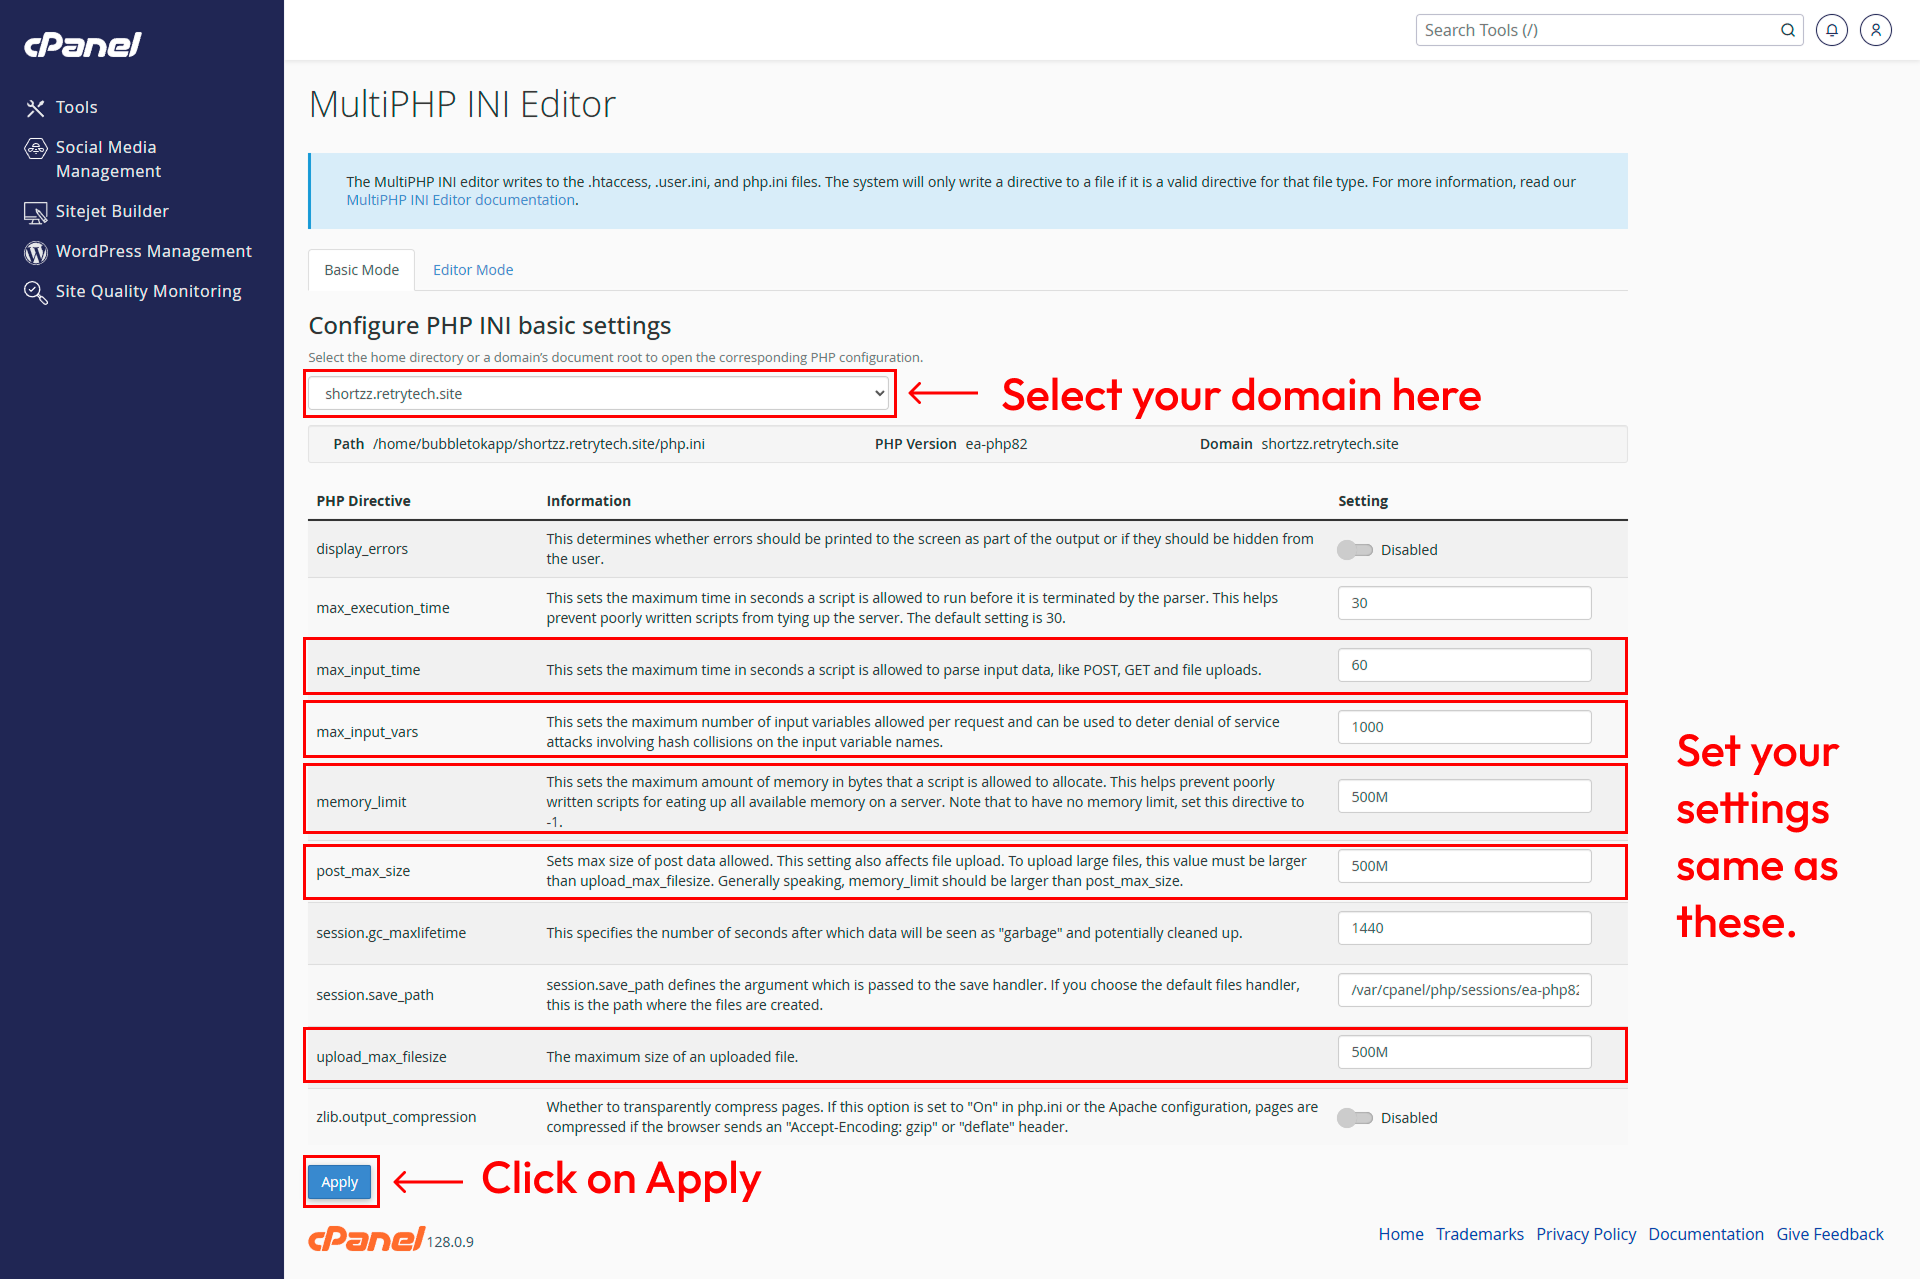
Misc. server settings at cPanel
-
memory_limit should be 500M
-
upload_max_filesize : 500M
-
post_max_size : 500M
-
max_input_time : 60
Configure cron jobs
-
We need to setup multiple cronjobs (listed below) for several tasks. (DAU, Delete expired stories, Delete old notifications etc..)
-
Enter your admin panel url below and it will create a list of cron job commands. which you can copy and configure with frequency at cPanel.
| # | Command | Frequency |
|---|---|---|
| 1 | curl --request GET 'https://yourdomain.com/api/cron/reGeneratePlaceApiToken' | Twice Per Hour(0,30 * * * *) |
| 2 | curl --request GET 'https://yourdomain.com/api/cron/deleteExpiredStories' | Once Per Day(0 0 * * *) |
| 3 | curl --request GET 'https://yourdomain.com/api/cron/deleteOldNotifications' | Once Per Day(0 0 * * *) |
| 4 | curl --request GET 'https://yourdomain.com/api/cron/countDailyActiveUsers' | Once Per Day(0 0 * * *) |
-
Now follow This guide and set all cron jobs listed above.
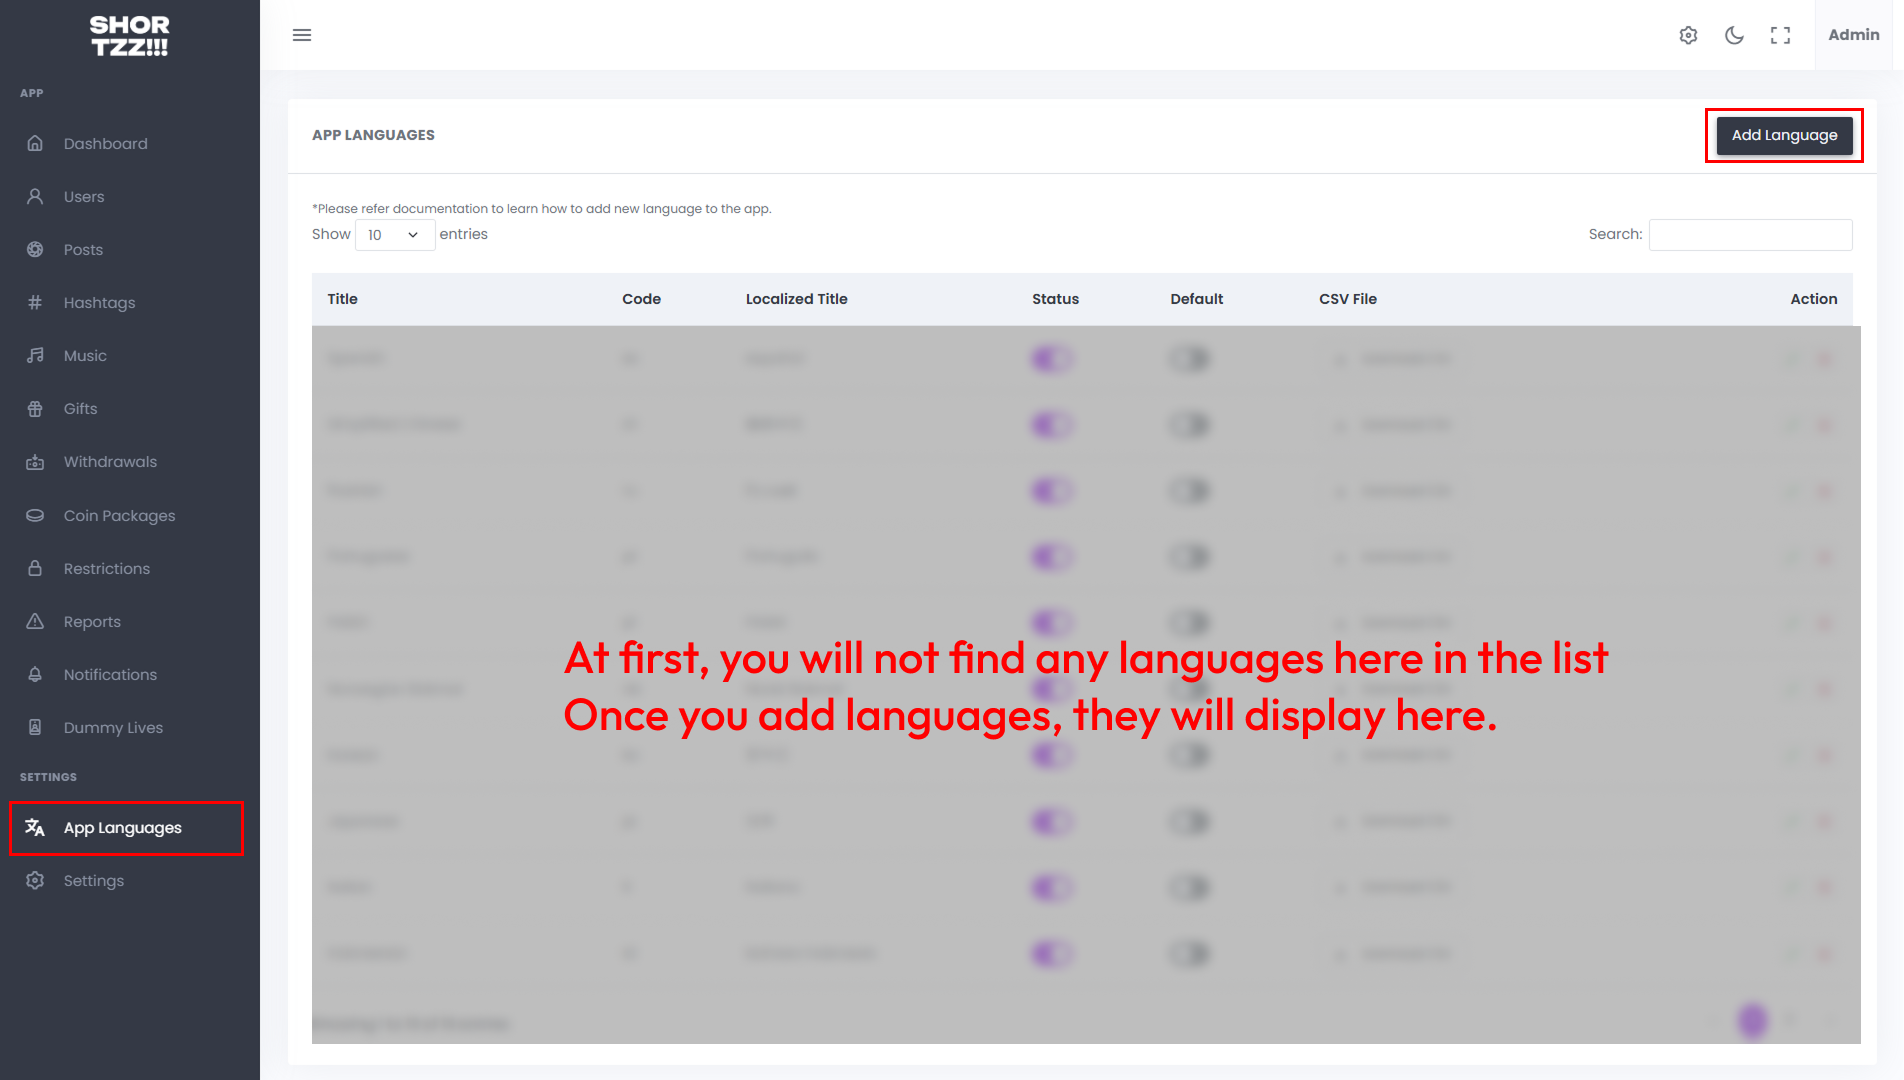
Add app languages
-
In this project, mobile app languages are managed from backend. you can add as many languages as you want. but initially we provide 18 languages with this project.
-
Follow the steps below to add those languages.
-
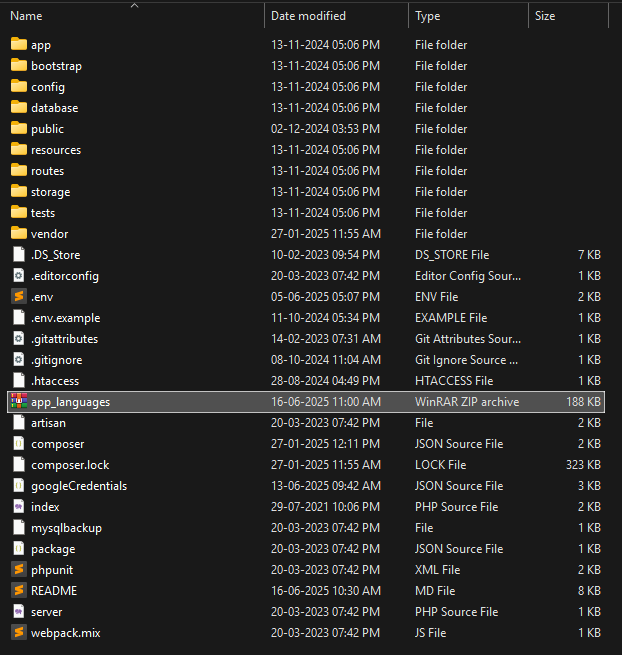
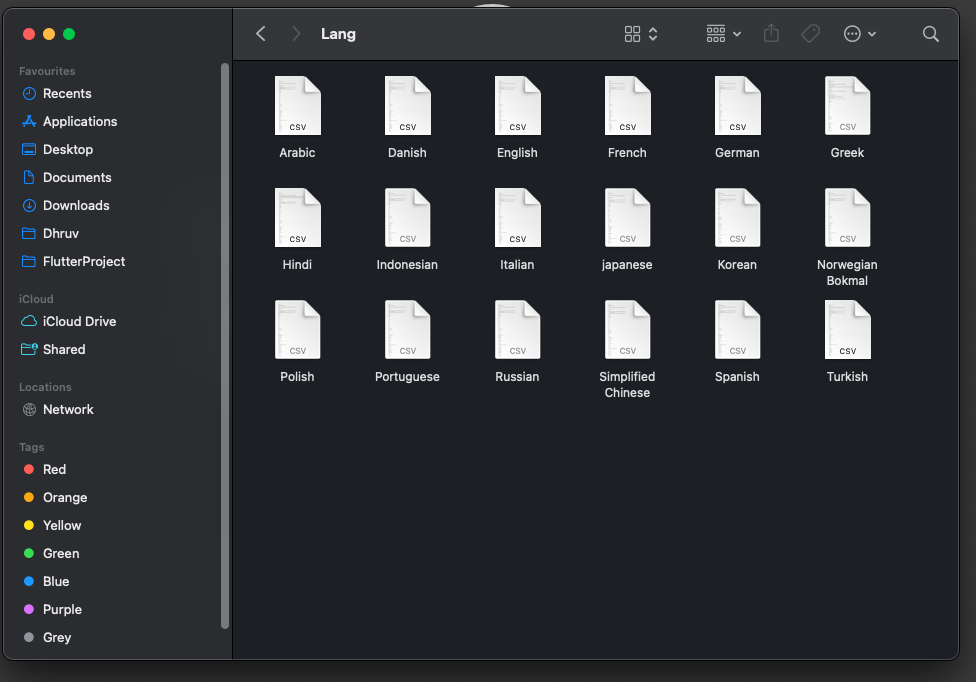
In your backend project, find the app_languages.zip file. copy that file to your desktop and extract it.
-
You will find language files (.csv) in it. (Check image below)
-
We will use this files while adding languages at Admin panel.
-
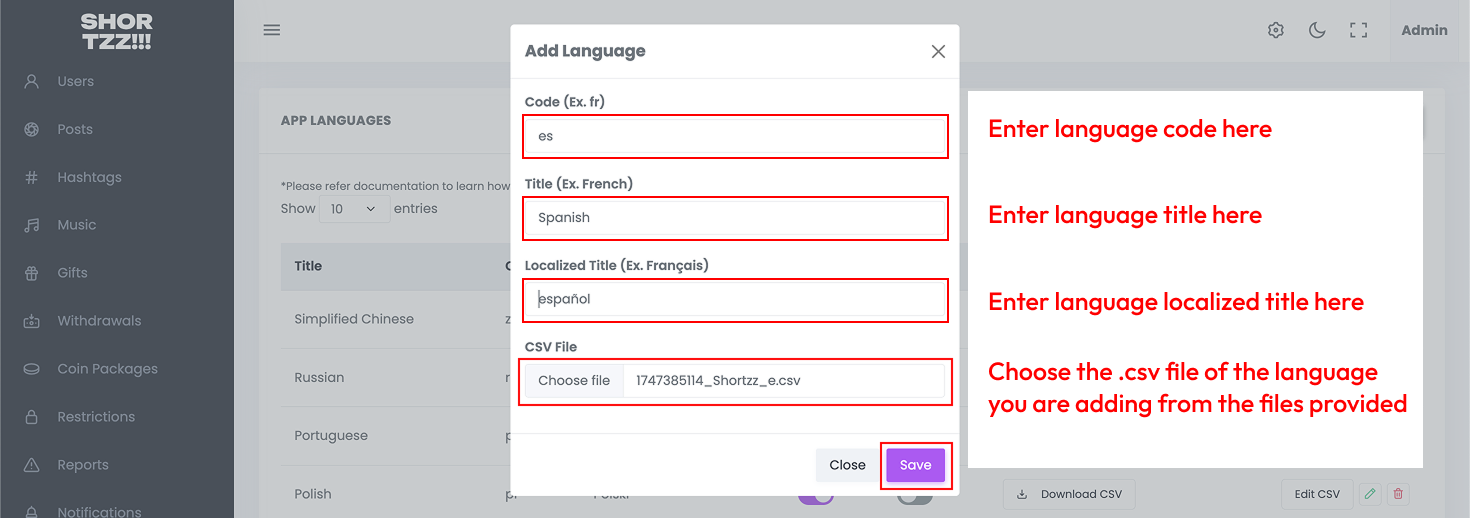
Open your Admin panel, Go to App Languages and click on Add Language button.
-
Do this for all the languages. (Make sure to select right files) And your languages are added.
ZEGOCLOUD Configuration
-
Follow This guide to create ZEGOCLOUD project , enable Interactive Live Streaming & collect Zego Cloud App ID, Zego Cloud App Sign.
-
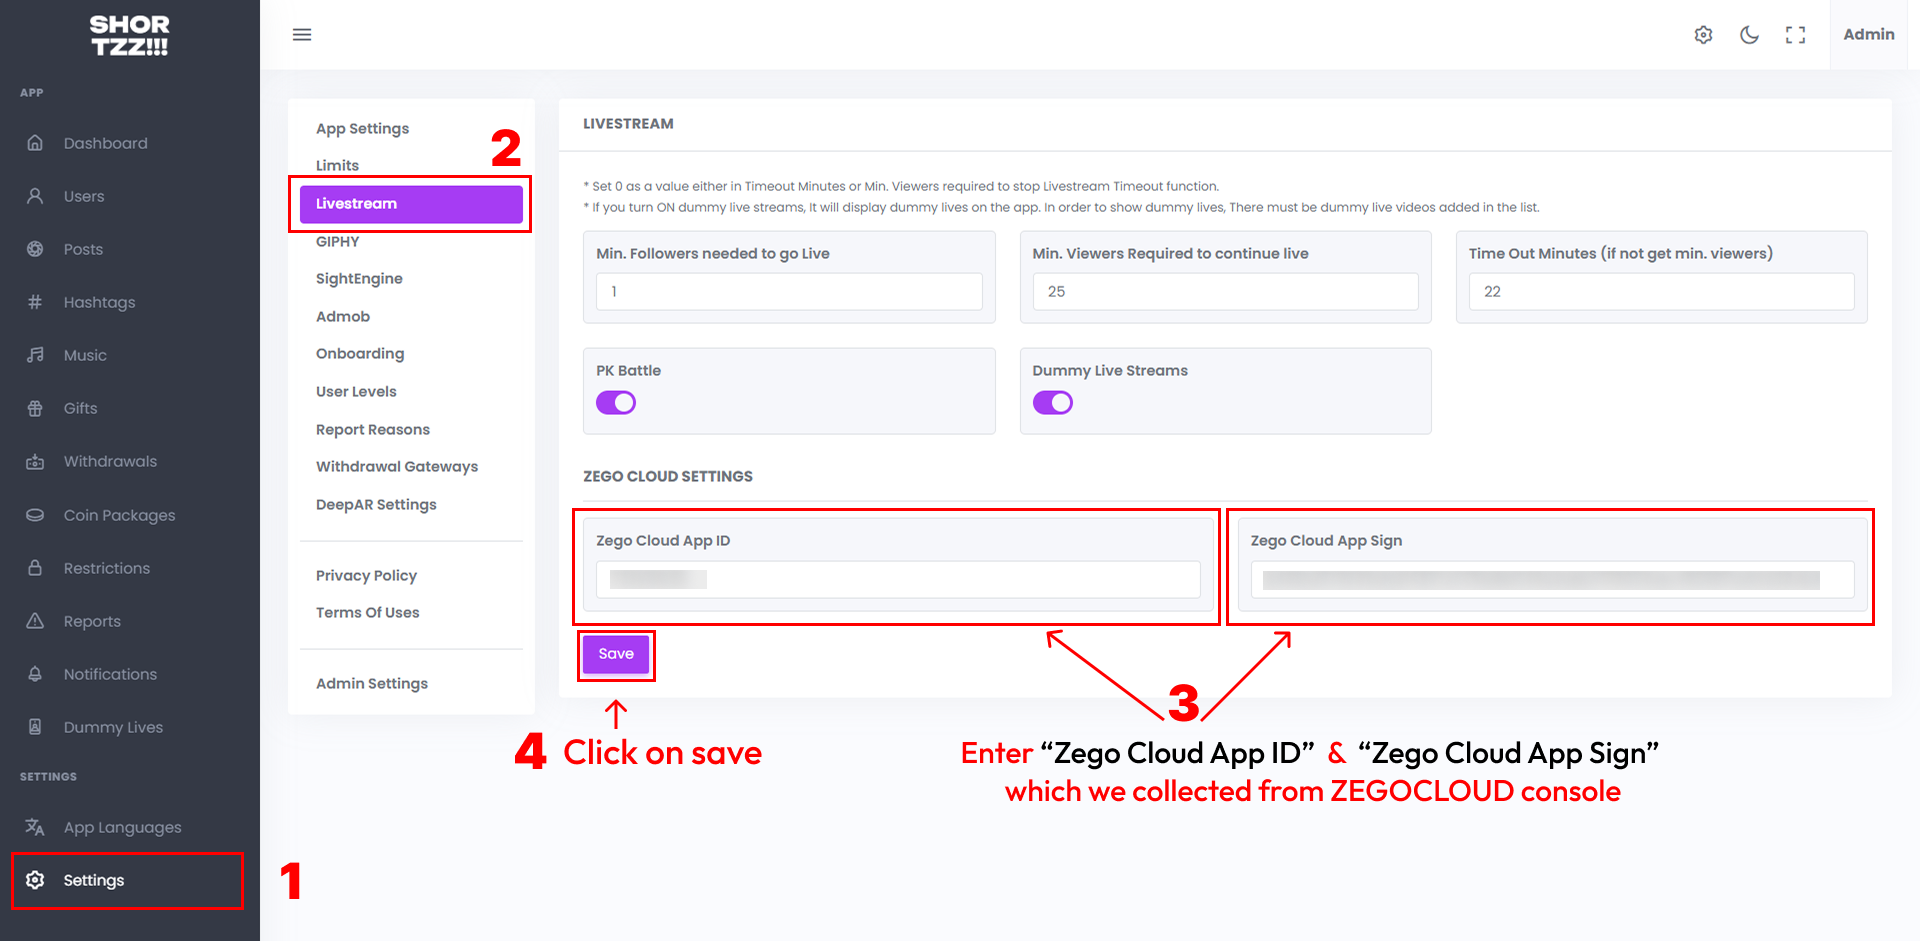
Open your admin panel, Go to Settings > livestream.
-
There you will find the fields to add collected credentials as shown in the image below.
-
Enter Zego Cloud App ID & Zego Cloud App Sign and click on save button
GIPHY Configuration
-
Follow This guide and collect GIPHY API key
-
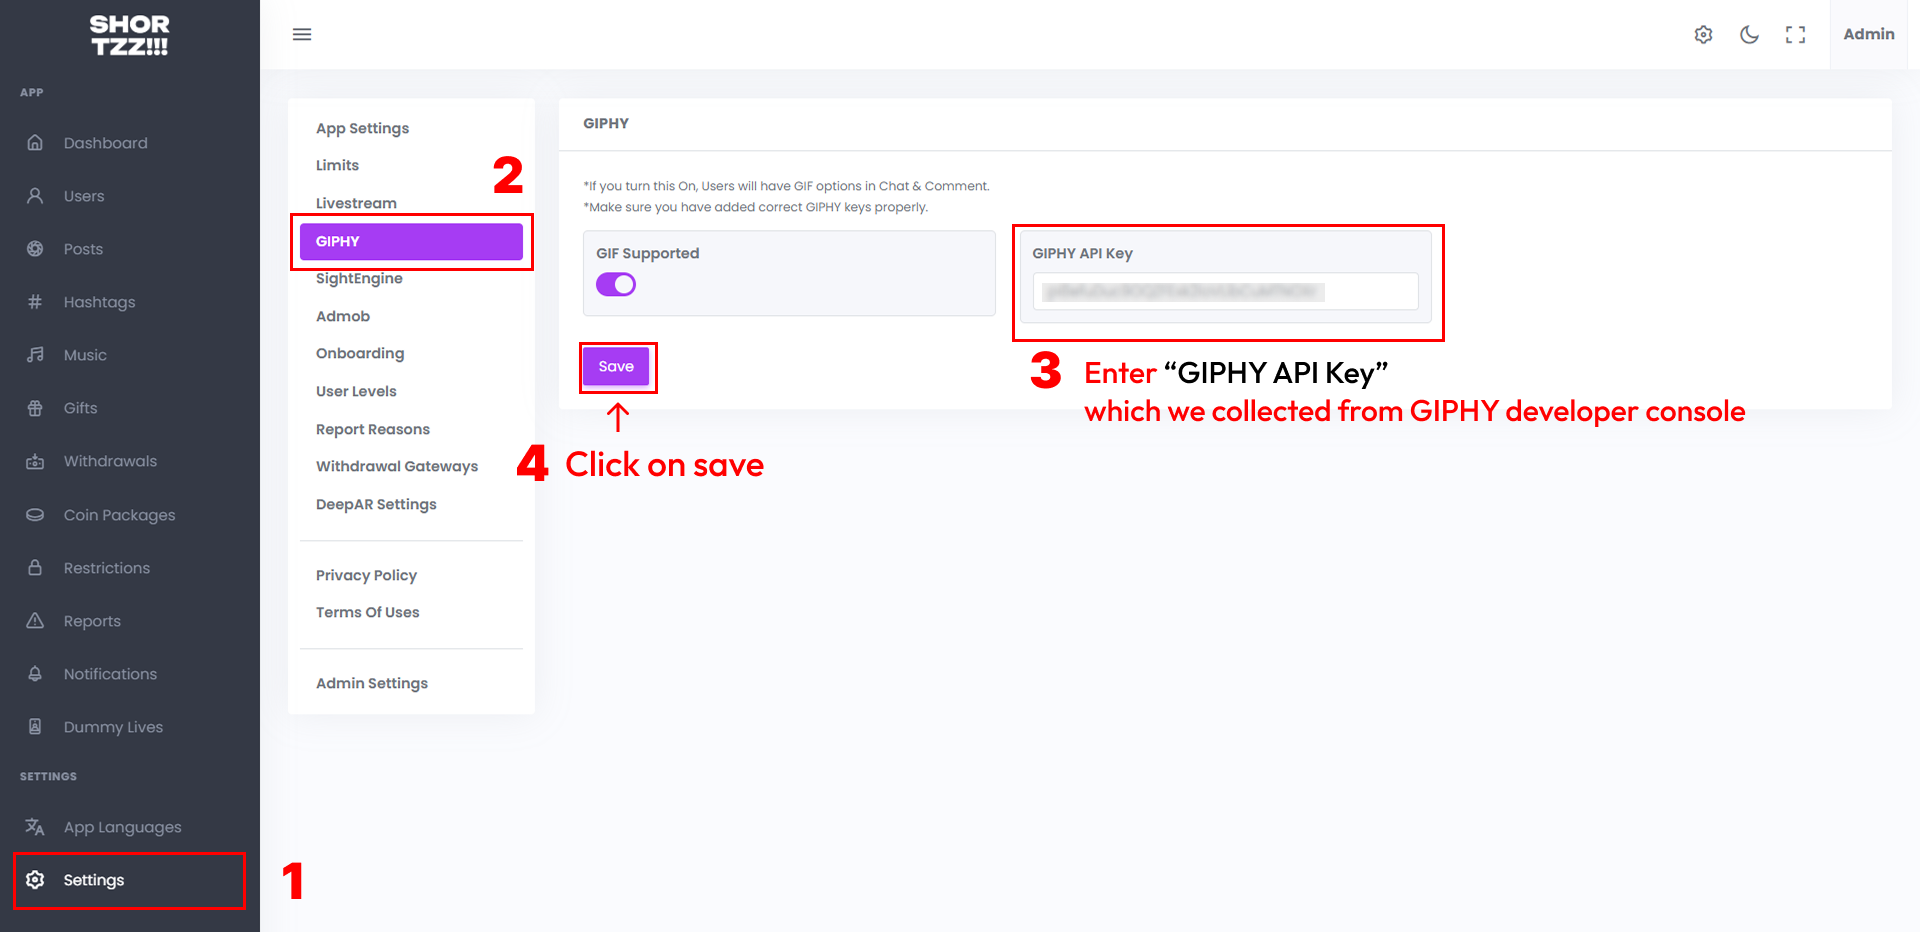
Open your admin panel, Go to Settings > GIFs.
-
There you will find the fields to add collected credentials as shown in the image below.
-
Enter GIPHY API Key and click on save button
SightEngine Configuration
-
Follow This guide and collect API User, API Secret, Image Workflow ID & Video Workflow ID.
-
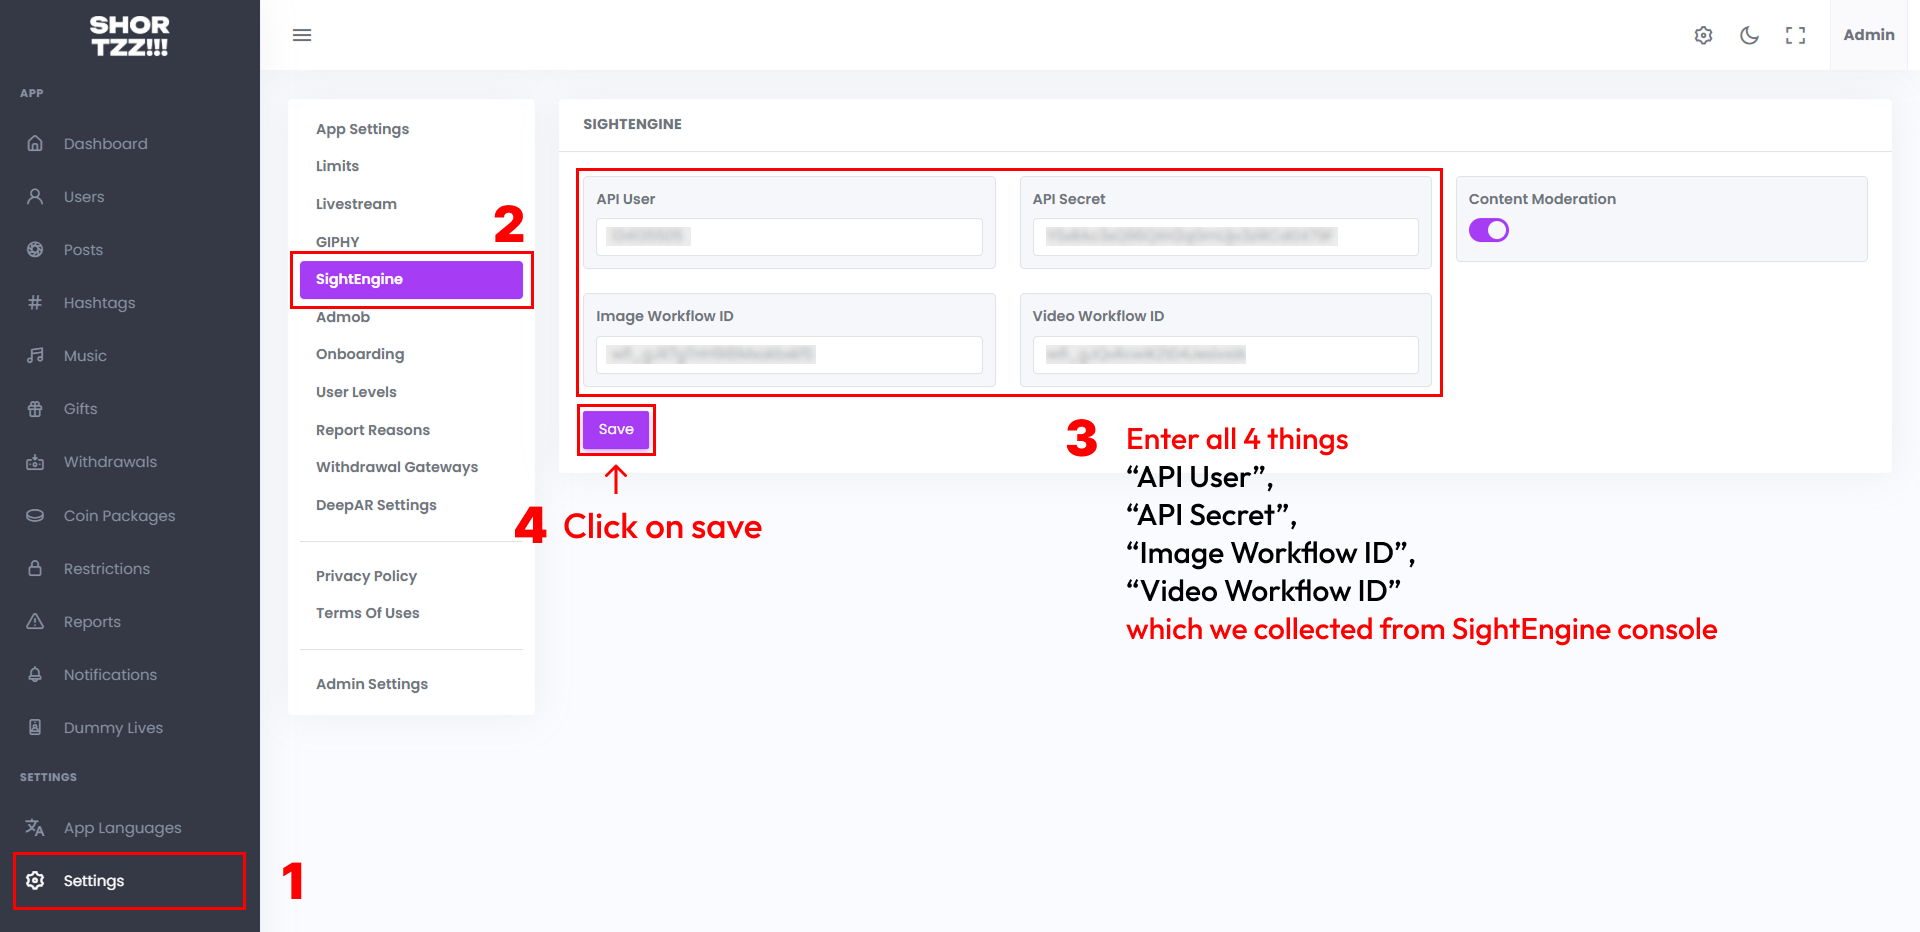
Open your admin panel, Go to settings > SightEngine.
-
There you will find the fields to add collected credentials as shown in the image below.
-
Enter API User, API Secret, Image Workflow ID & Video Workflow ID and click on save button
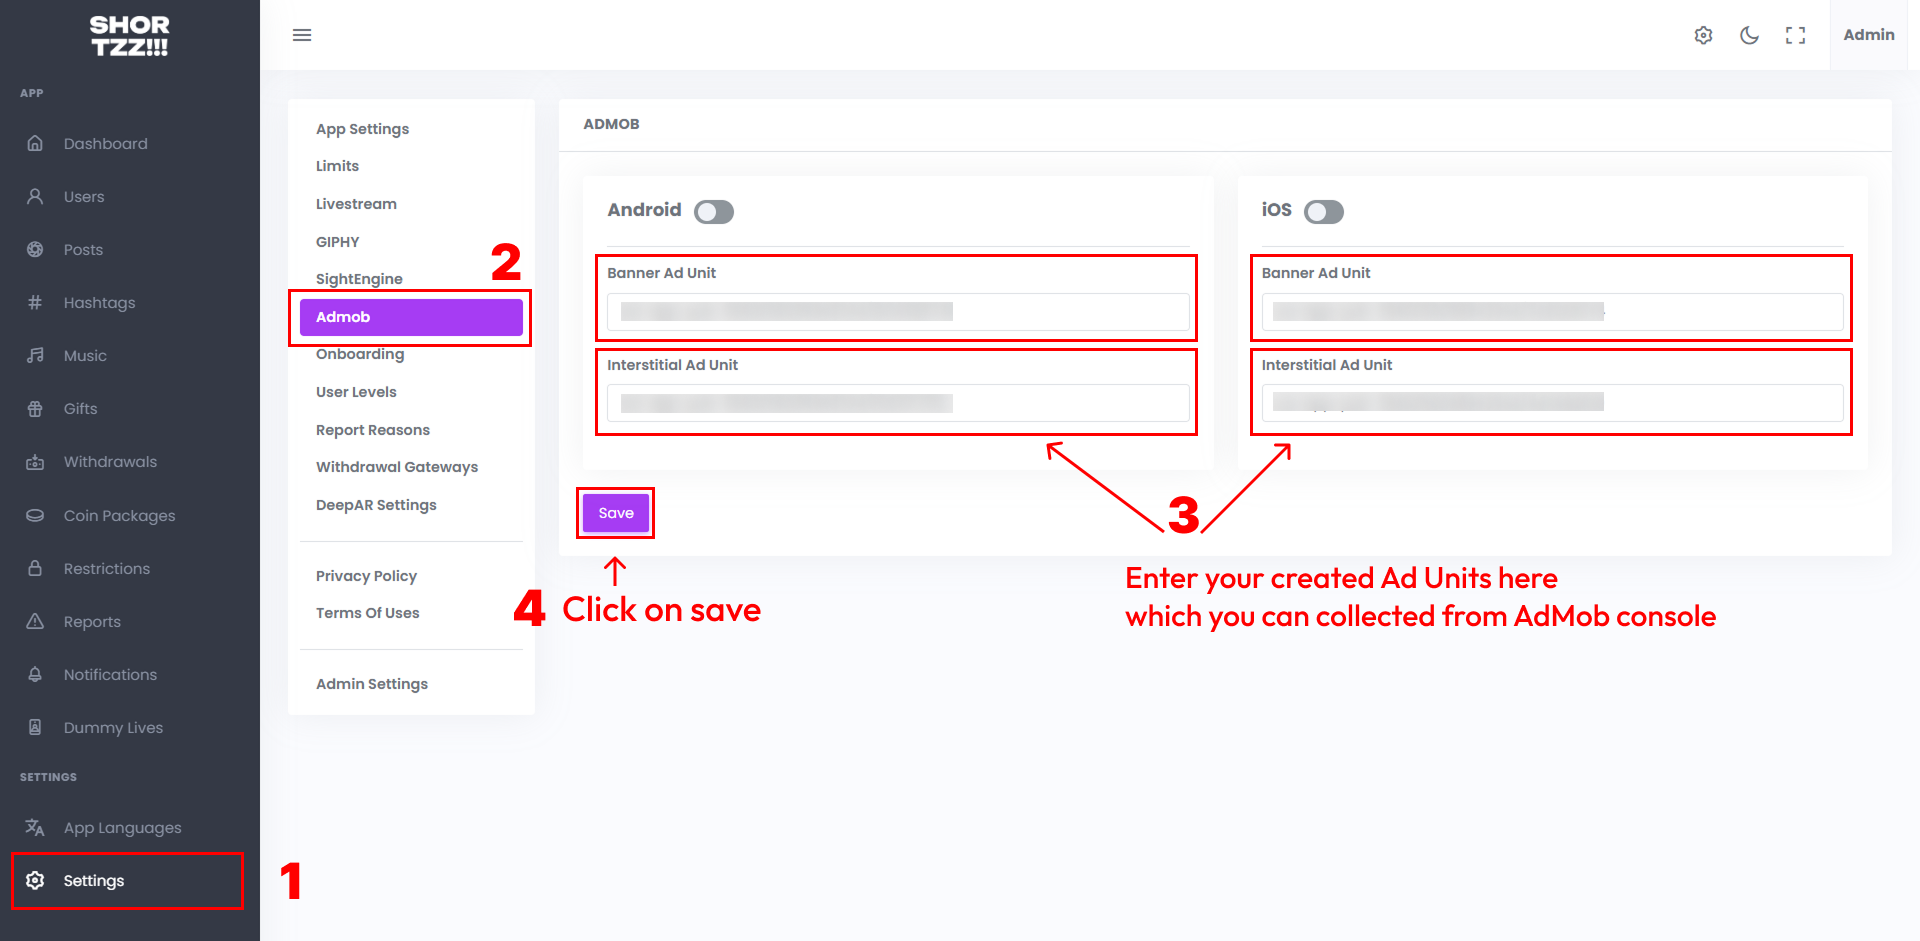
AdMob Configuration
-
Open https://admob.google.com/home/get-started/ URL and setup account.
-
For now, Shortzz app has banner and interstitial placements only.
-
Below are the links to know how to create Ad Units for your app at AdMob.
-
Create a banner ad unit : https://support.google.com/admob/answer/7311346
-
Create an interstitial ad unit : https://support.google.com/admob/answer/7311435
-
Once you have created Ad Units, you have to add them at admin panel. Go to Settings > Admob
Backend setup is completed
-
Now the backend has been configured successfully. and you can start following flutter project documentation.
Update info
-
To update your project (Whenever we update the project at Codecanyon), you have to Add/Update/Remove some files and fields in database (sometimes). Please check README.md file for the update information. (Mostly, can be found at root level directory of the project)
-
Please be careful while making an updates this way, It might result in errors sometimes.
-
If it comes any issues while making an update, you are absolutely responsible for that since updating existing project is not included in the support.
Want to talk with us?
- Telegram (Support Desk) : +91 7990425274
- Email : help.retrytech@gmail.com
- Whatsapp (No Support Here) : +91 7990425274