
Introduction
Orange app is very efficient dating app having many advanced features like Profile cards, Random match, chatting, Earnings, Geo location search, Live streaming and much more.
System Required
-
Gmail Account credentials for Firebase
-
Apple developer account credentials : Create Account
-
Android Studio : Download
-
Flutter Sdk : Download
-
Agora Account : Create Account
-
Branch.io Account : Create Account
-
Xcode (Only Mac Users).
Things to do before you continue
-
Setup Backend (Must do it)
-
Once you follow above documentation, you will find some credentials like Base url, Admin panel link and password etc. collect them as you will require them as we continue.
Setup Flutter SDK
-
Skip this step, If you have already setup Flutter SDK.
-
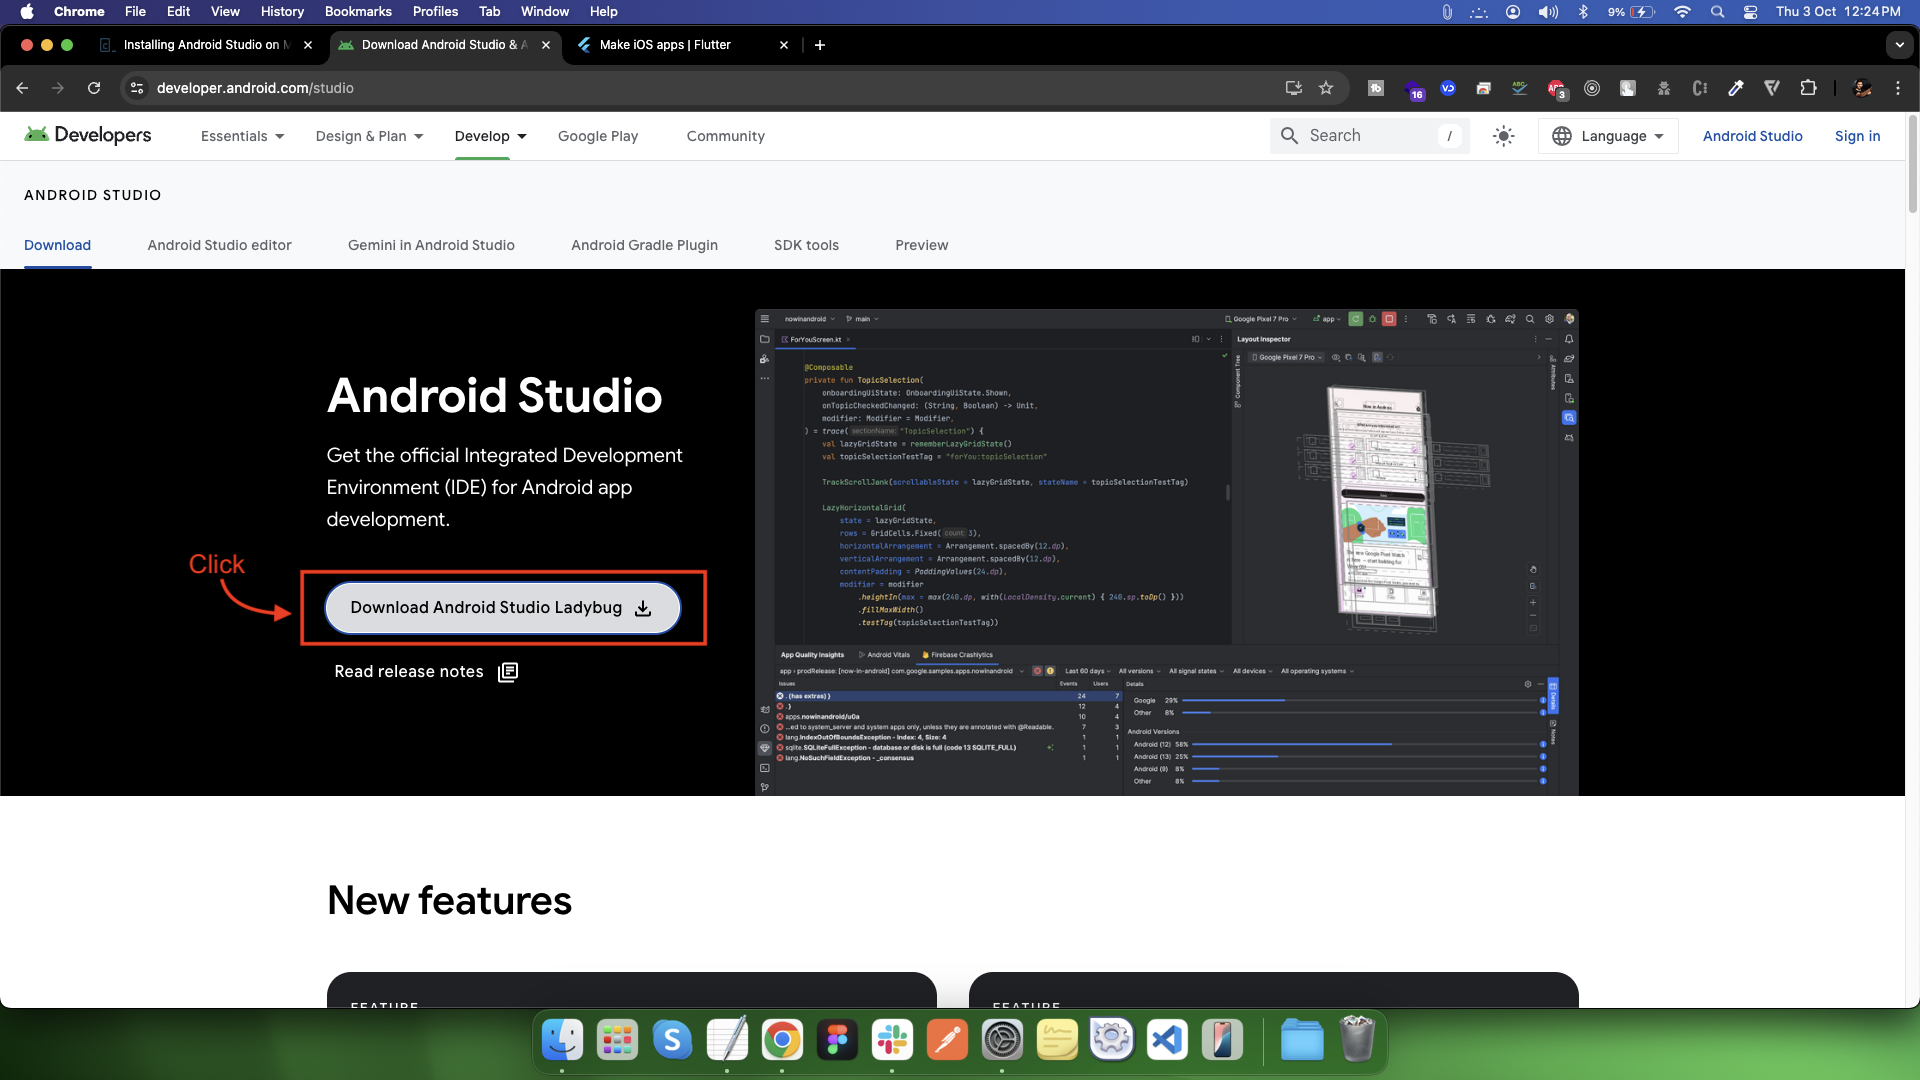
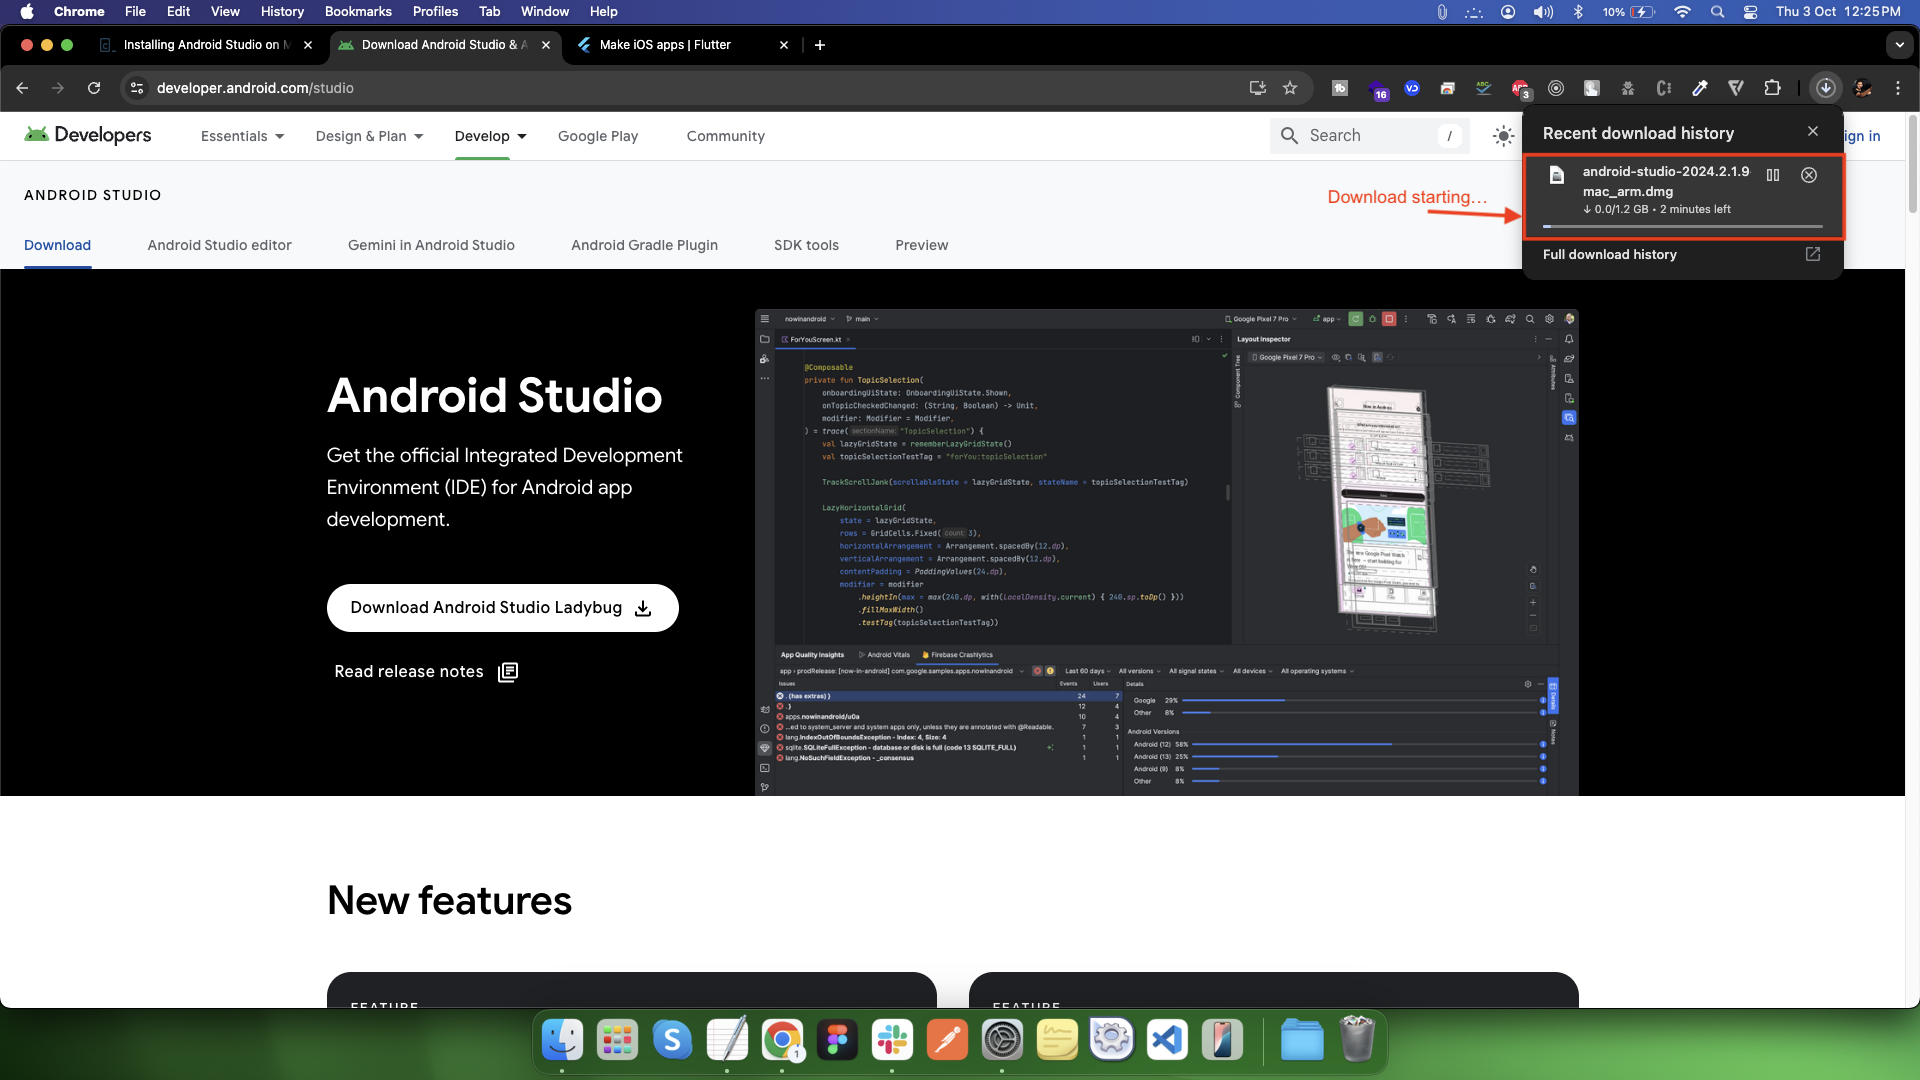
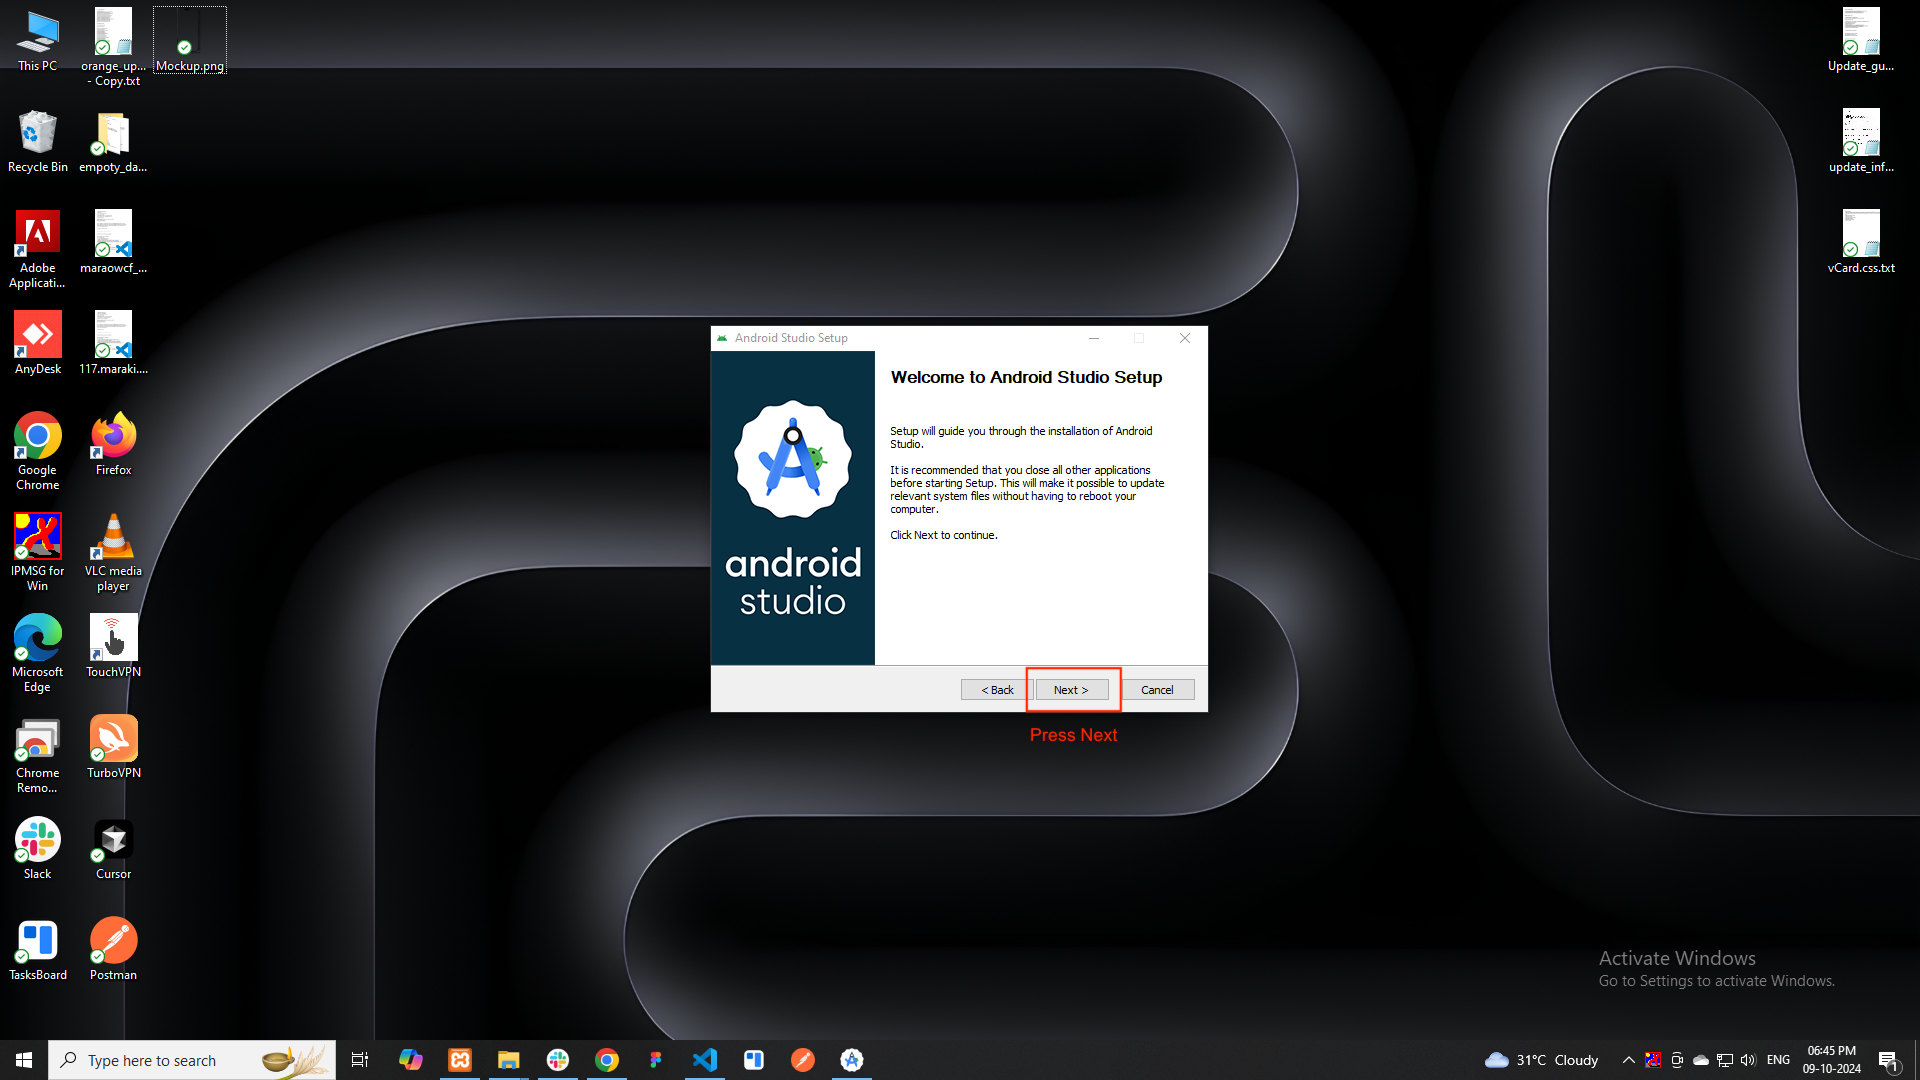
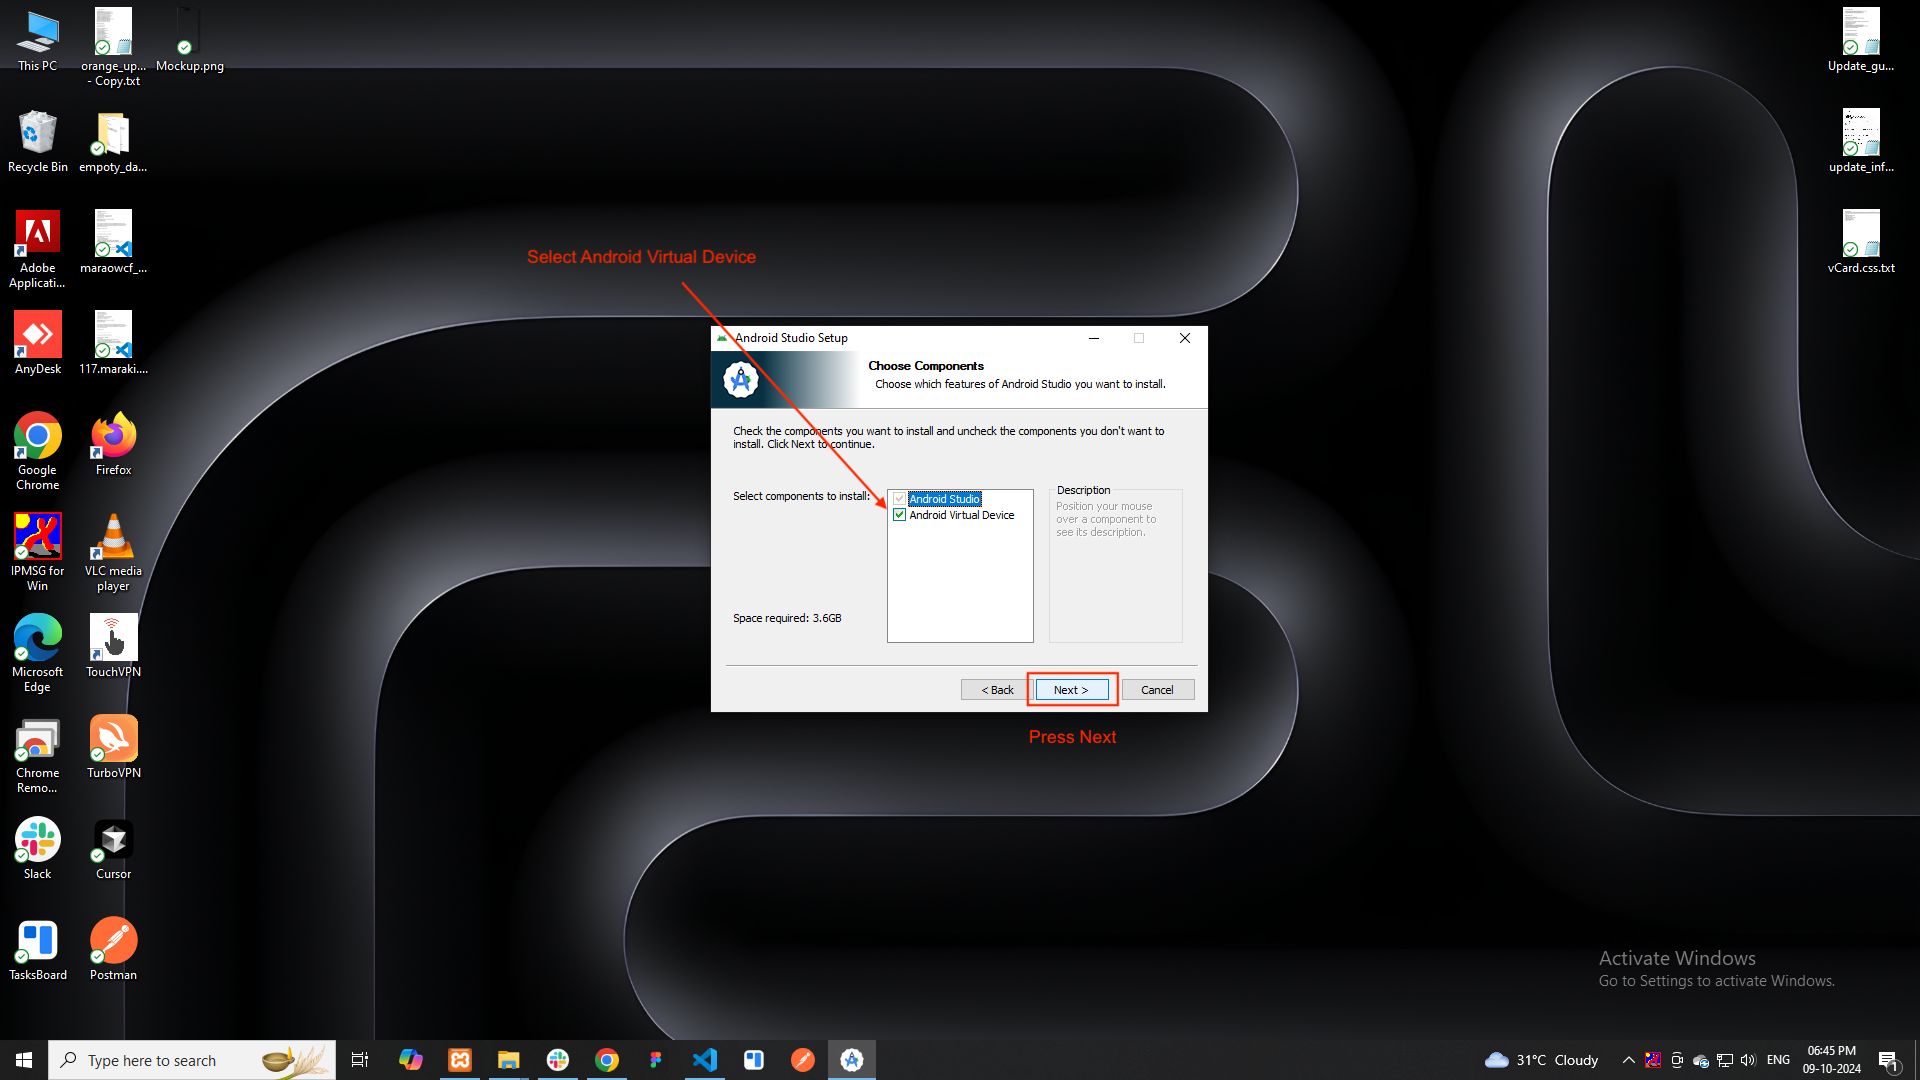
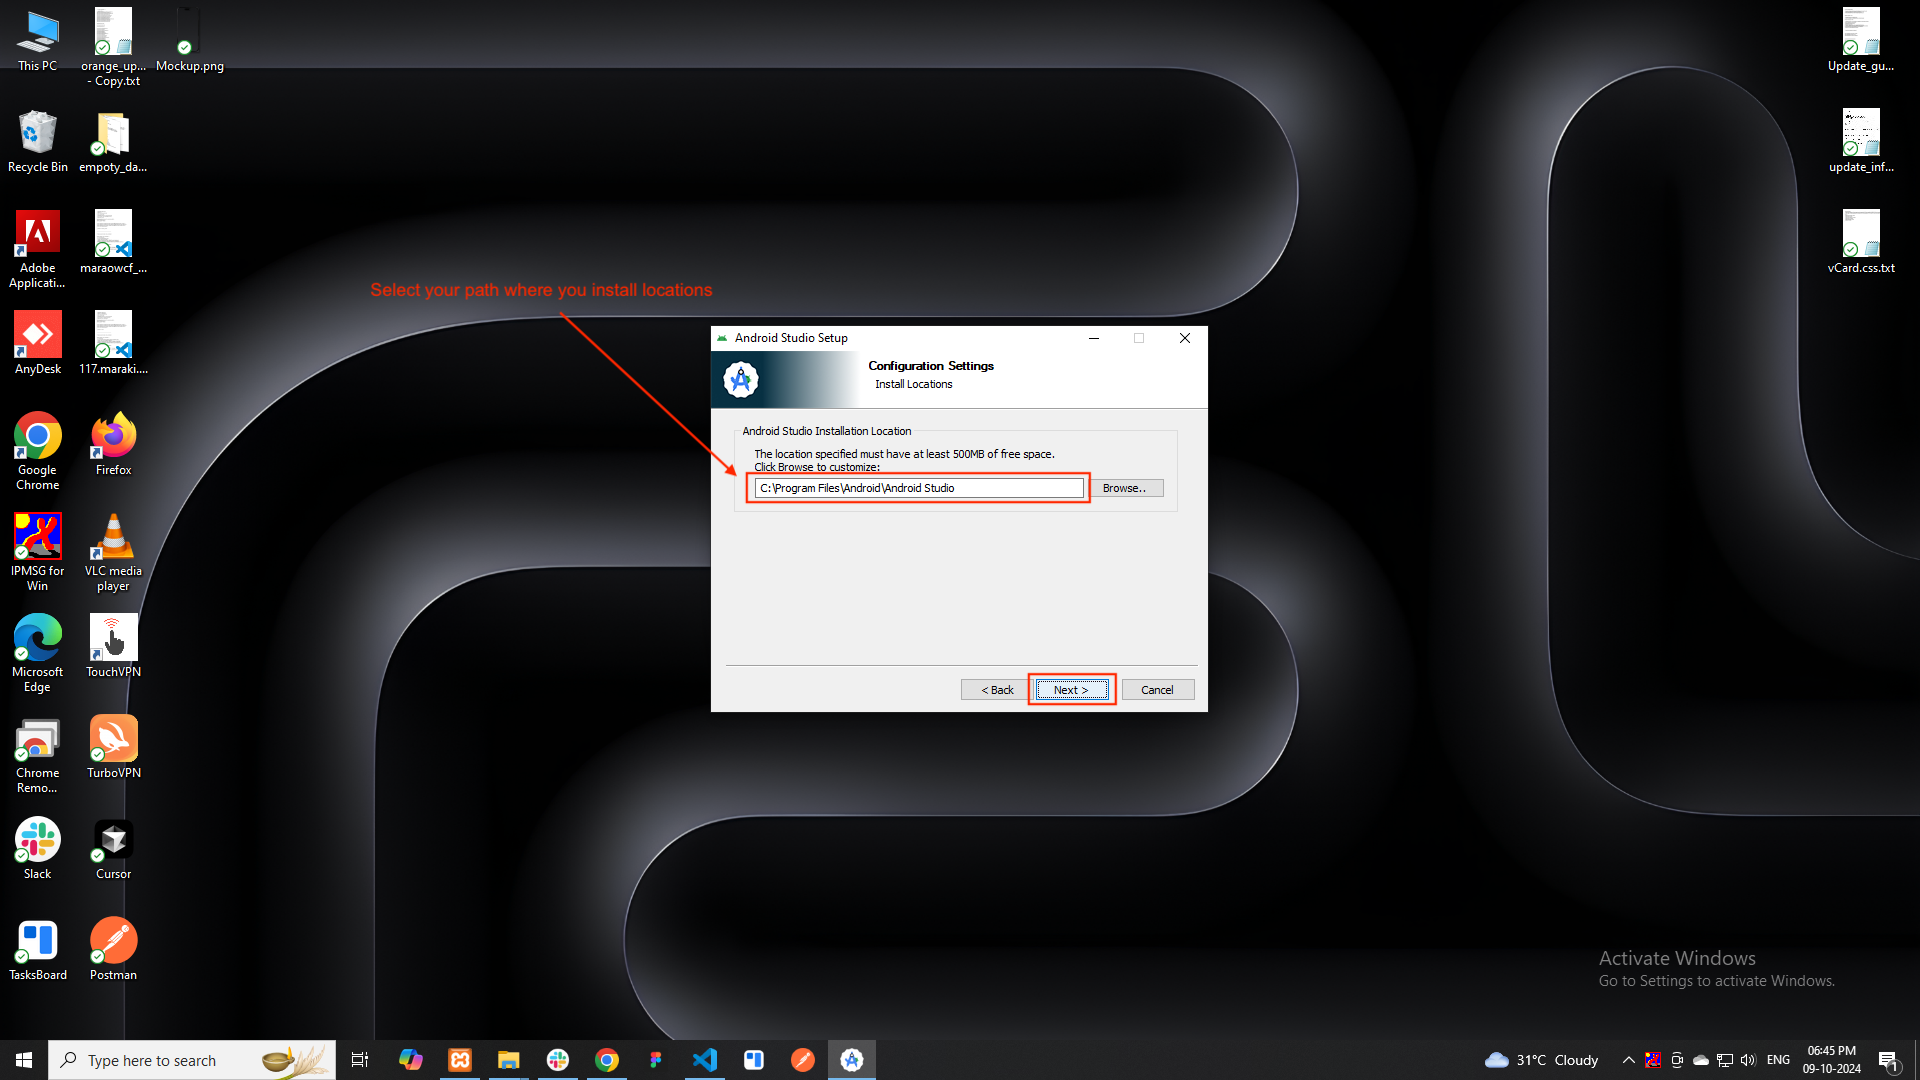
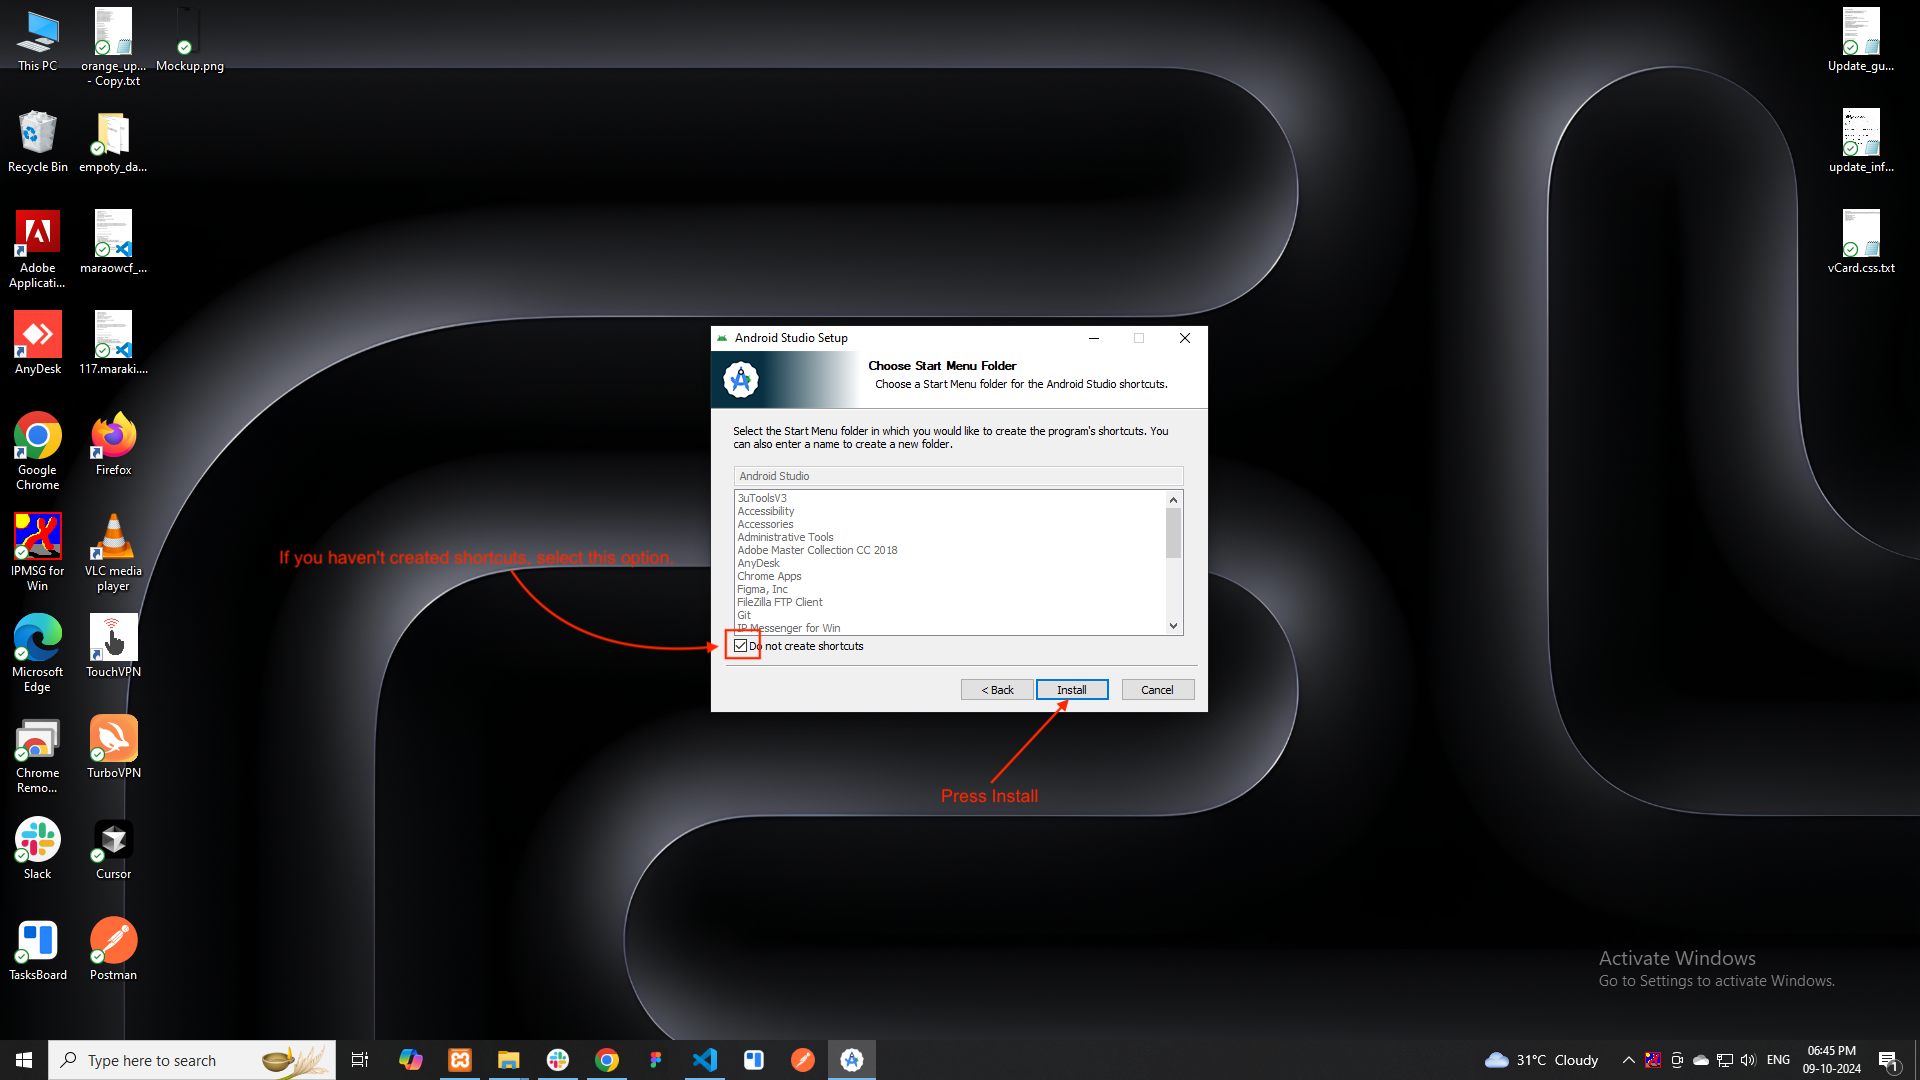
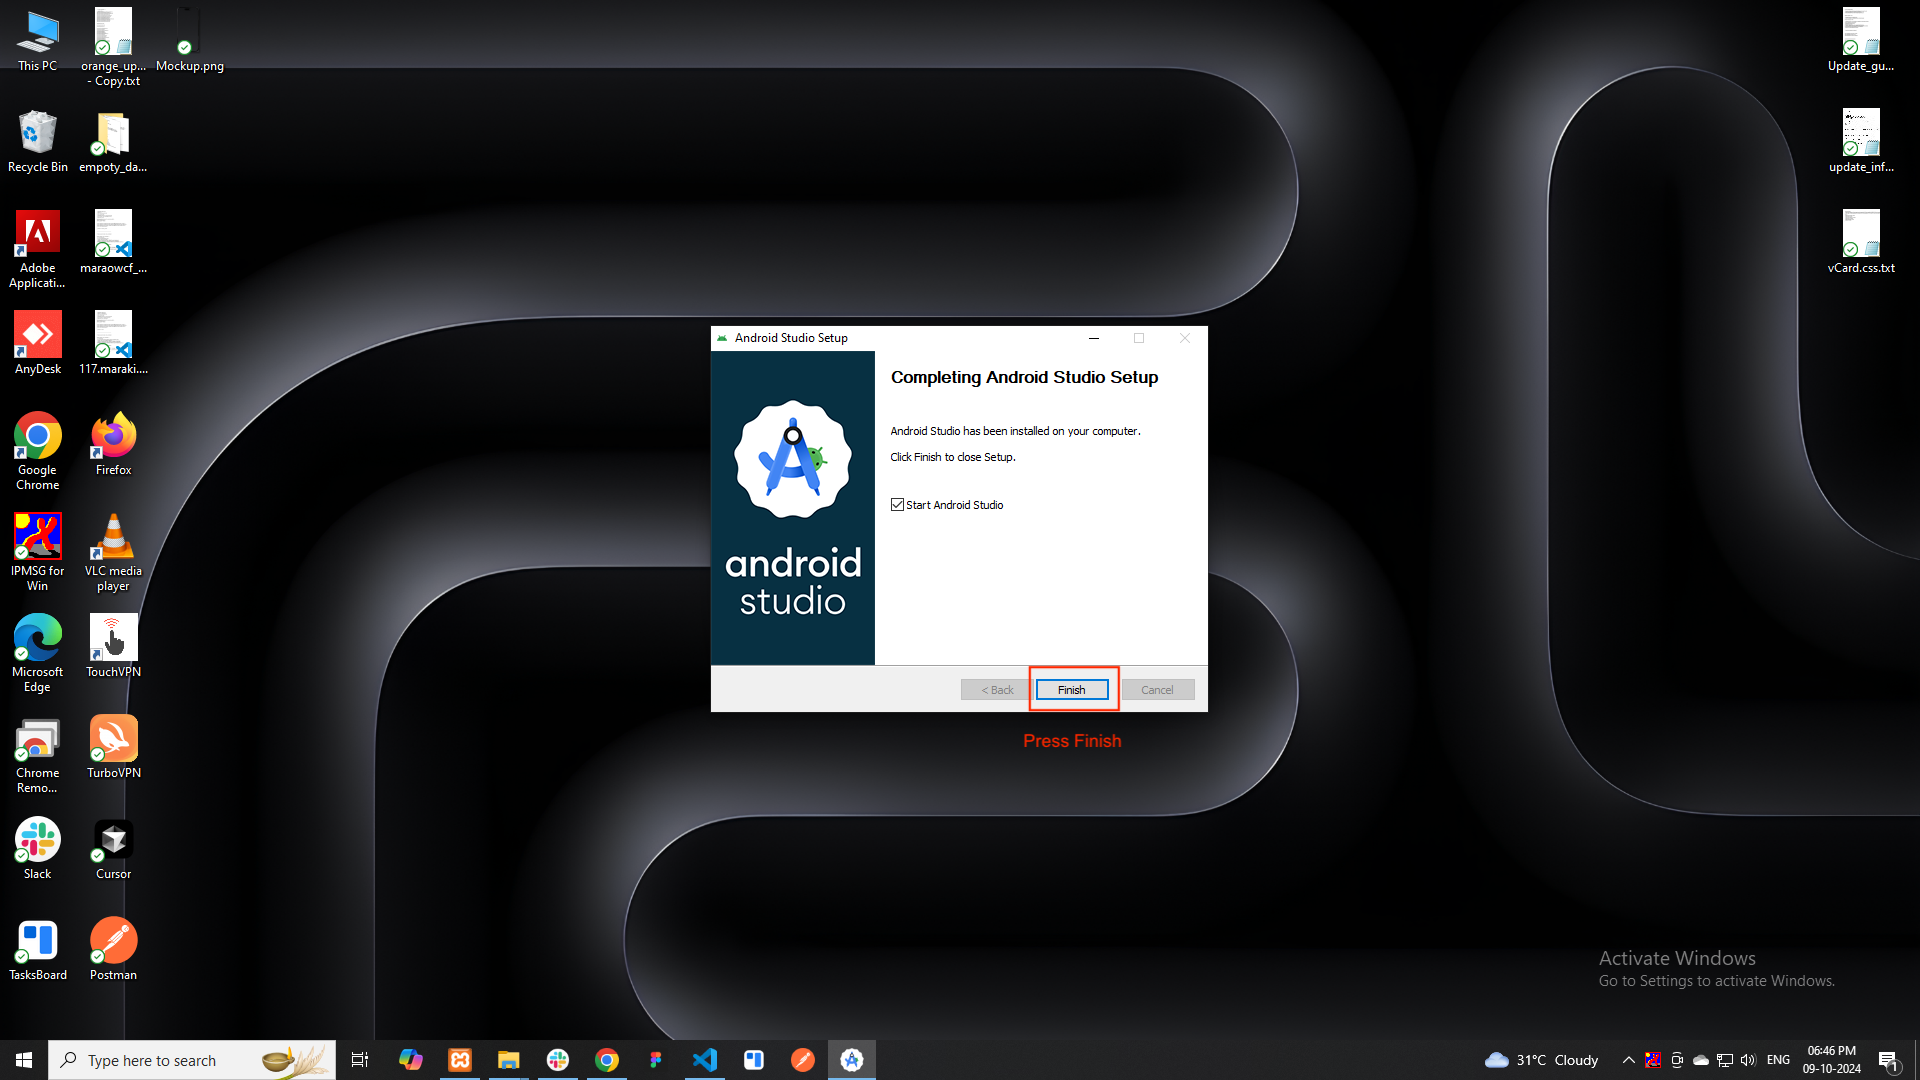
Install the android studio
-
Download Android Studio
-
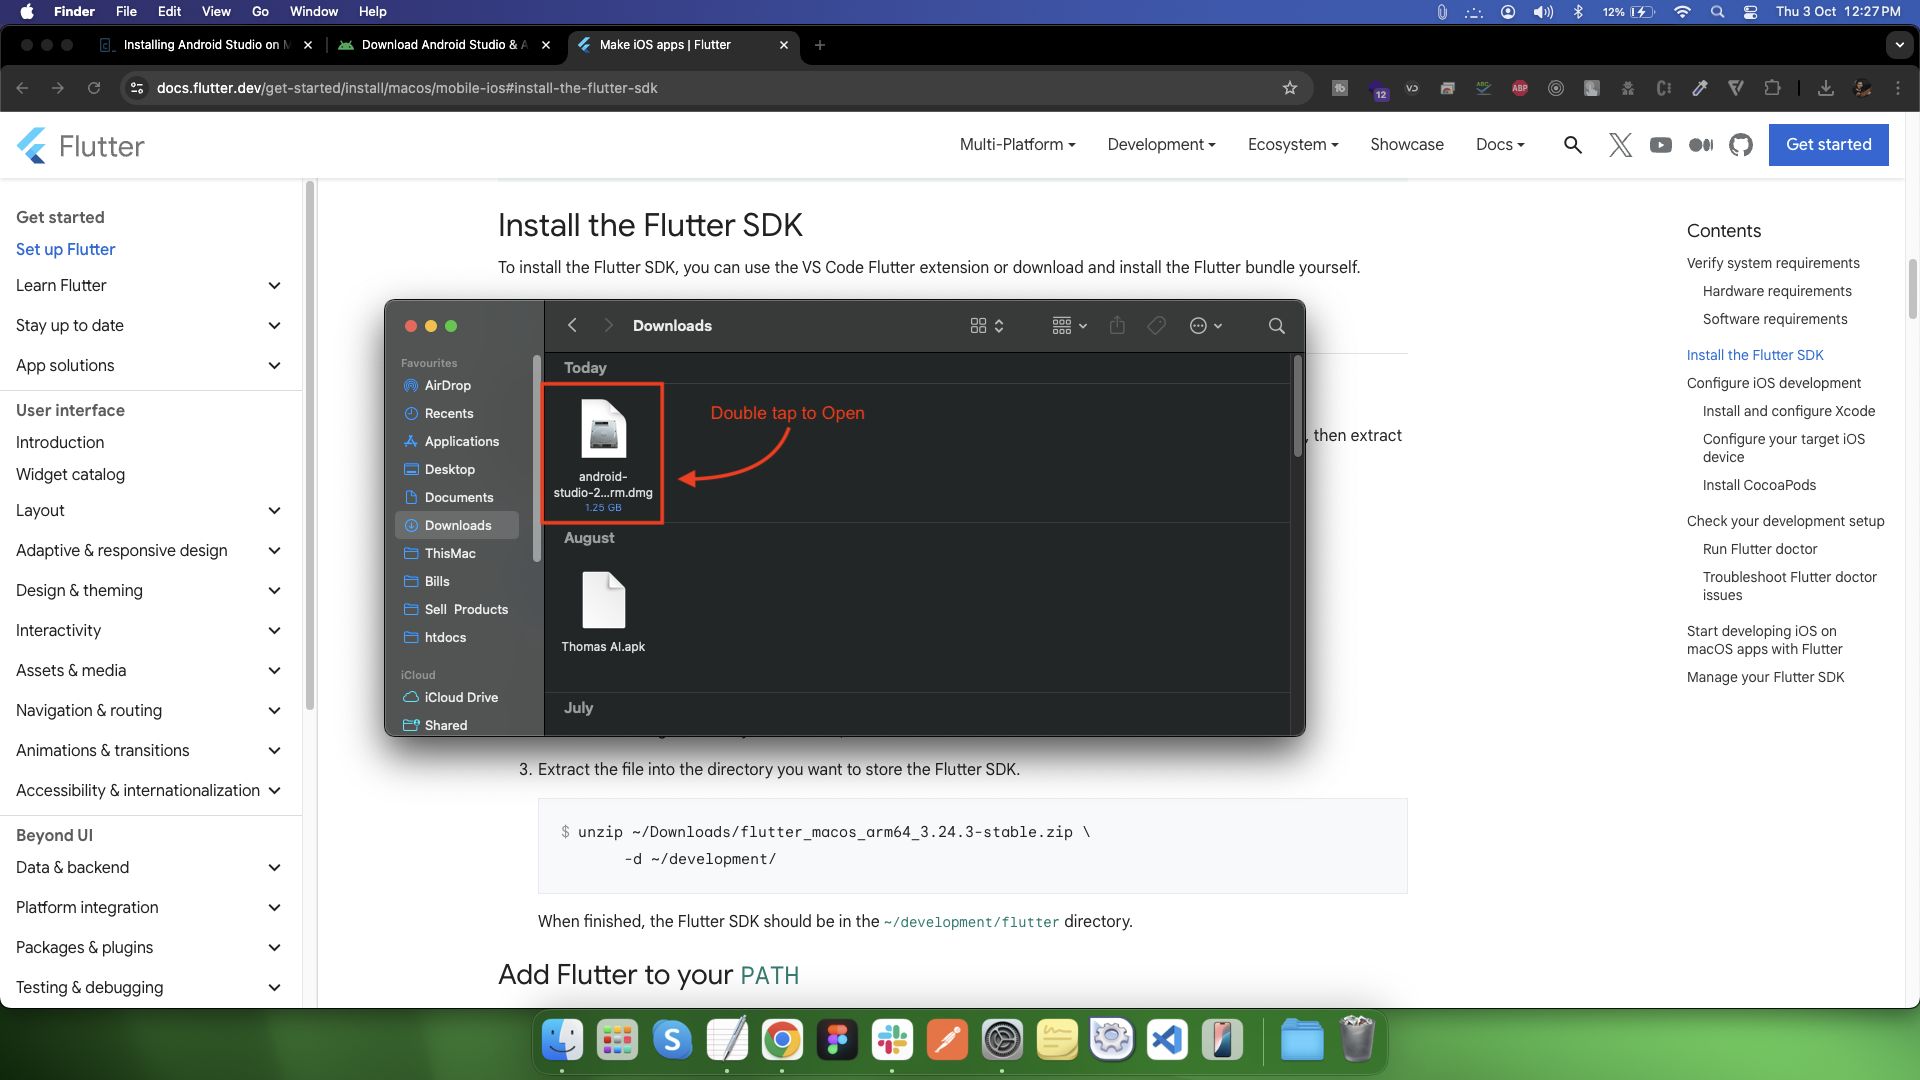
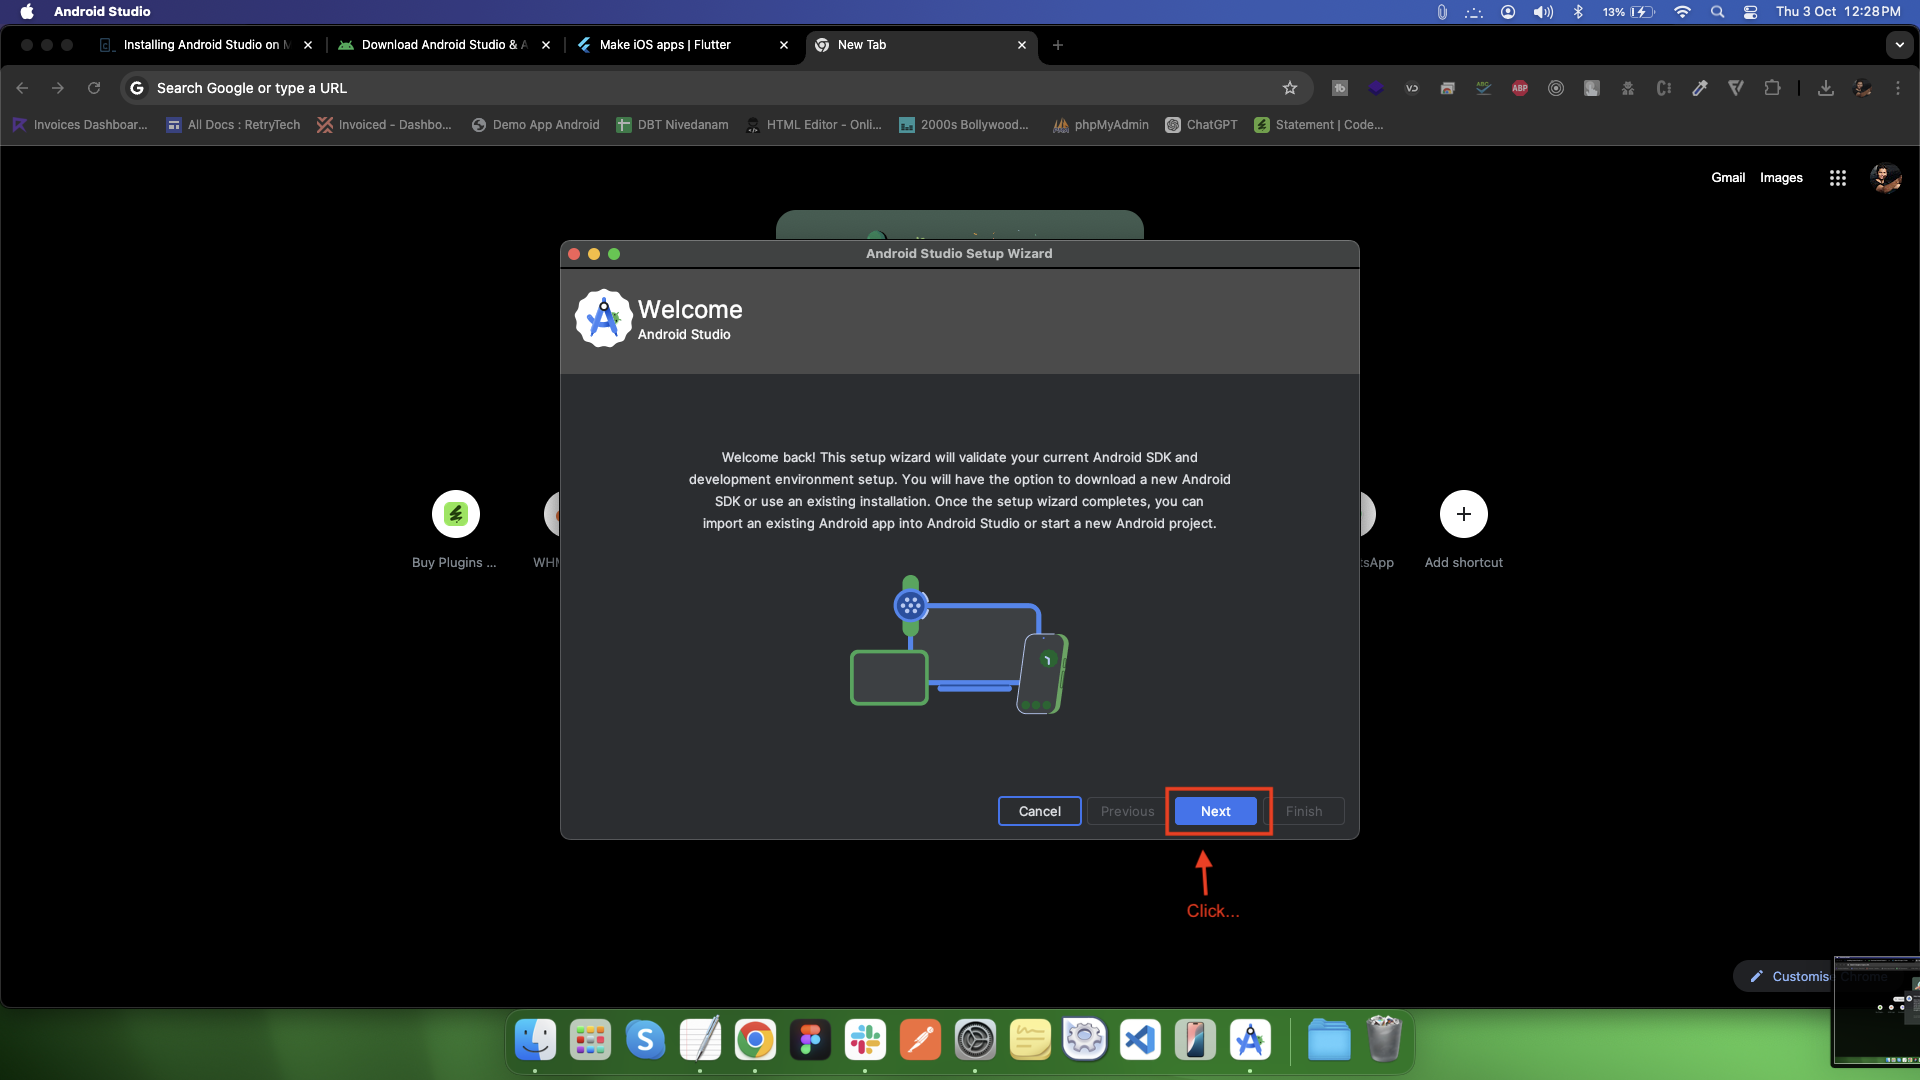
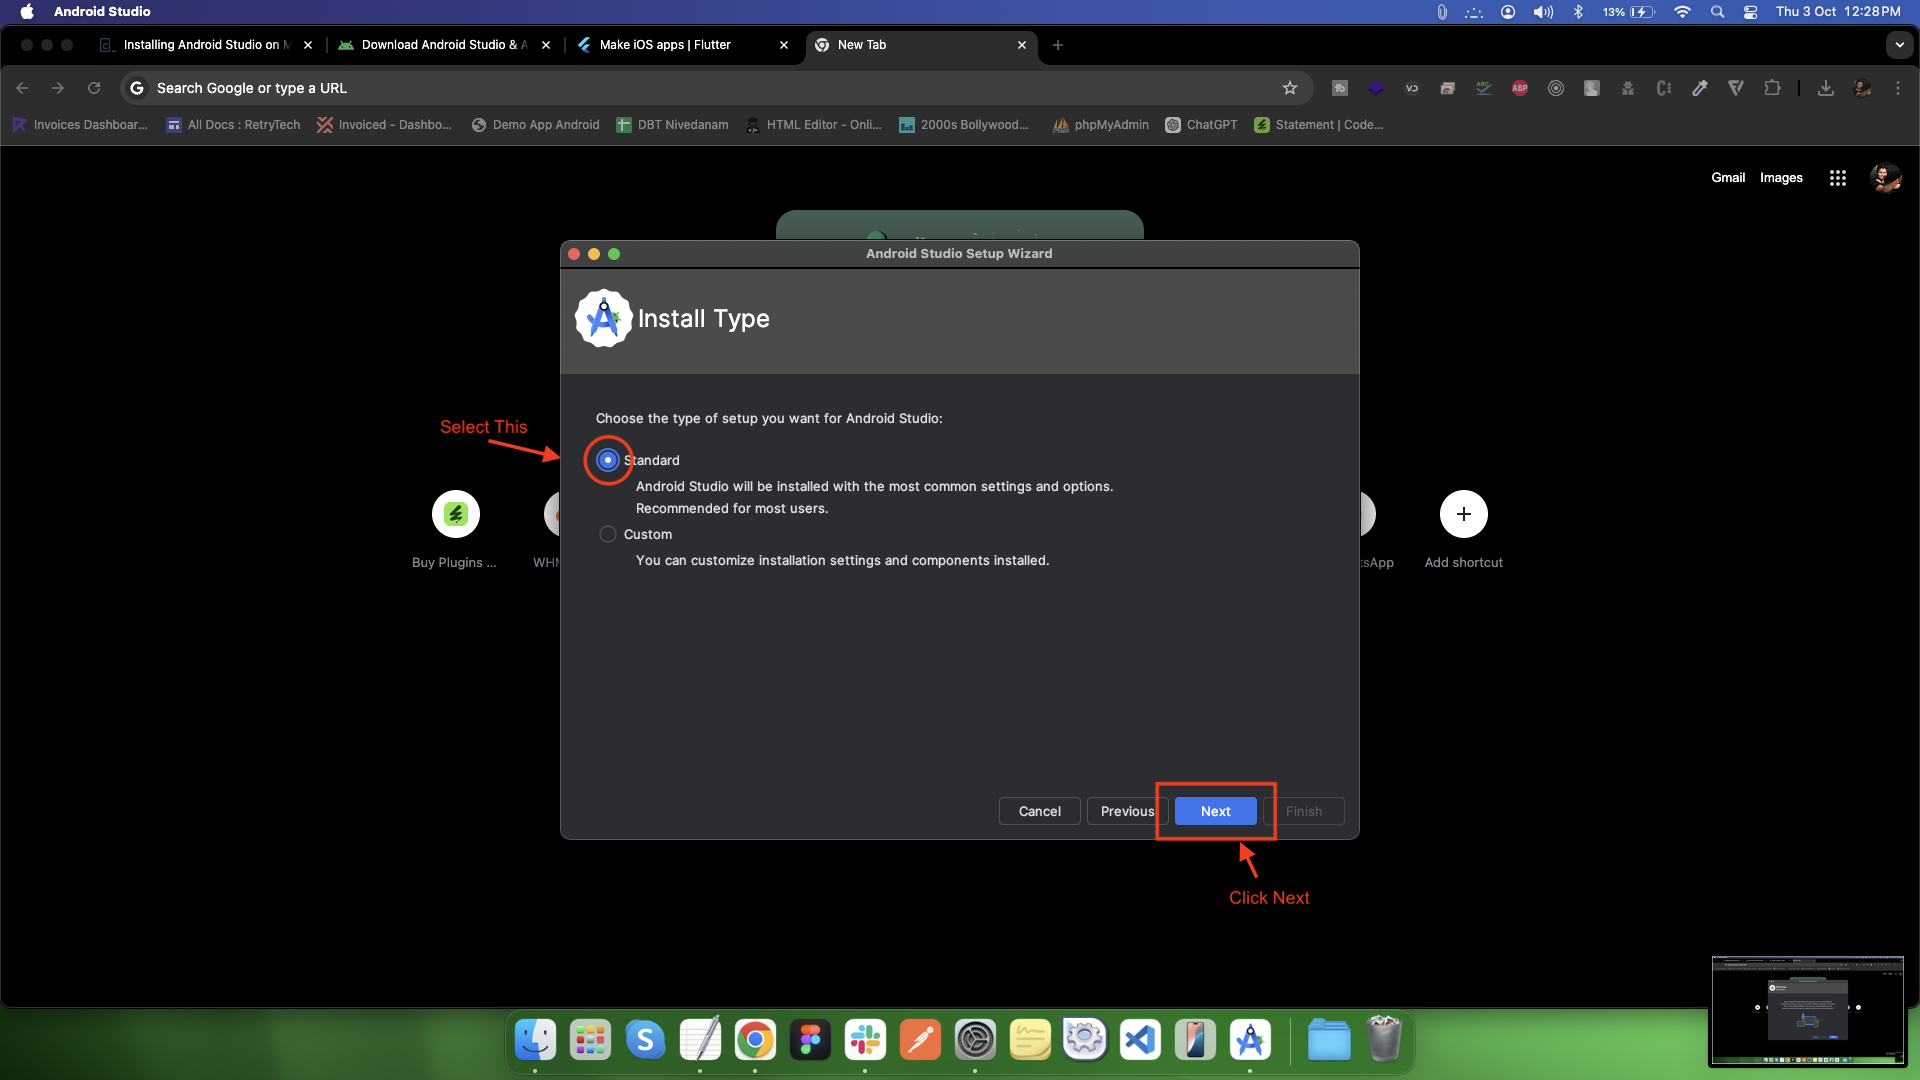
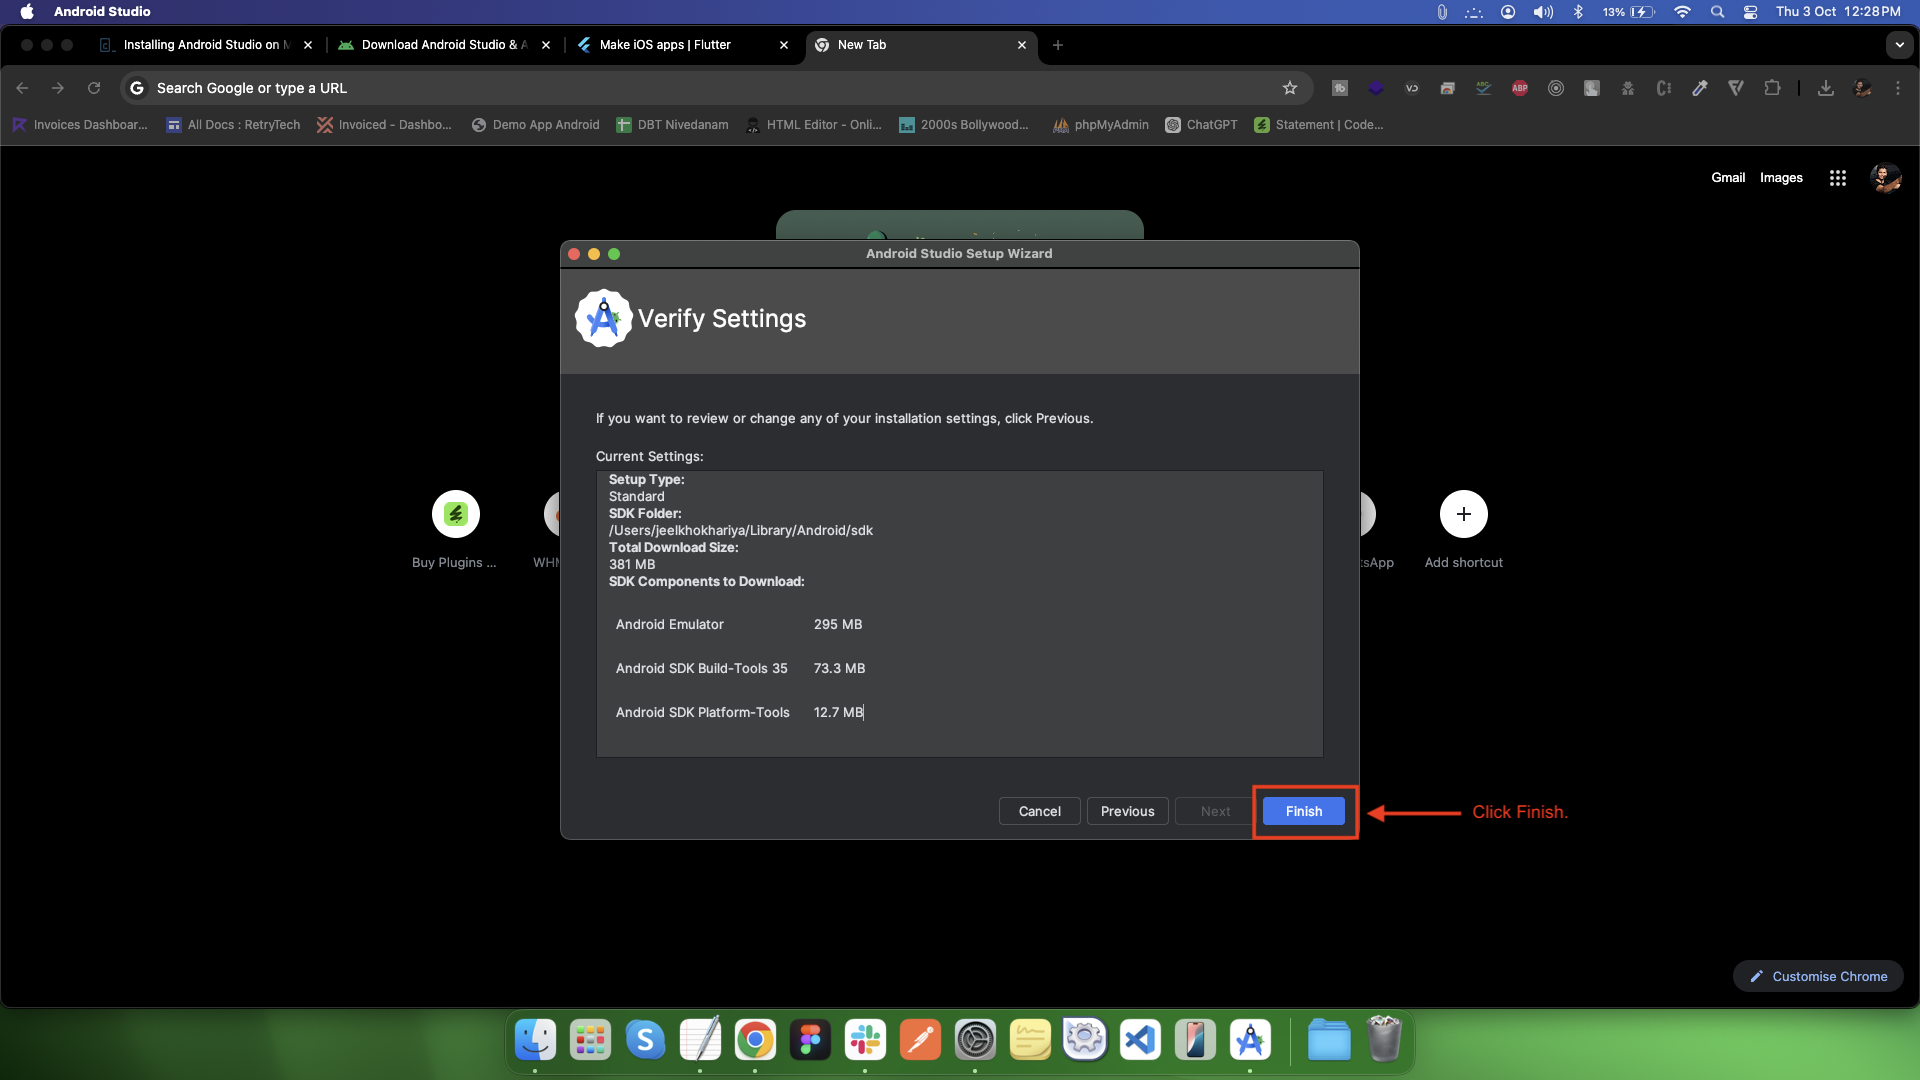
Launch the Android Studio DMG file.
-
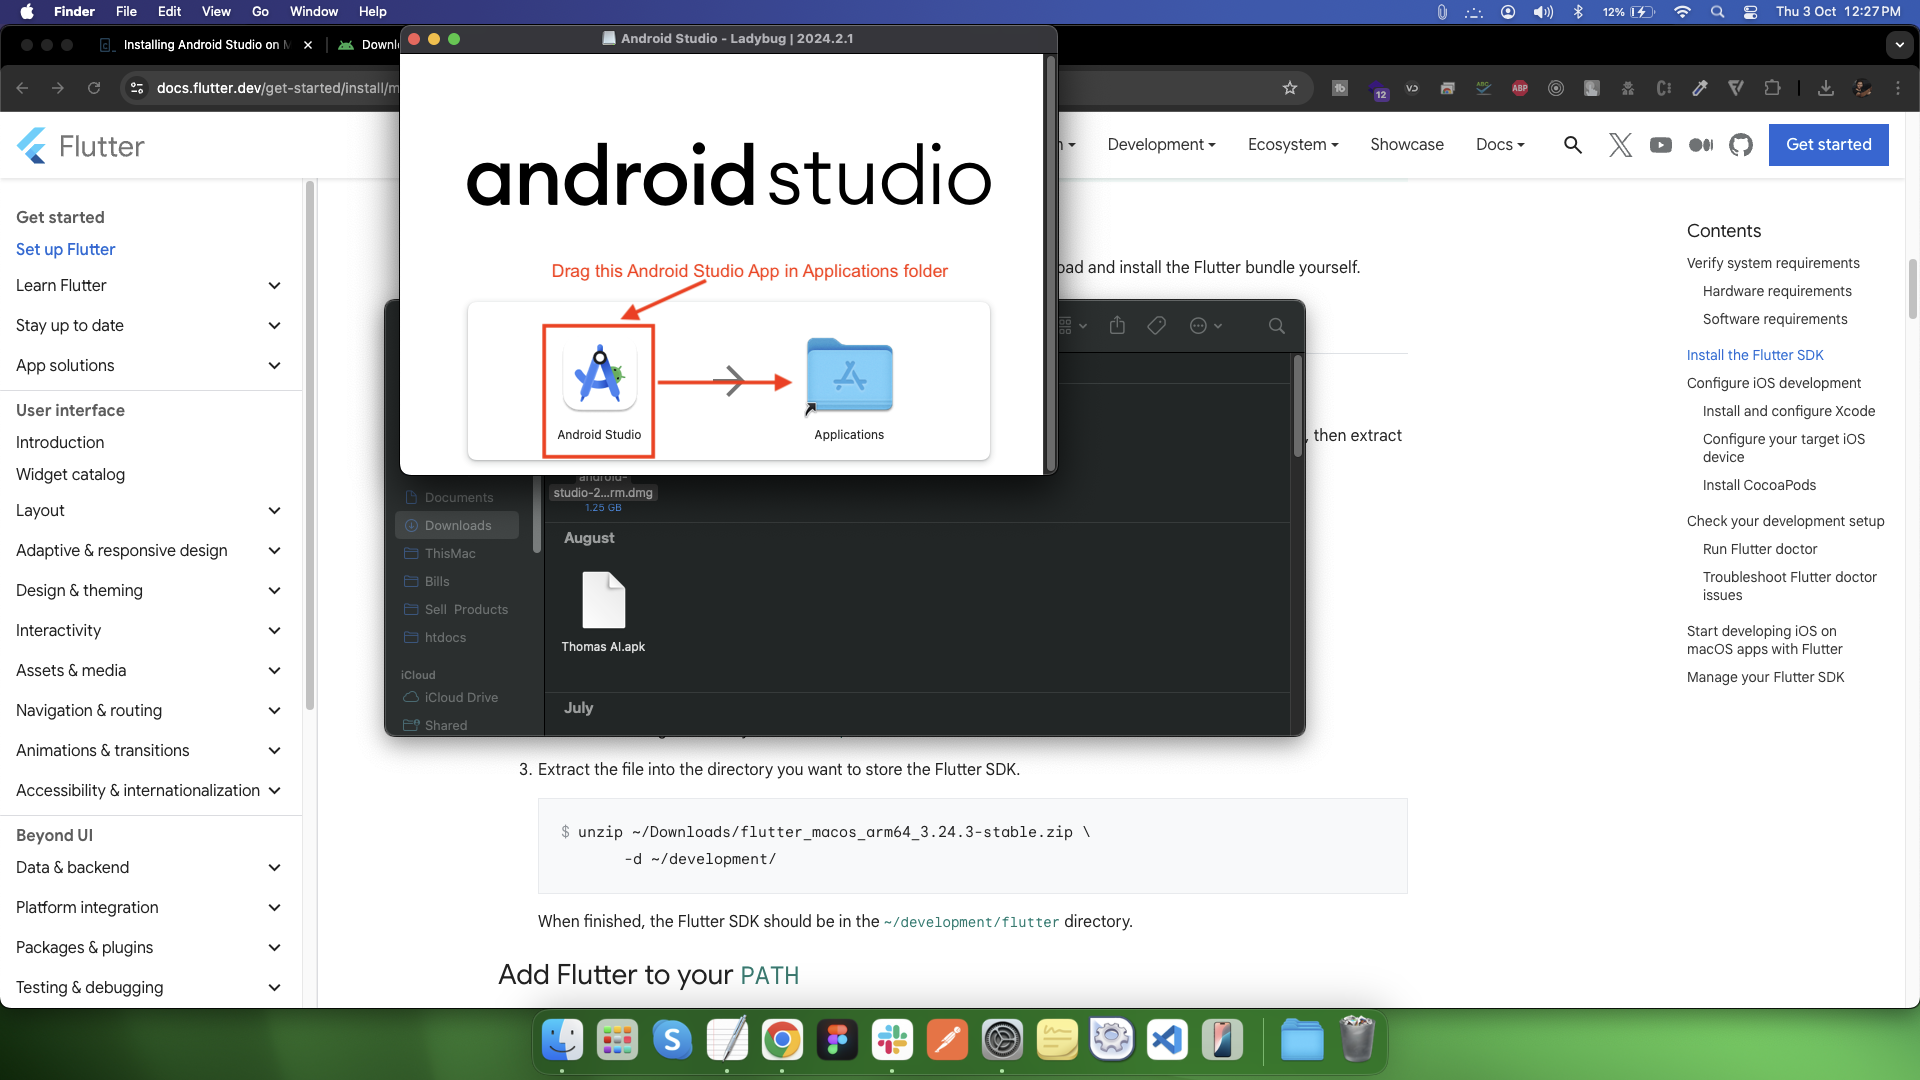
Drag and drop Android Studio into the Applications folder, then launch Android Studio.
-
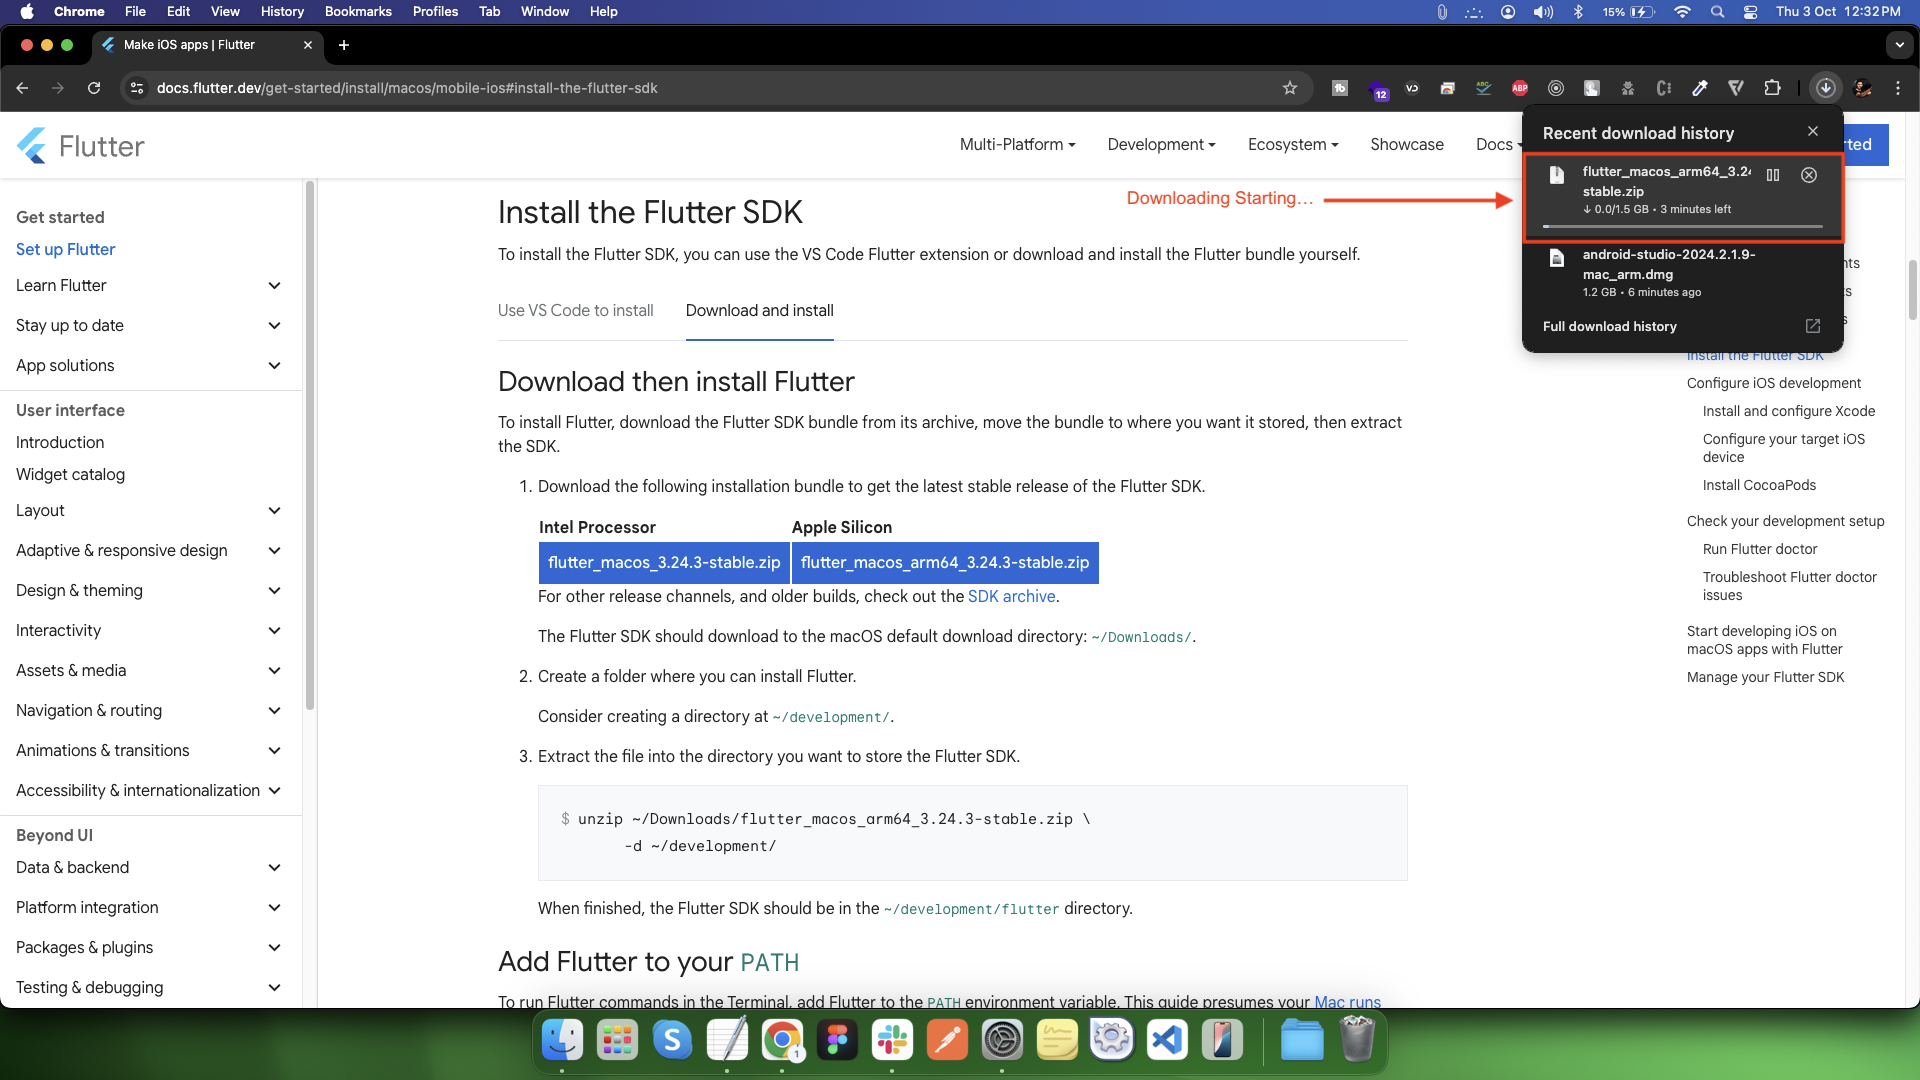
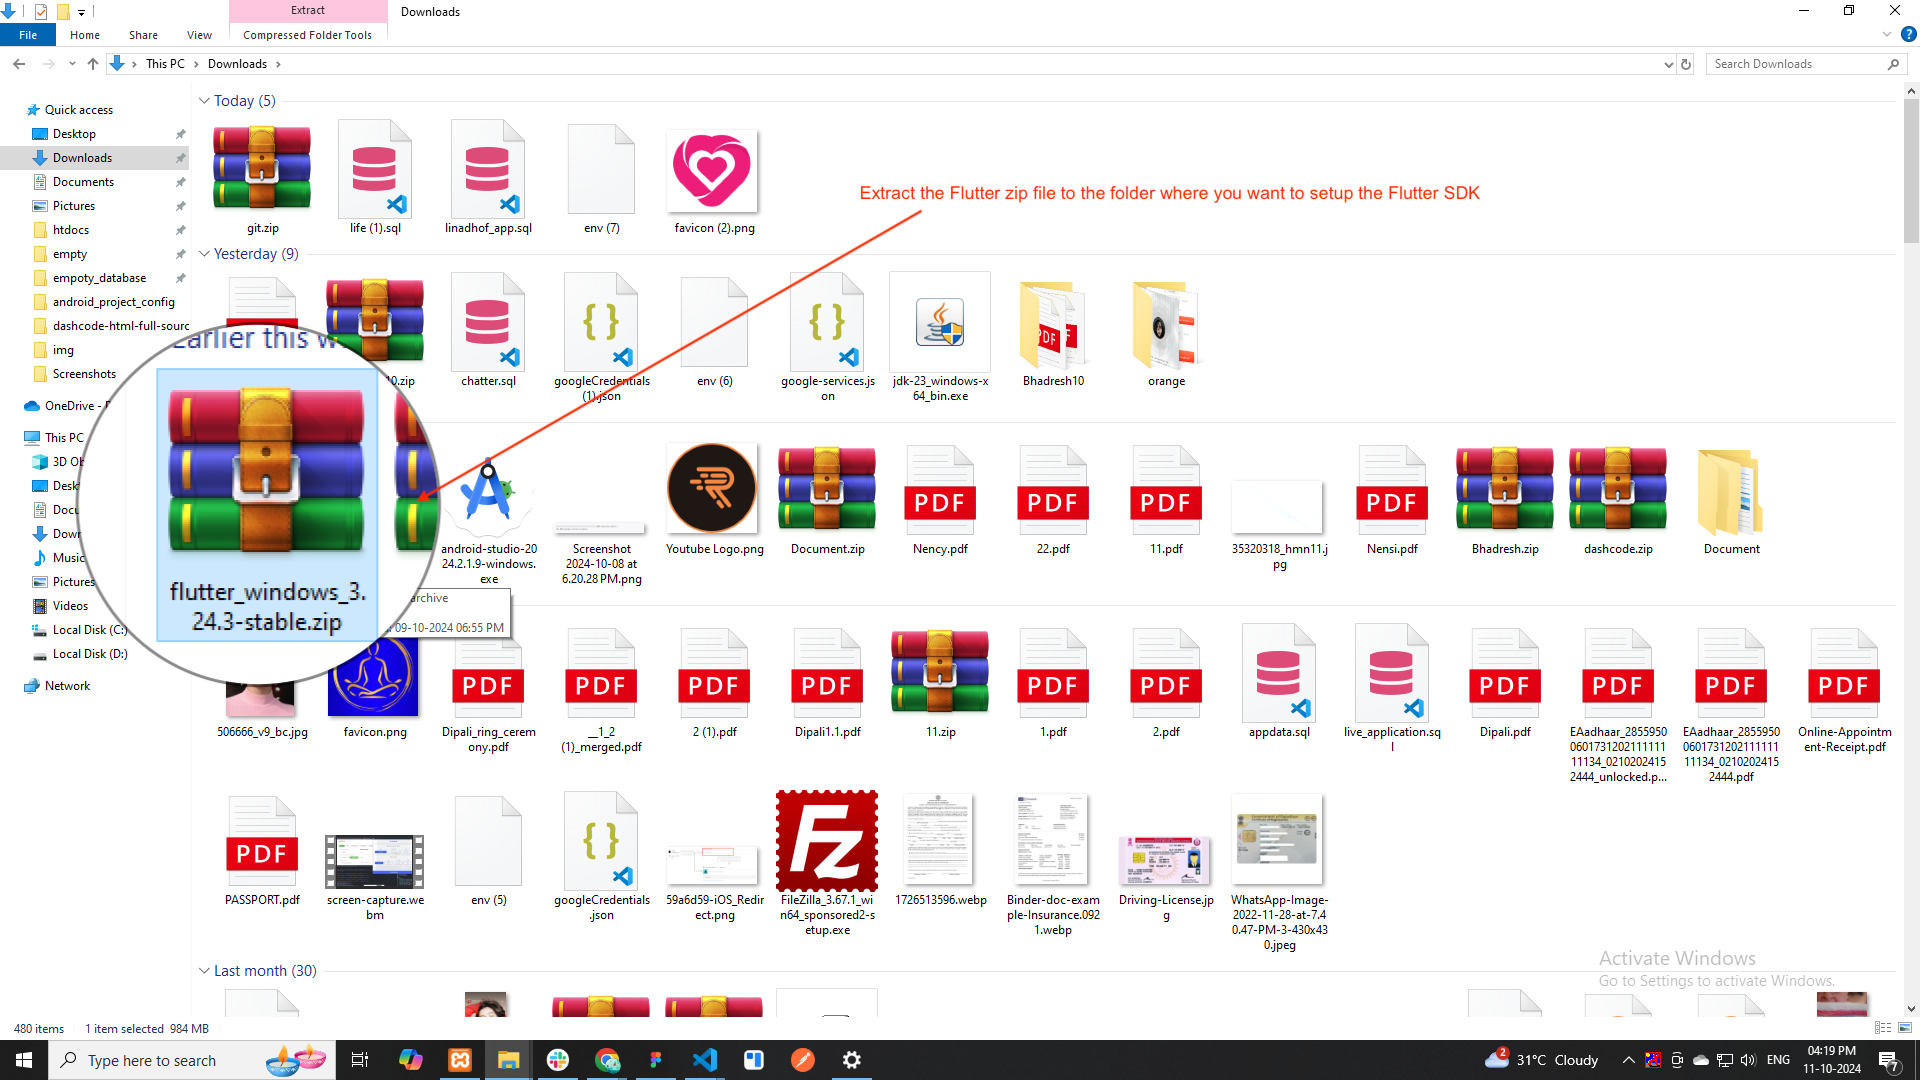
Download the following installation bundle to get the latest stable release of the Flutter SDK.
-
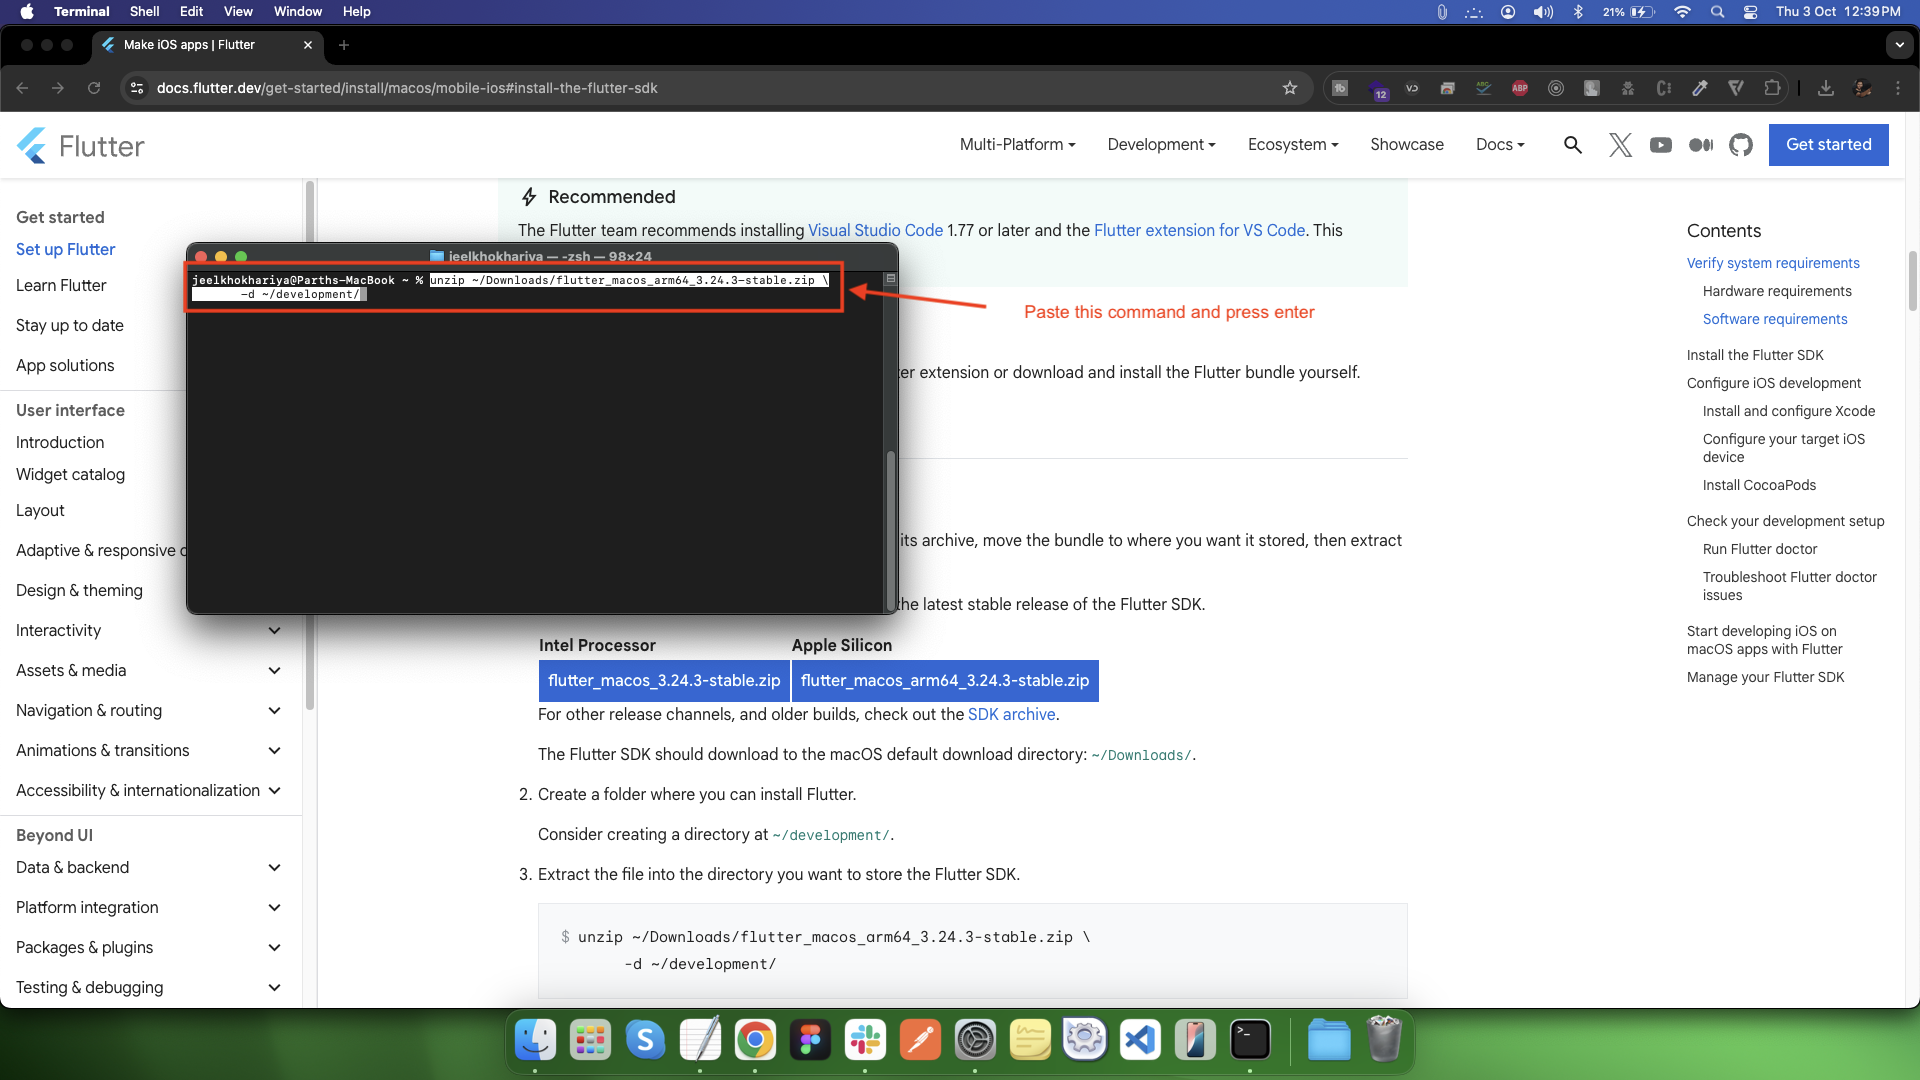
Extract the file into the directory you want to store the Flutter SDK.
-
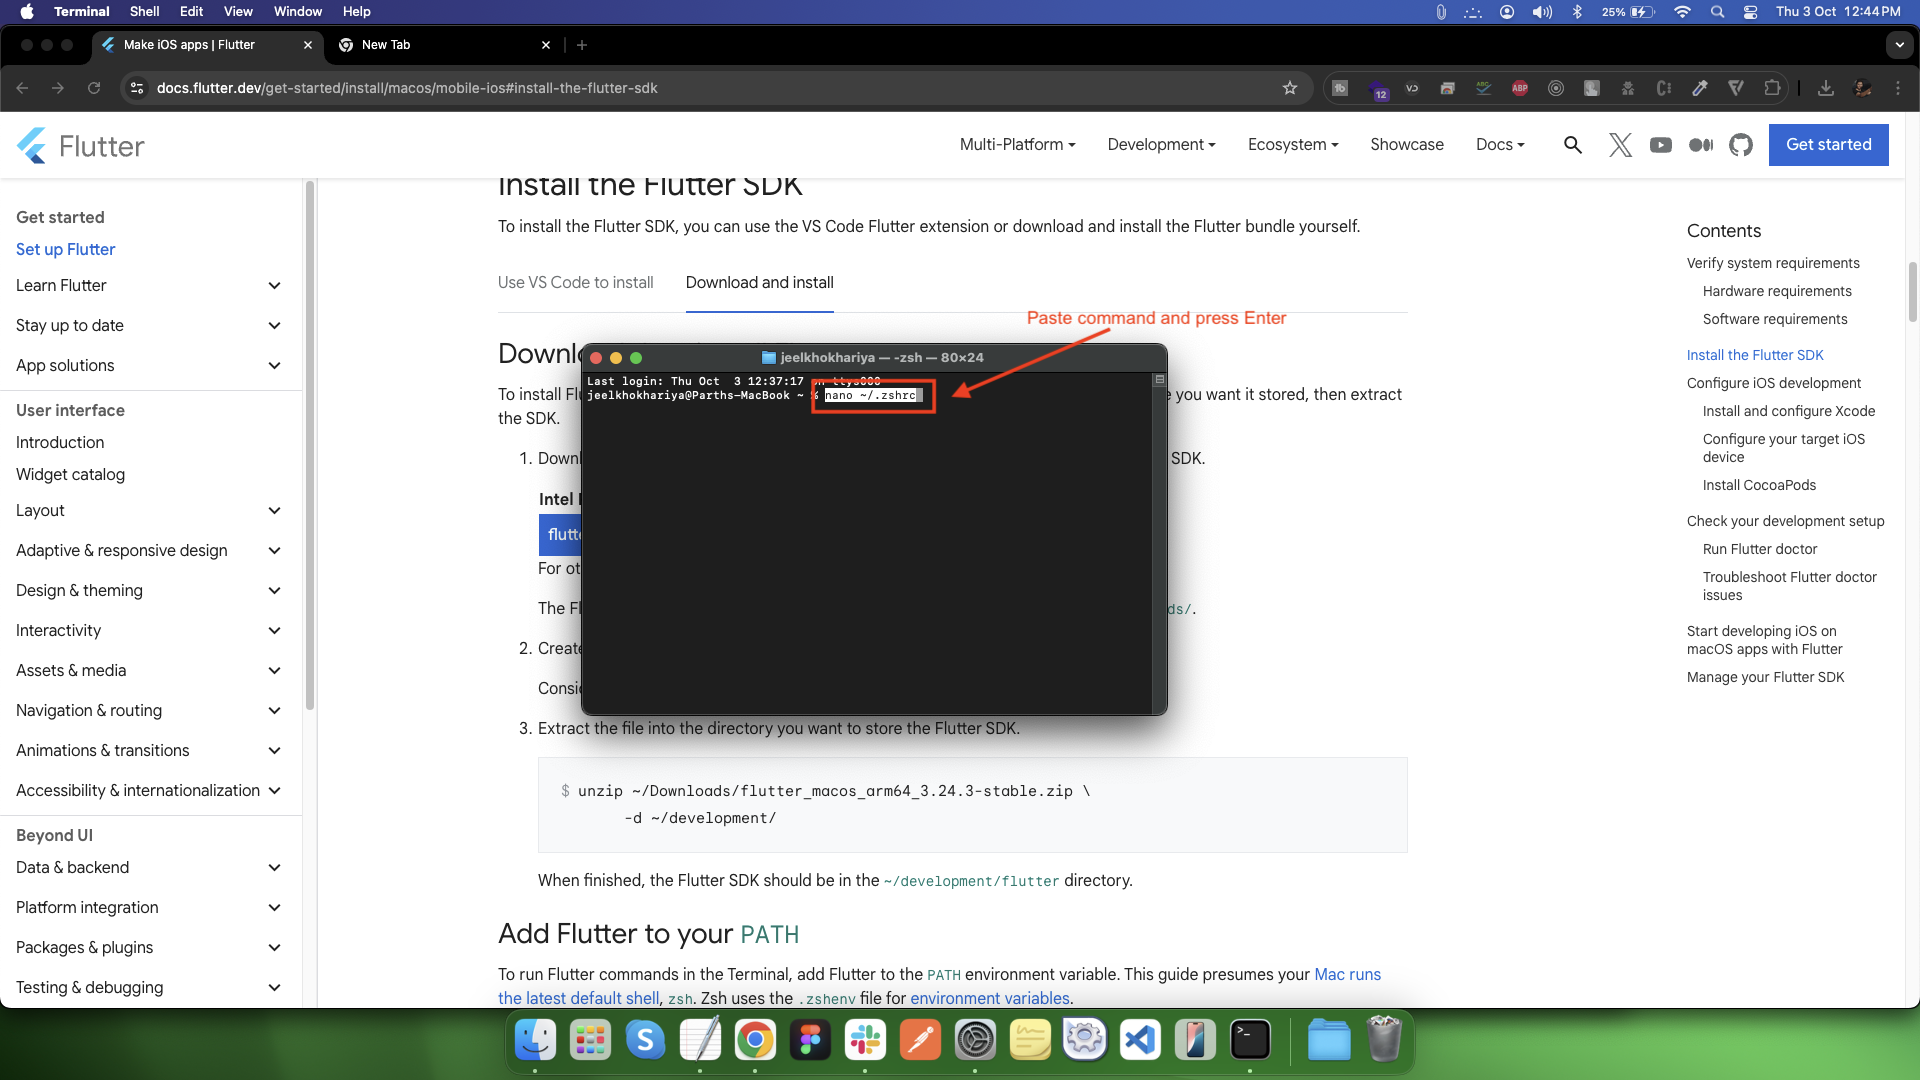
Open terminal
-
Run:
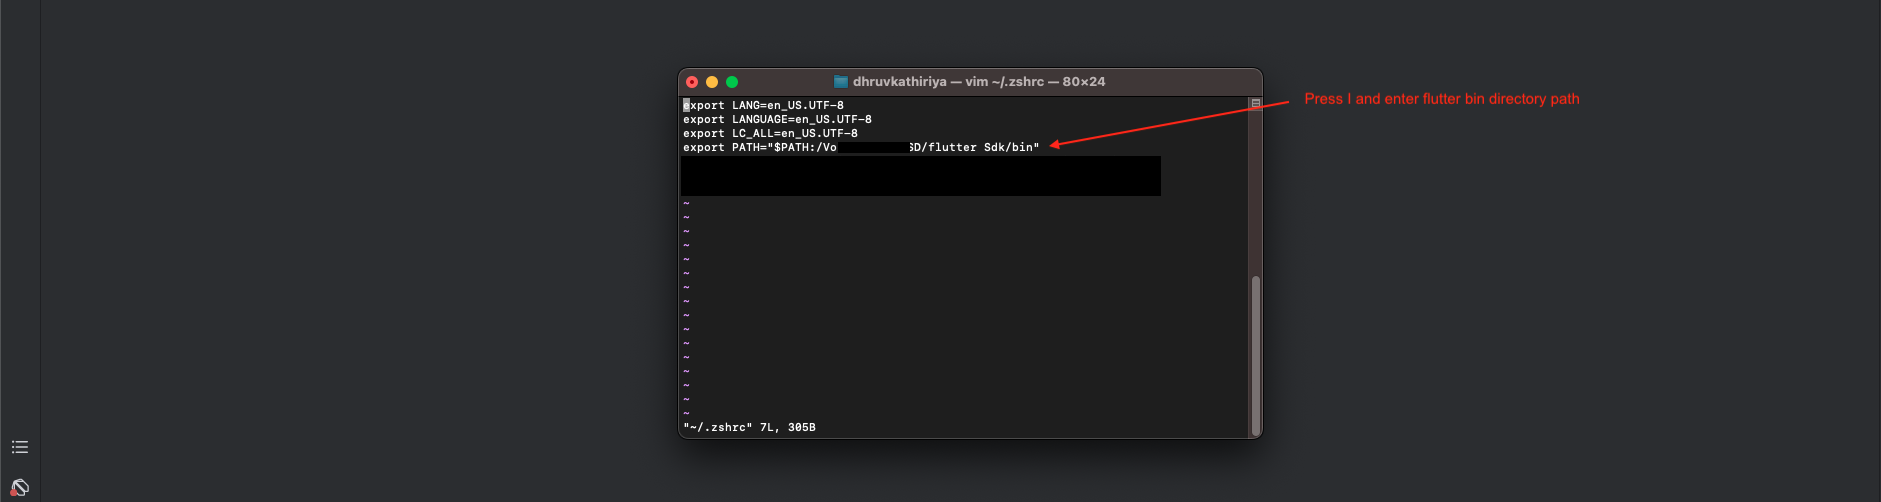
vim ~/.zshrc -
Press 'I' to insert the path as (export PATH=/Users/DK/flutter/bin:$PATH). Here /Users/DK/ is the folder where Flutter is installed
-
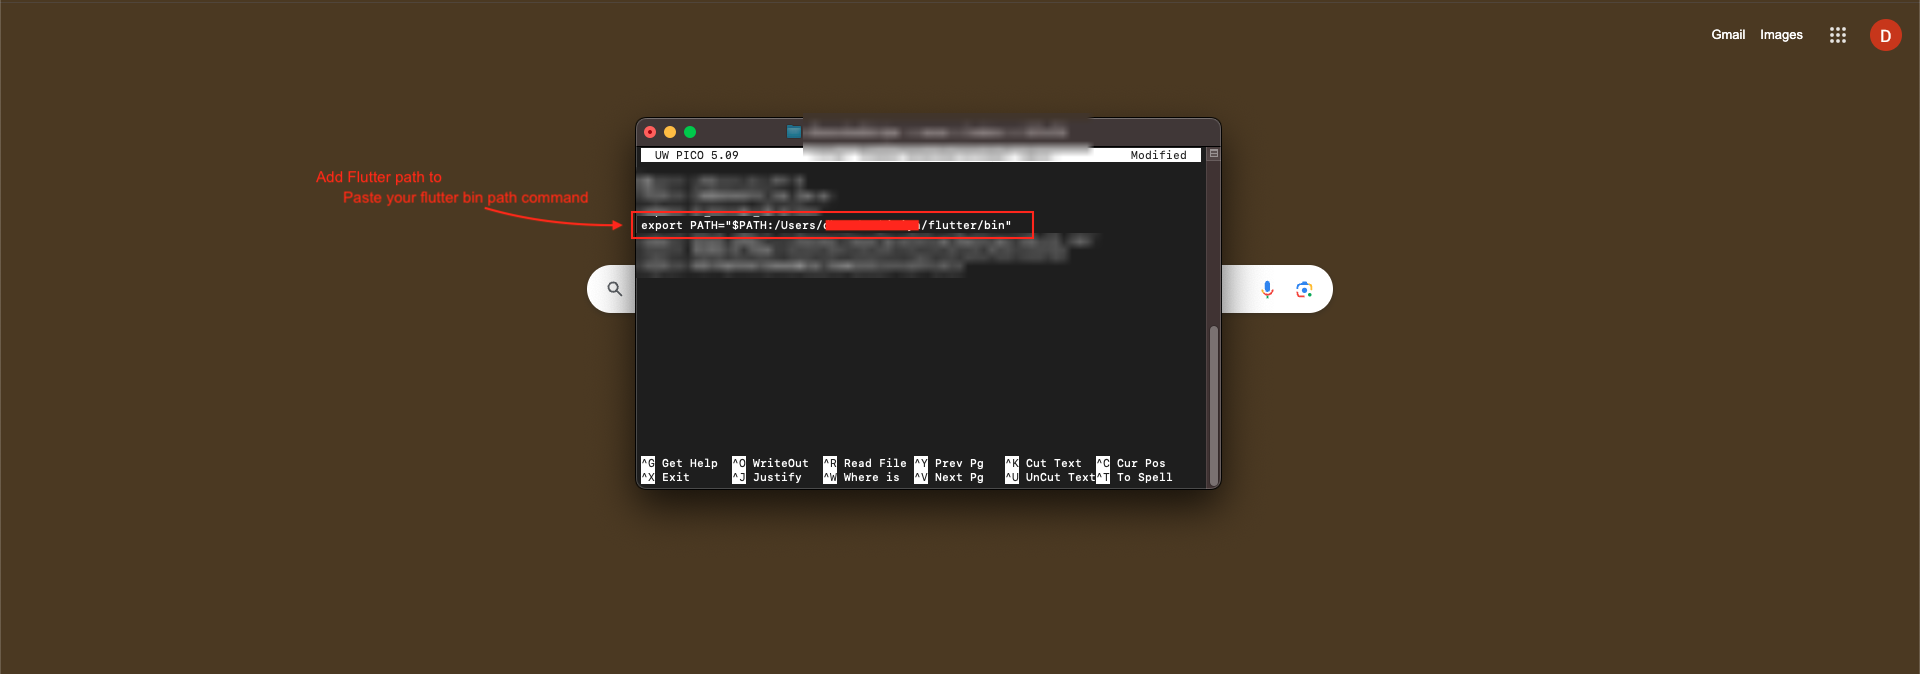
Add:
export PATH="$PATH:/Volumes/DK SSD/flutter Sdk/bin" -
Hit Esc key, then enter :wq and then press Enter or return to save and exit the file
-
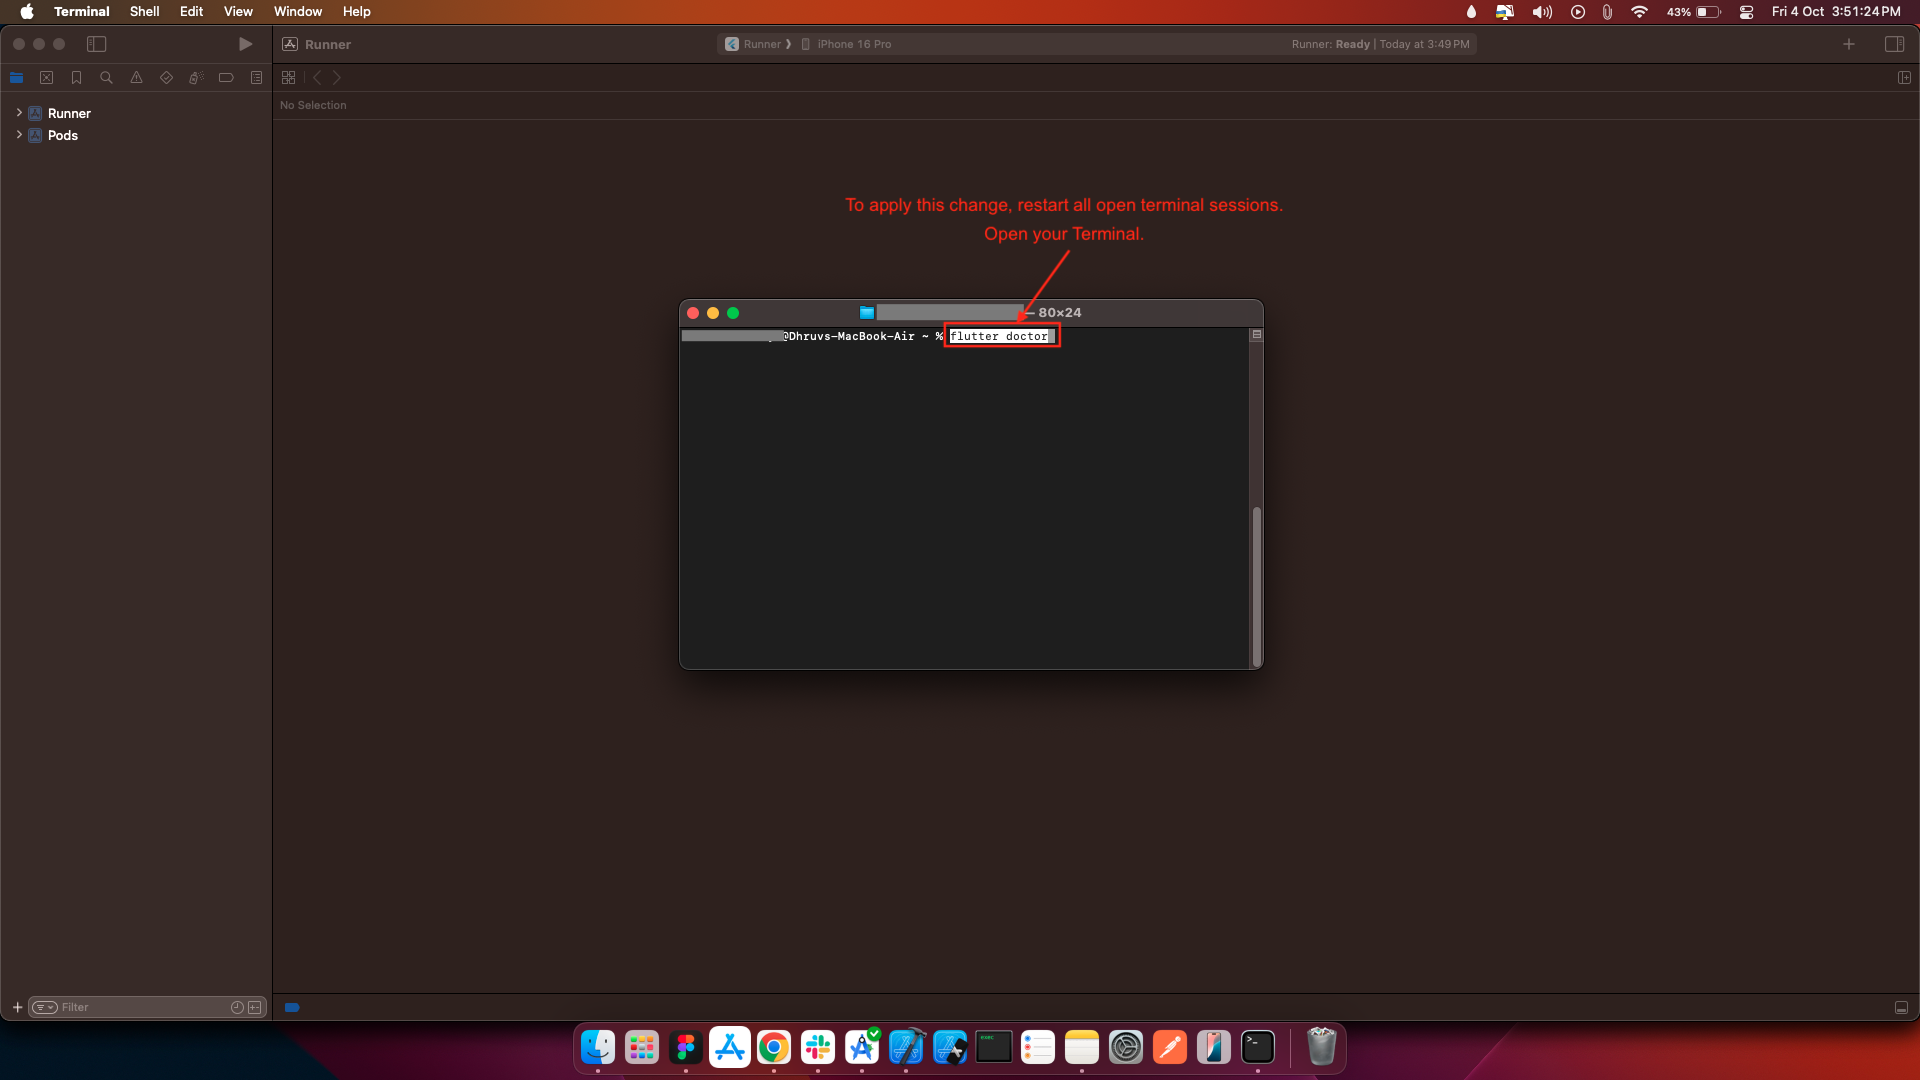
Restart Terminal
-
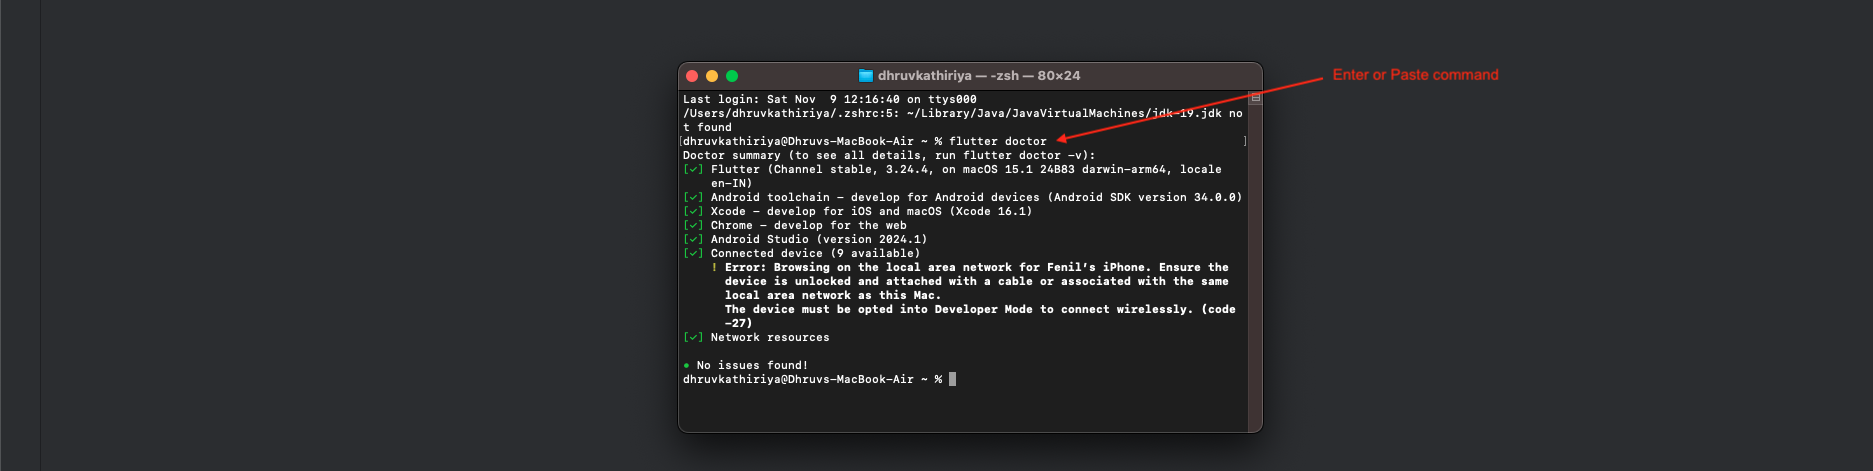
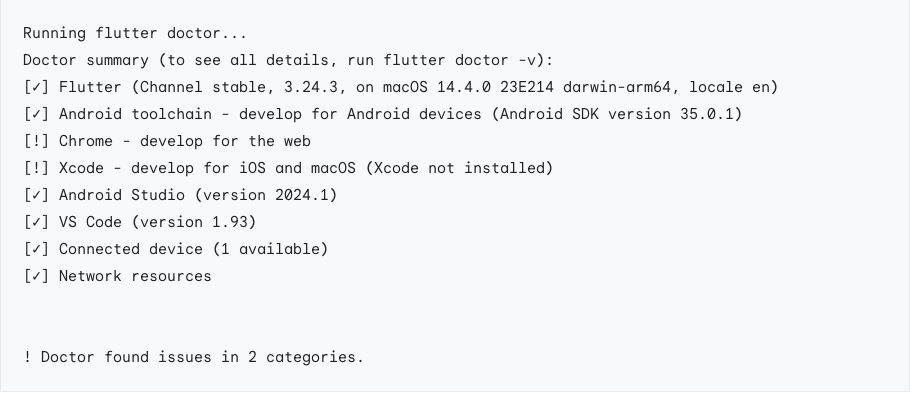
All set! To ensure everything is working correctly, enter the following command in the terminal.
flutter doctor -
Open the App Store and sign in.
-
Search for Xcode.
-
Click Install.
-
The Xcode installer takes up 6+ GB of storage. The download might take some time.
-
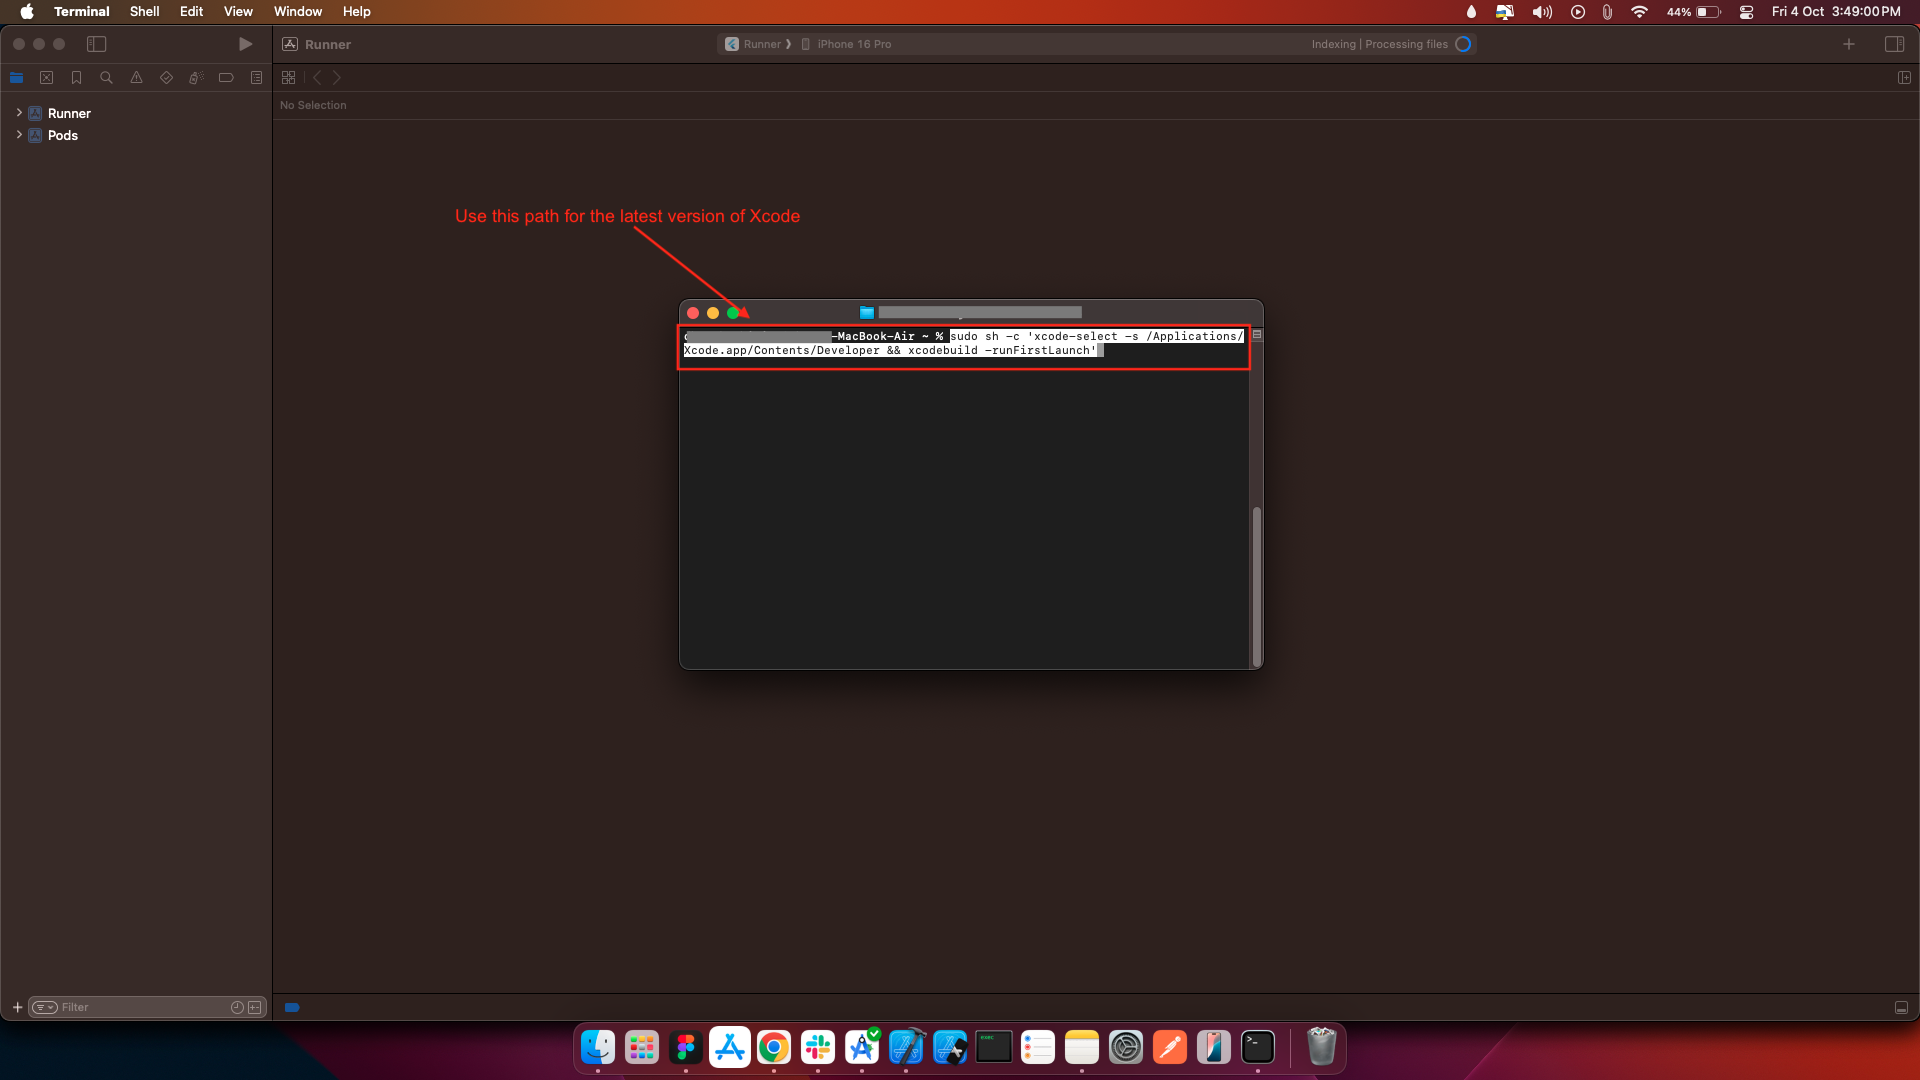
To configure the command-line tools to use the installed version of Xcode, use the following commands.
-
Use this path for the latest version of Xcode. If you need to use a different version, specify that path instead.
-
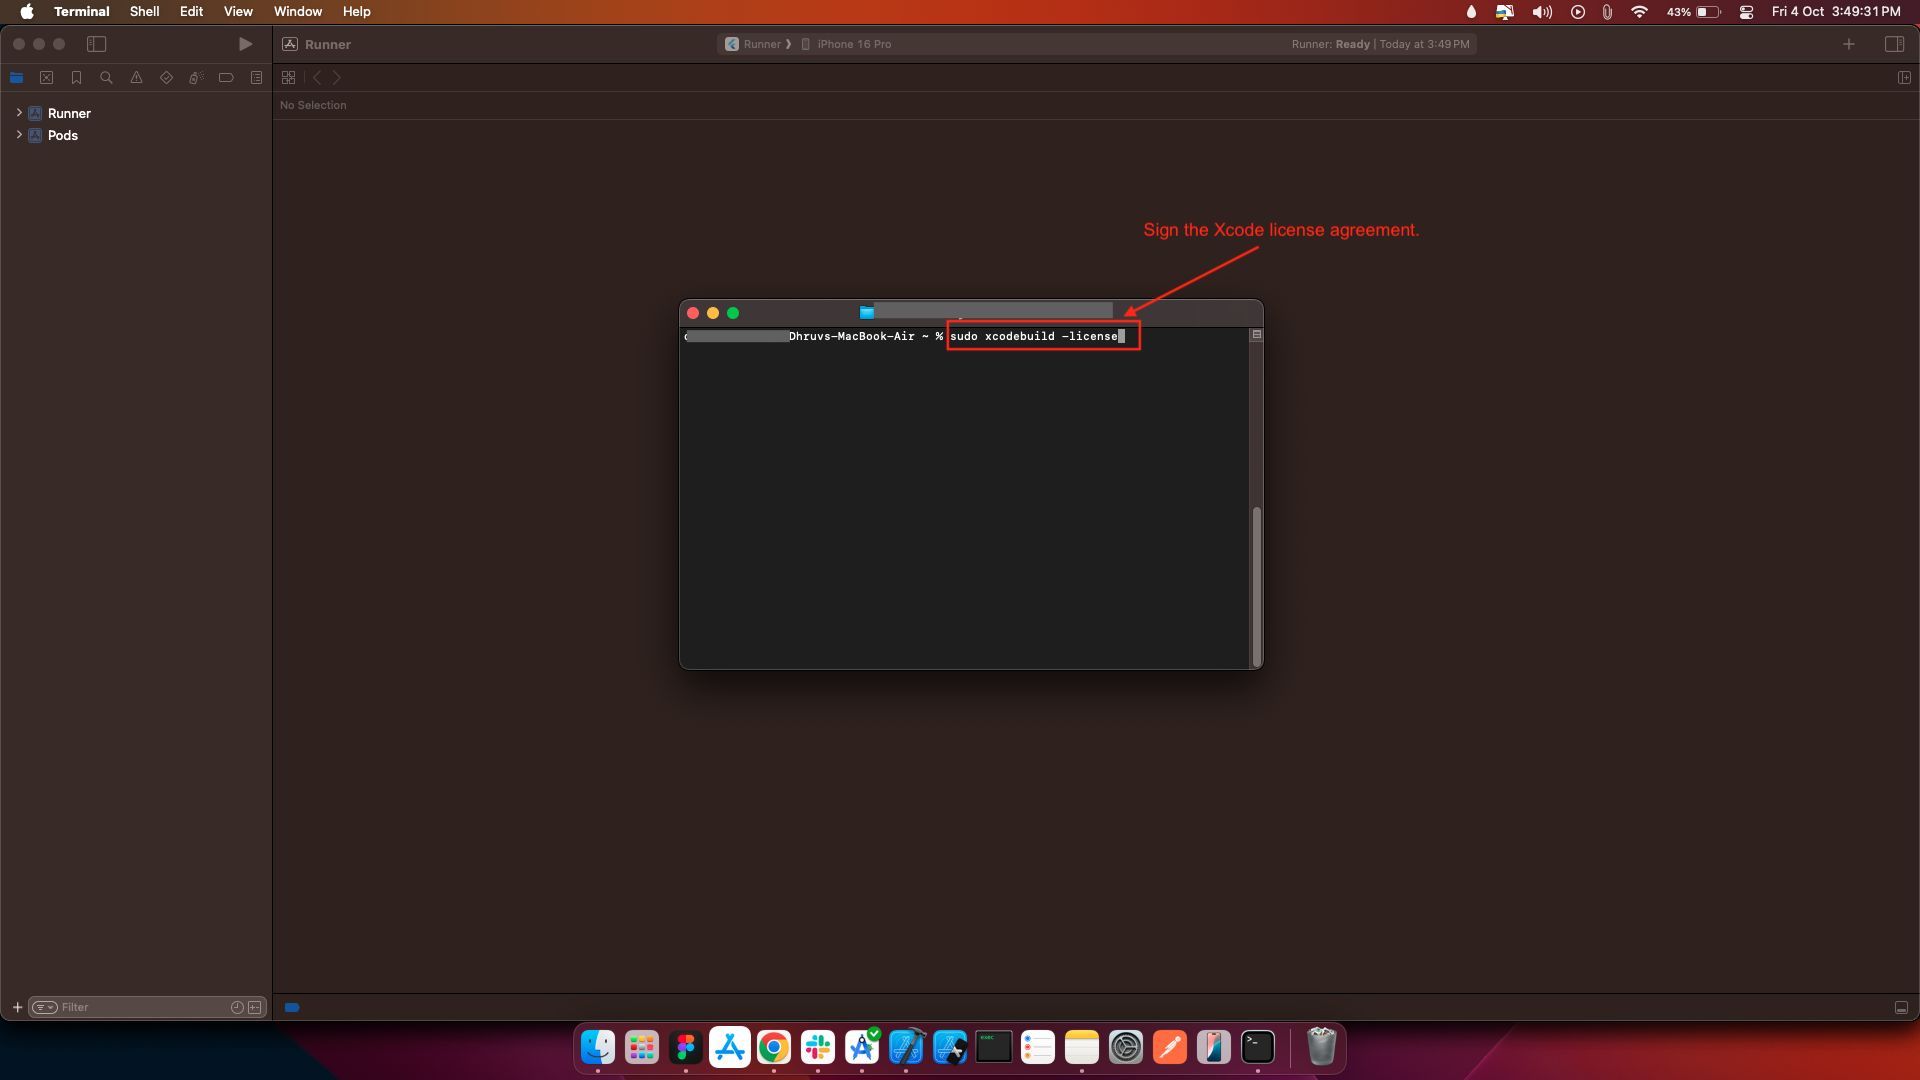
Sign the Xcode license agreement.
-
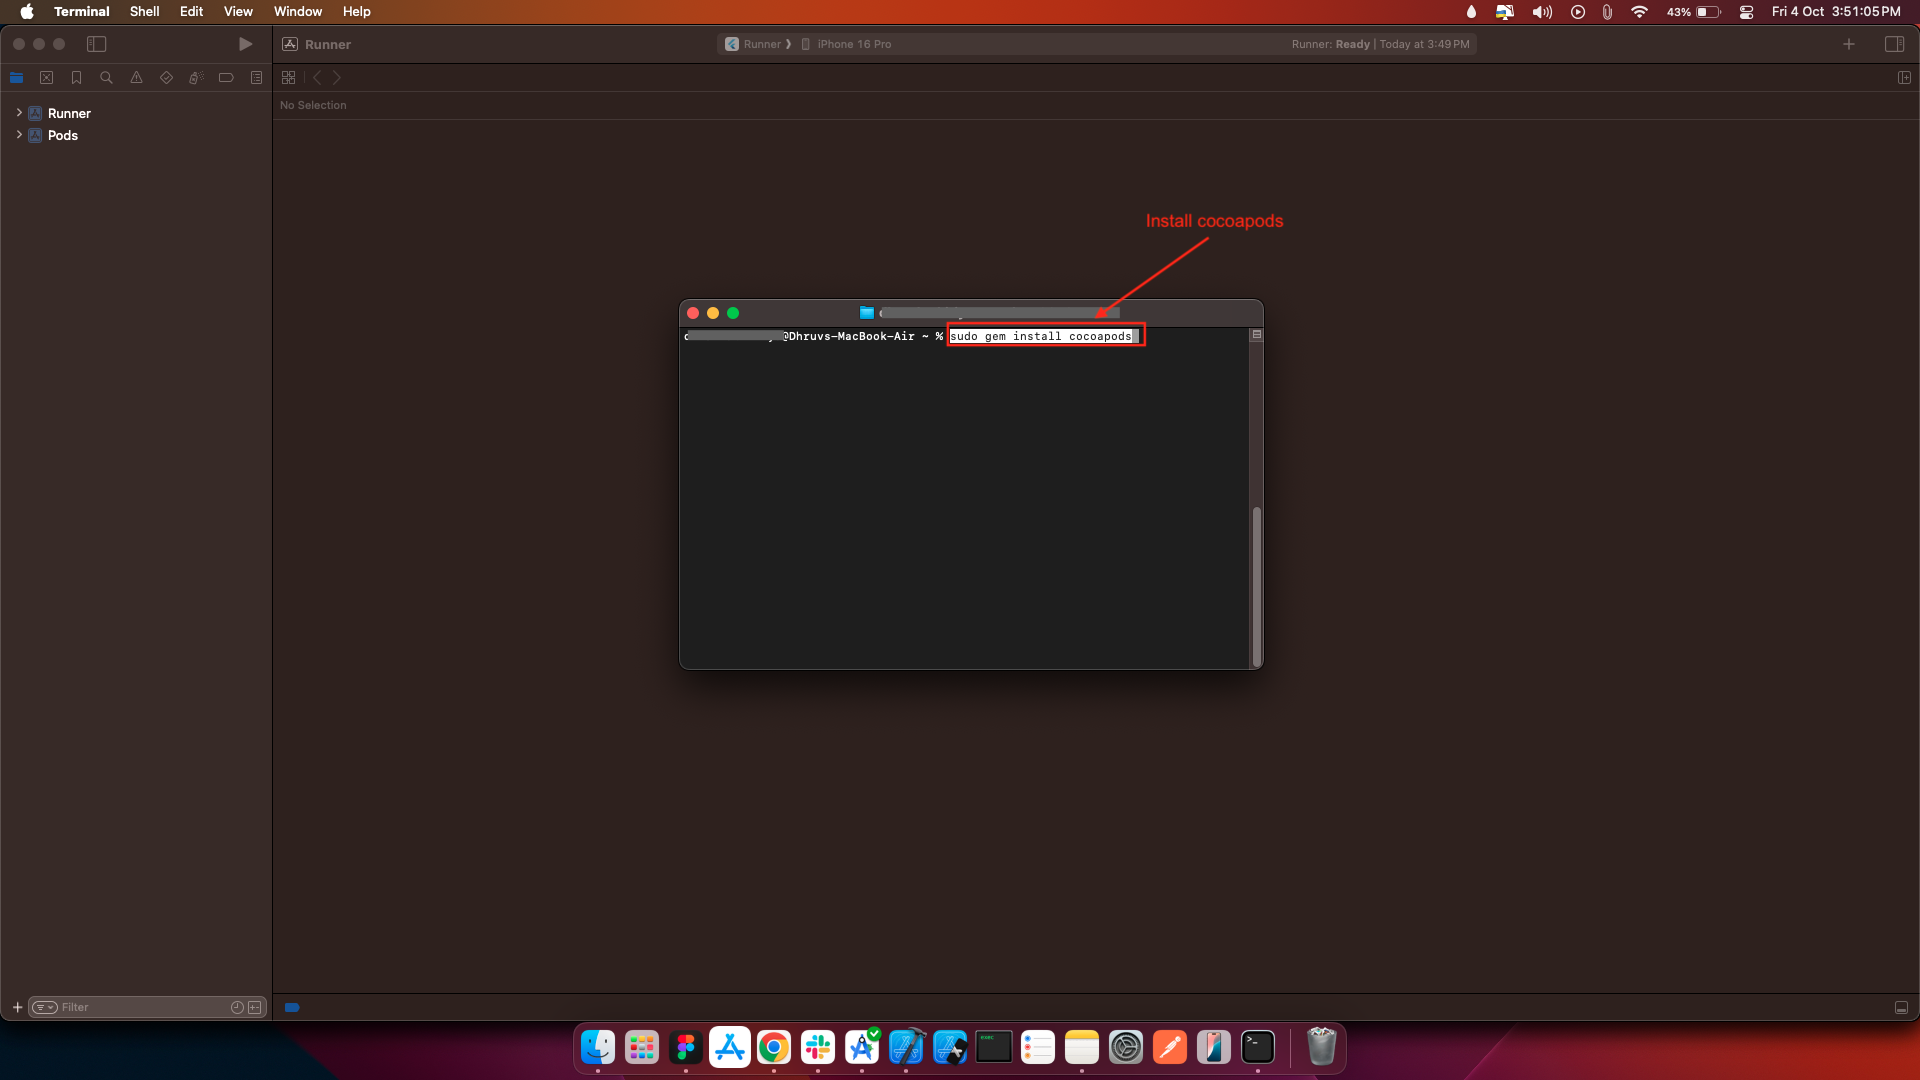
Install cocoapods following the CocoaPods install guide.
-
Open your Terminal.
-
To verify your installation of all the components, run the following command.
-
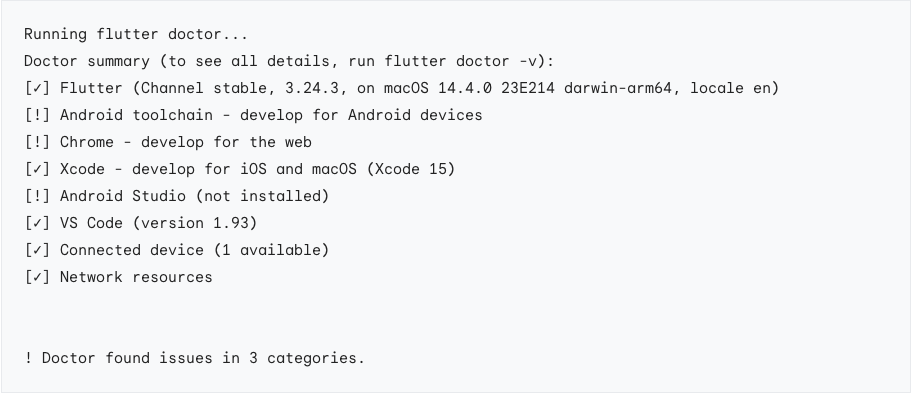
As you chose to develop for iOS, you do not need all components. If you followed this guide, the result of your command should resemble:
-
⚠️ Note : : If you do not configure iOS development : link
-
Open an elevated console window.
-
Run the following command to enable signing licenses.
-
Right click and click show package contents
-
Create a new folder called jre
-
Copy the contents of the jbr folder and paste them into jre folder
-
Open your Terminal.
-
To verify your installation of all the components, run the following command.
-
As you chose to develop for Android, you do not need all components. If you followed this guide, the result of your command should resemble:
-
⚠️ Note : : If you do not configure Android development : link
-
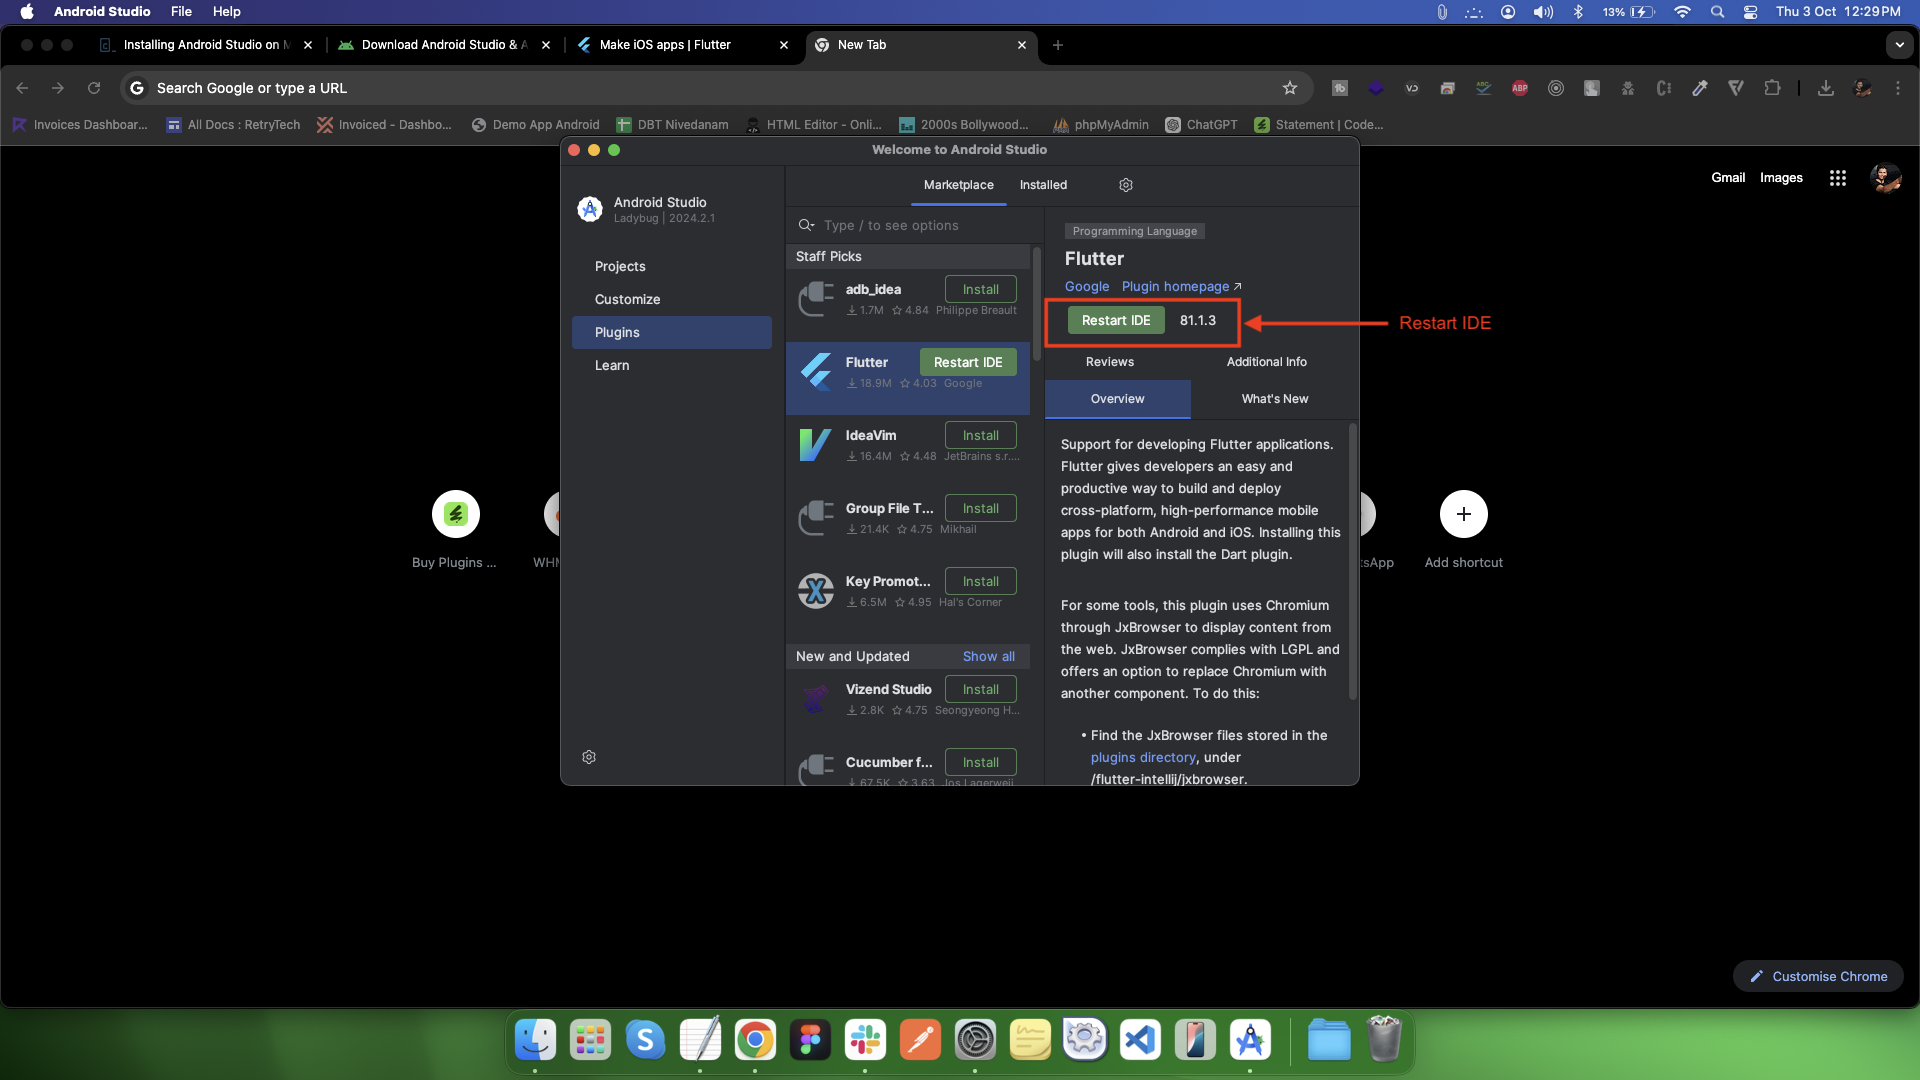
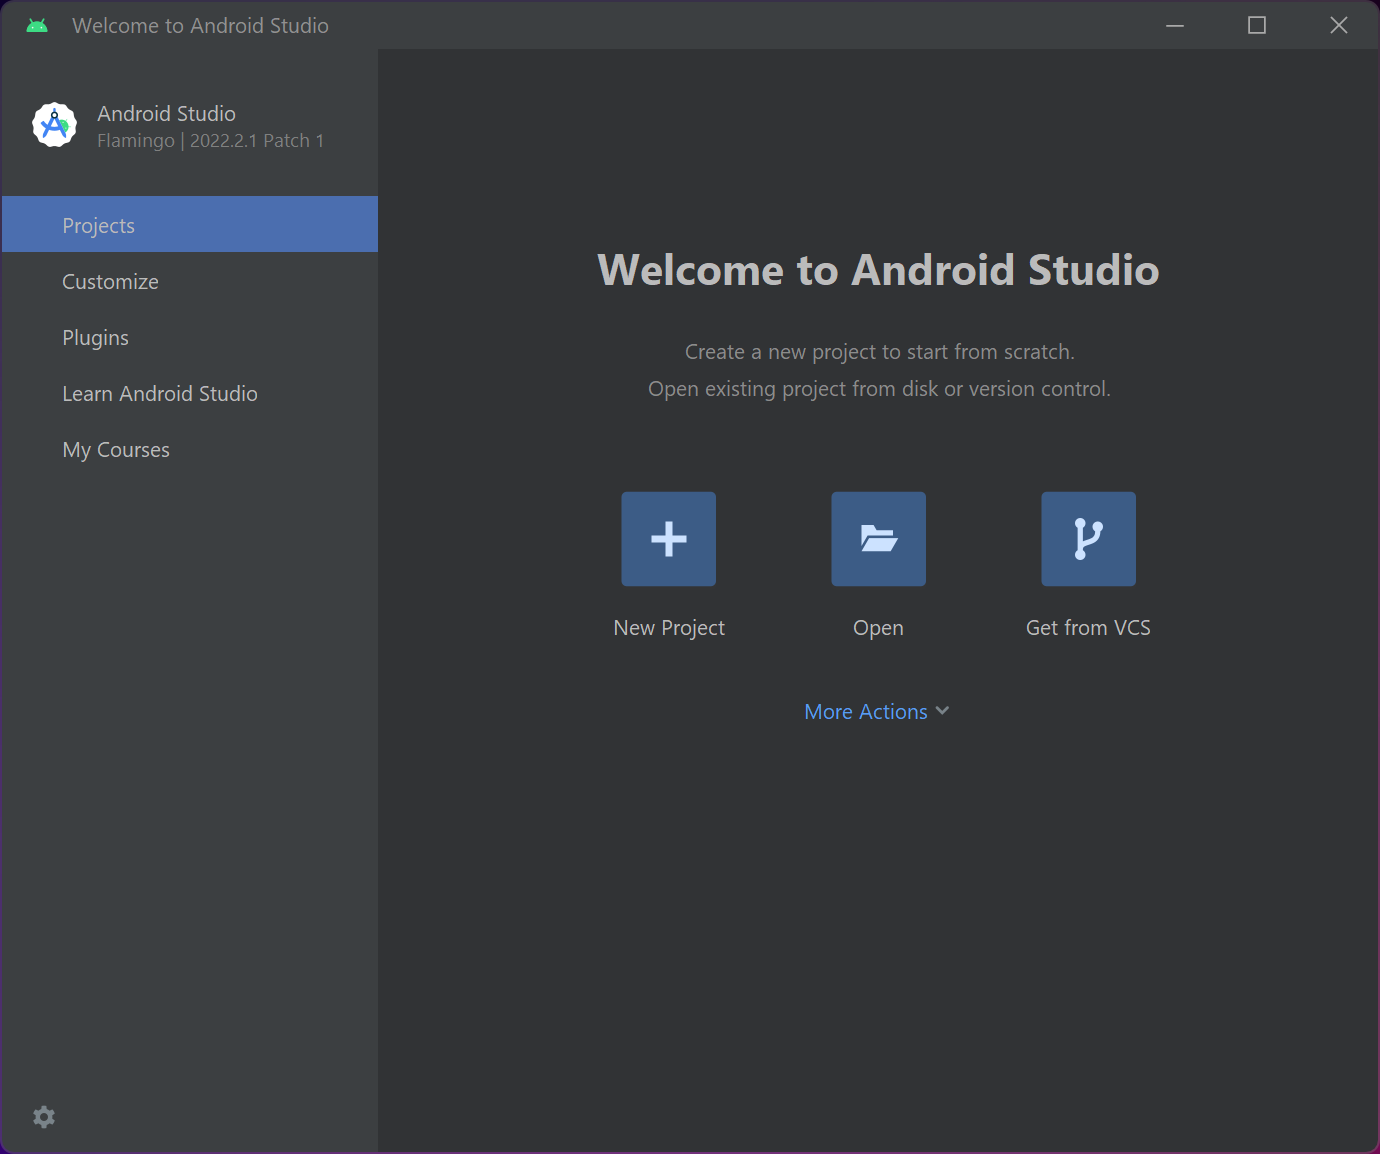
Download and install from Android Studio.
-
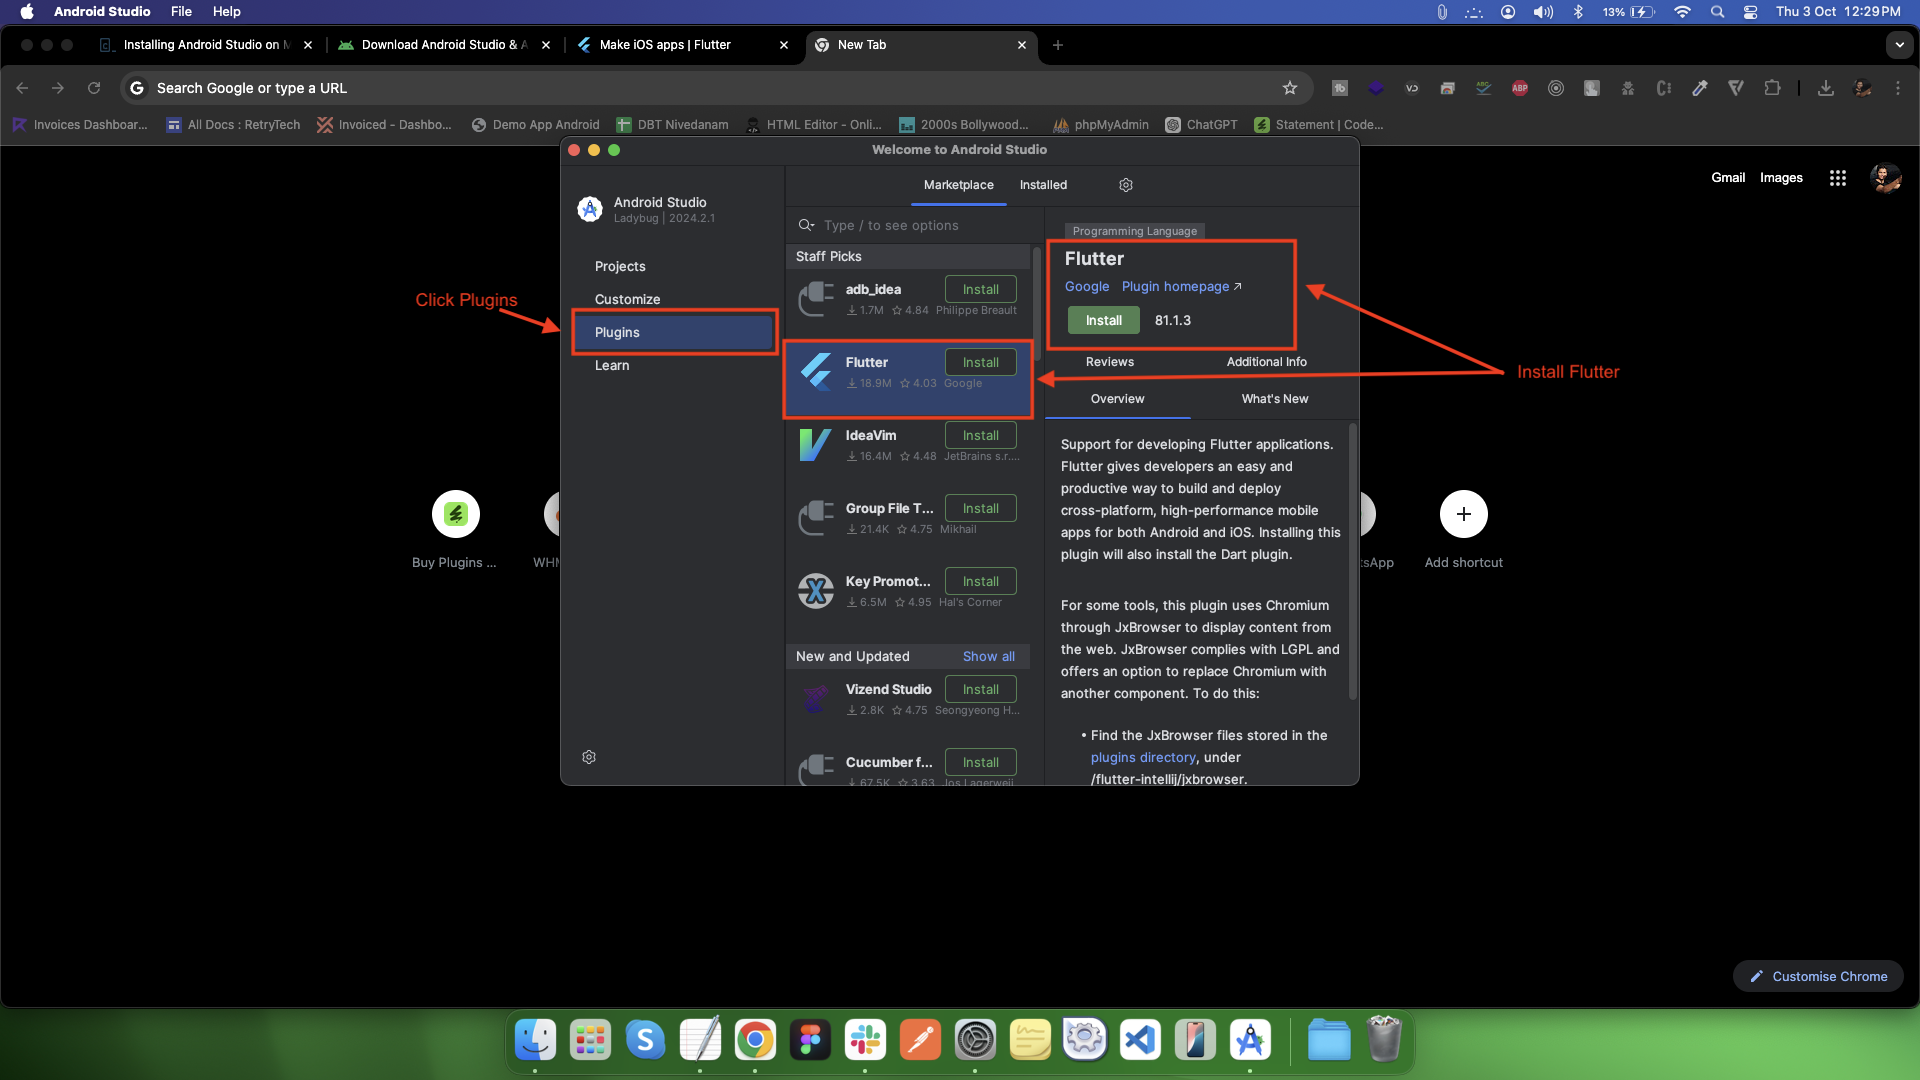
After installation, install the Flutter and Dart plugins from File > Settings > Plugins.
-
Extract the zip file to a desired location (e.g., C:\src\flutter).
-
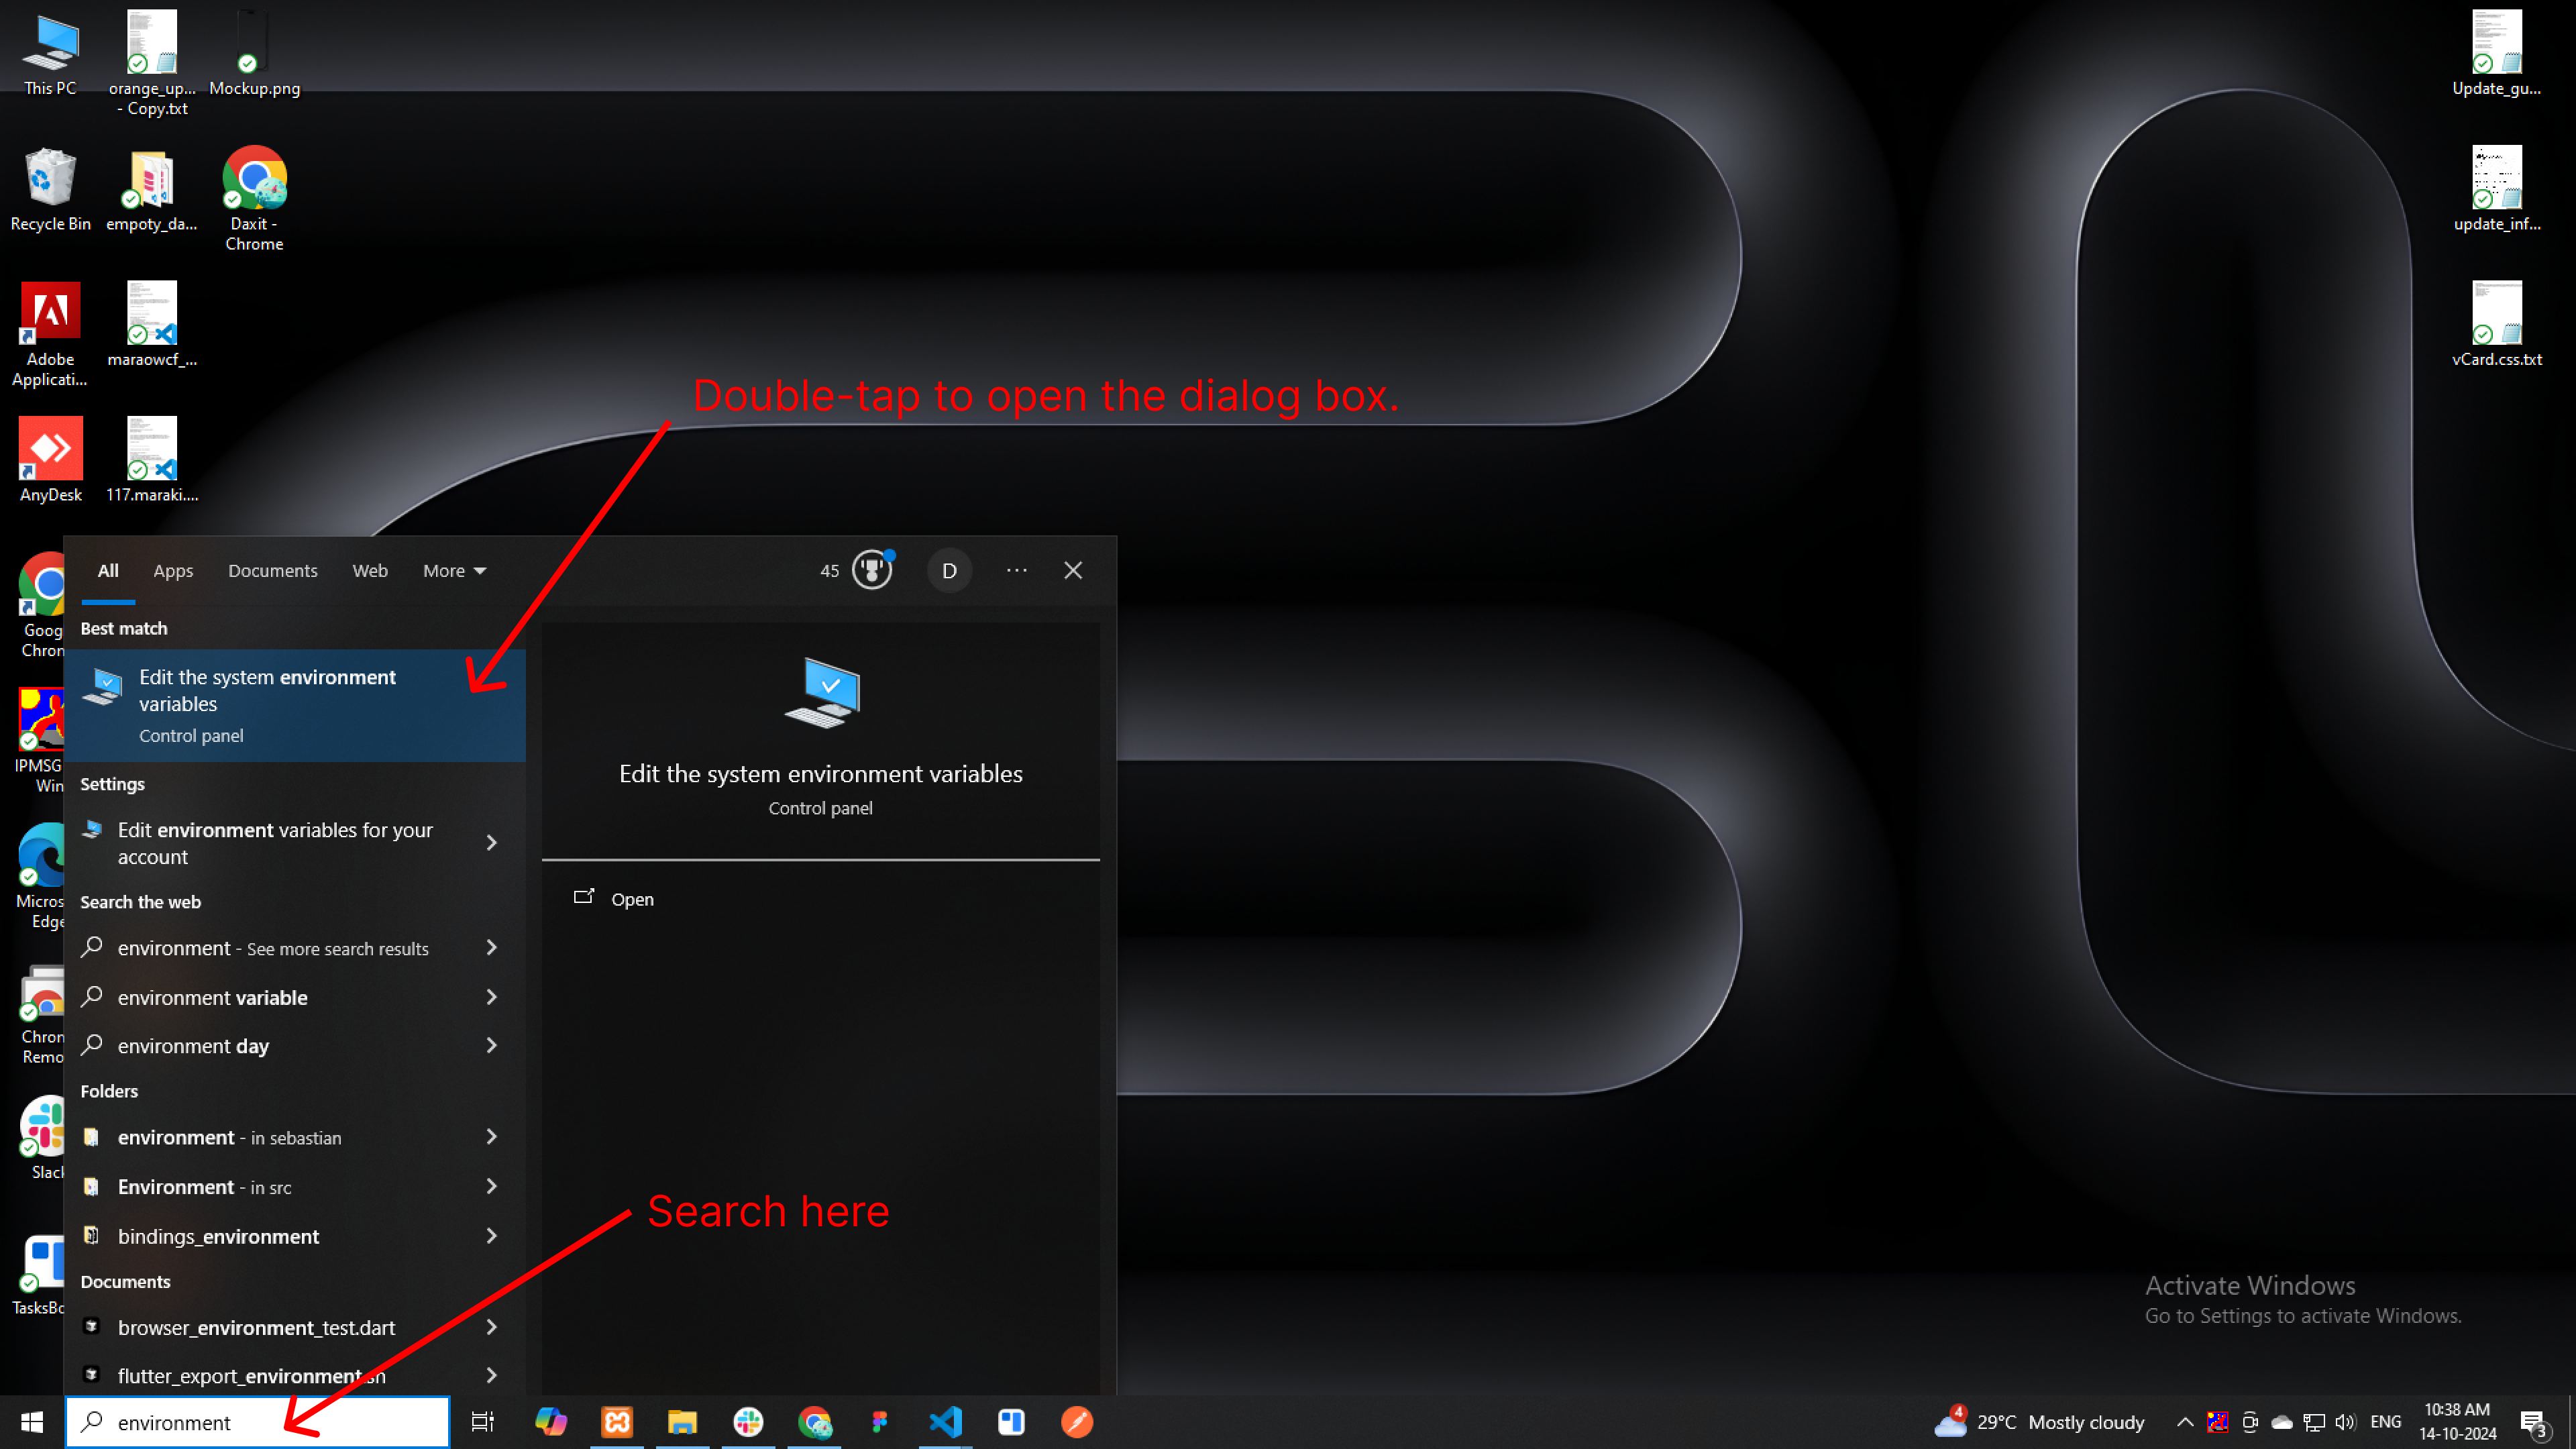
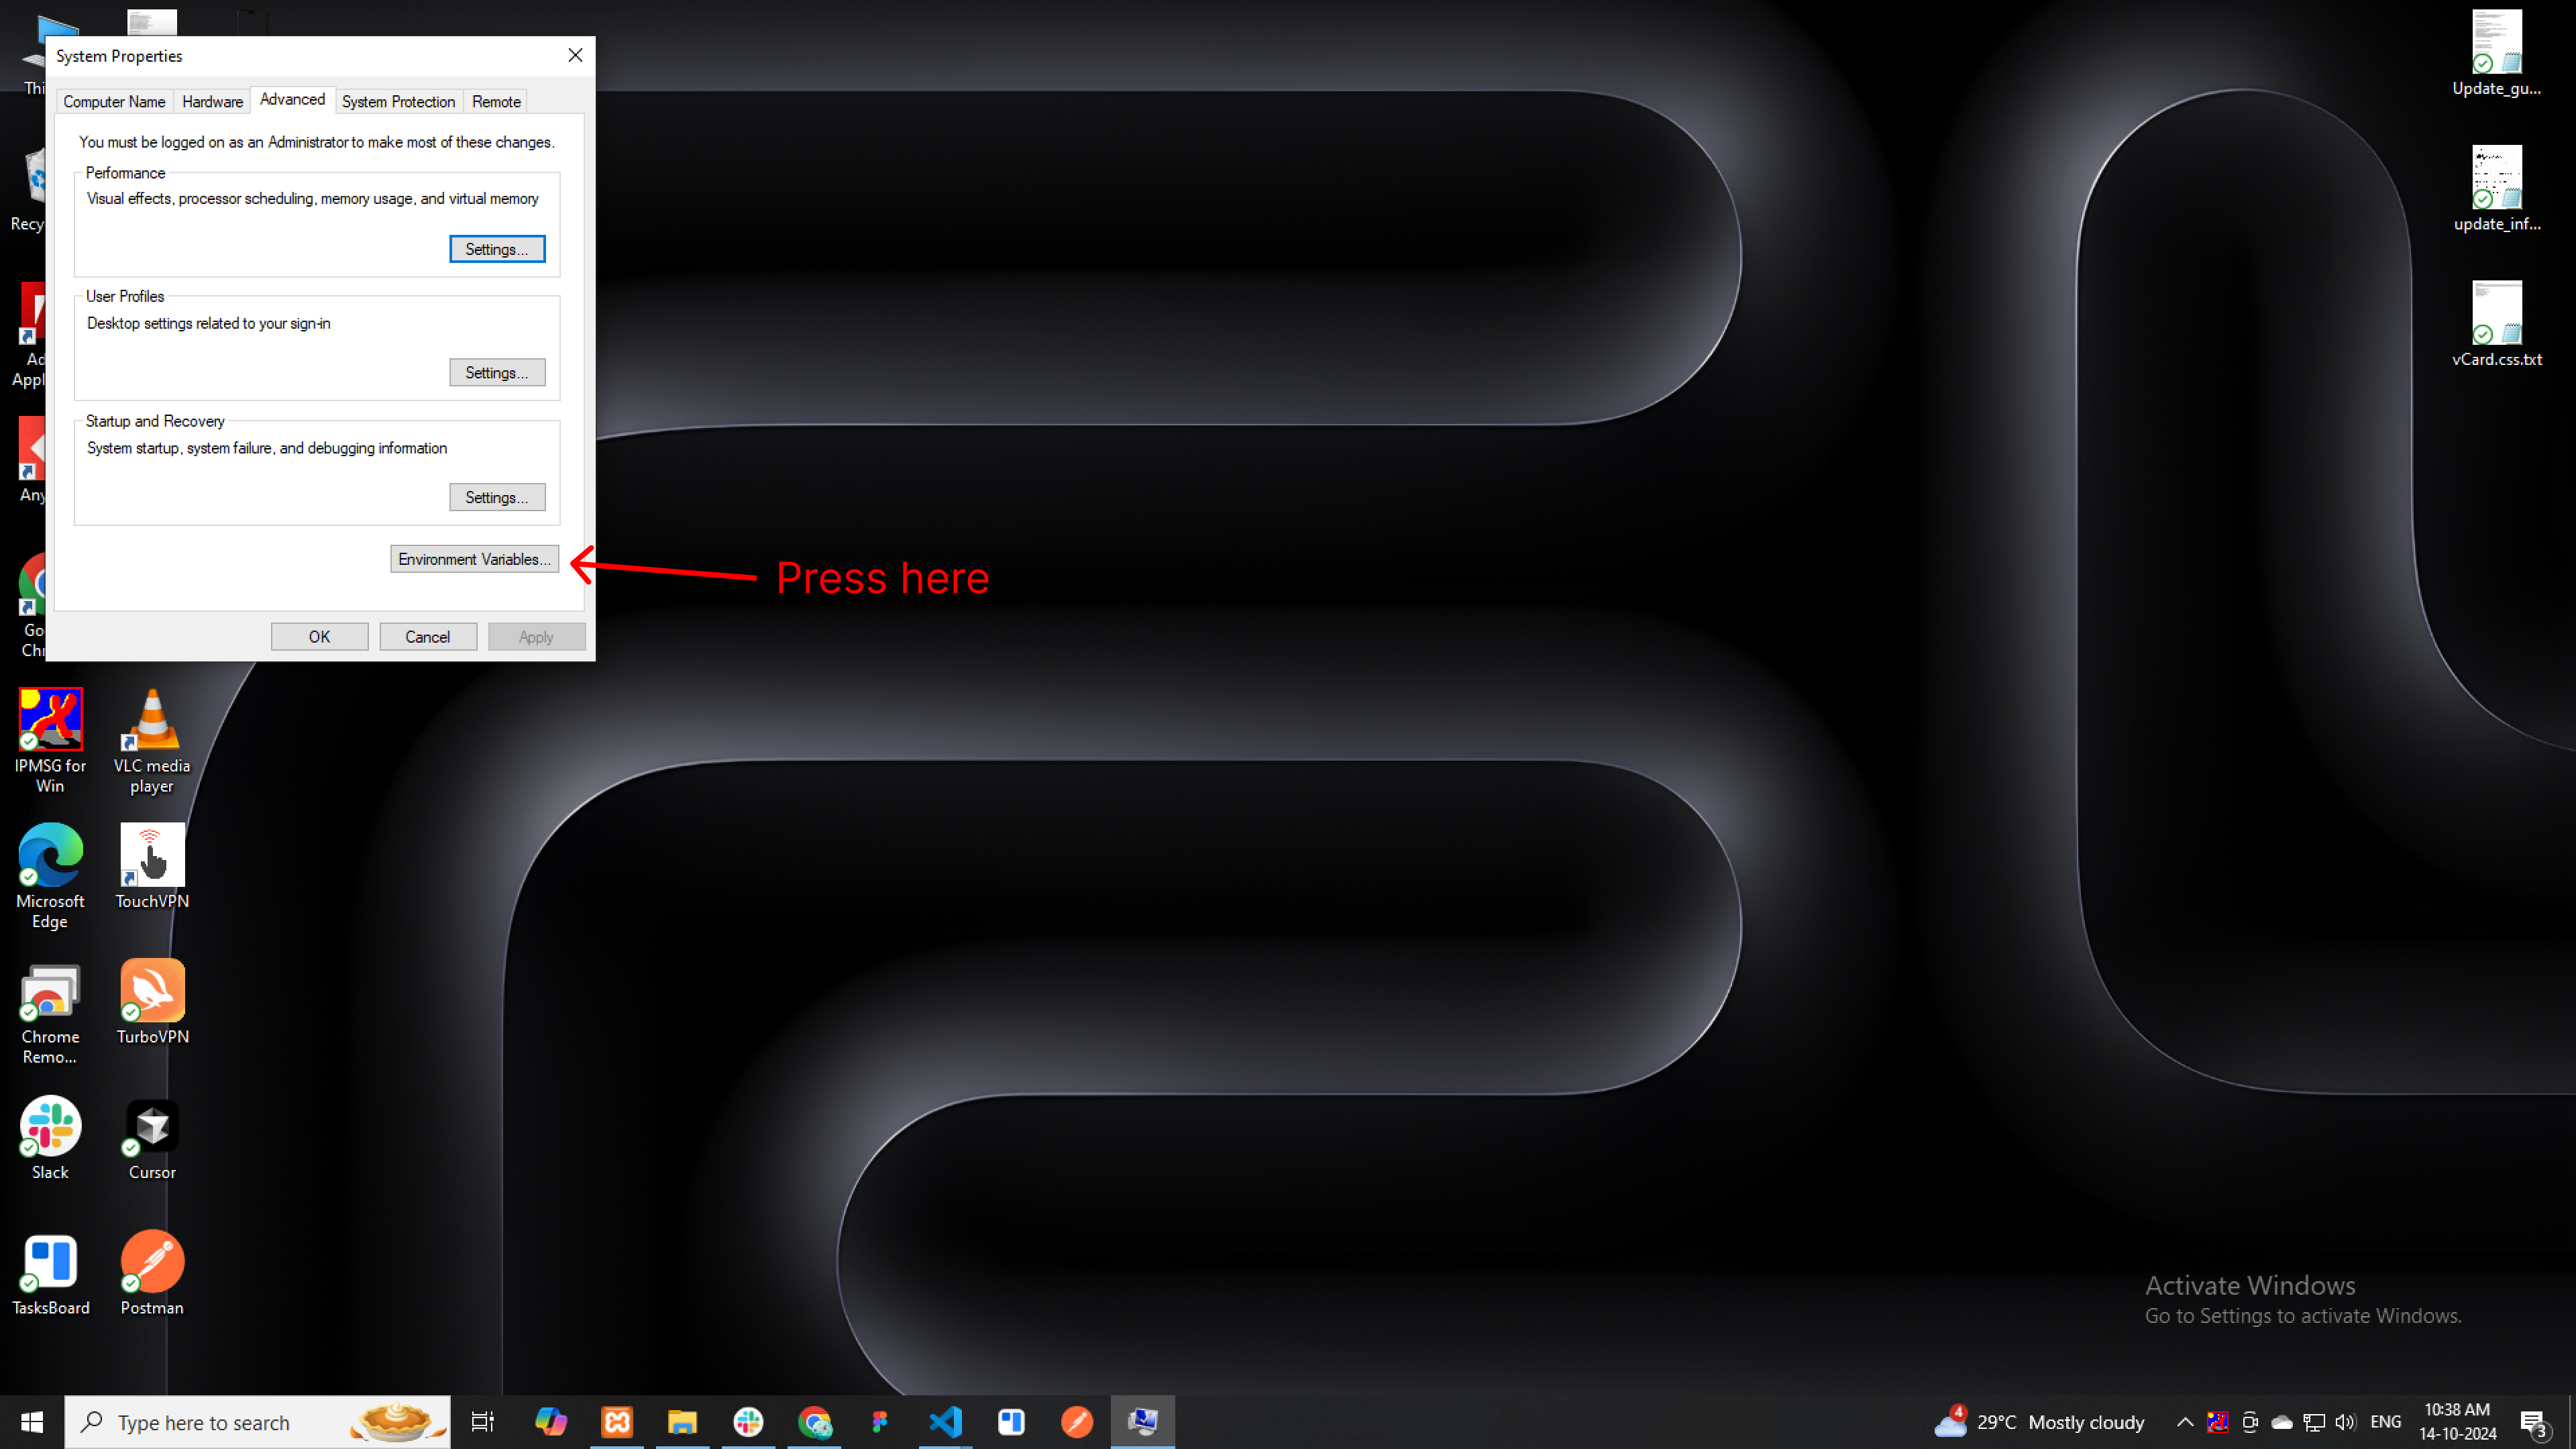
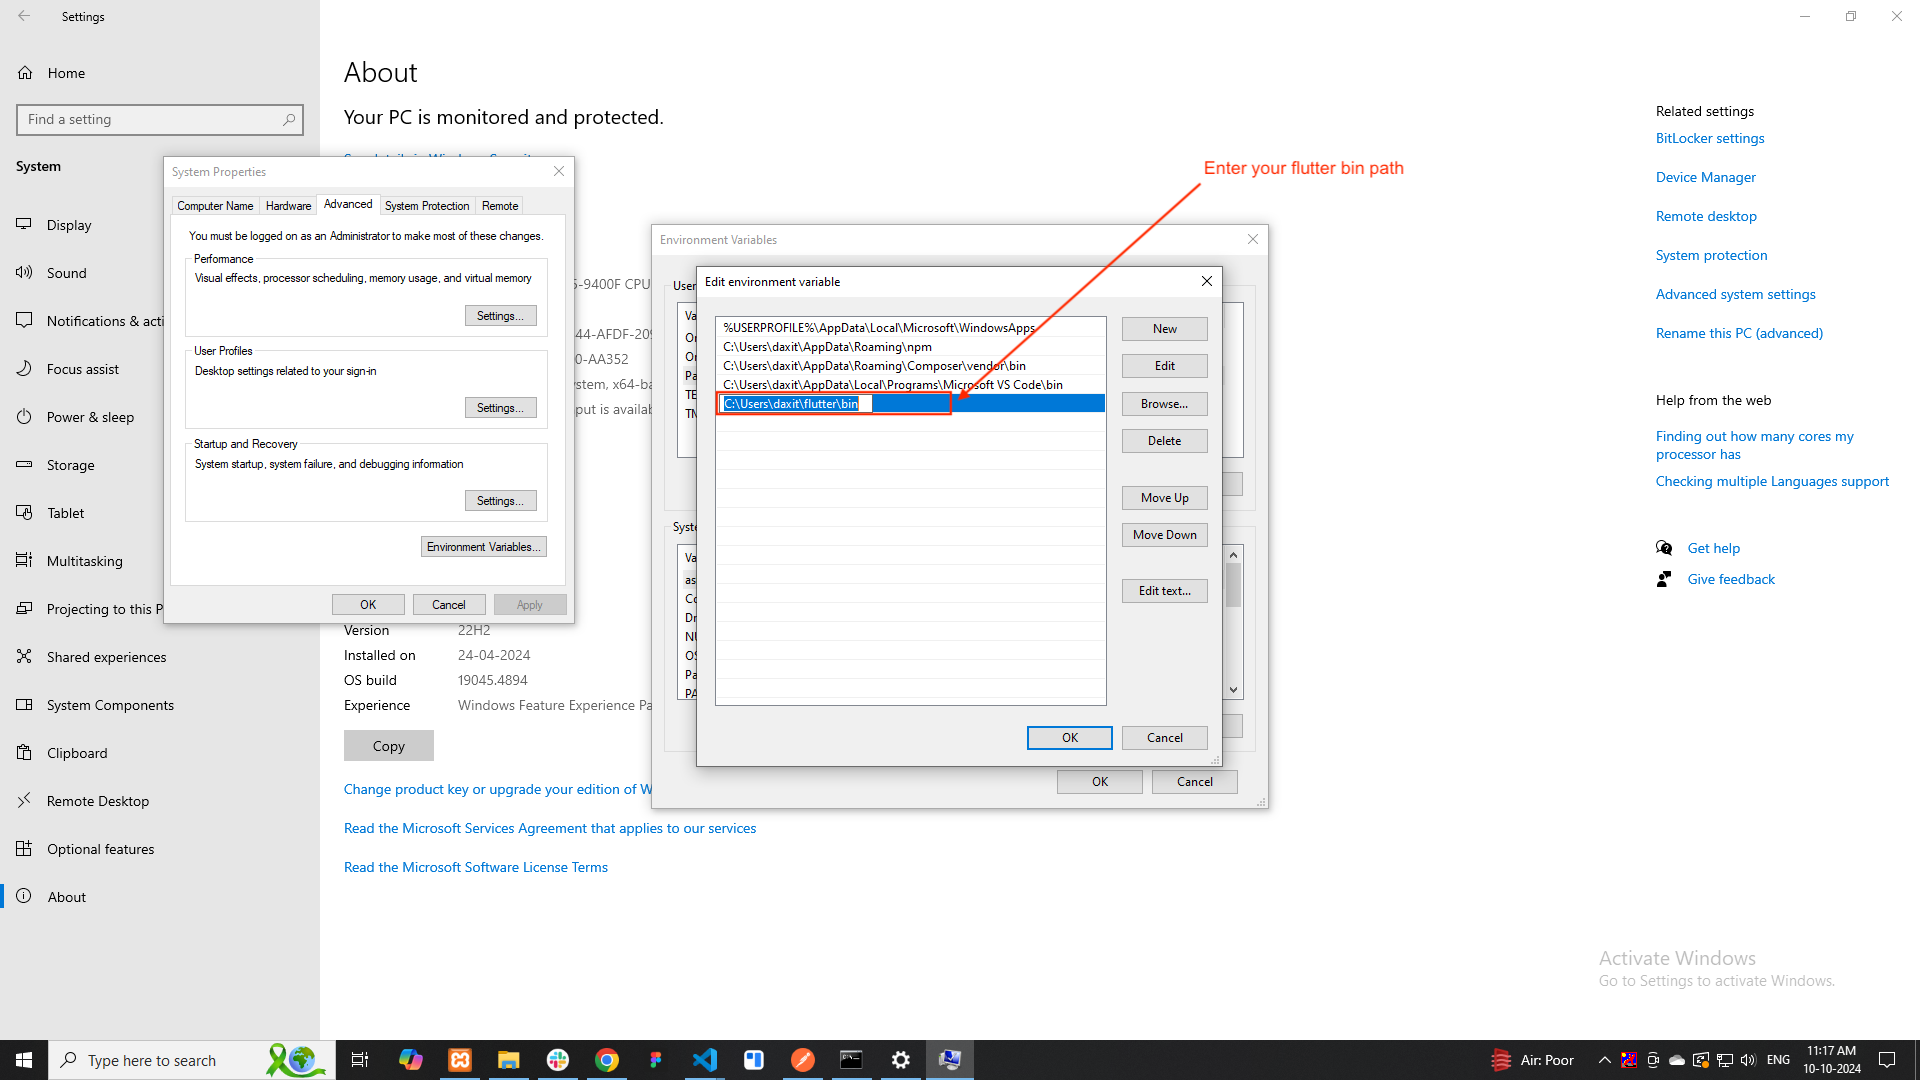
Update Your Path
- Open Start and search for Environment Variables.
- In the System Properties window, click Environment Variables.
- Under System variables, find the Path variable, and select it. Click Edit.
- Click New and add the path to the flutter\bin directory (e.g., C:\src\flutter\bin).
- Click OK to close all windows.
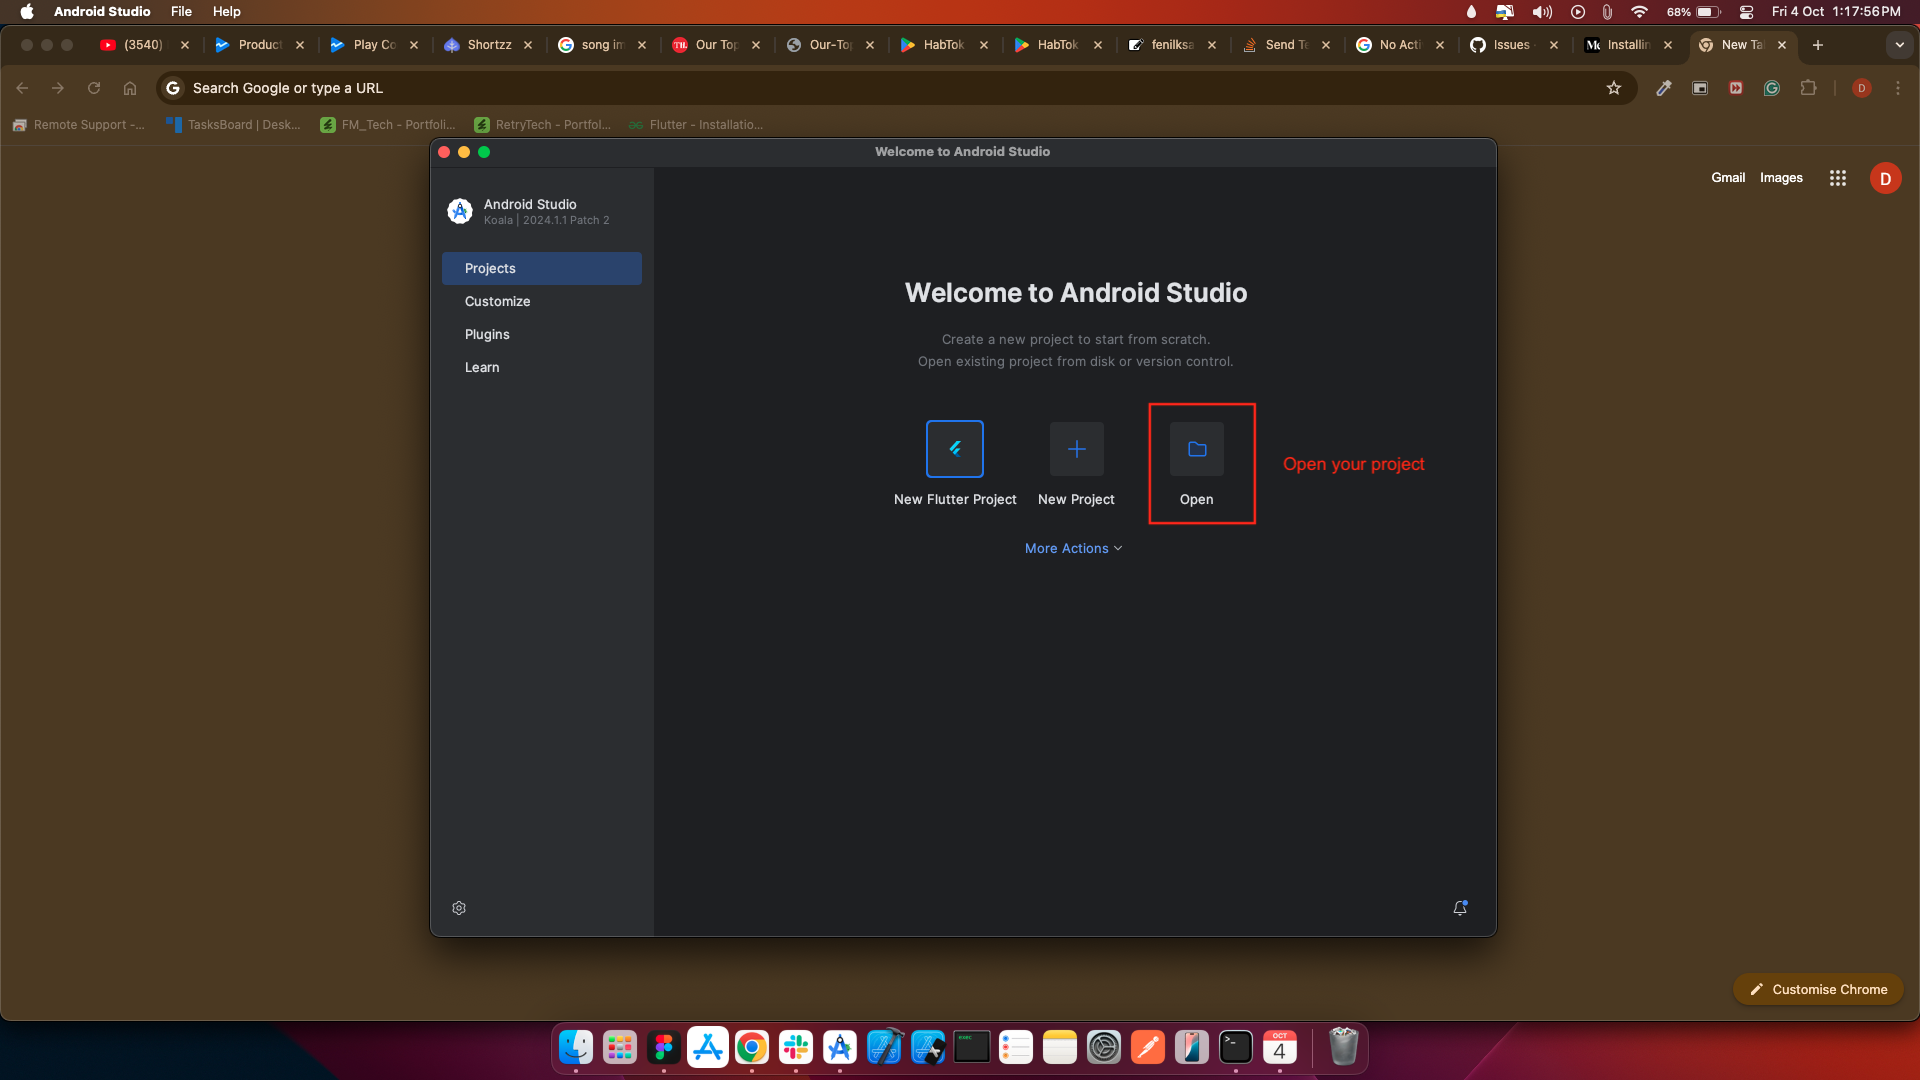
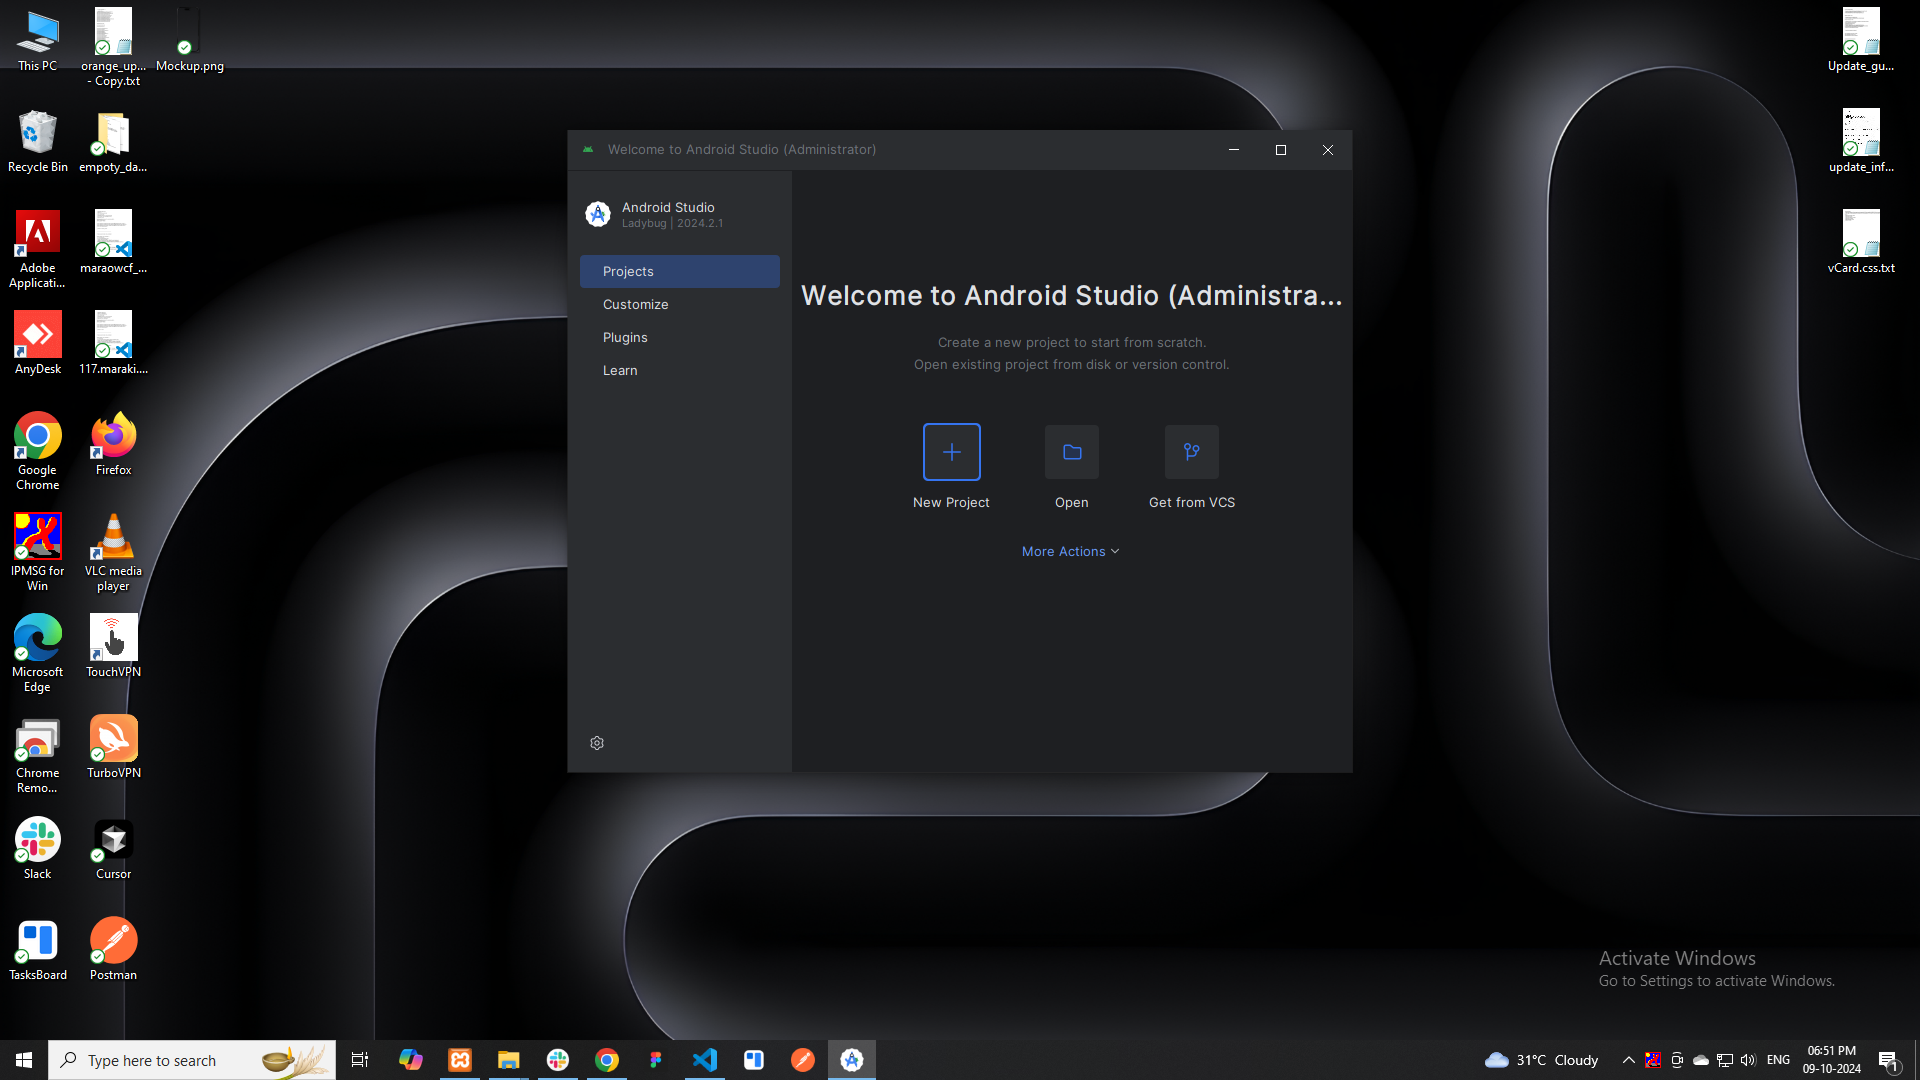
- Open android studio and click new project.
- Then top toolbar, click on File.
- Then click on Settings (or press Ctrl + Alt + S ).
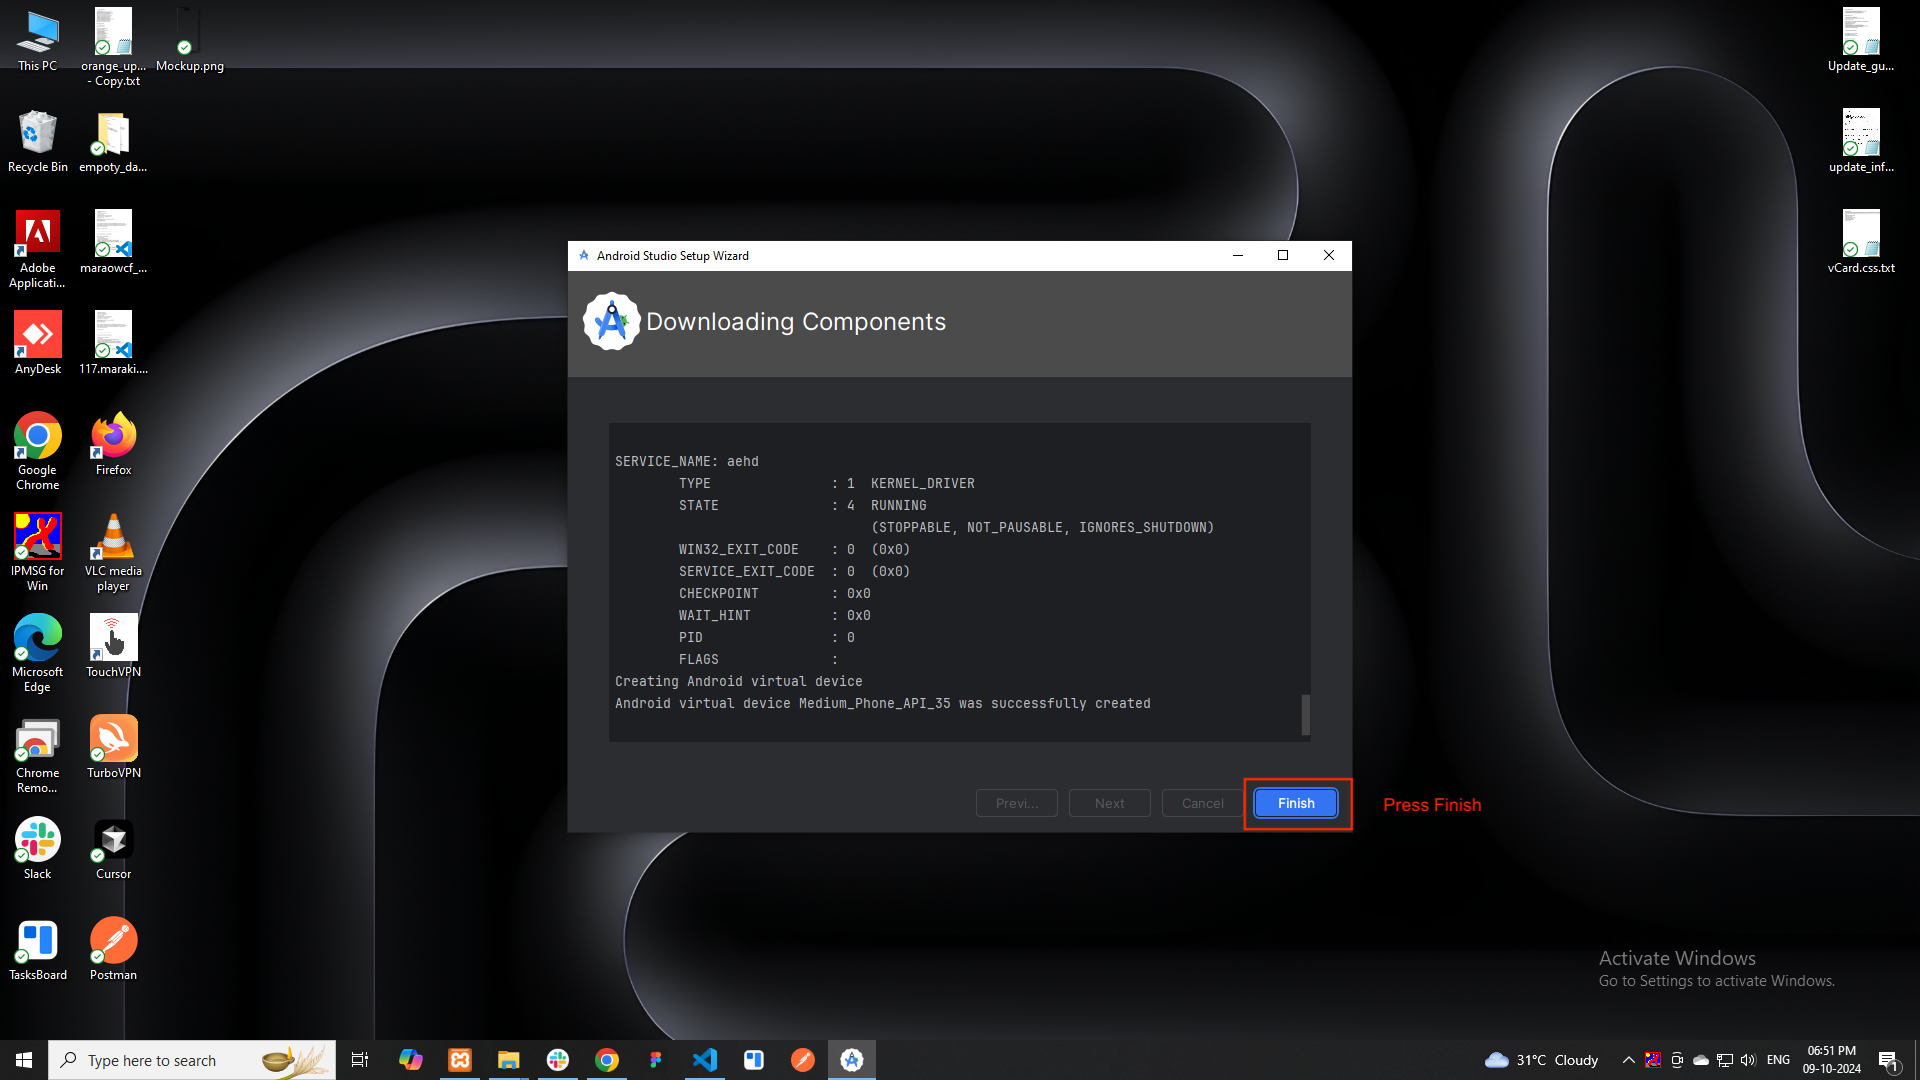
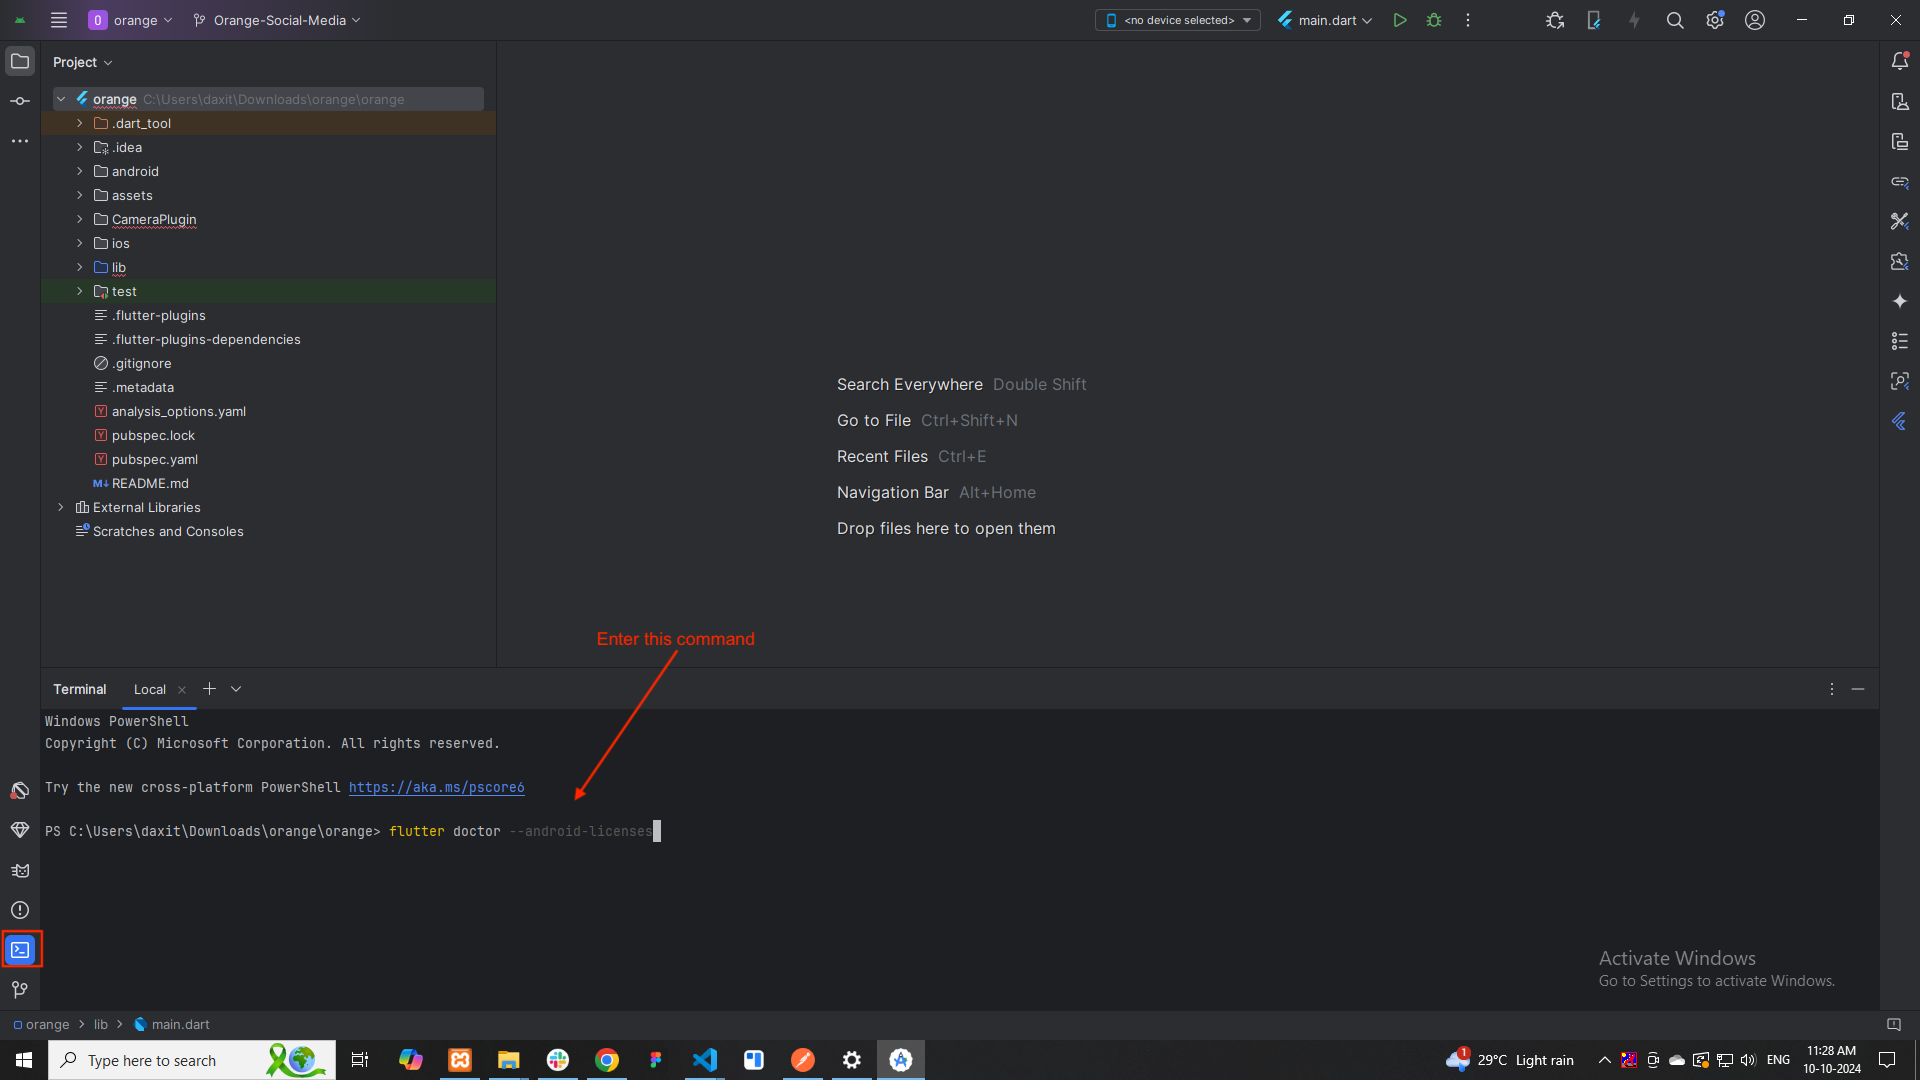
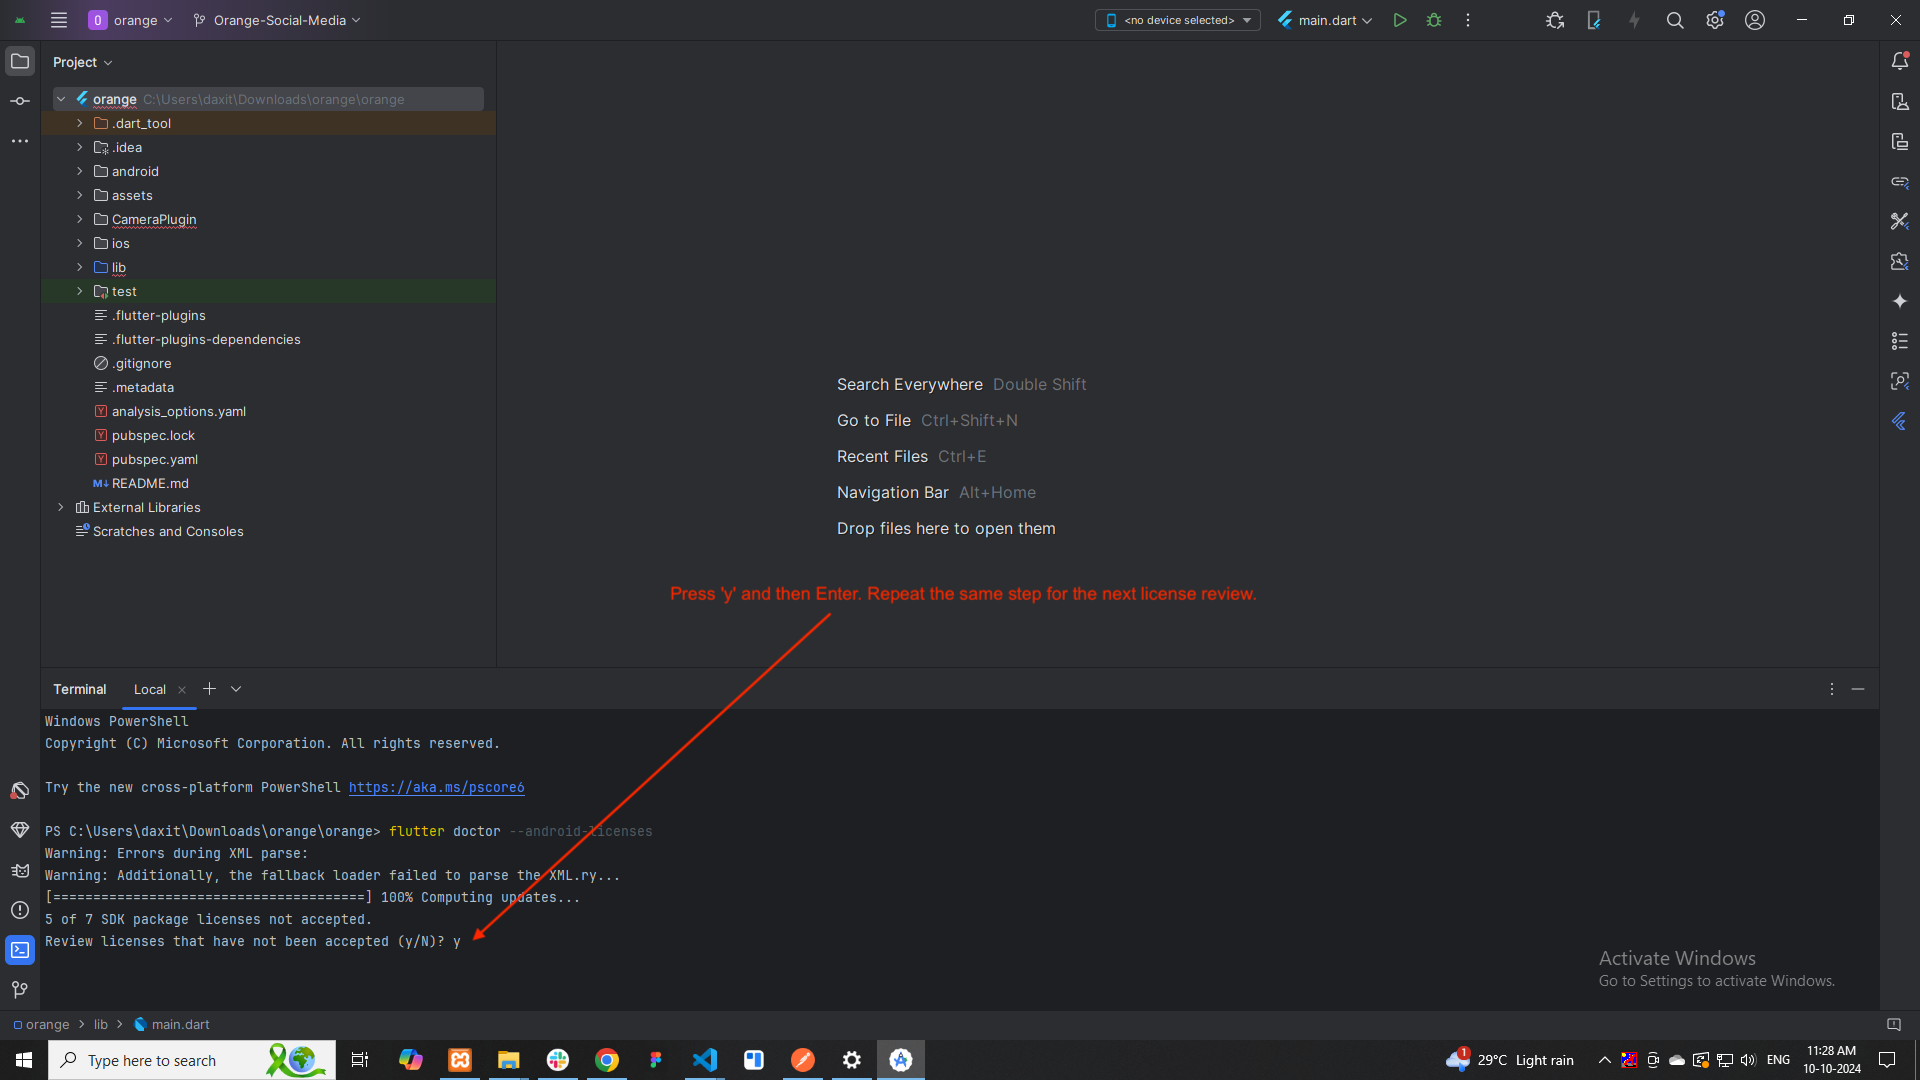
- In your terminal (Command Prompt or PowerShell), run the following command:
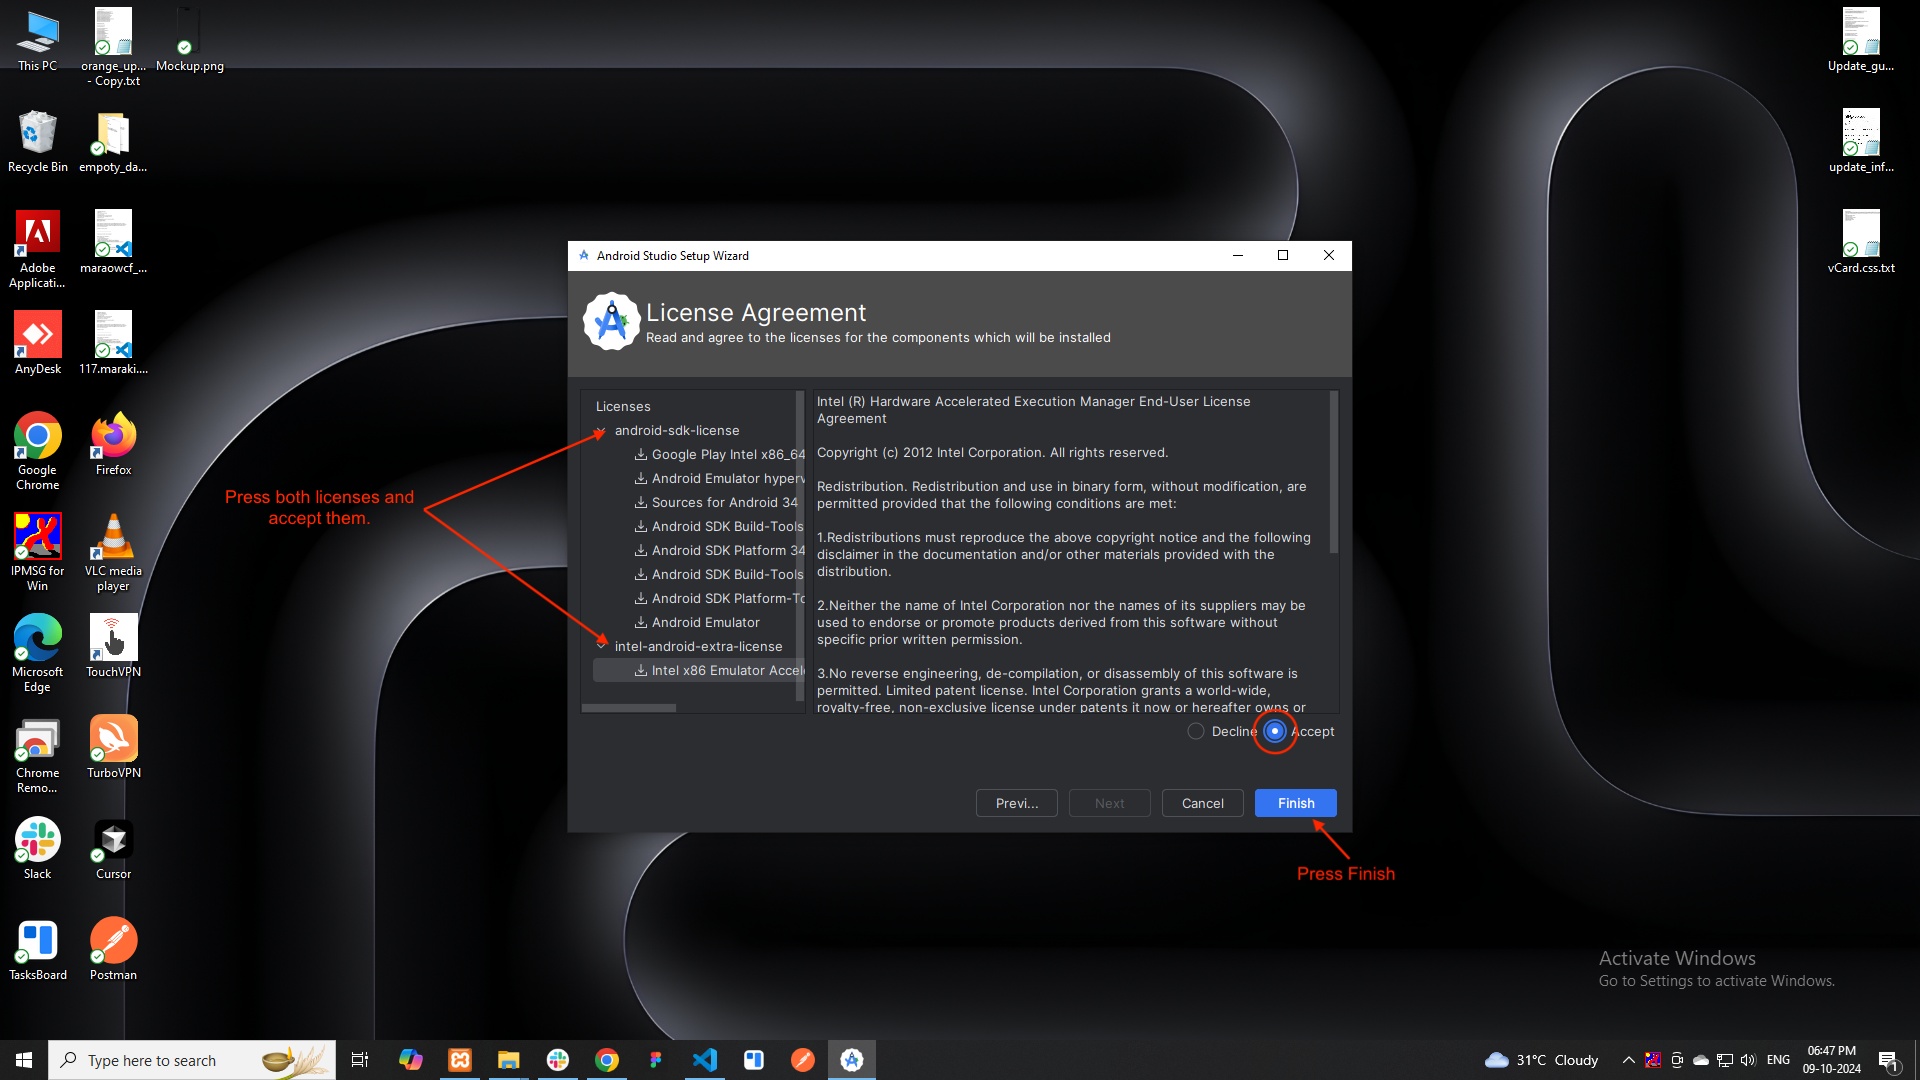
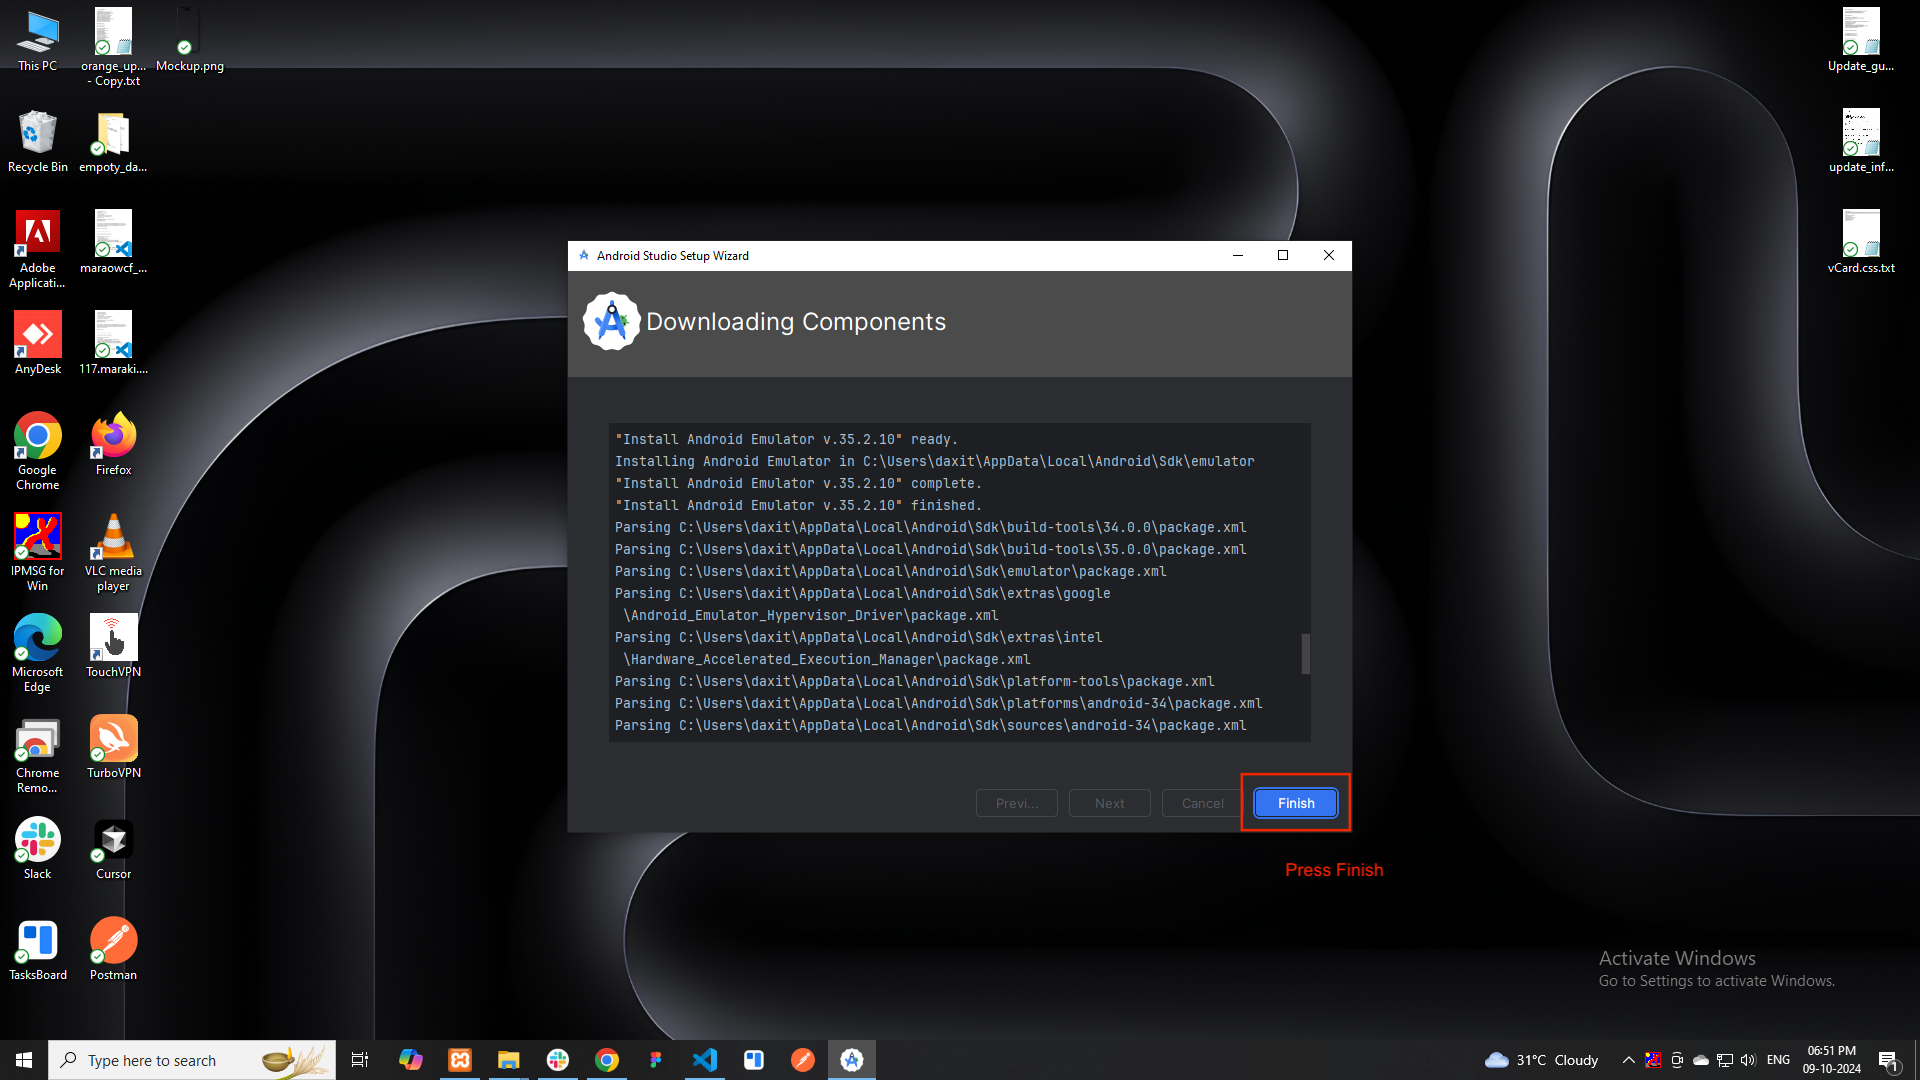
- You will be prompted to review and accept each of the Android SDK licenses.
- Press y for "yes" to accept the licenses as they appear.
-
⚠️ Note : : If you do not configure flutter SDK : link
For Mac :

Install the Flutter SDK
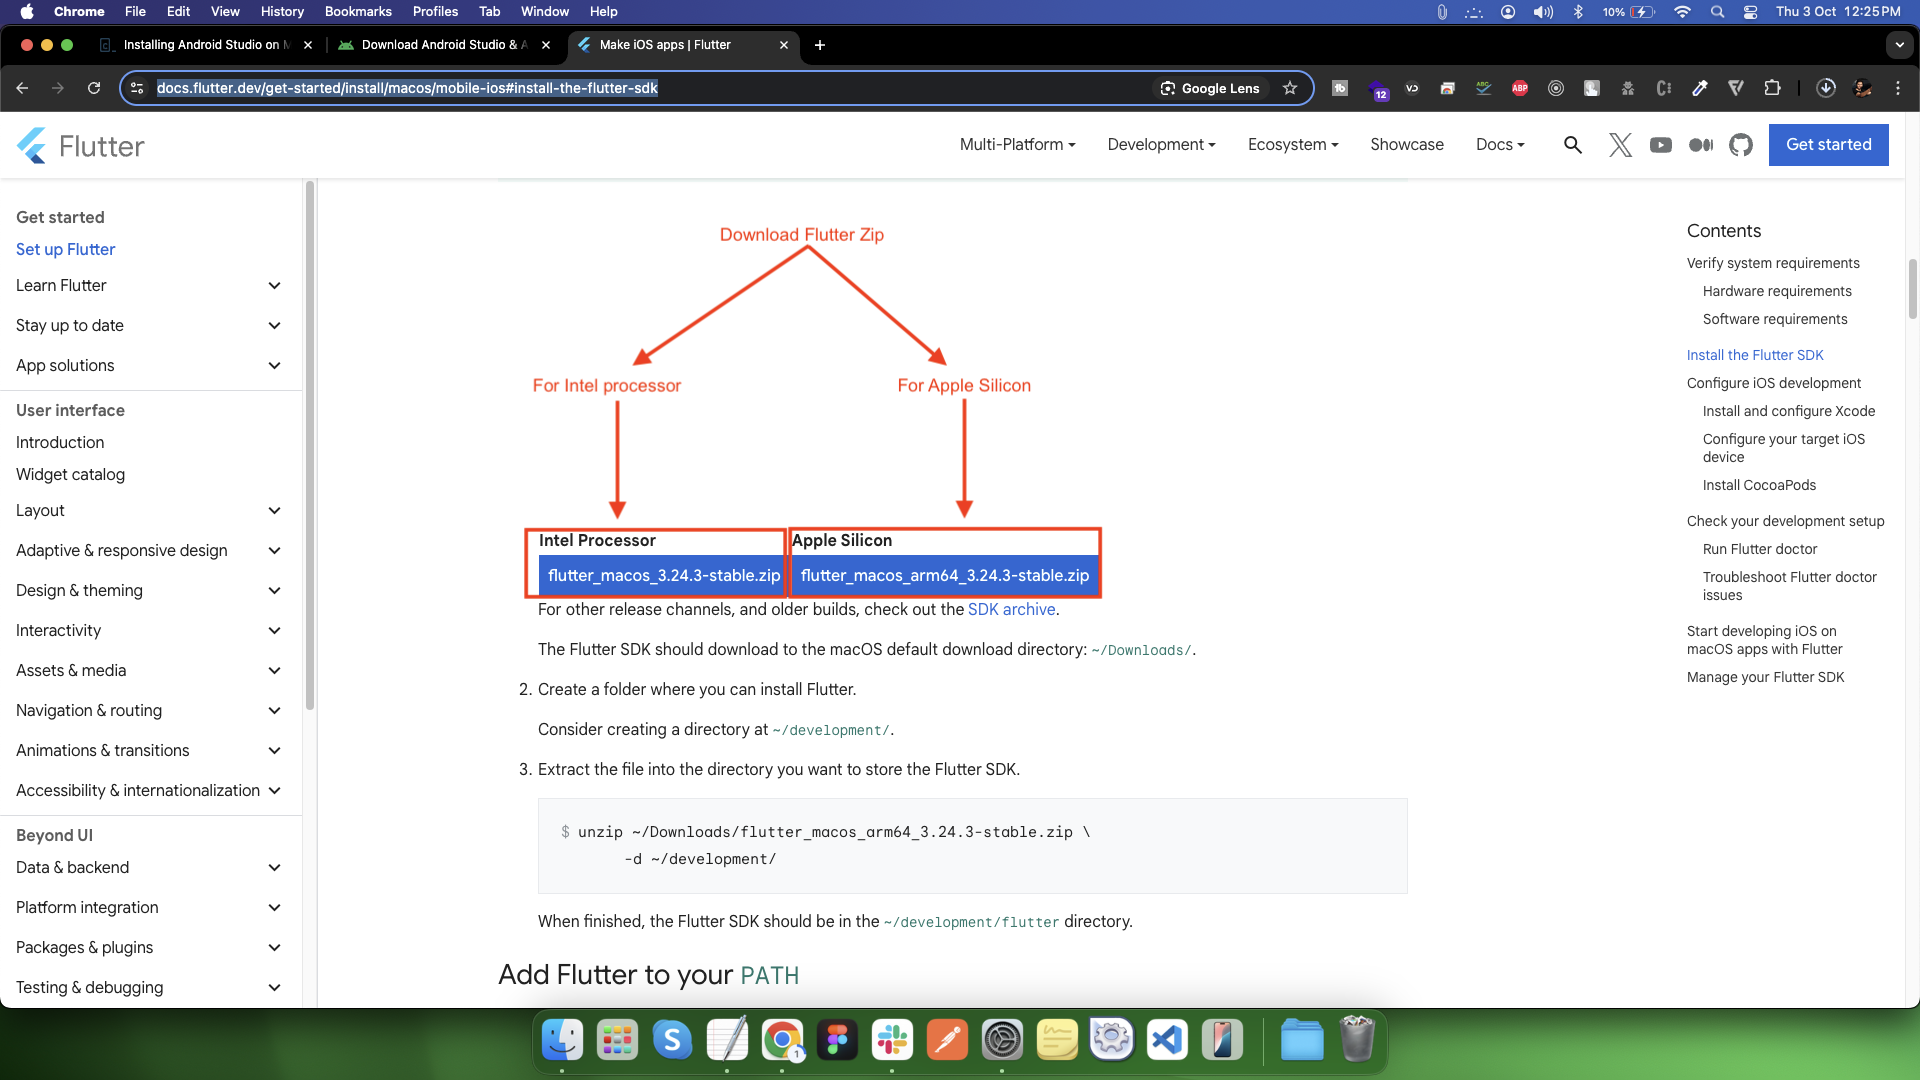
unzip ~/Downloads/flutter_macos_arm64_3.24.3-stable.zip \ -d ~/development/
Add Flutter to your PATH


Configure iOS development
Install and configure Xcode
To develop Flutter apps for iOS, install Xcode to compile to native bytecode.
sudo sh -c 'xcode-select -s /Applications/Xcode.app/Contents/Developer && xcodebuild -runFirstLaunch'
sudo xcodebuild -license
Install CocoaPods
sudo gem install cocoapods
Configure your target iOS device
With Xcode, you can run Flutter apps on an iOS device or on the simulator.
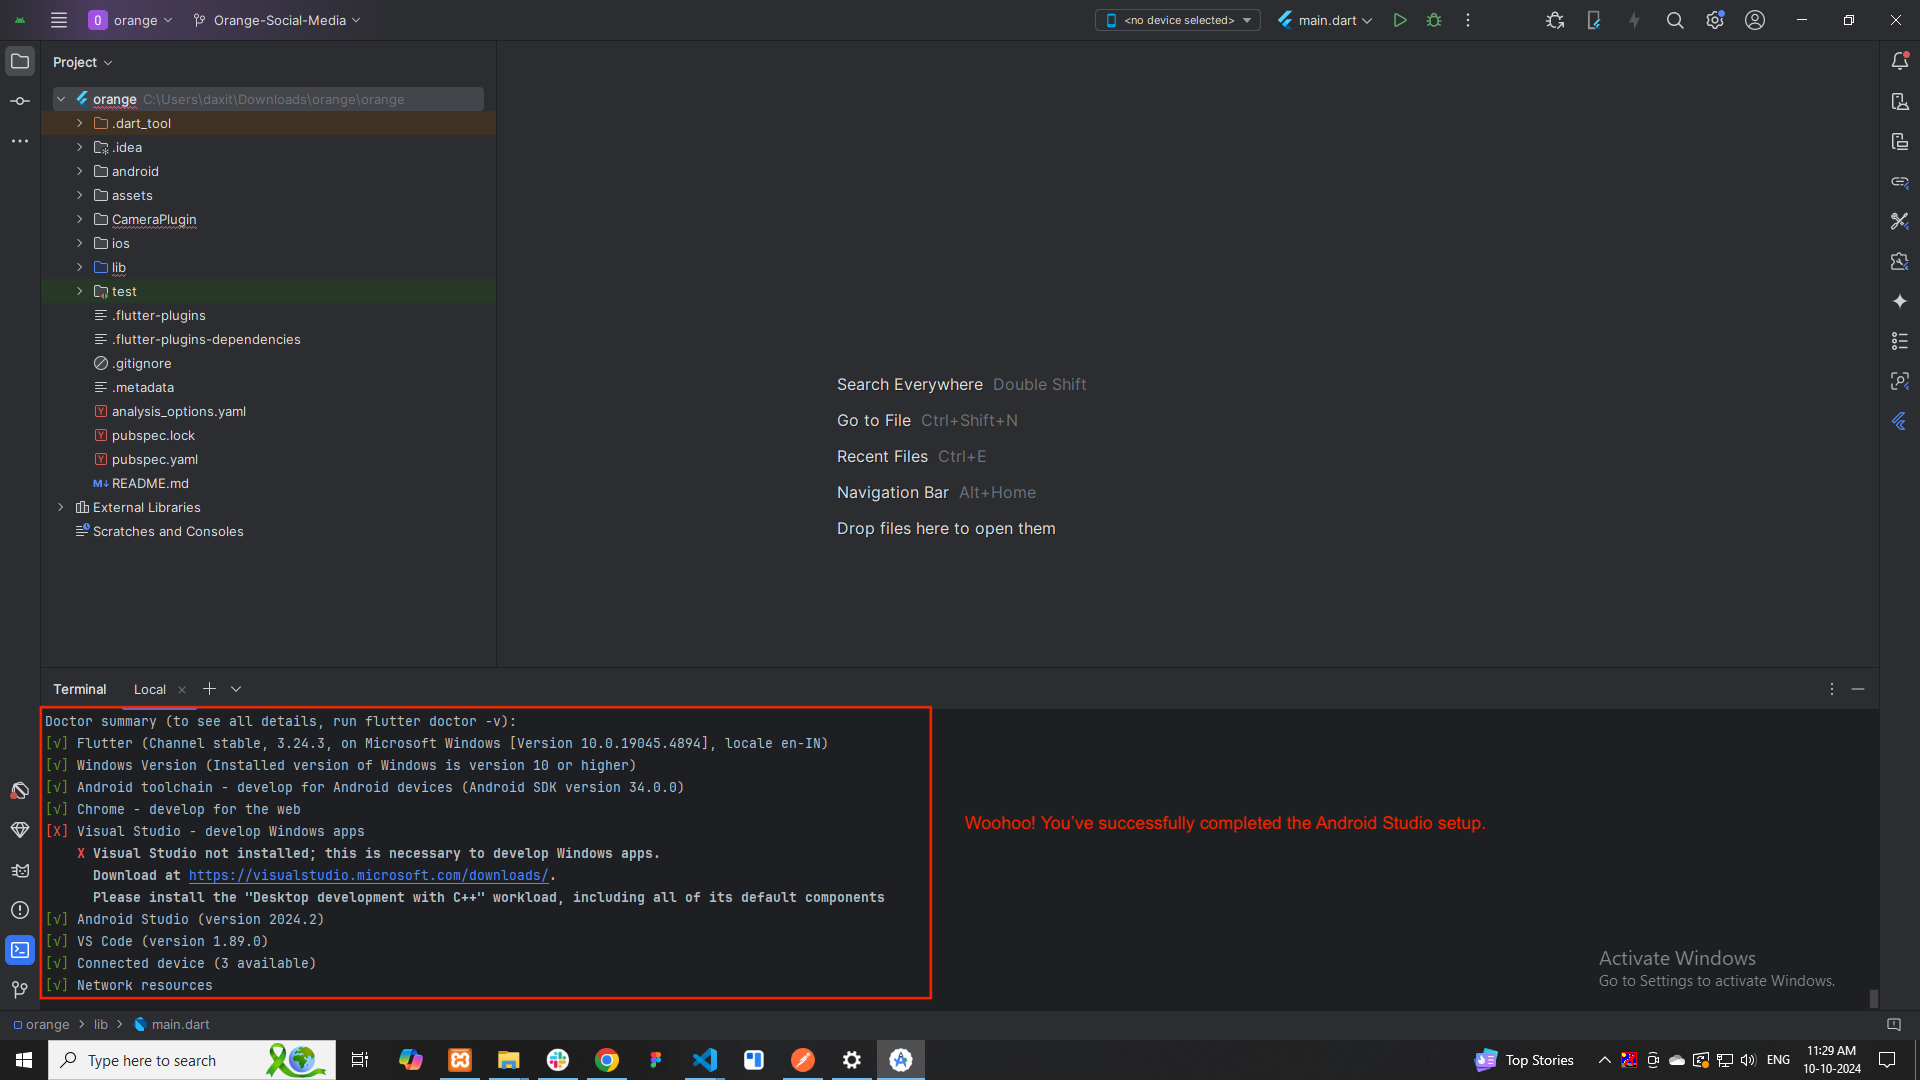
Check your development setup
flutter doctor
Configure Android development
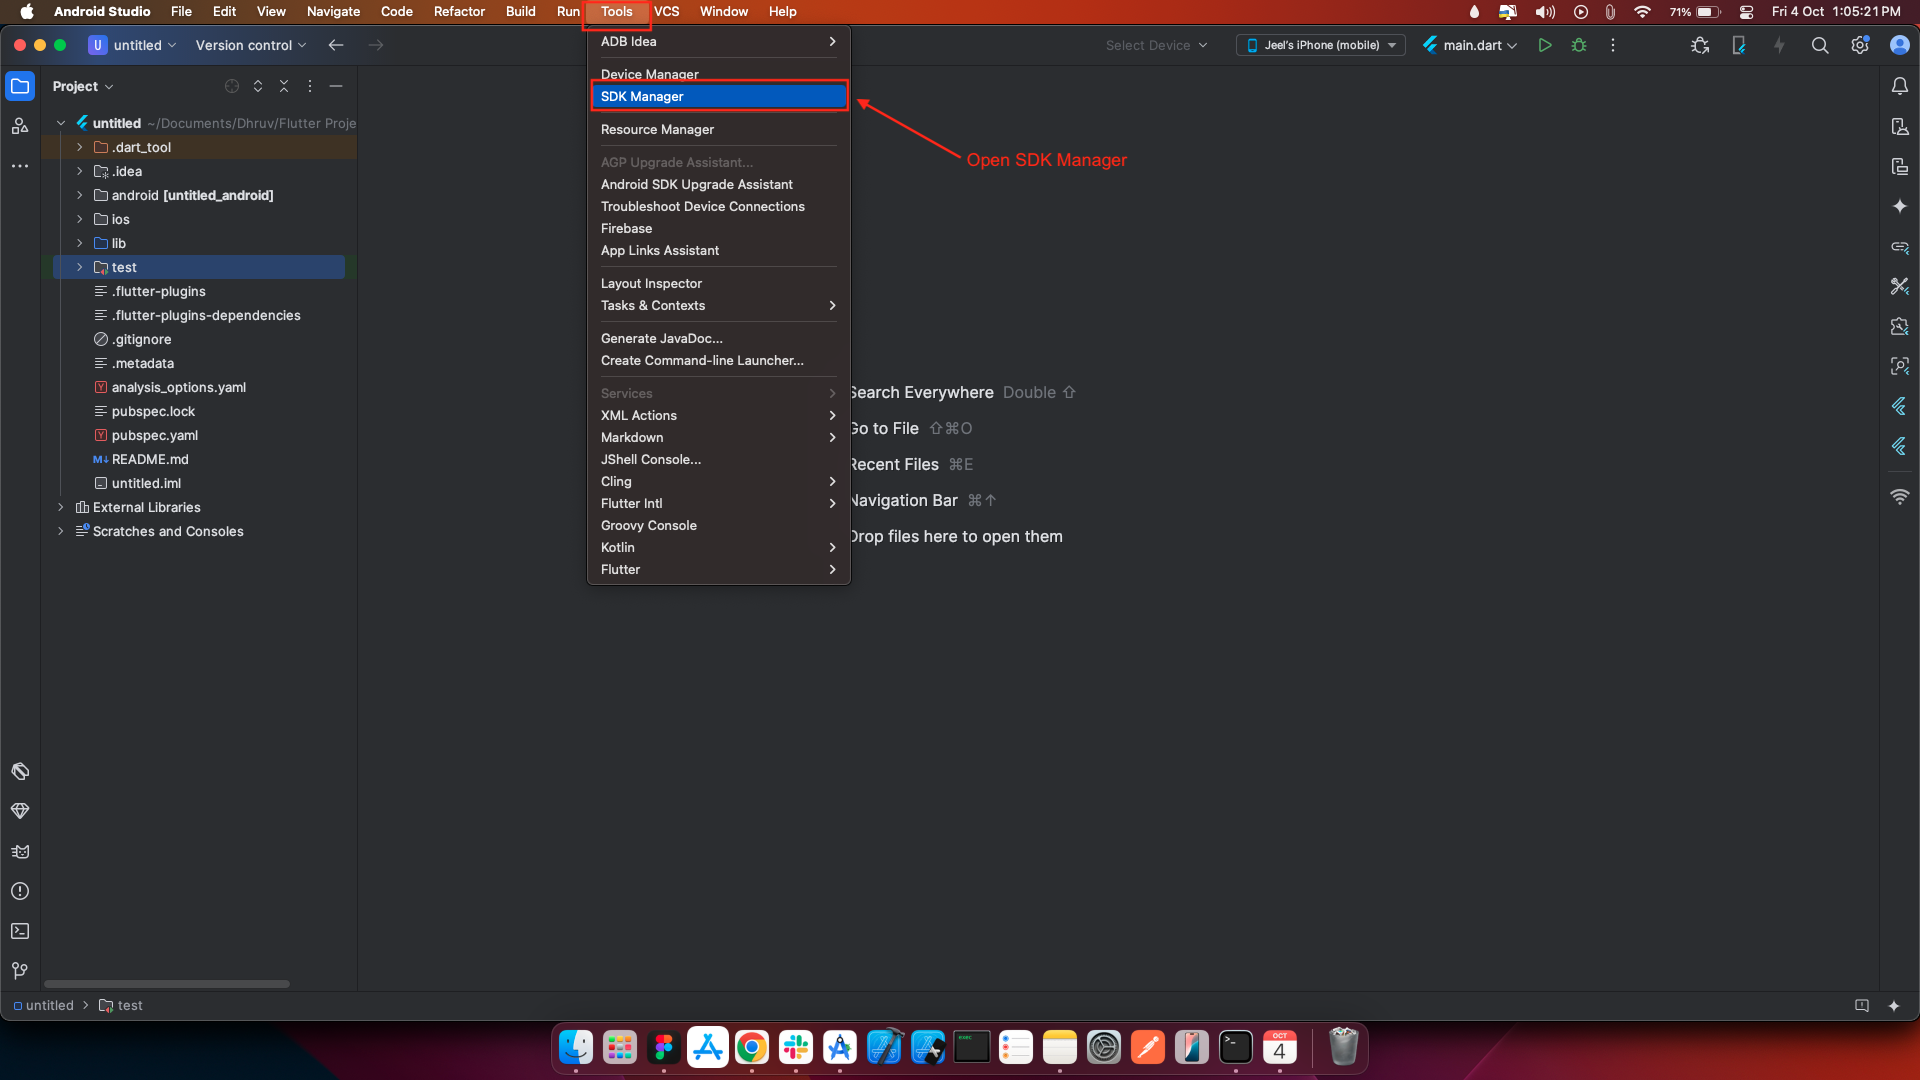
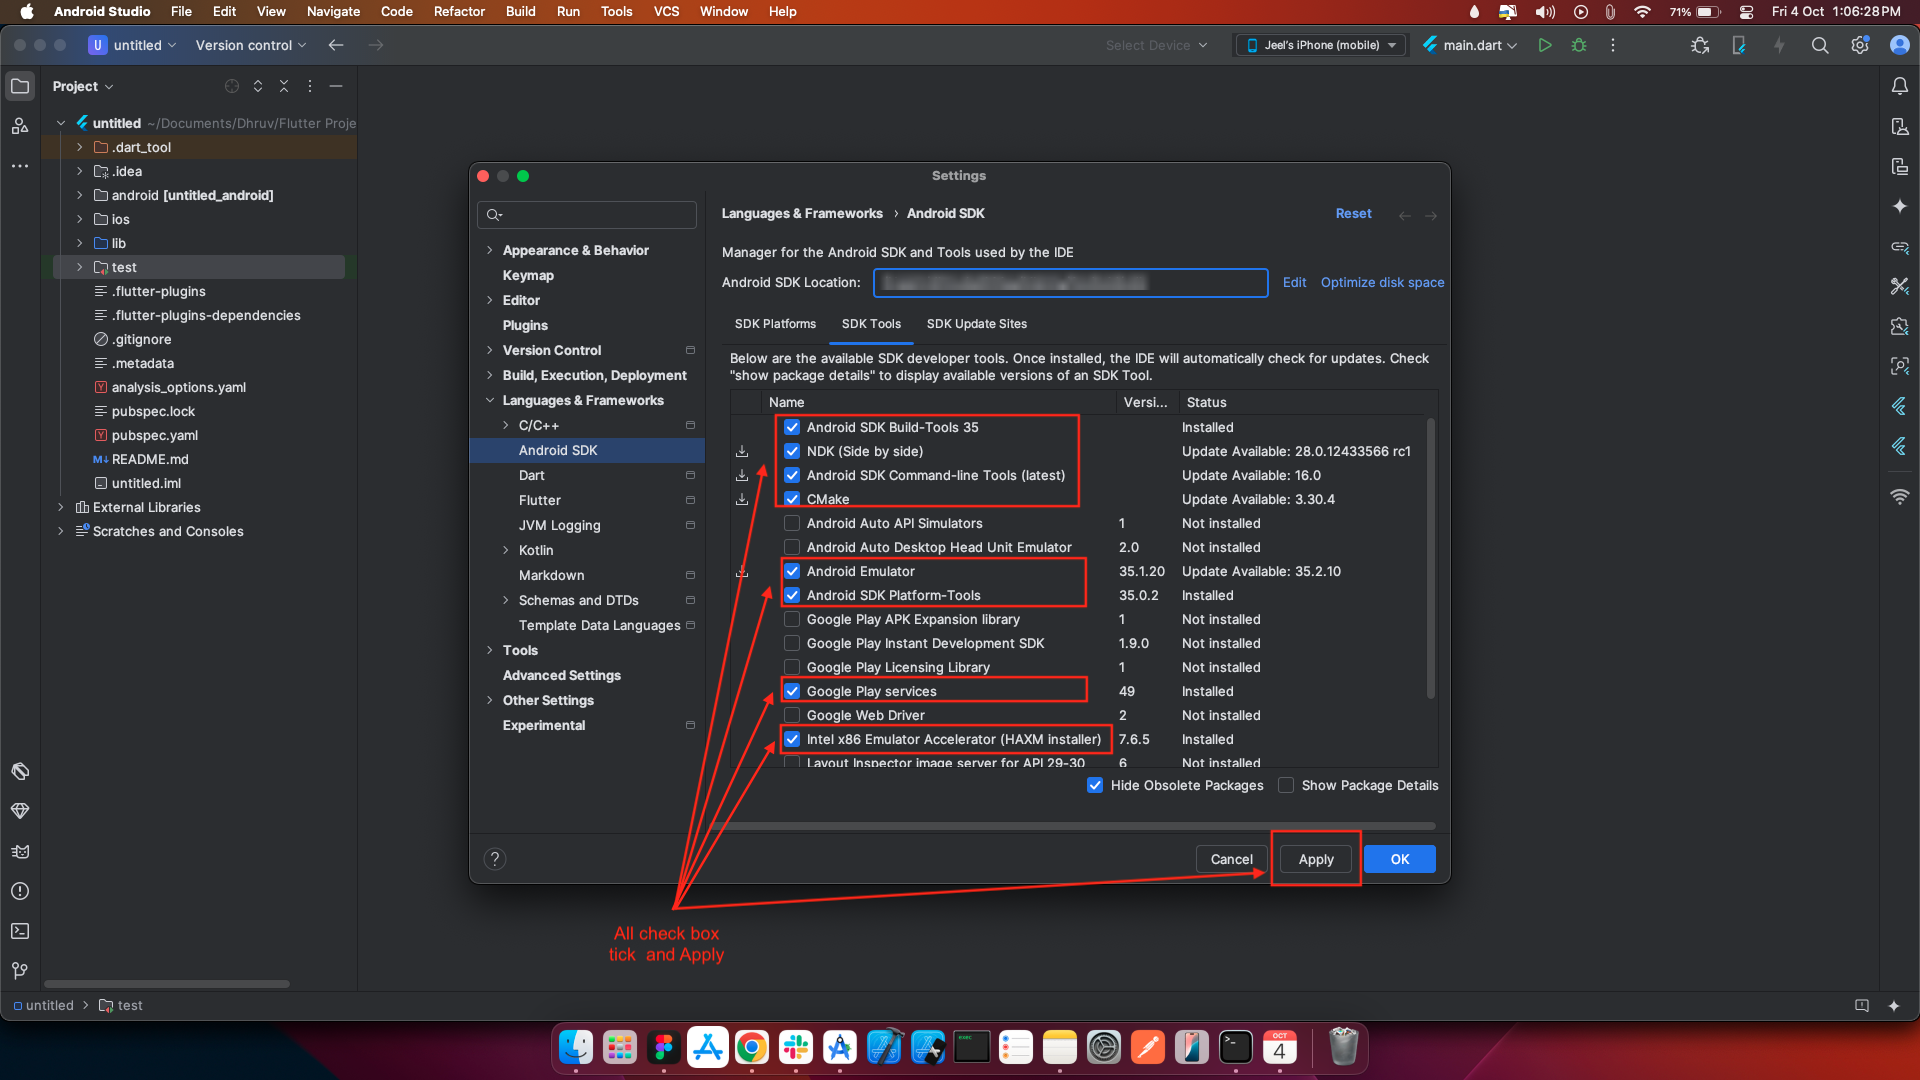
Configure the Android toolchain in Android Studio
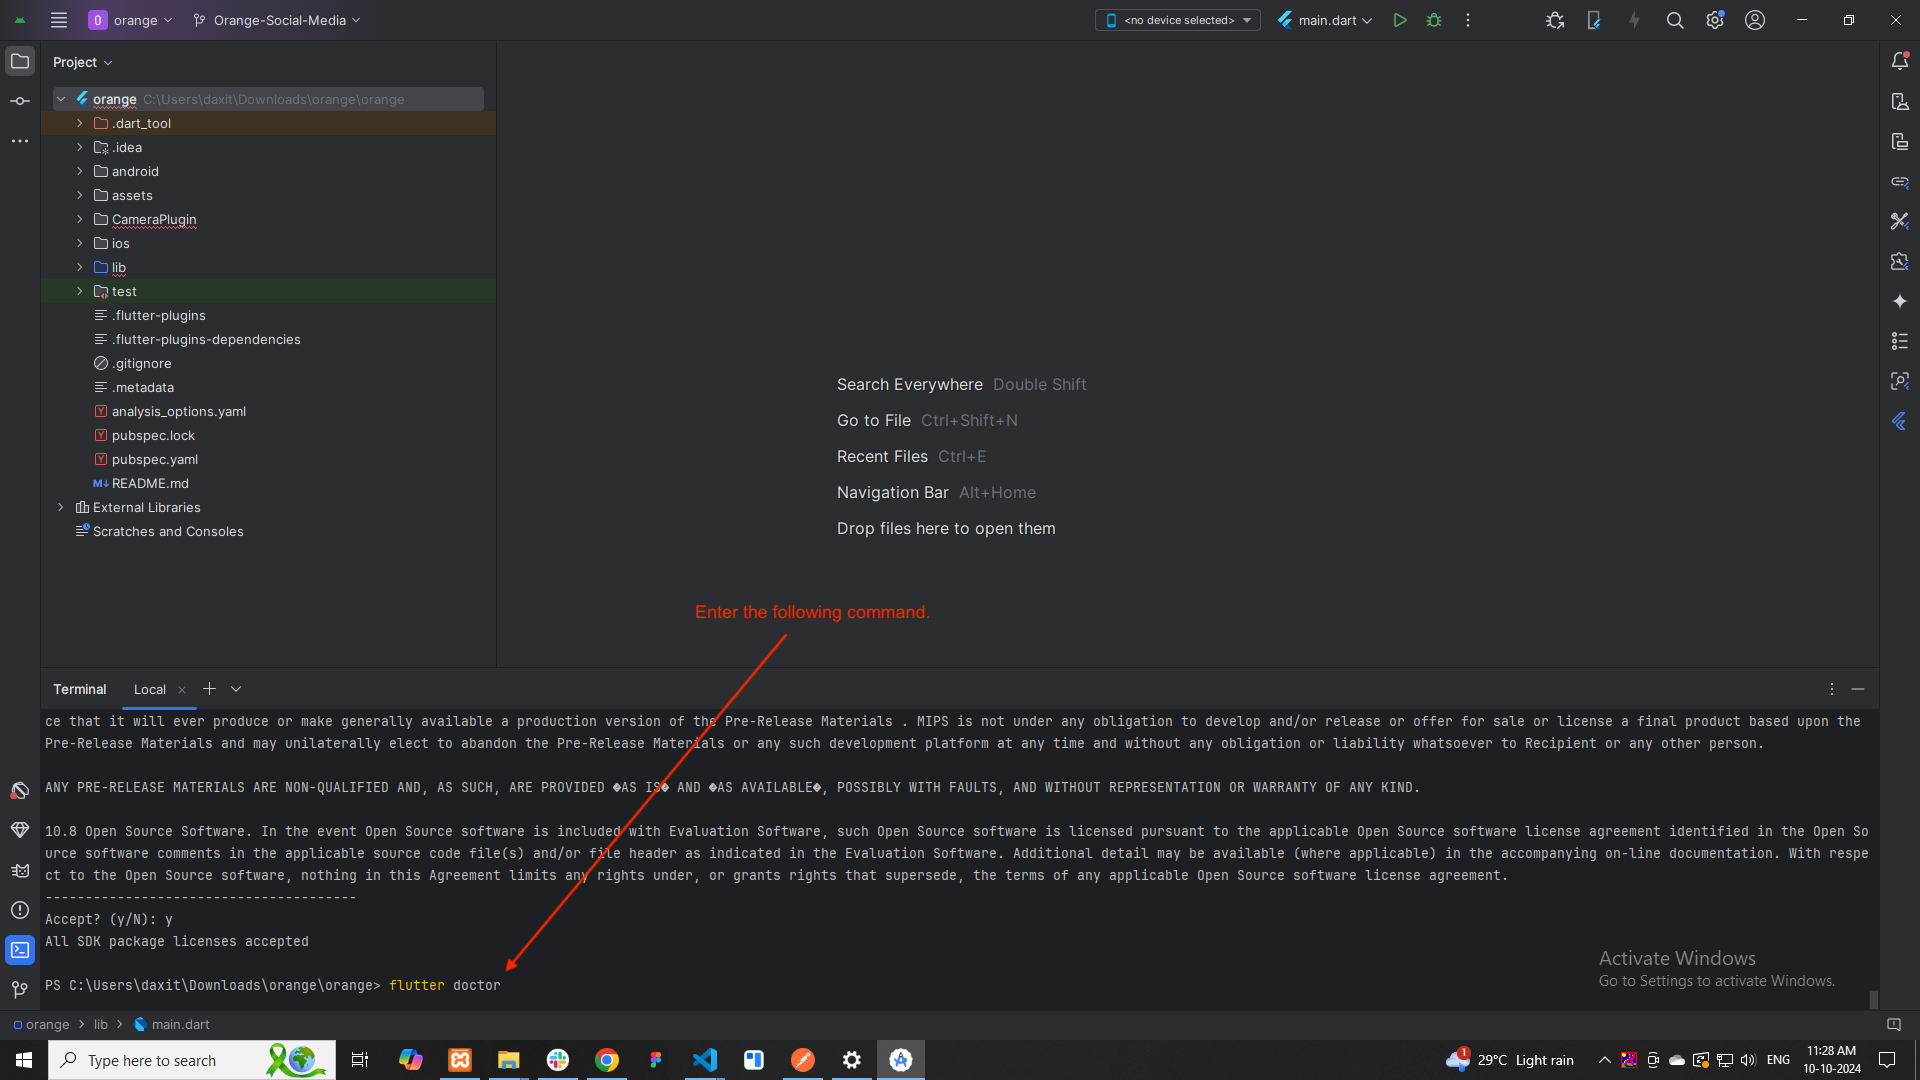
Agree to Android licenses
flutter doctor --android-licenses
Troubleshooting licensing issues
Unable to find bundled Java version
Go to finder and find Android studio:
Check your development setup
flutter doctor
For window :

flutter doctor --android-licenses
flutter doctor
Setup Firebase
-
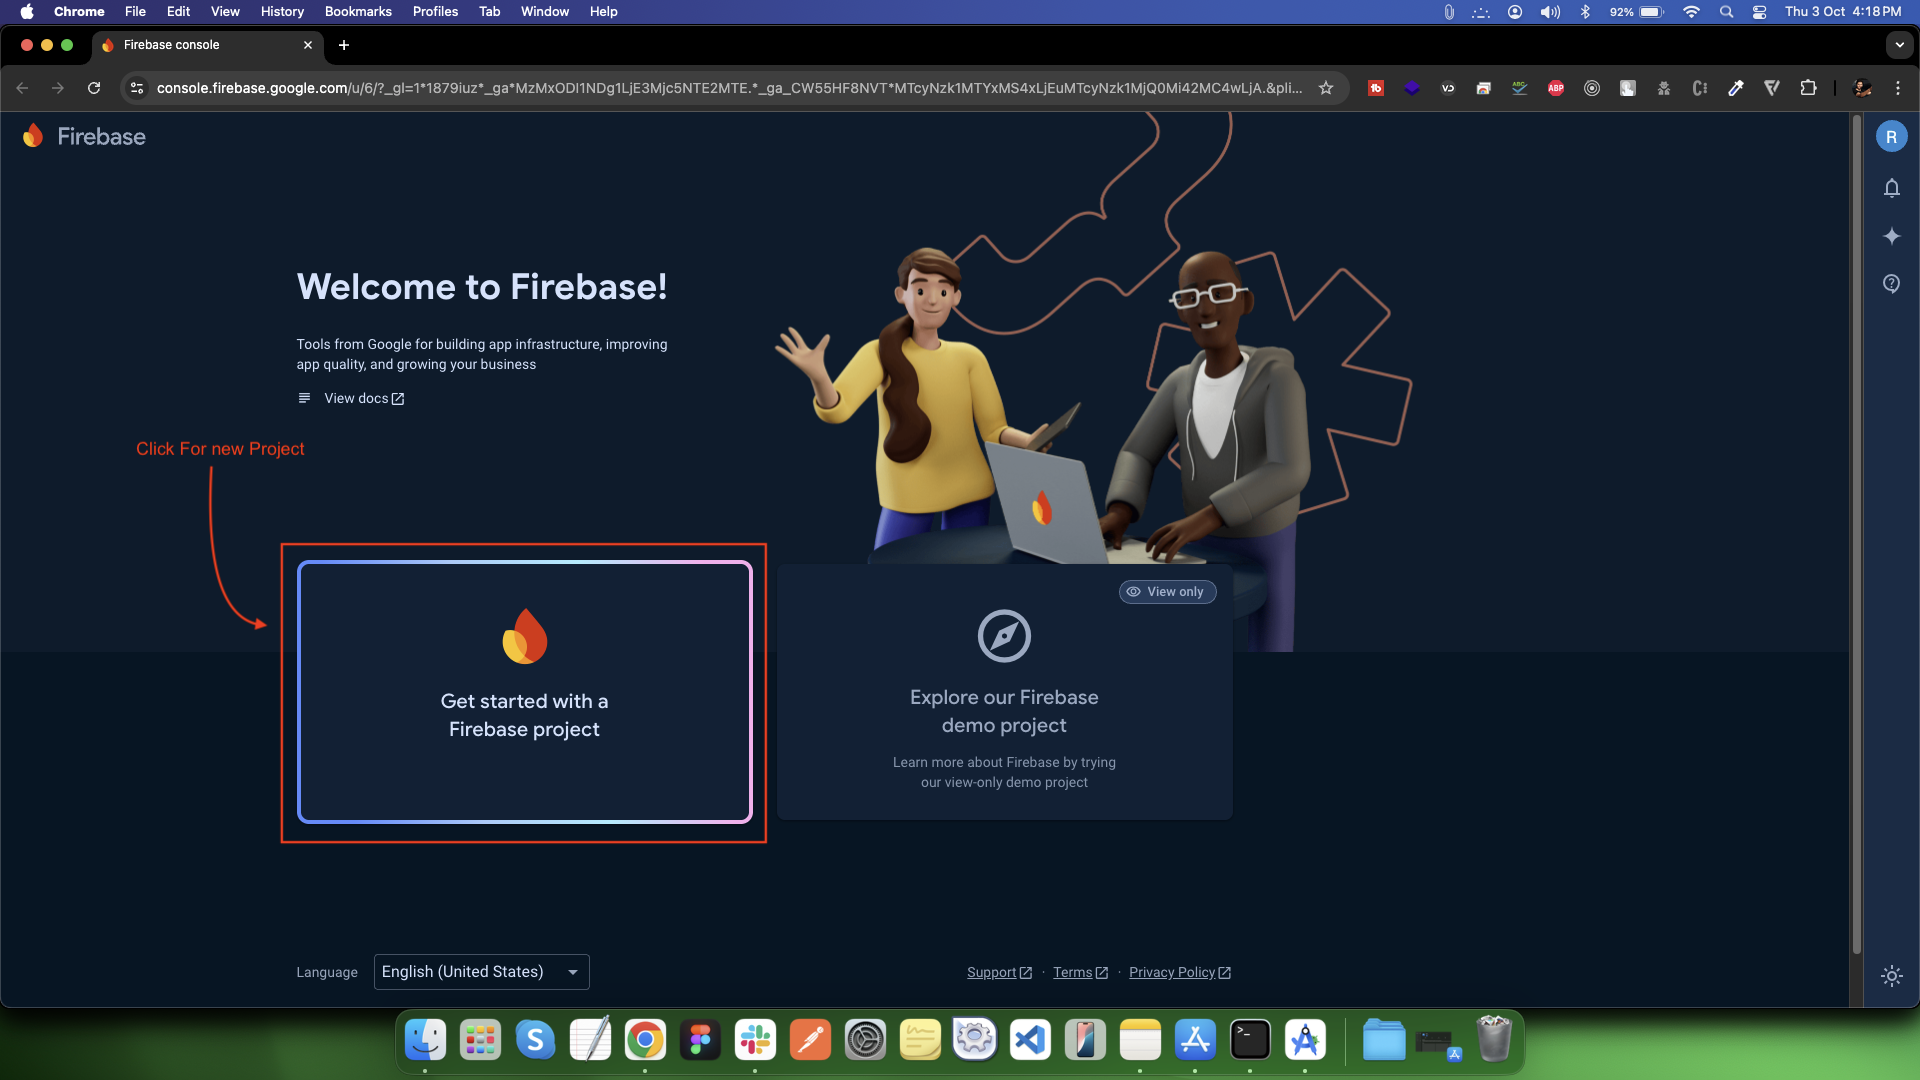
Go to the Firebase Console.
-
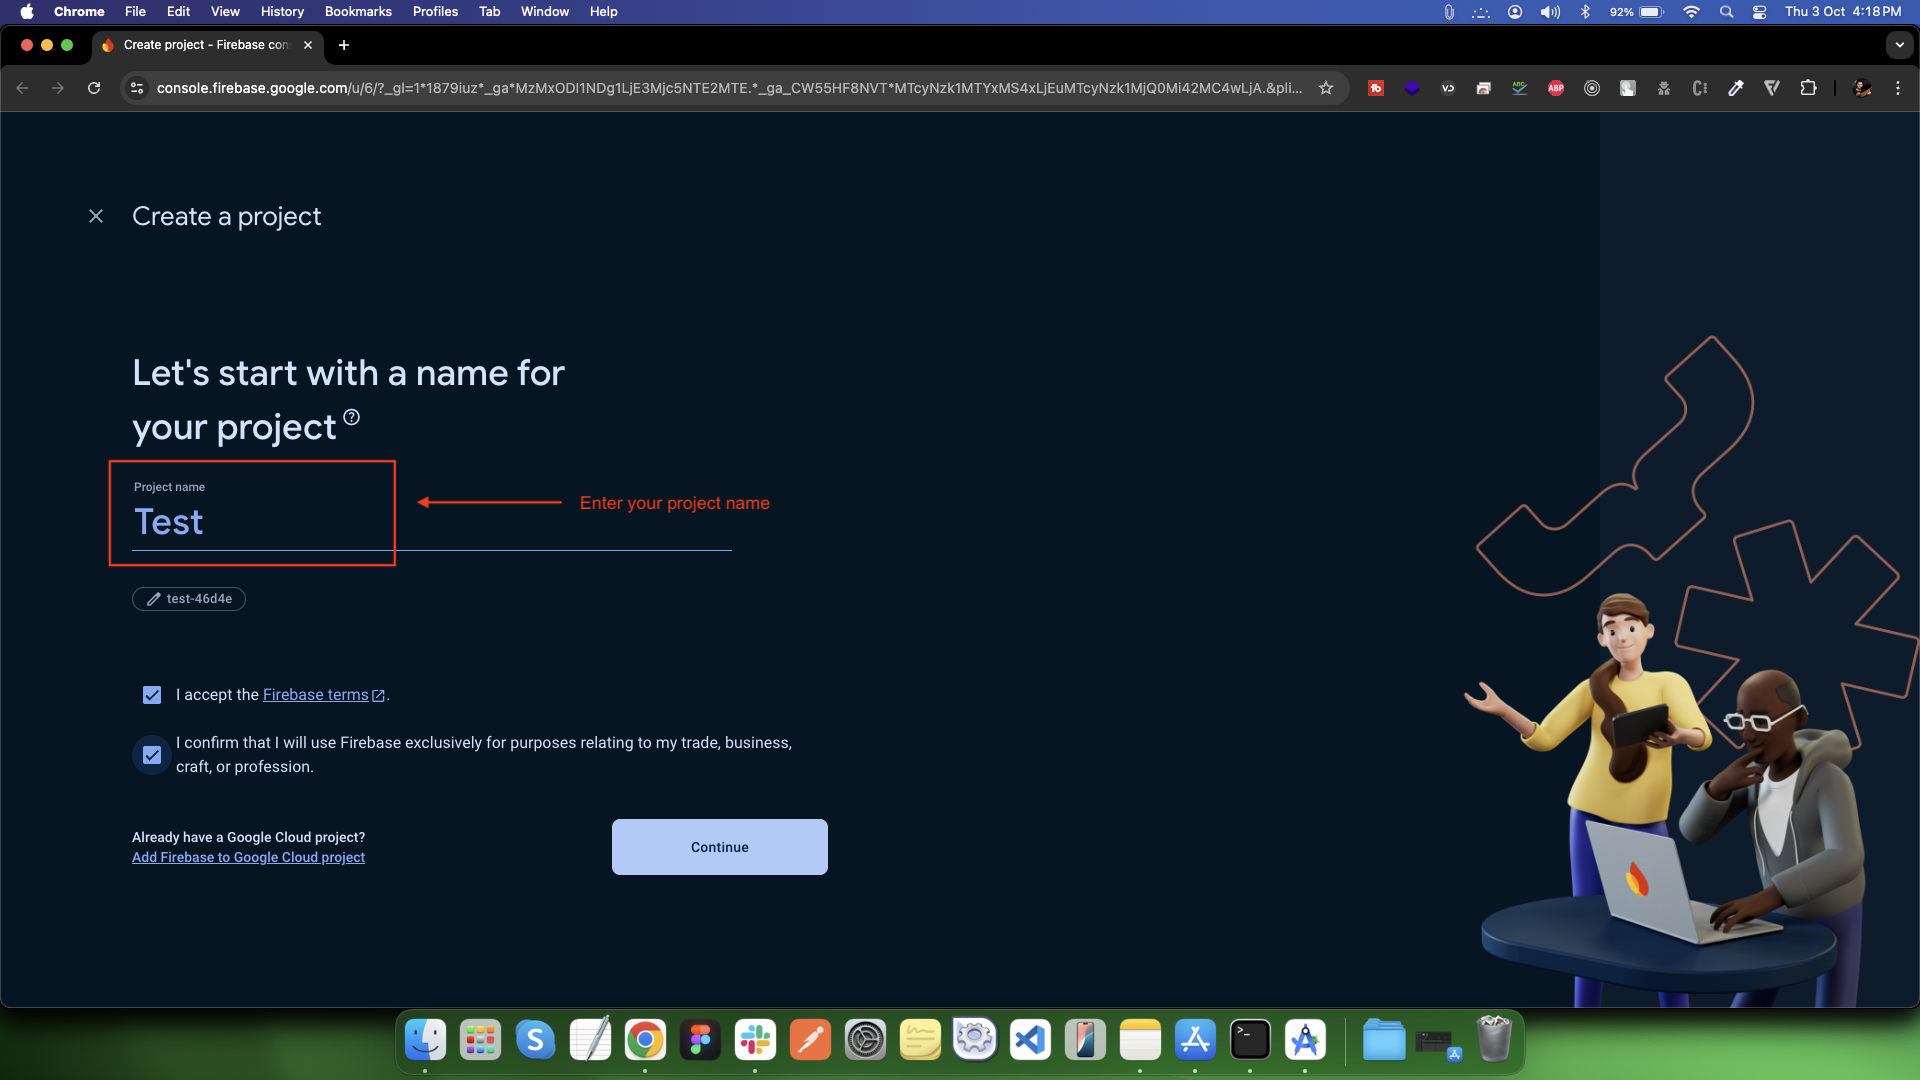
Click Add Project and follow the instructions to create a new project.
-
Giving a name to the project
-
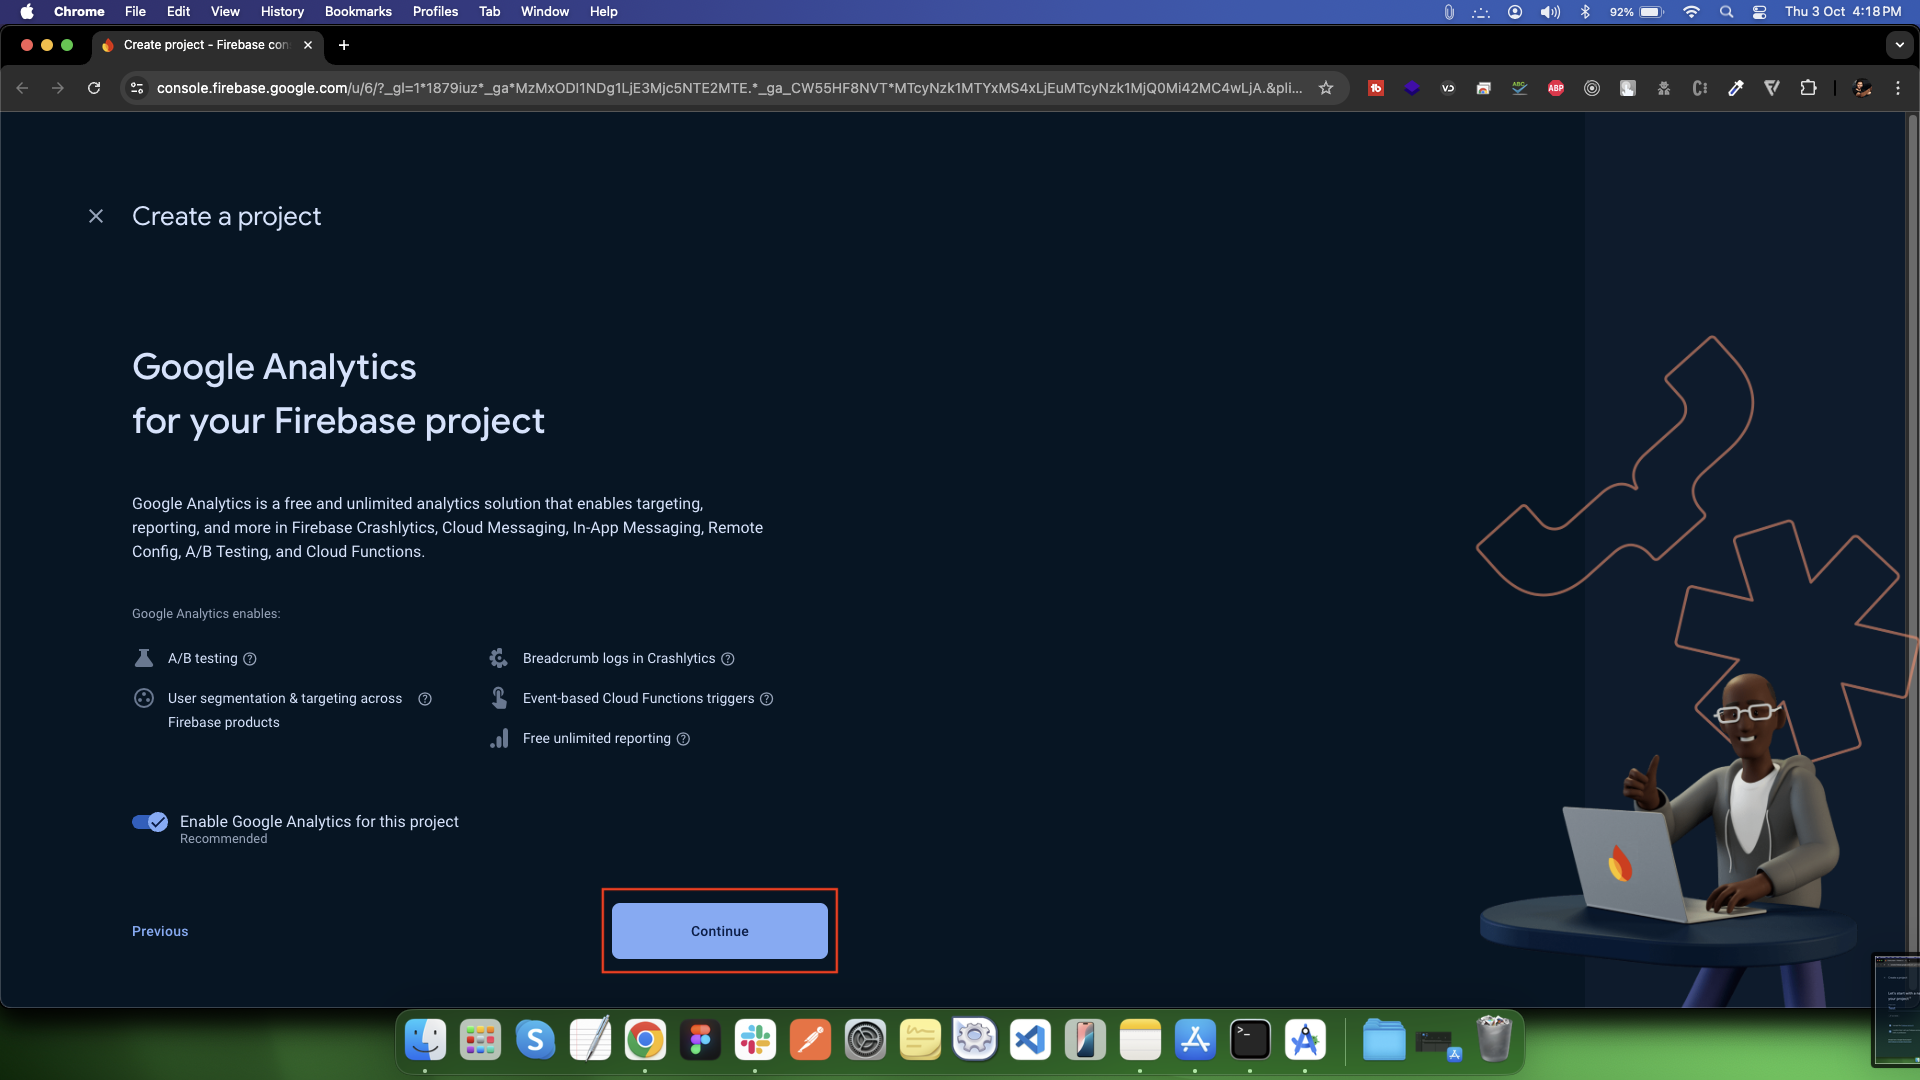
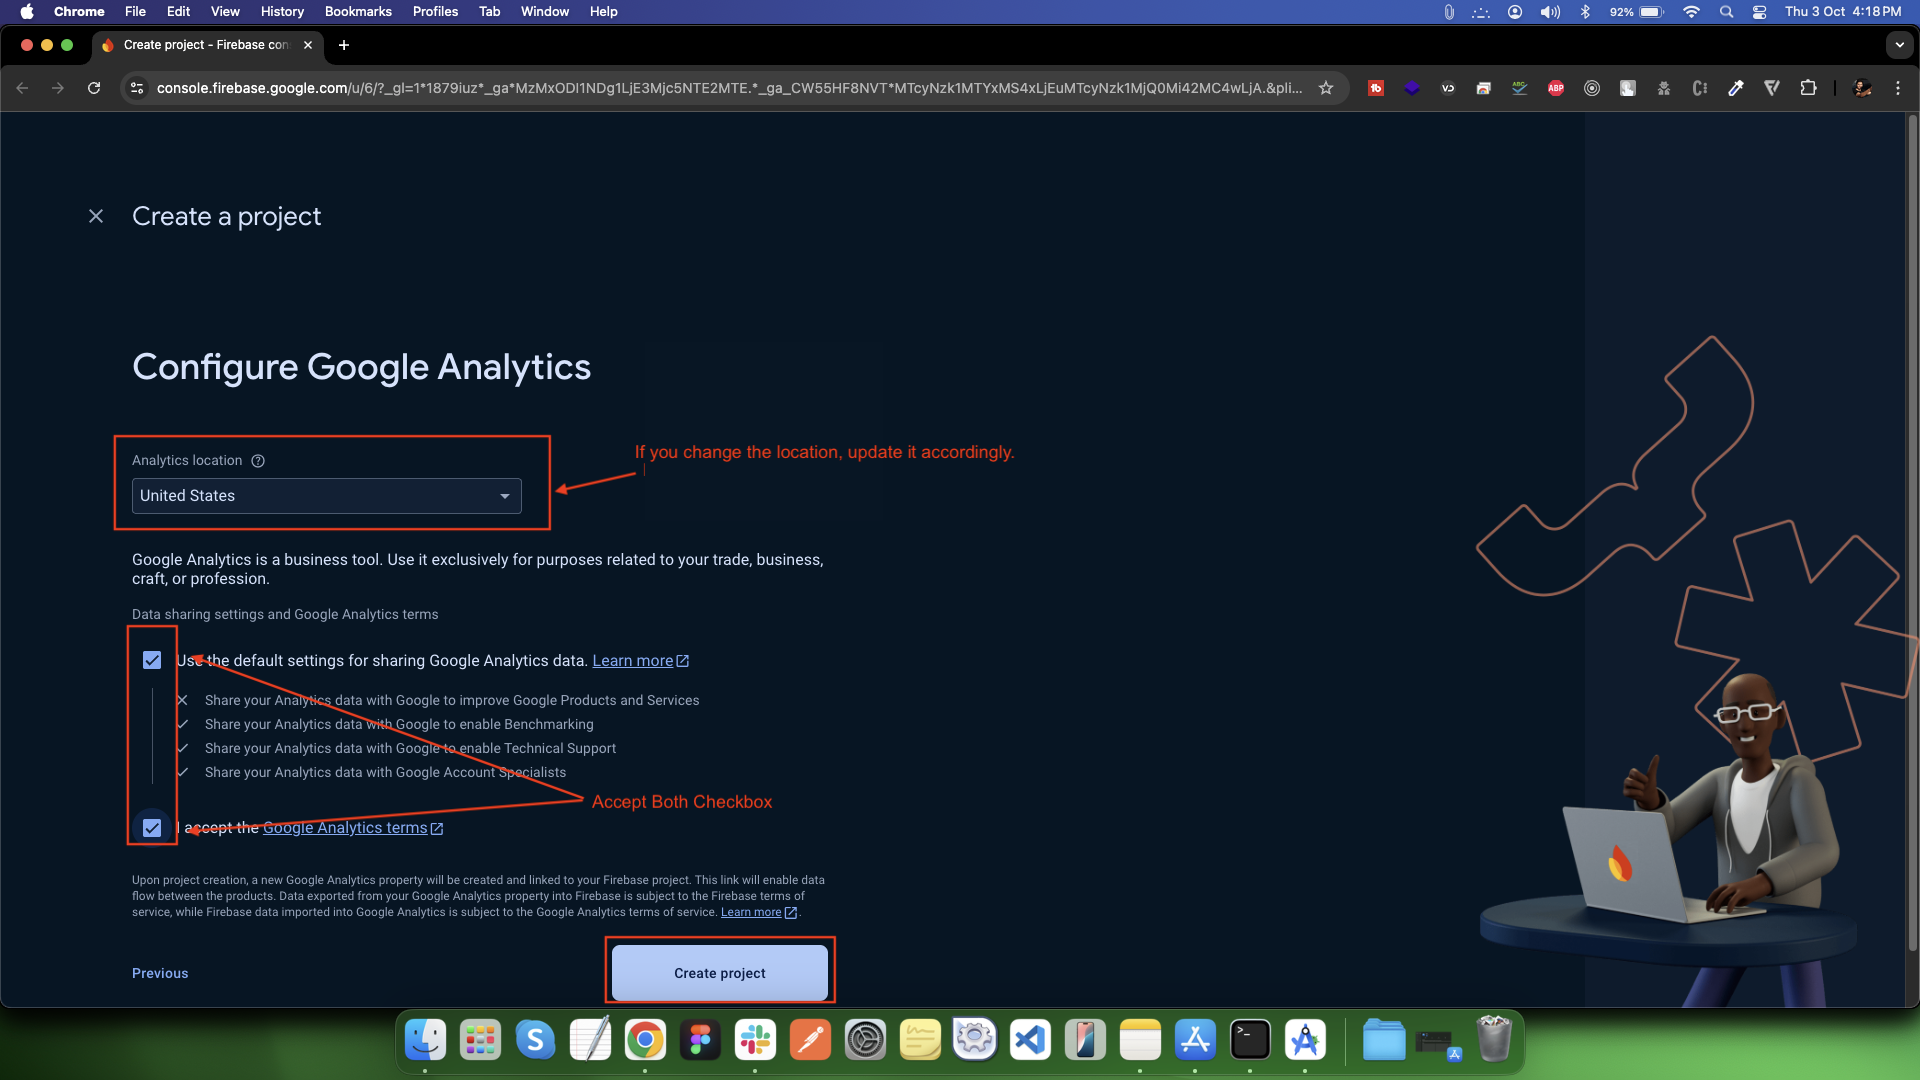
Enable the Google Analytics feature if needed, and configure your project.
-
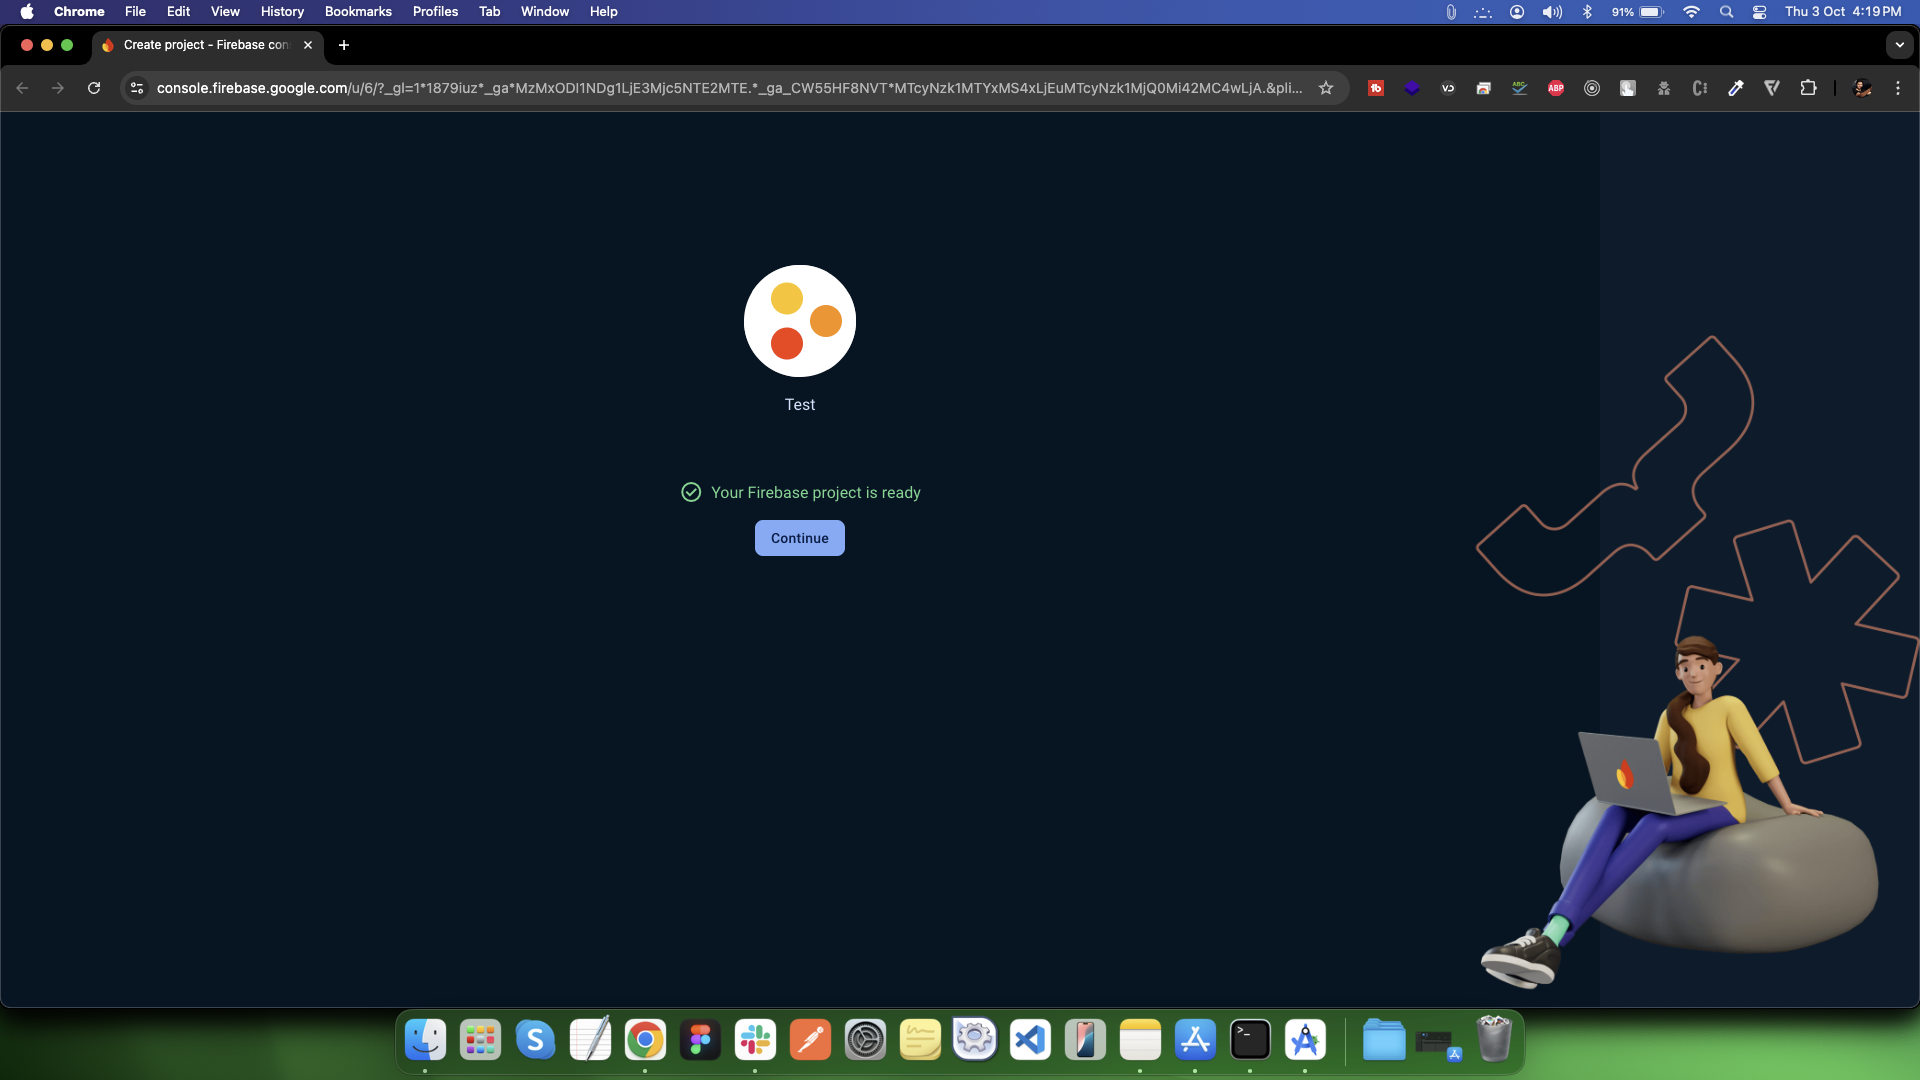
First Choose default Firebase account and then create project
Android Setup
-
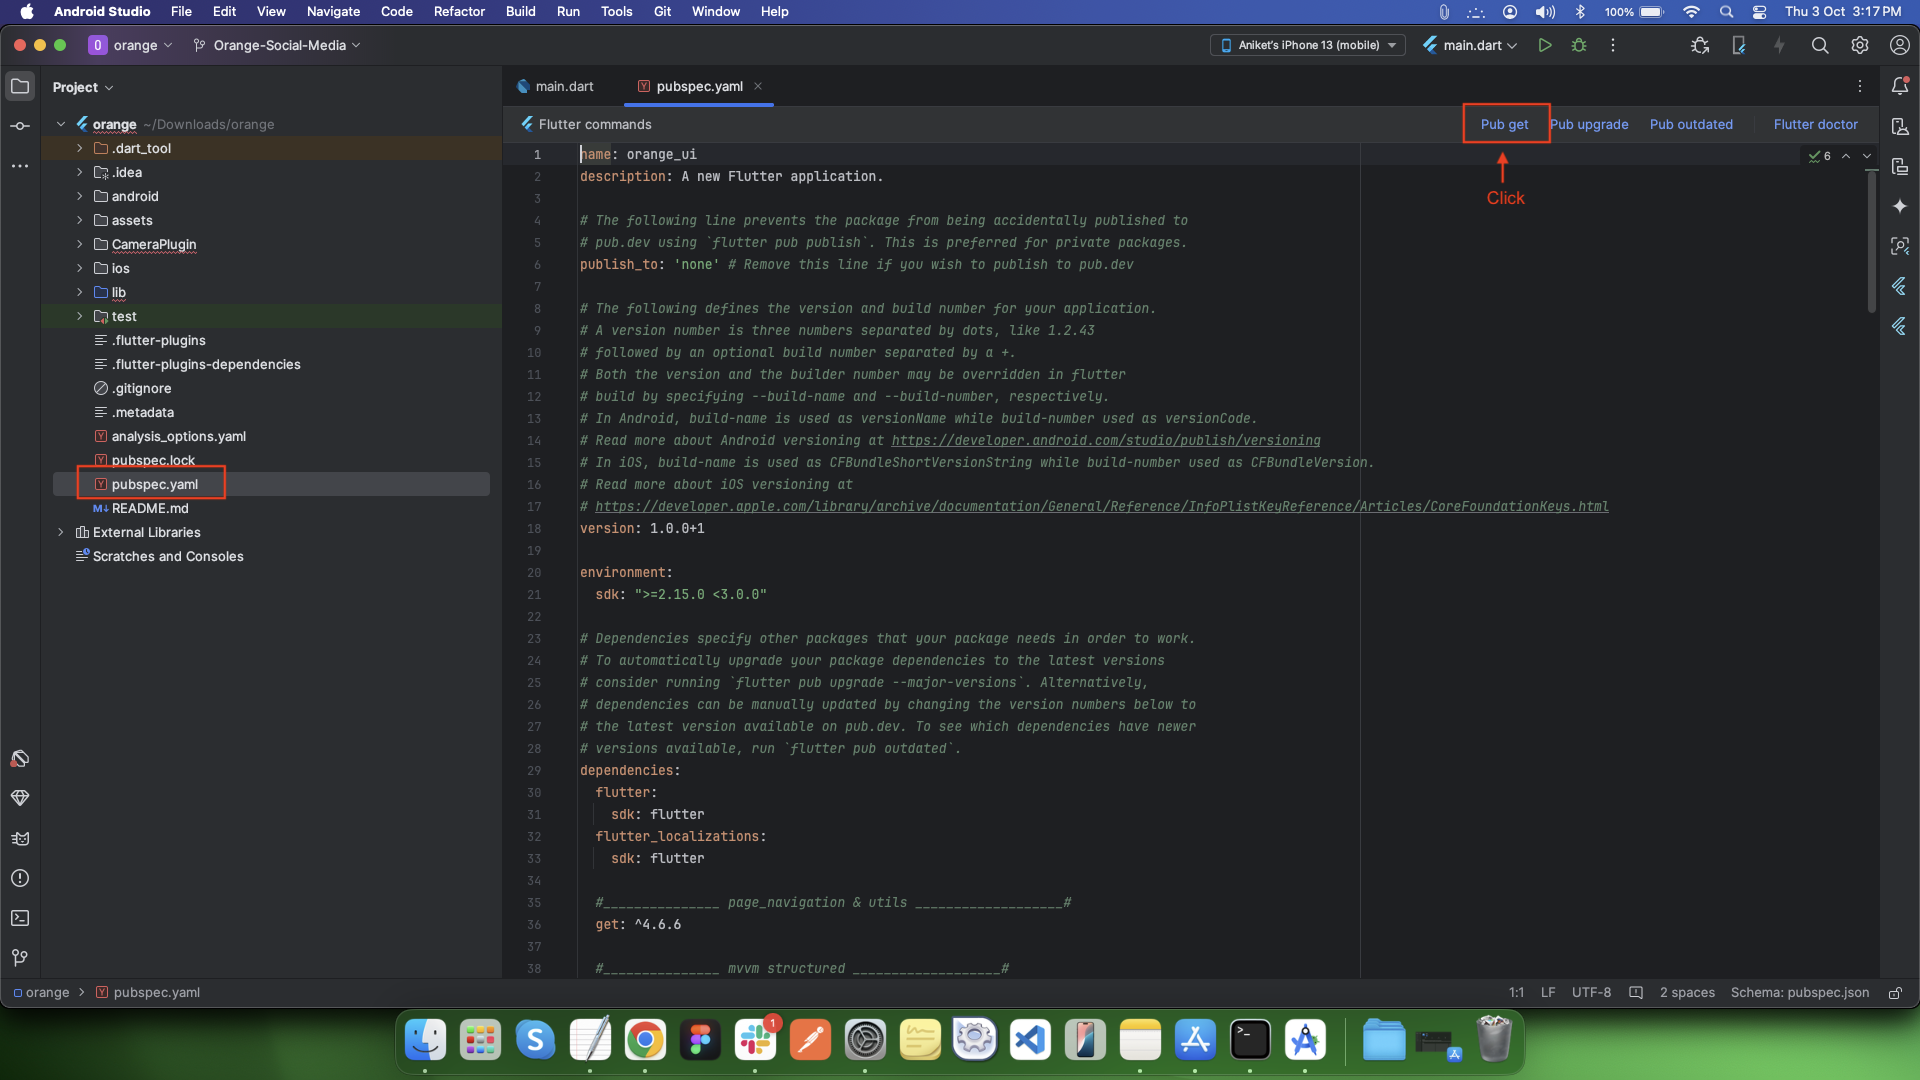
Open the project in Android Studio. Then, click Pub get as shown in the image below.
-
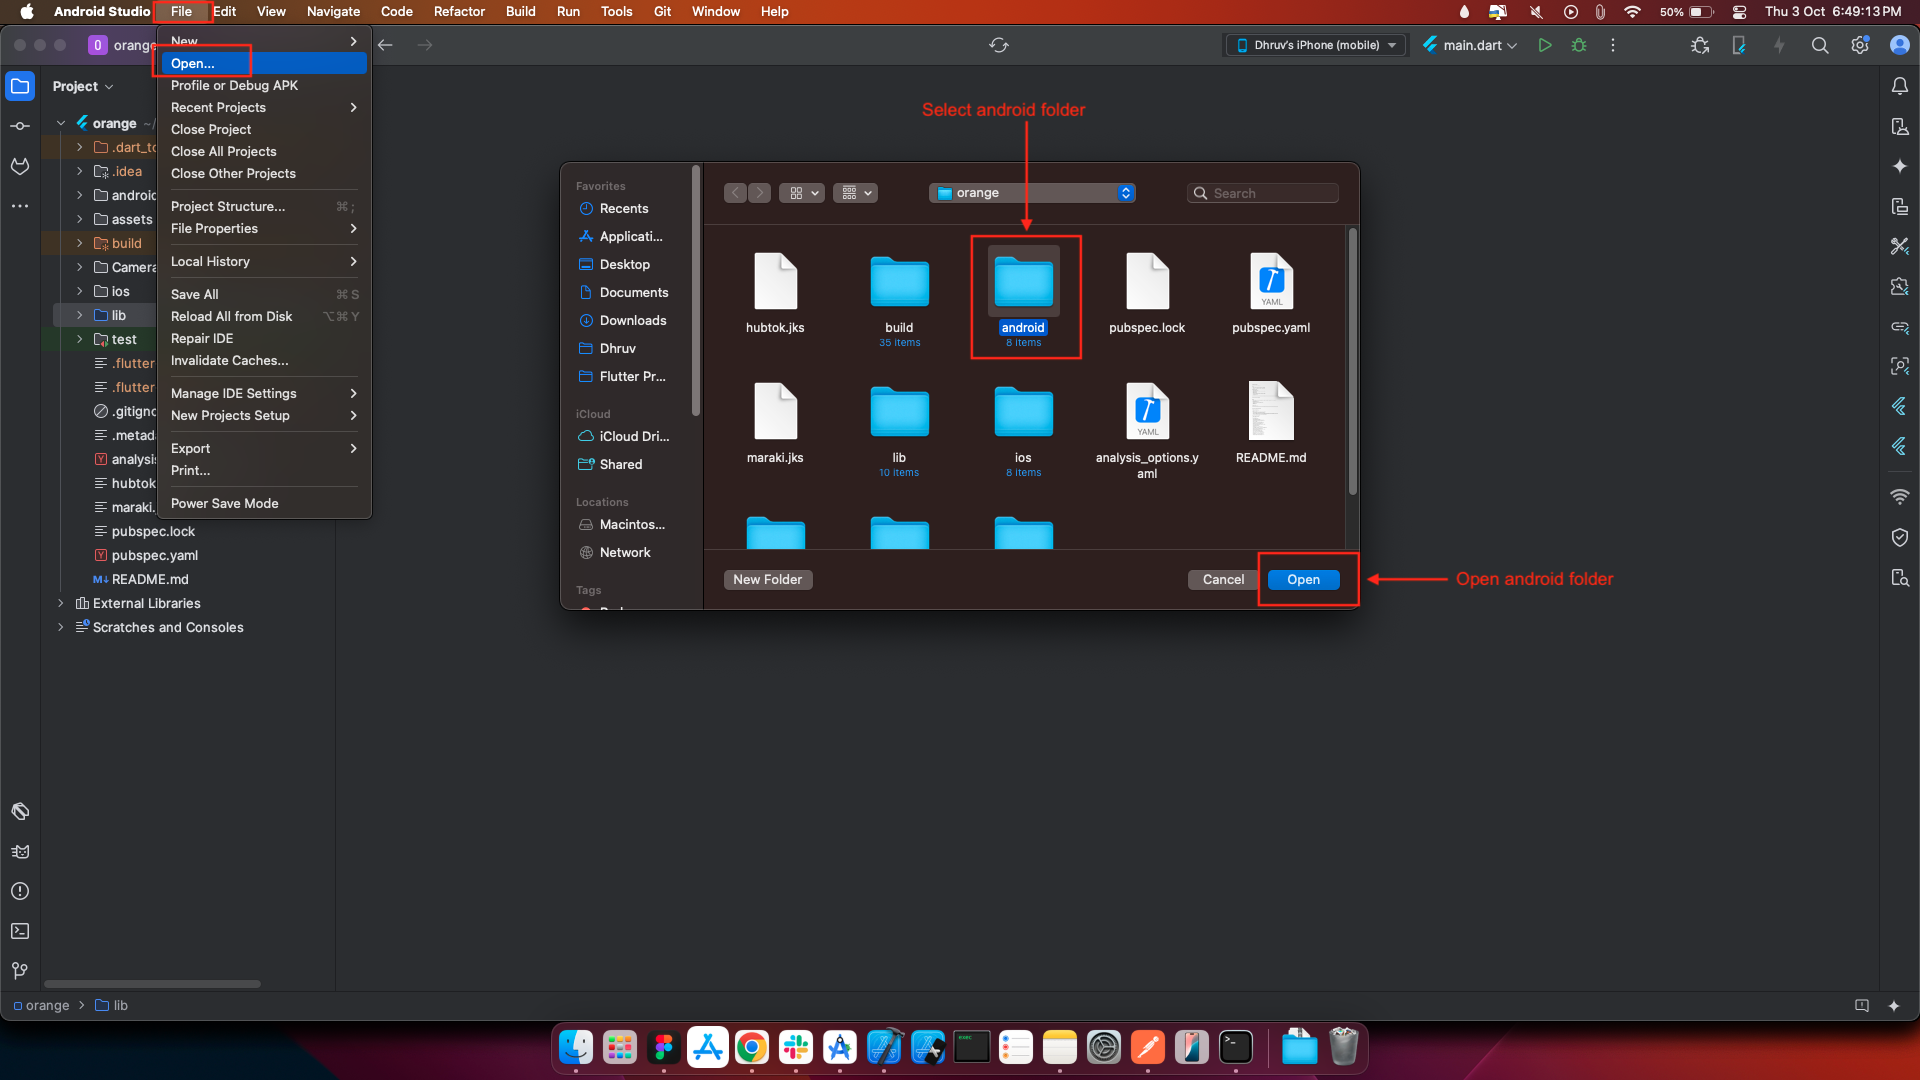
Opening the Android Directory in Android Studio (Windows/macOS)
-
Go to File > Open from the top menu.
-
Navigate to your Flutter project folder.
-
Select the `android` directory.
-
Click Open to load it in a new window or tab.
-
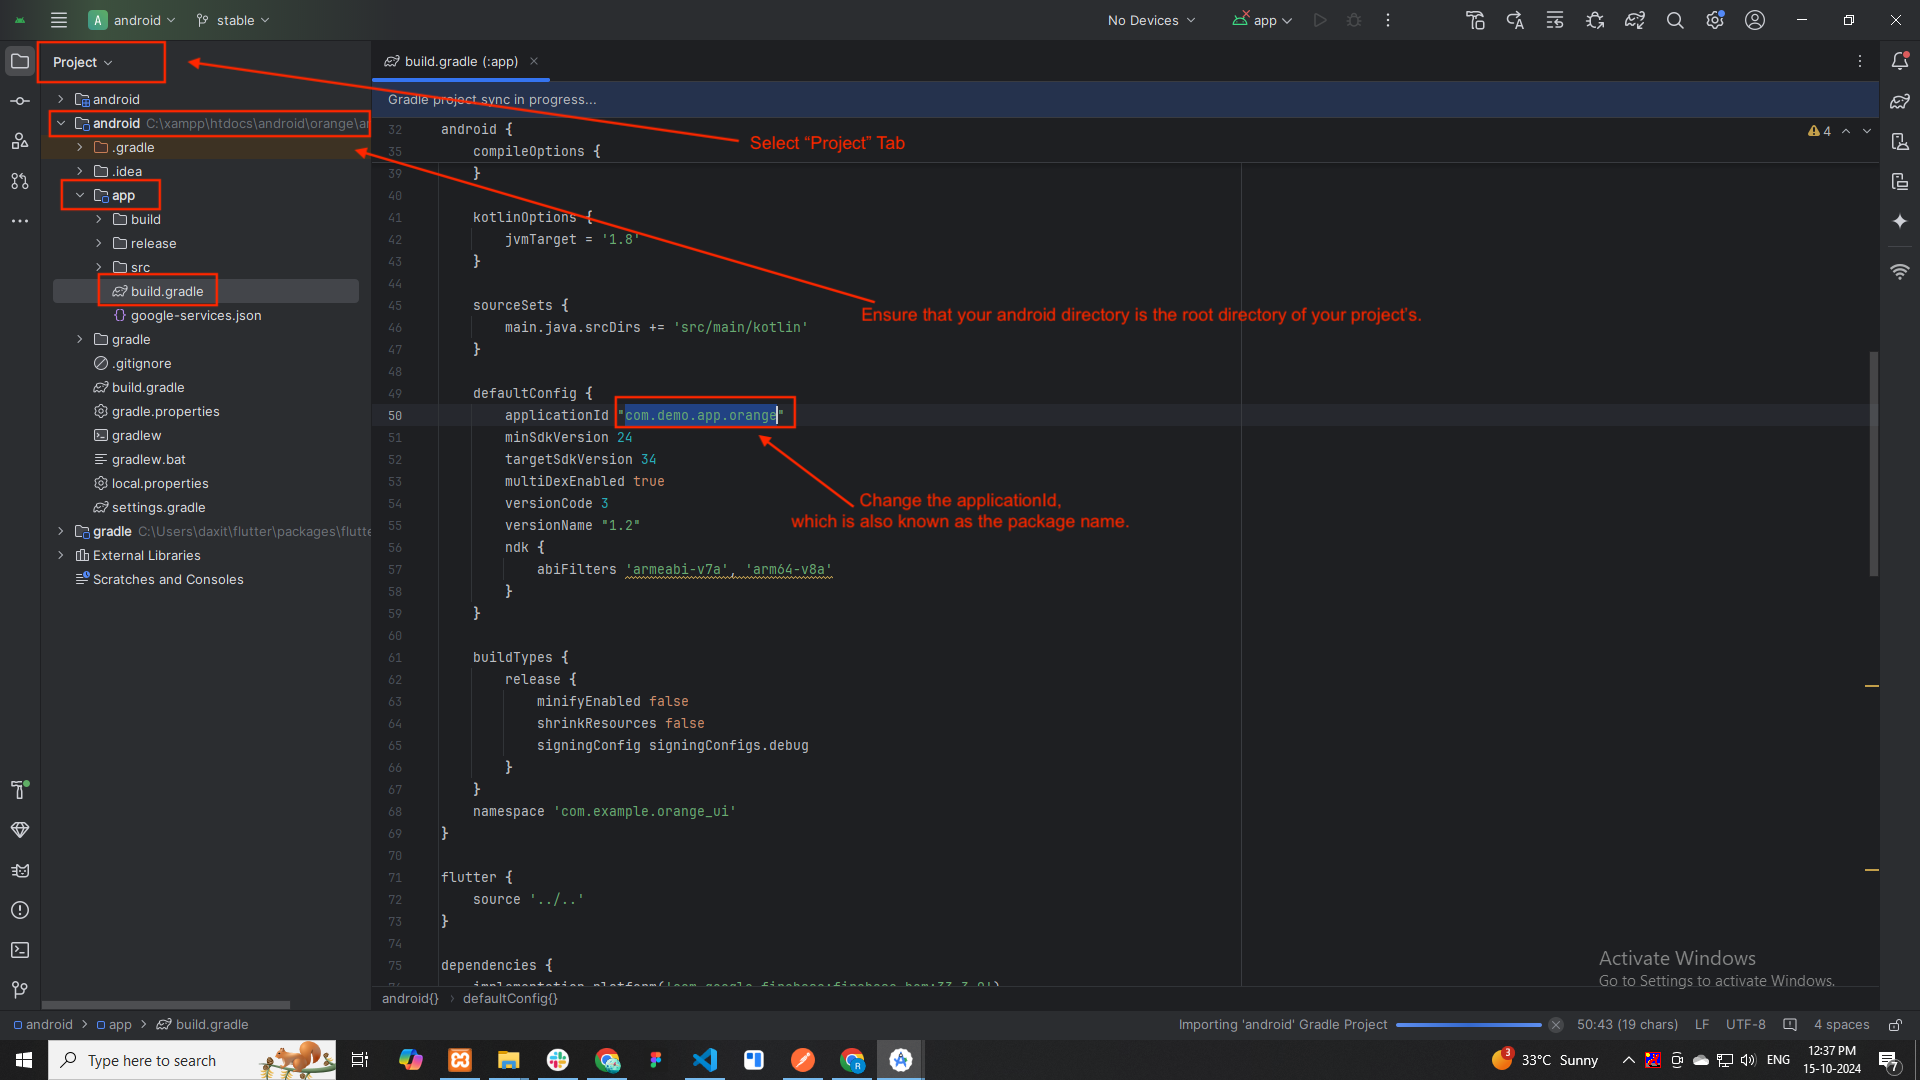
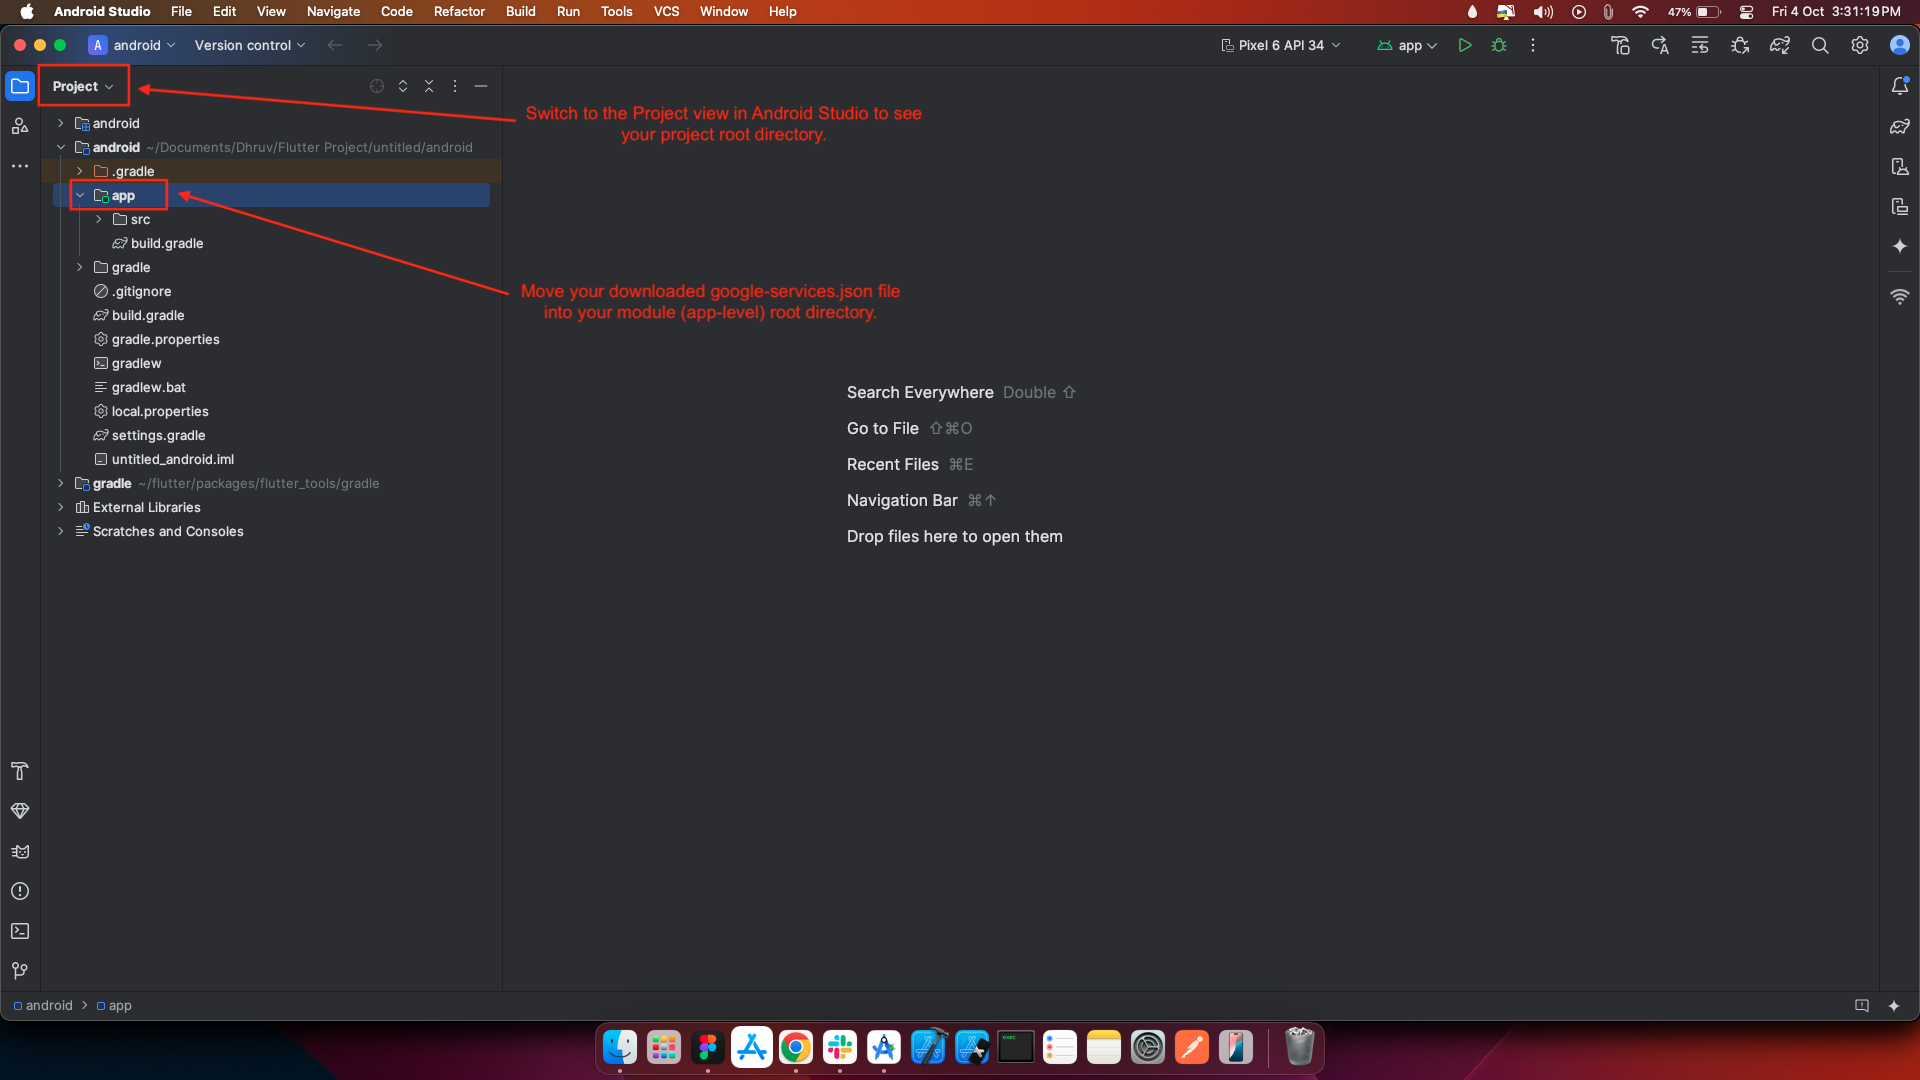
Ensure the Project view is set to Project from the top-left dropdown.
-
Verify that the android directory is opened as the root project.
-
-
Navigate to the build.gradle File
-
In the left panel, expand the app module under the android directory.
-
Locate and open the file: android > app > build.gradle.
-
-
Change the applicationId
-
Scroll to the defaultConfig block in the build.gradle file.
-
Locate the line: applicationId
-
Replace the existing value with your desired package name, e.g.: applicationId "com.yourcompany.appname"
-
This value is also known as the package name and must be unique.
-
-
Sync Gradle
-
Once the applicationId is updated, Android Studio will prompt you to Sync Gradle.
-
Click "Sync Now" at the top or manually sync using File > Sync Project with Gradle Files.
-
-
How to get SHA1 Key : Link
-
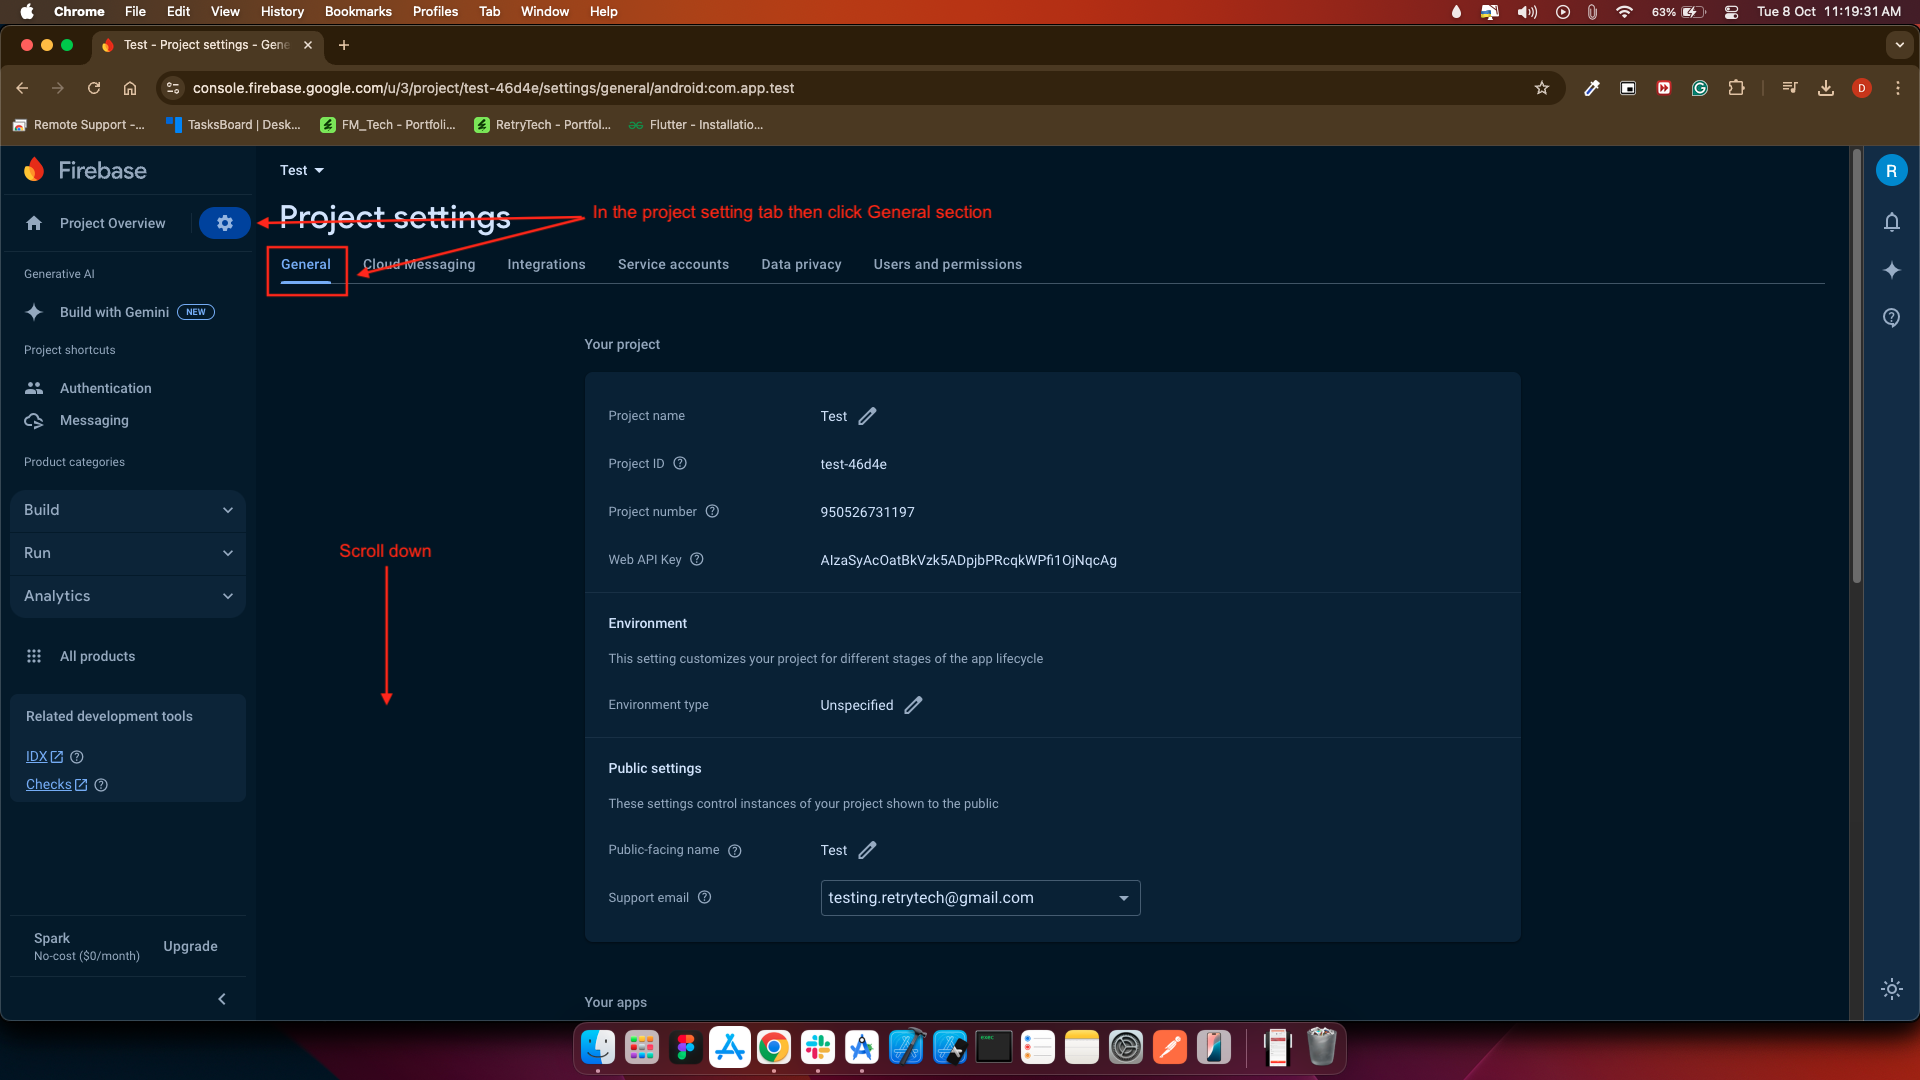
Open Firebase Console
-
Select your firebase project which was created while setting up the Backend Documentation.
-
Add Android App to Firebase
-
On the Project Overview page, look for the platform icons in the center.
-
Click the Android icon (robot icon), which represents adding an Android app to Firebase.
-
-
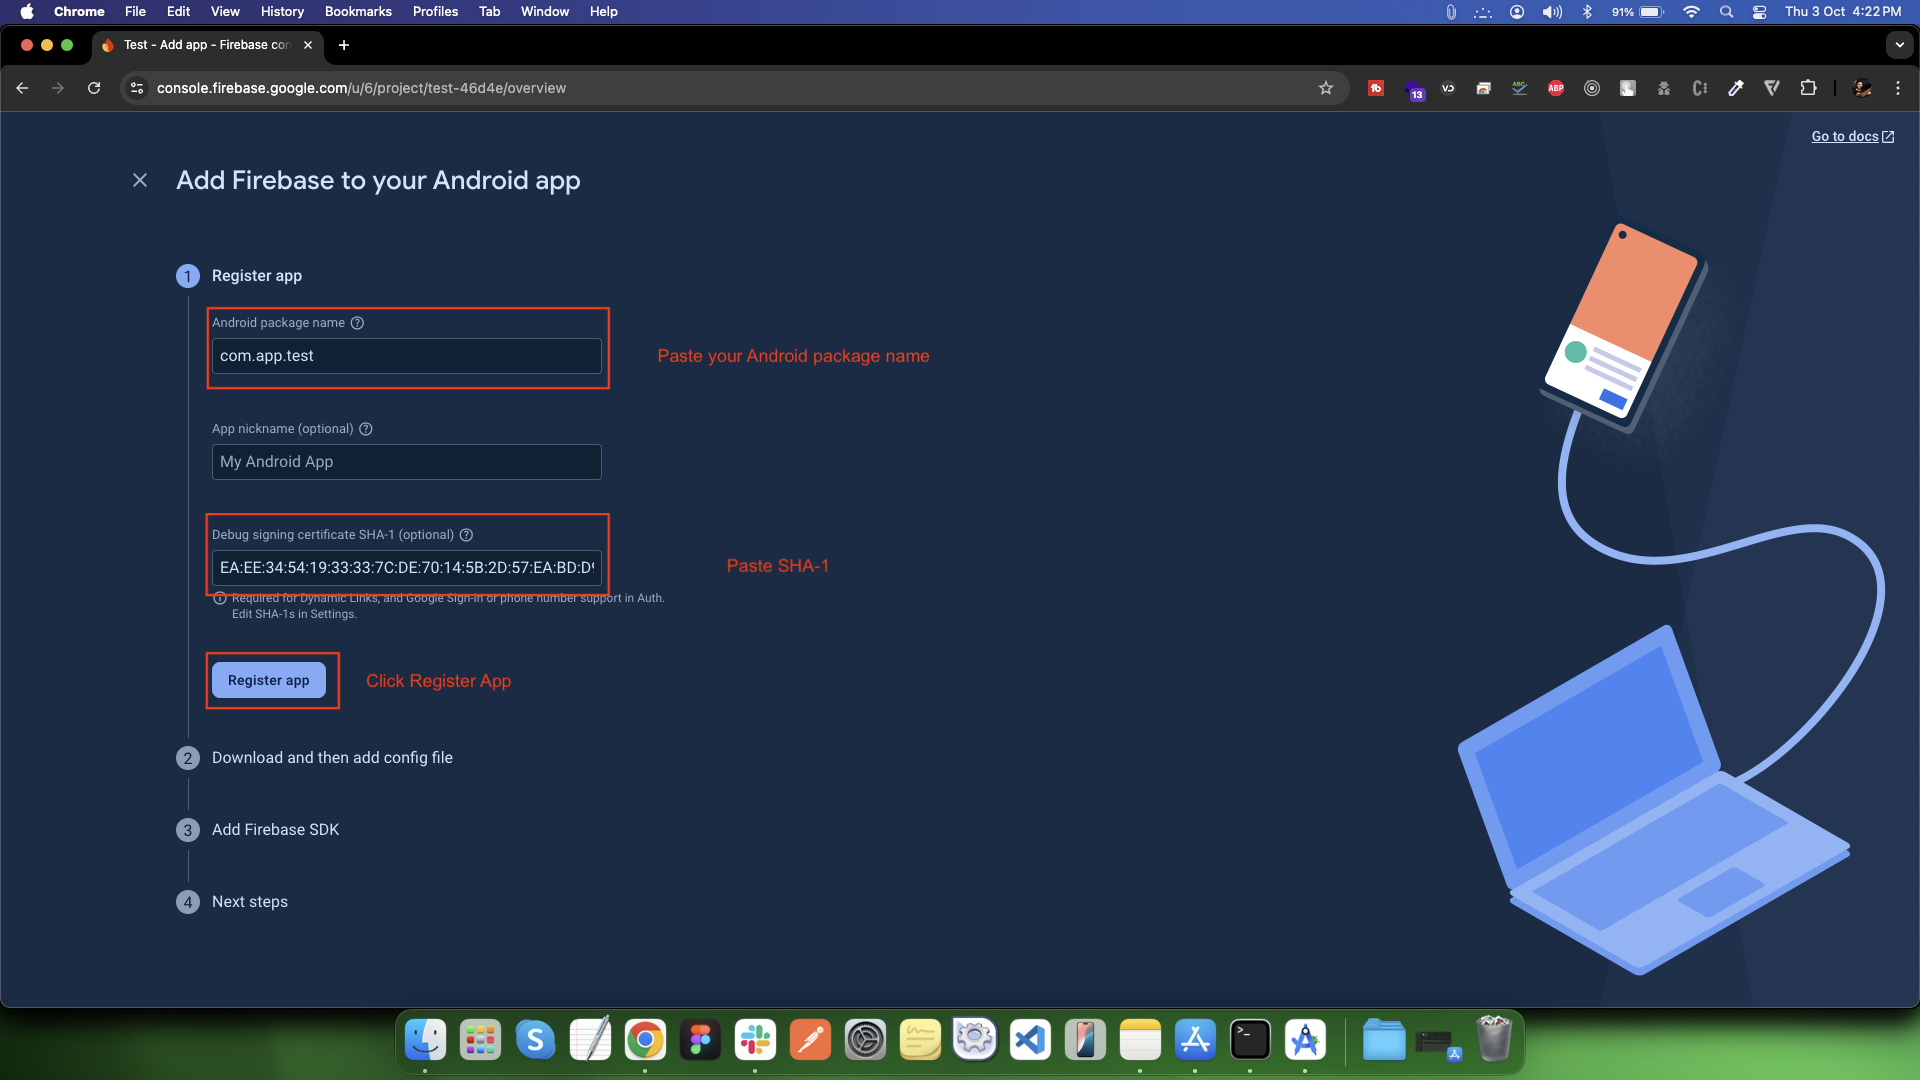
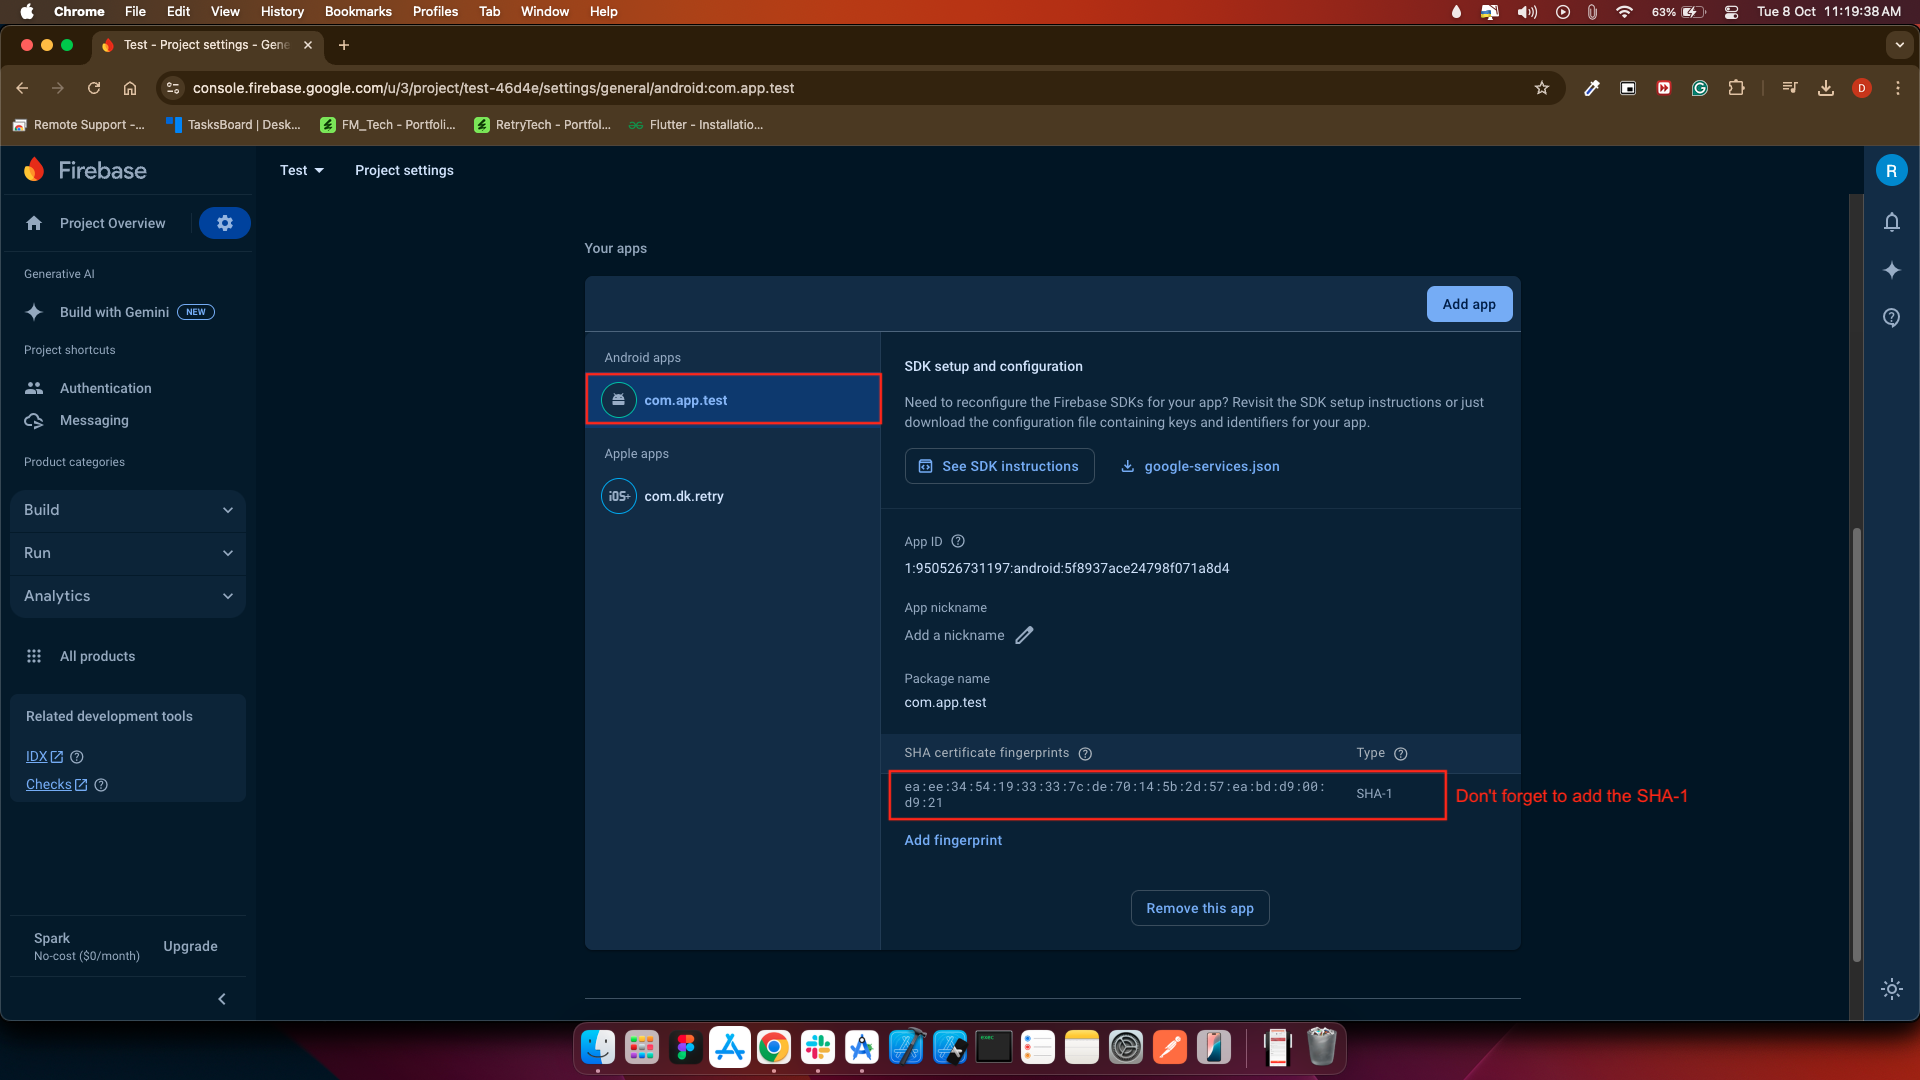
Register Android App
-
Click the Android icon on the Firebase project overview page.
-
Enter your Android package name (Example: com.example.myapp (must match applicationId in android/app/build.gradle))
-
(Optional) Enter: App nickname (for identification in Firebase)
-
Debug signing certificate SHA-1 (needed for Google sign-in, etc.) - Link
-
Click Register app.
-
-
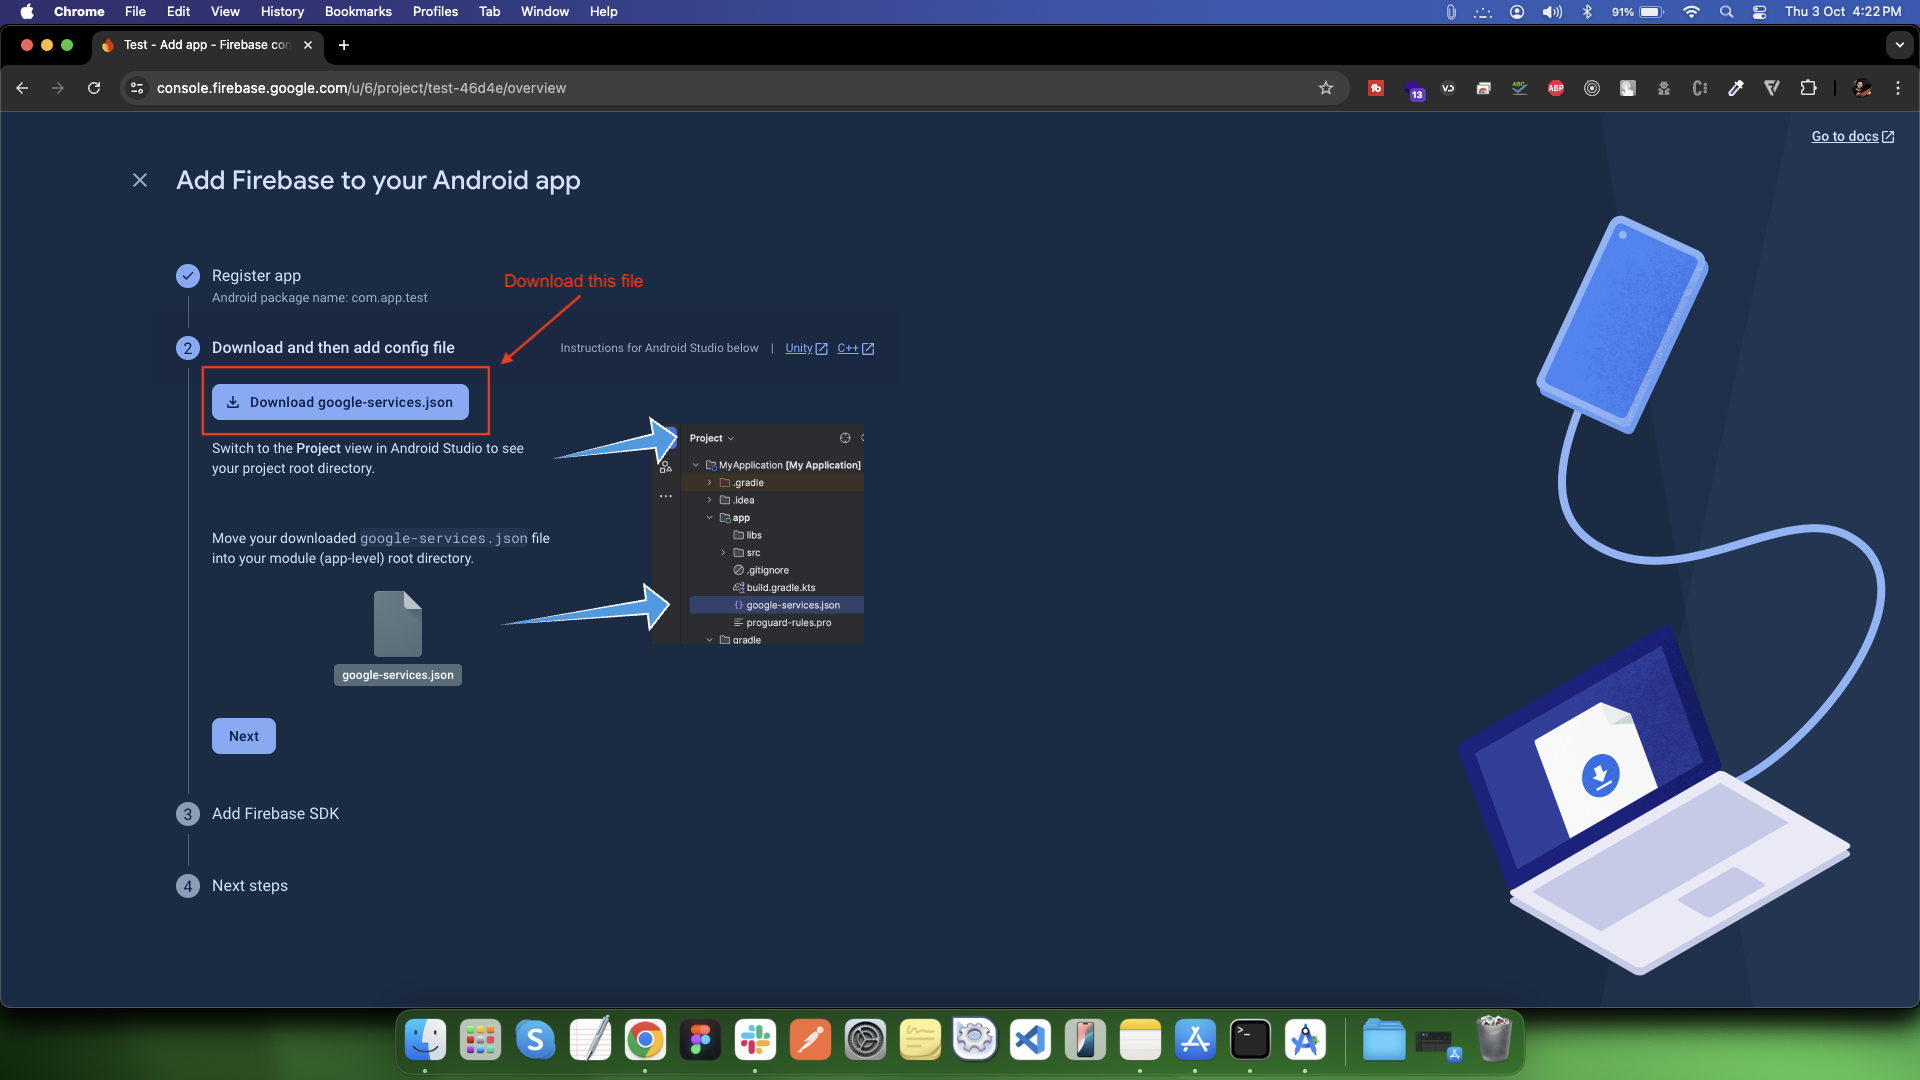
Download google-services.json
-
After registration, click Download google-services.json
-
-
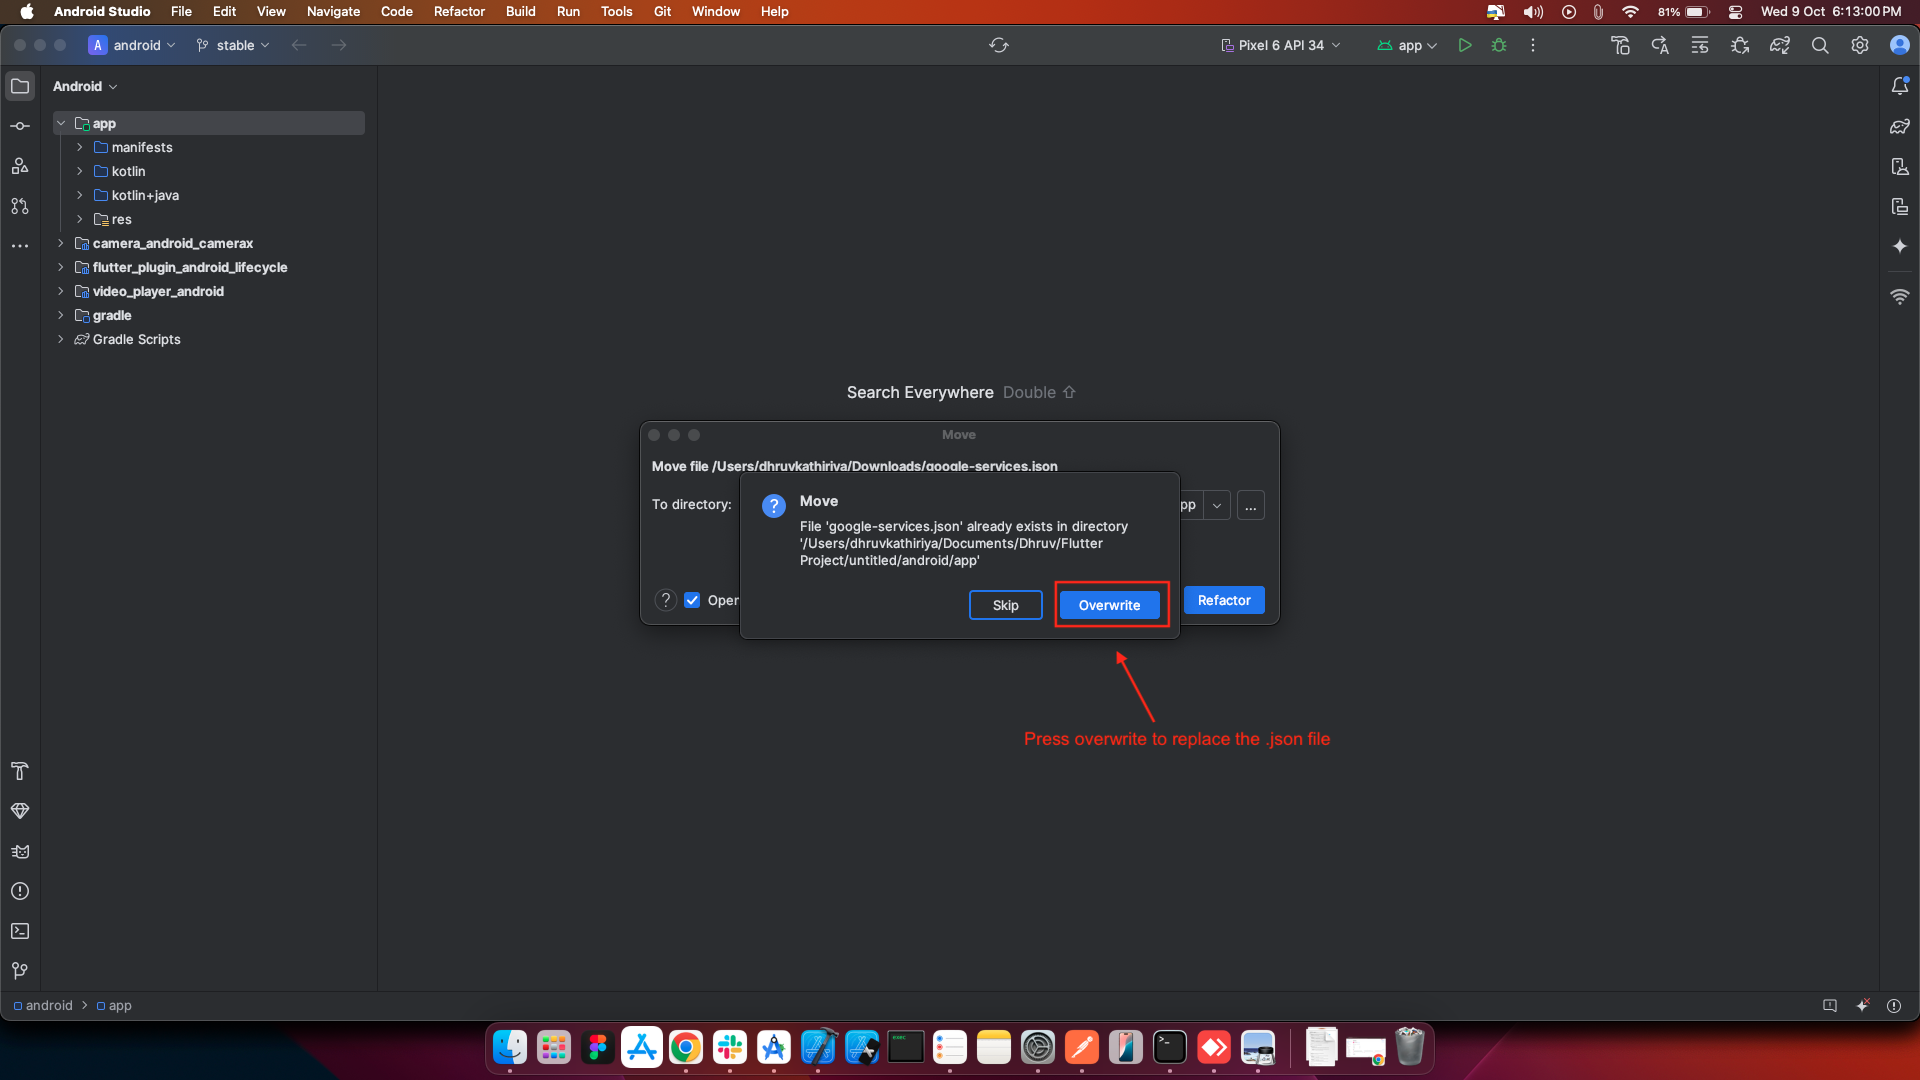
Move the file to your Flutter project under: android/app/google-services.json
-
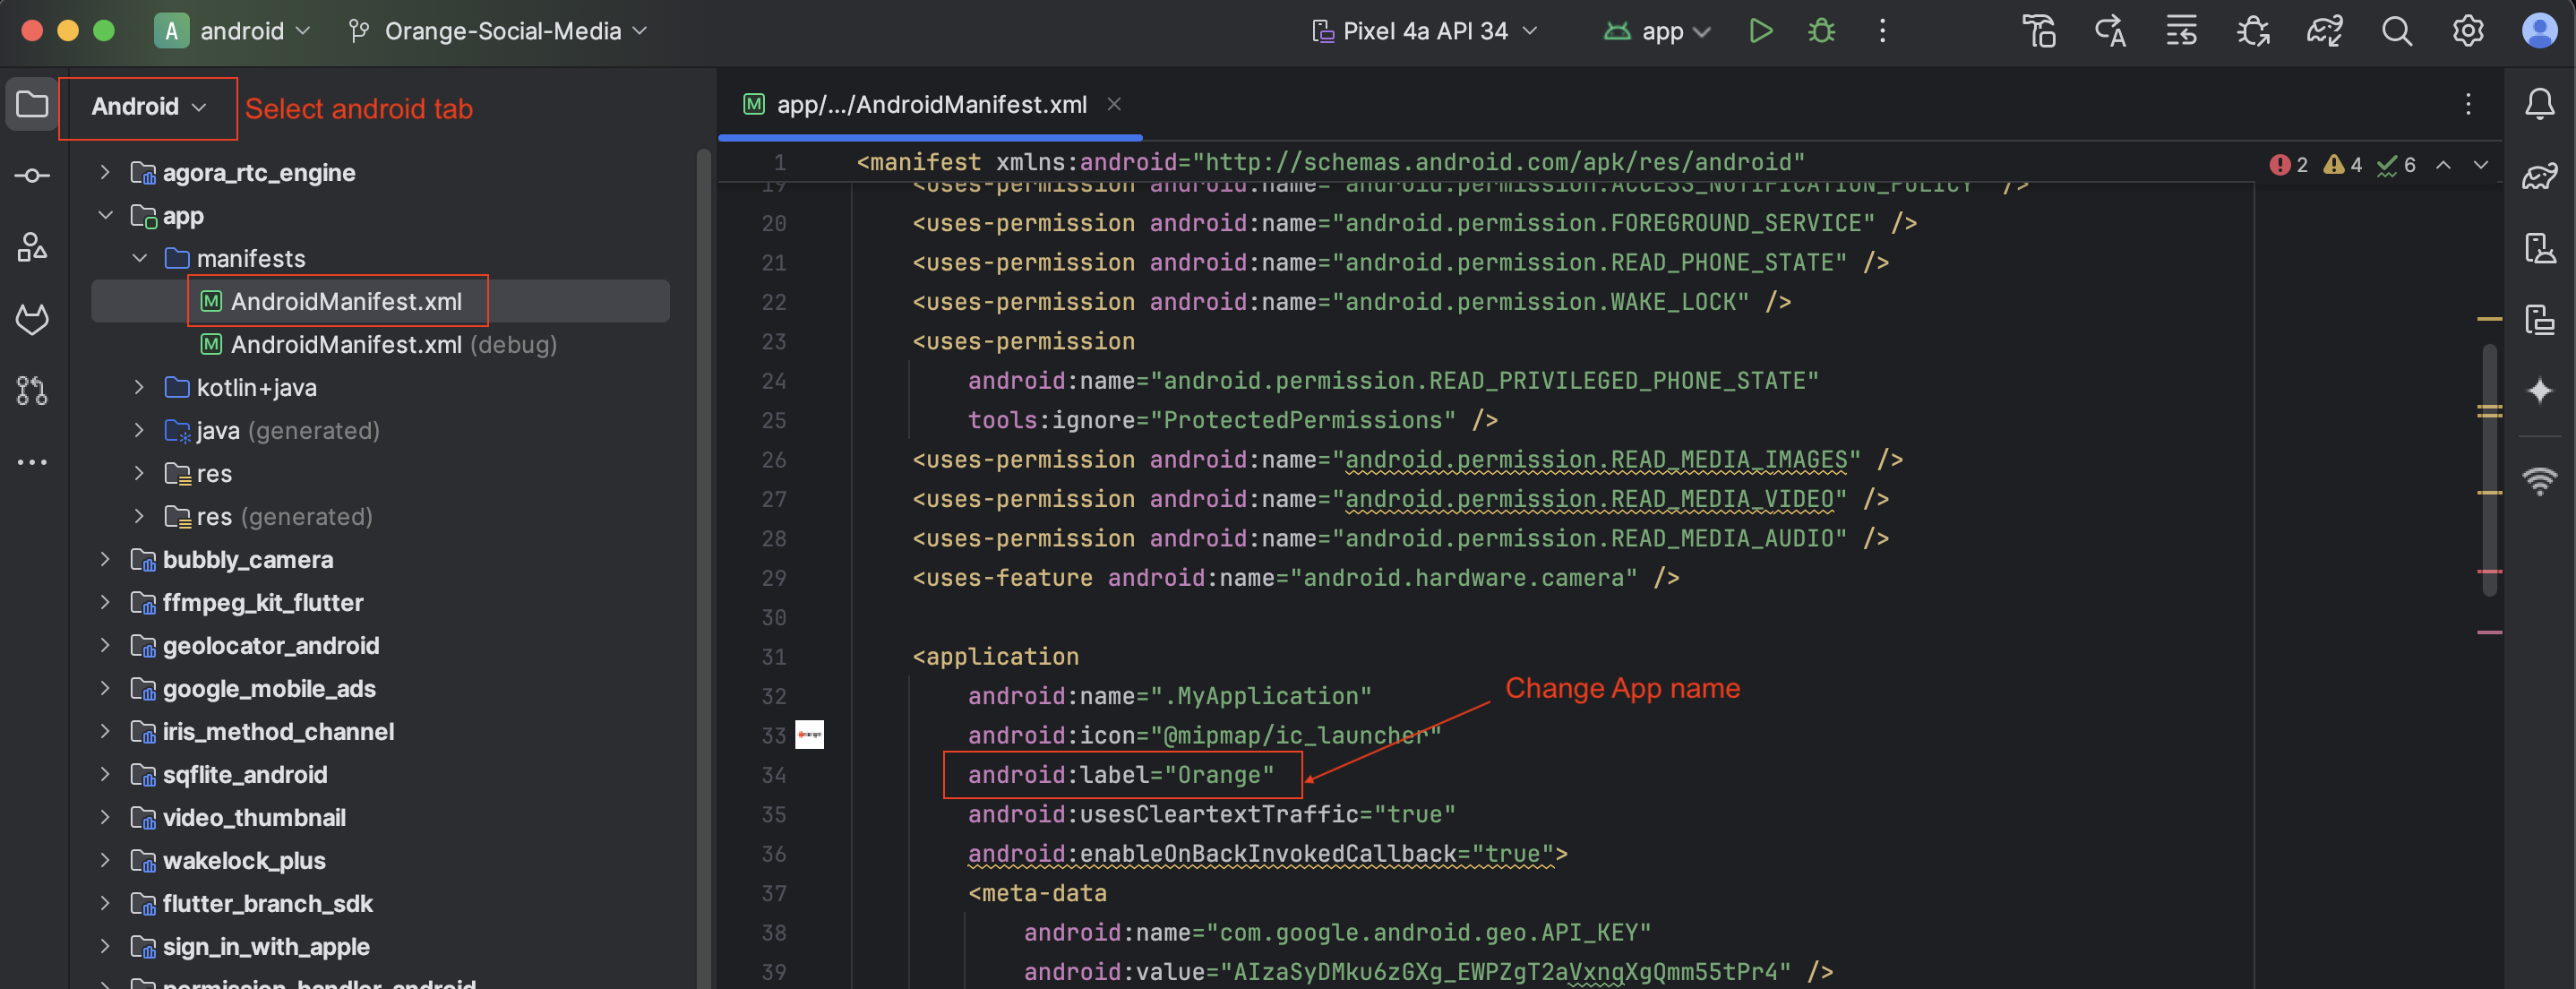
Open the Android Manifest
-
In Android Studio, switch to the Android tab from the dropdown in the top-left.
-
Navigate to: app/manifests/AndroidManifest.xml
-
Open AndroidManifest.xml.
-
Modify the App Label
-
Inside the
tag, find the following line : android:label="Orange" -
Replace "Orange" with your desired app name: android:label="My New App"
-
-
Select the Android device from the device list or connect a physical device via USB.
-
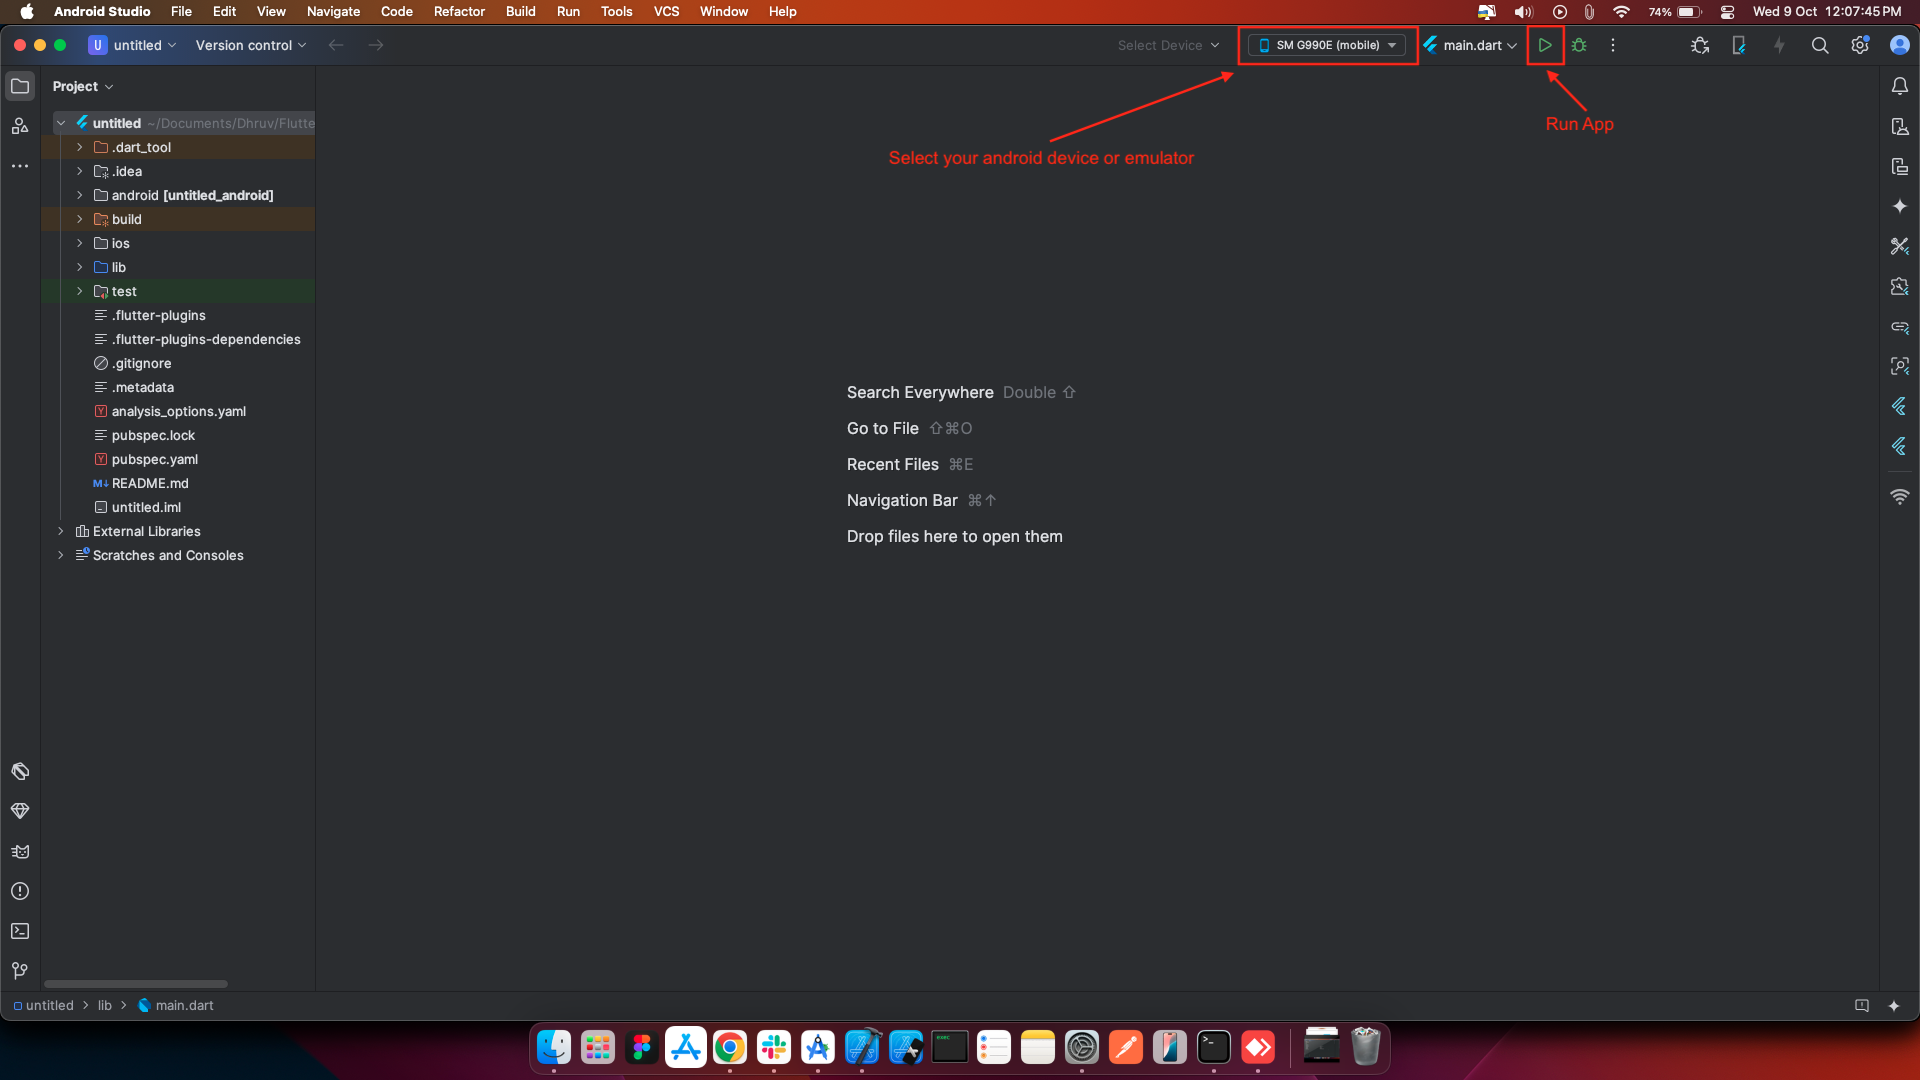
Click on Run (the green play button) or run the following command in the terminal


Change app name
Change app icon
Run Your Flutter App
flutter run
iOS Setup
-
Select the ios folder
-
- In the Android Studio Project panel , locate the ios folder under your Flutter project.
-
-
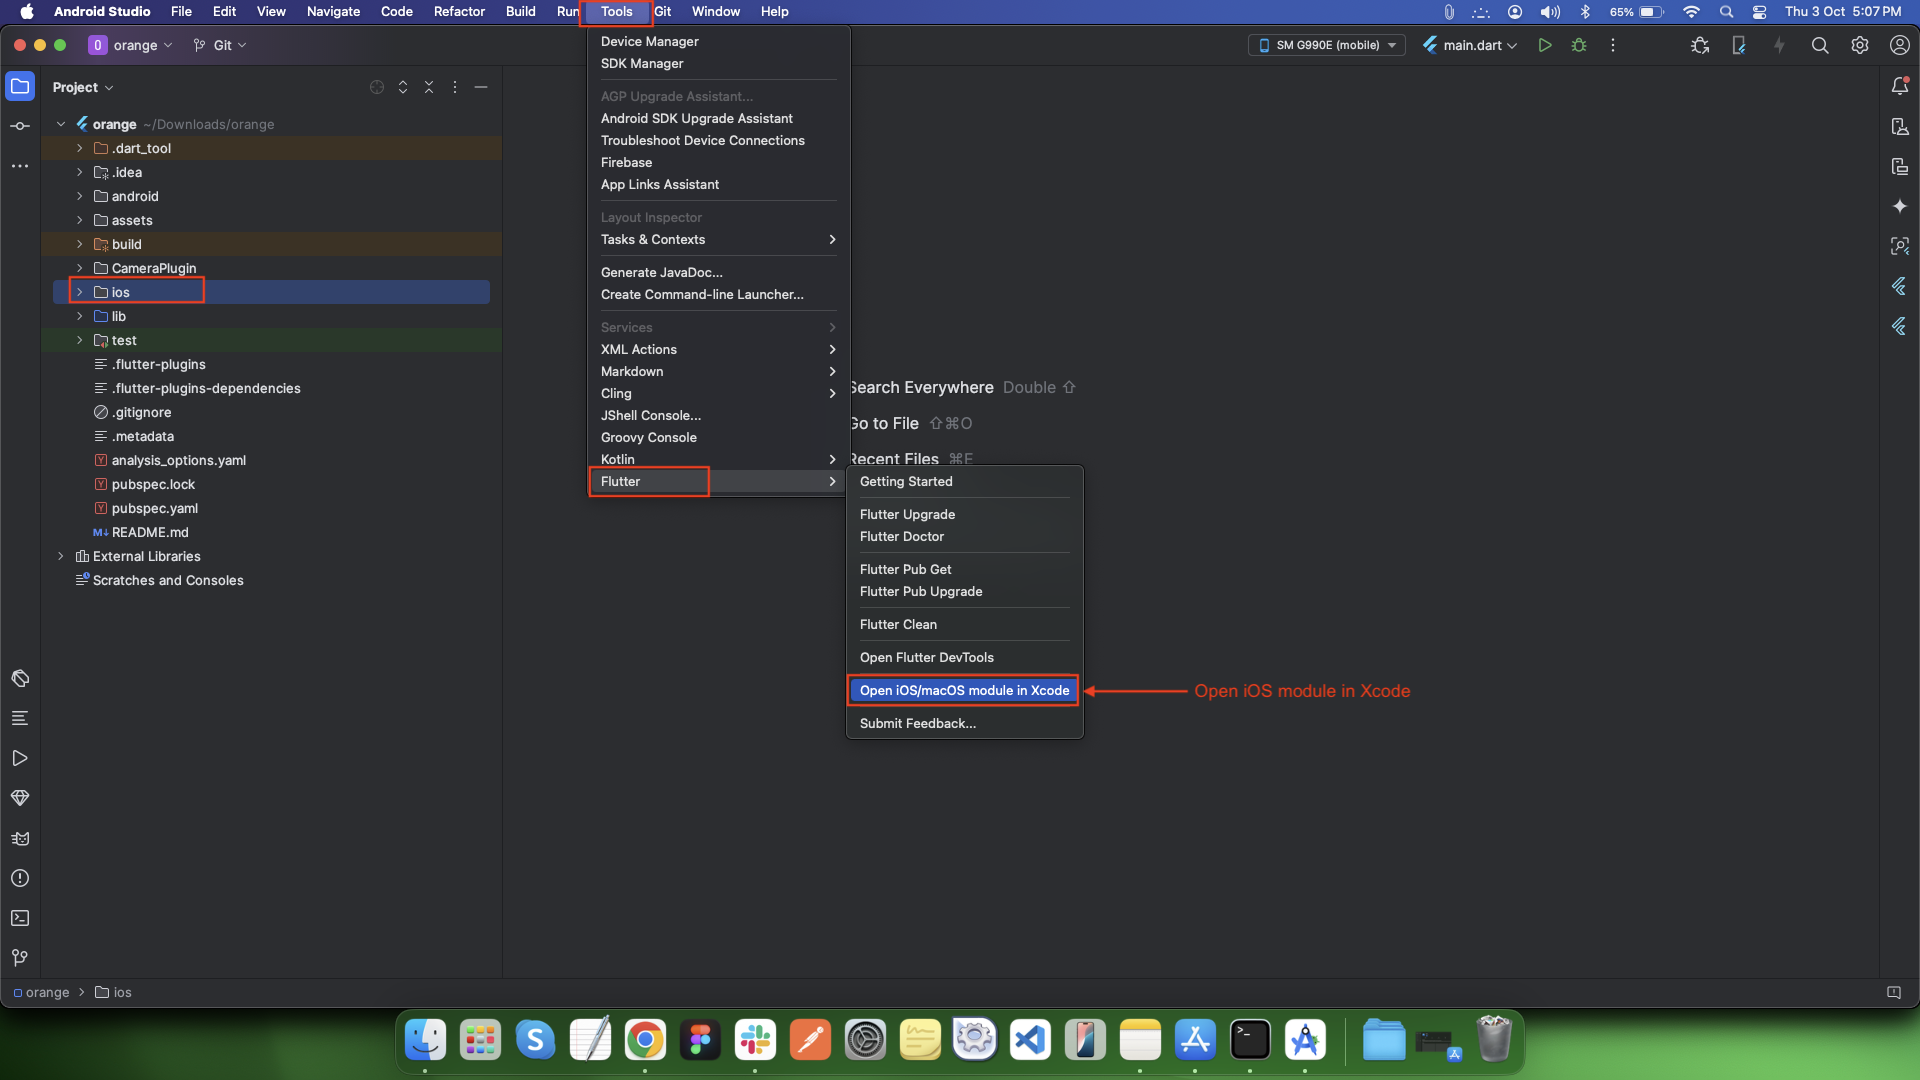
Navigate to Tools > Flutter
-
- On the top menu bar, go to: Tools → Flutter → Open iOS/macOS module in Xcode
-
-
Xcode Opens Automatically
-
- This will launch Xcode, opening your Flutter project's iOS module.
-
- From there, you can configure signing, capabilities, launch screen, etc.
-
-
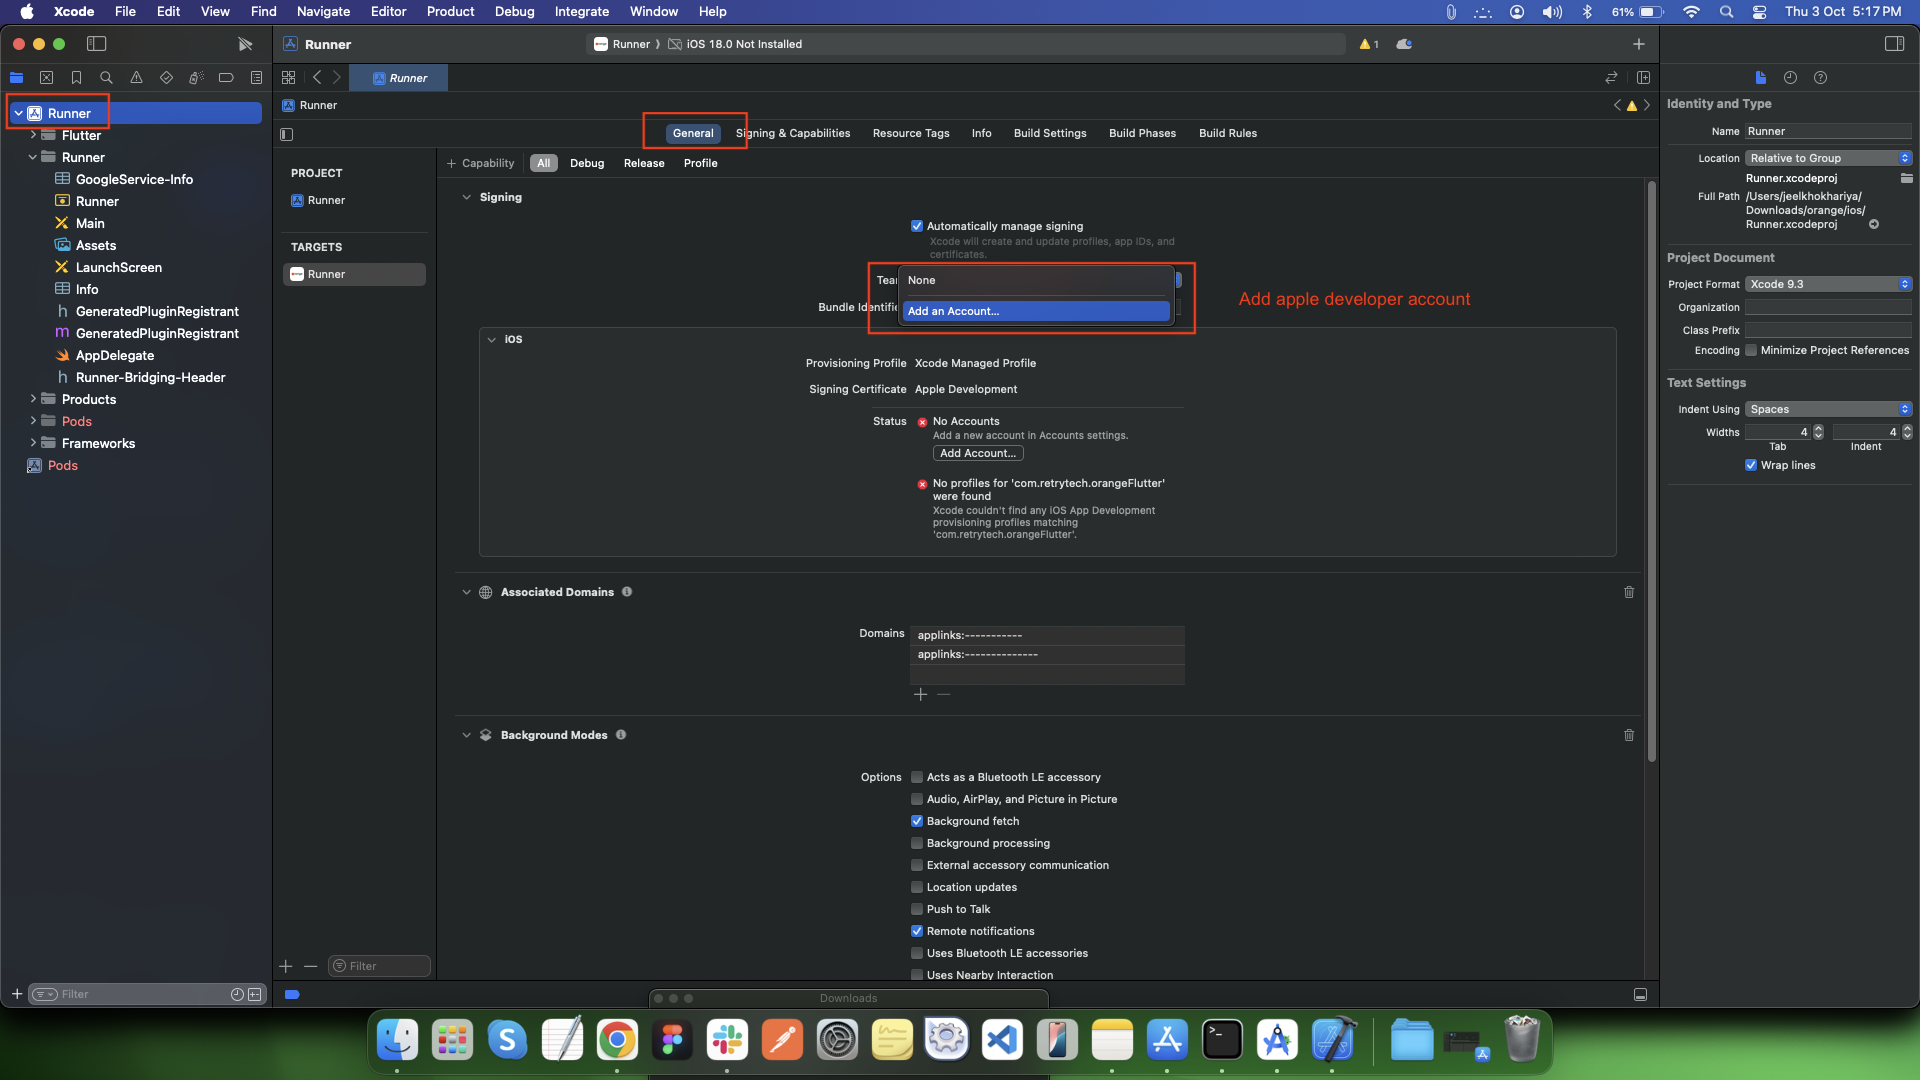
Select the Runner Target:
-
- In the project navigator on the left, select Runner (under the "Targets" section).
-
-
Go to the General Tab:
-
- In the middle of the window, you will see different tabs like General, Signing & Capabilities, Resource Tags, etc.
-
- Click on the General tab.
-
-
Set Your Developer Team:
-
- Scroll down to the Signing & Capabilities section under the General tab.
-
- In the Team dropdown, choose your developer account (Apple Developer Program).
-
If you haven't added your Apple ID yet, click Add Account in the dropdown, sign in with your Apple ID, and select the team.
-
-
-
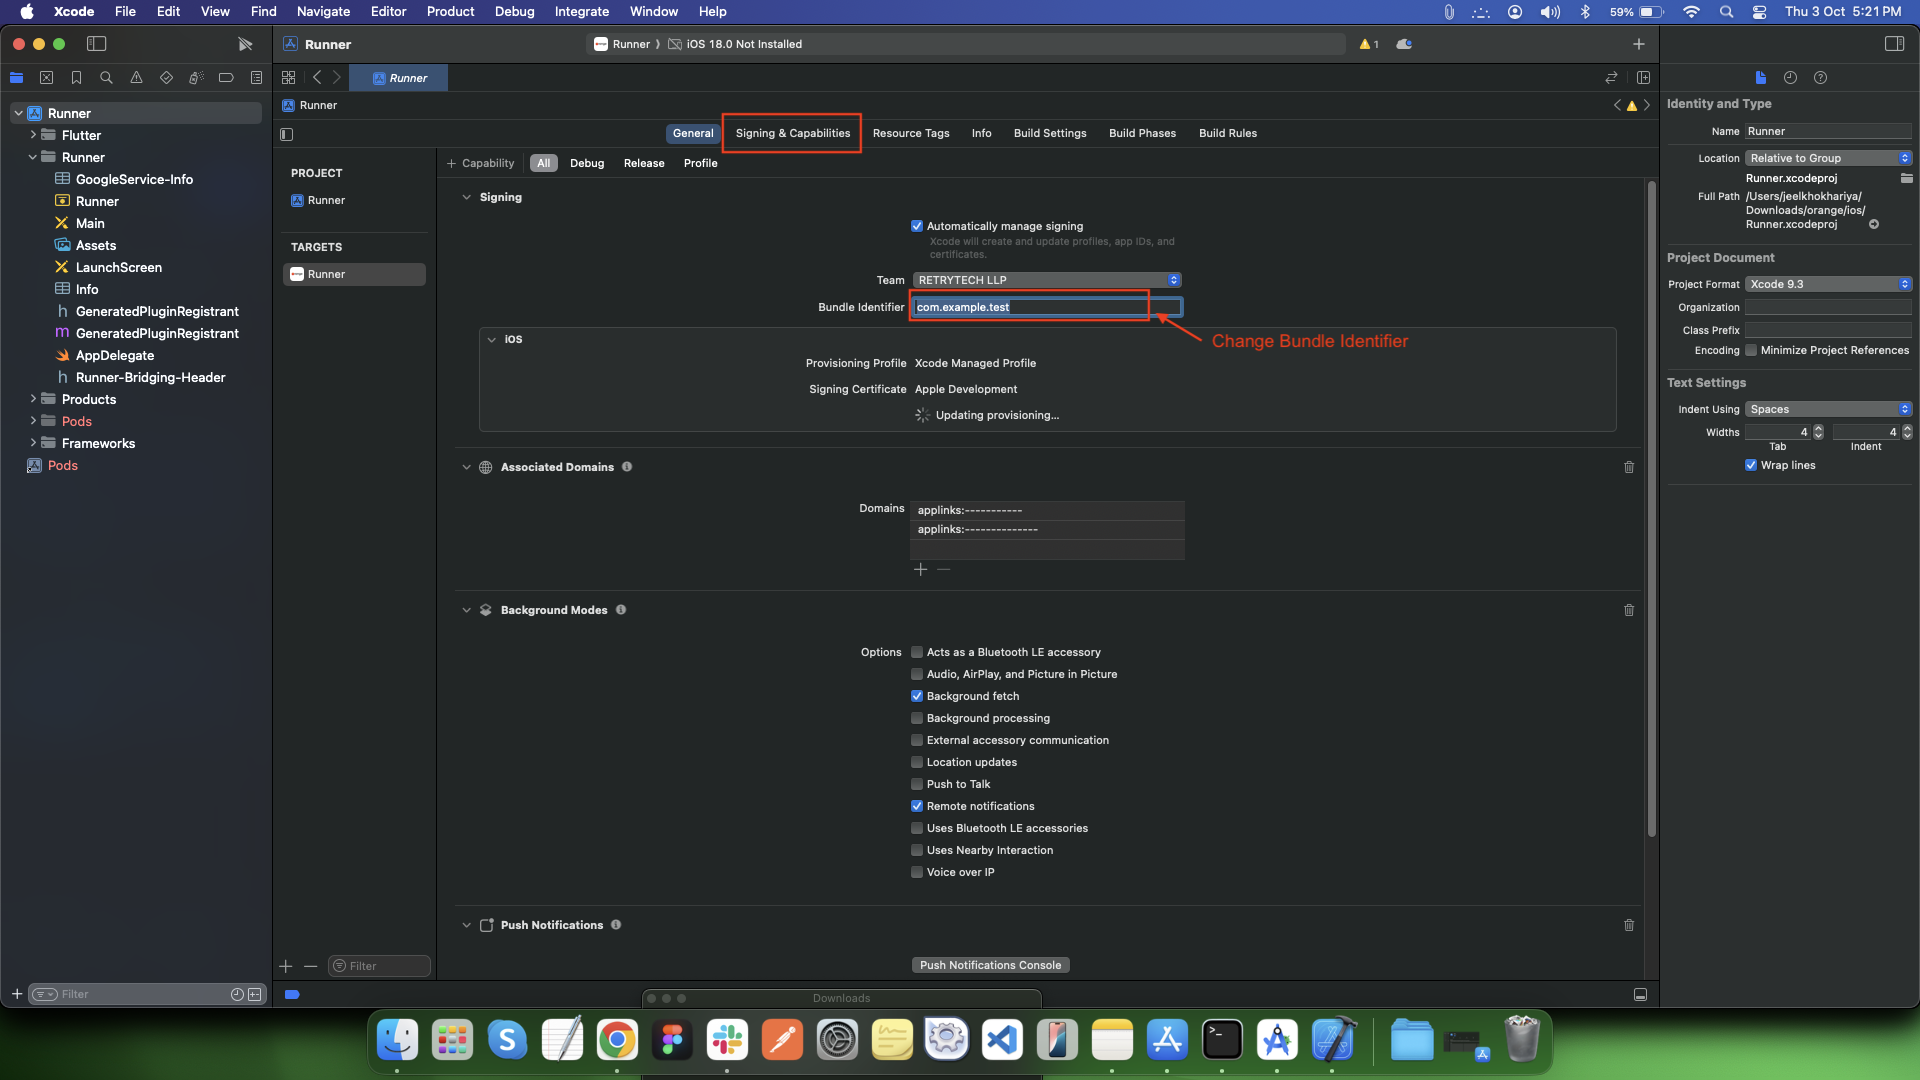
Change iOS Bundle Identifier in Xcode
-
- Open the ios module in Xcode (as shown earlier).
-
- Select the Runner project from the left panel.
-
- Choose the Signing & Capabilities tab.
-
- Locate the Bundle Identifier field.
-
- Change the bundle ID to your desired format, e.g.: com.yourcompany.yourappname
-
-
Open Firebase Console
-
Select your firebase project which was created while setting up the Backend Documentation.
-
Add iOS App to Firebase
-
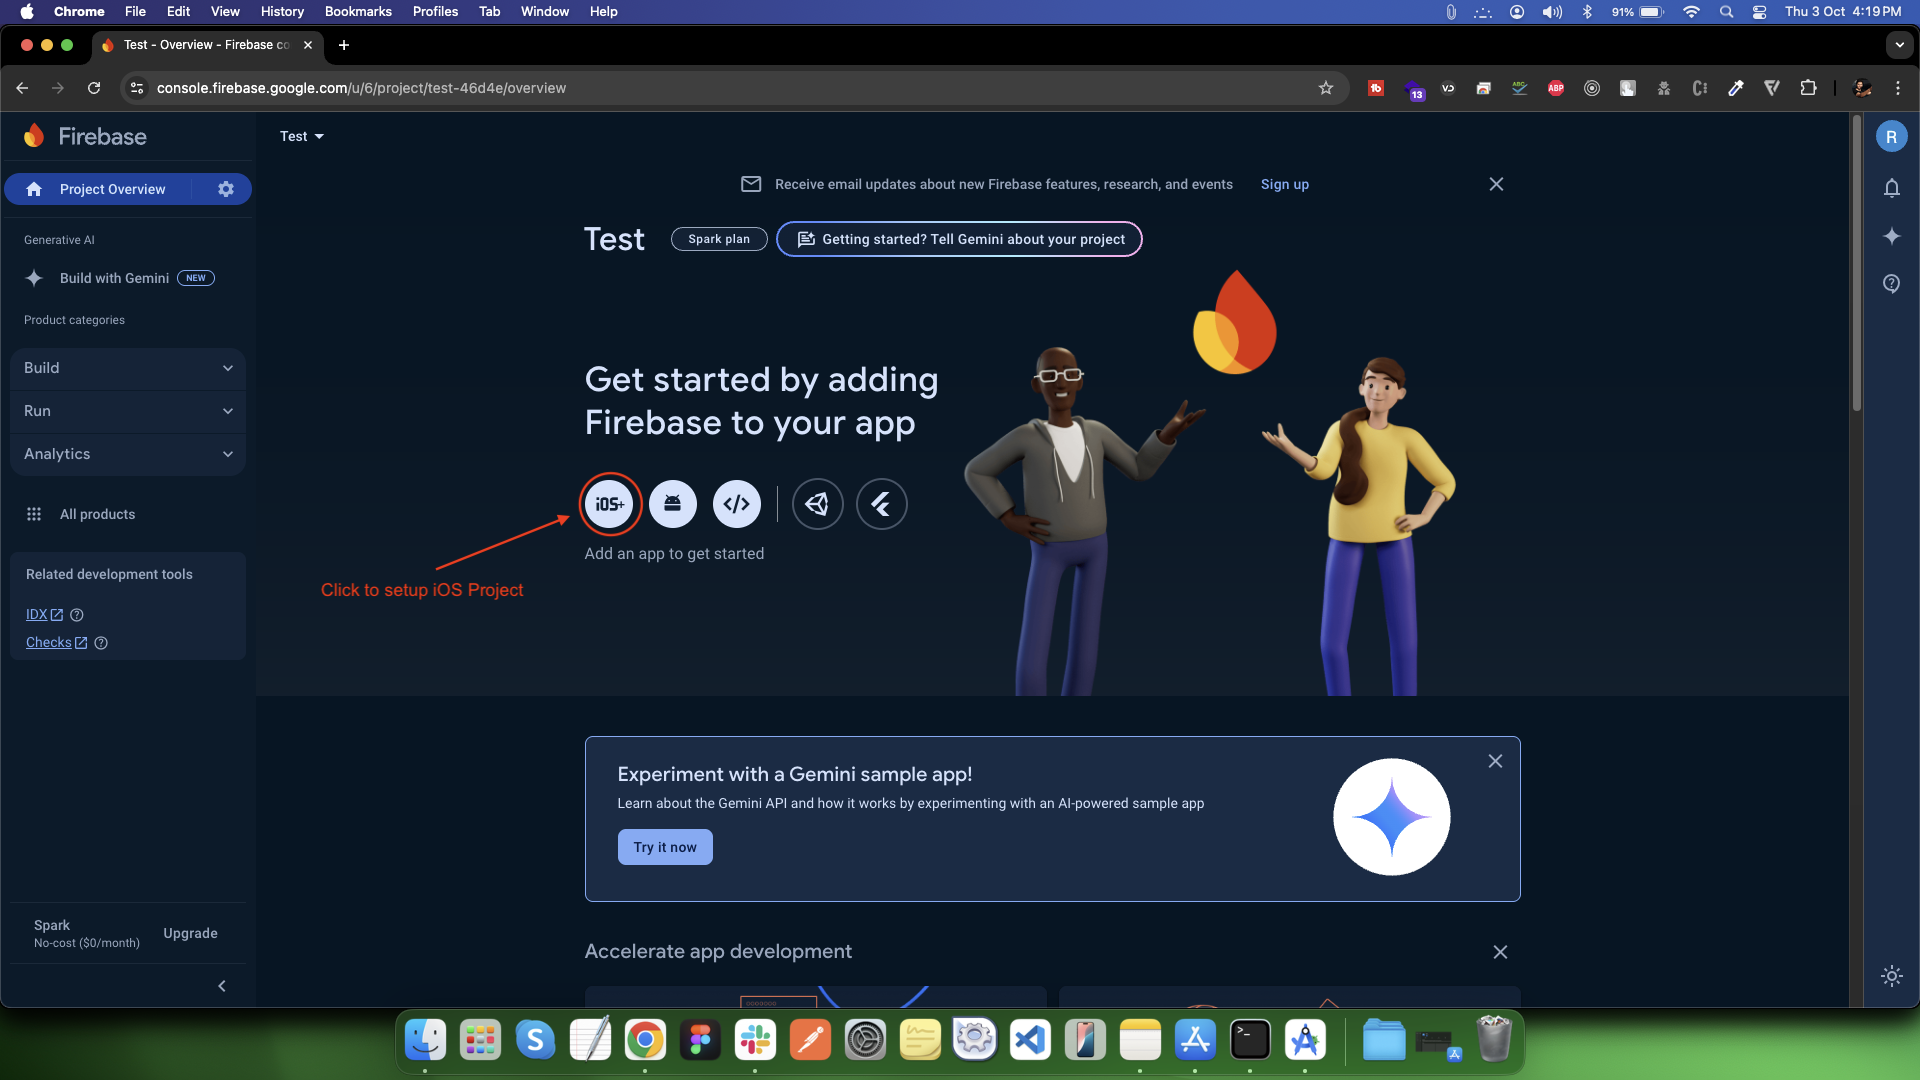
On the Project Overview page, look for the platform icons in the center.
-
Click the iOS + icon which represents adding an iOS app to Firebase.
-
-
Link Firebase with iOS App
-
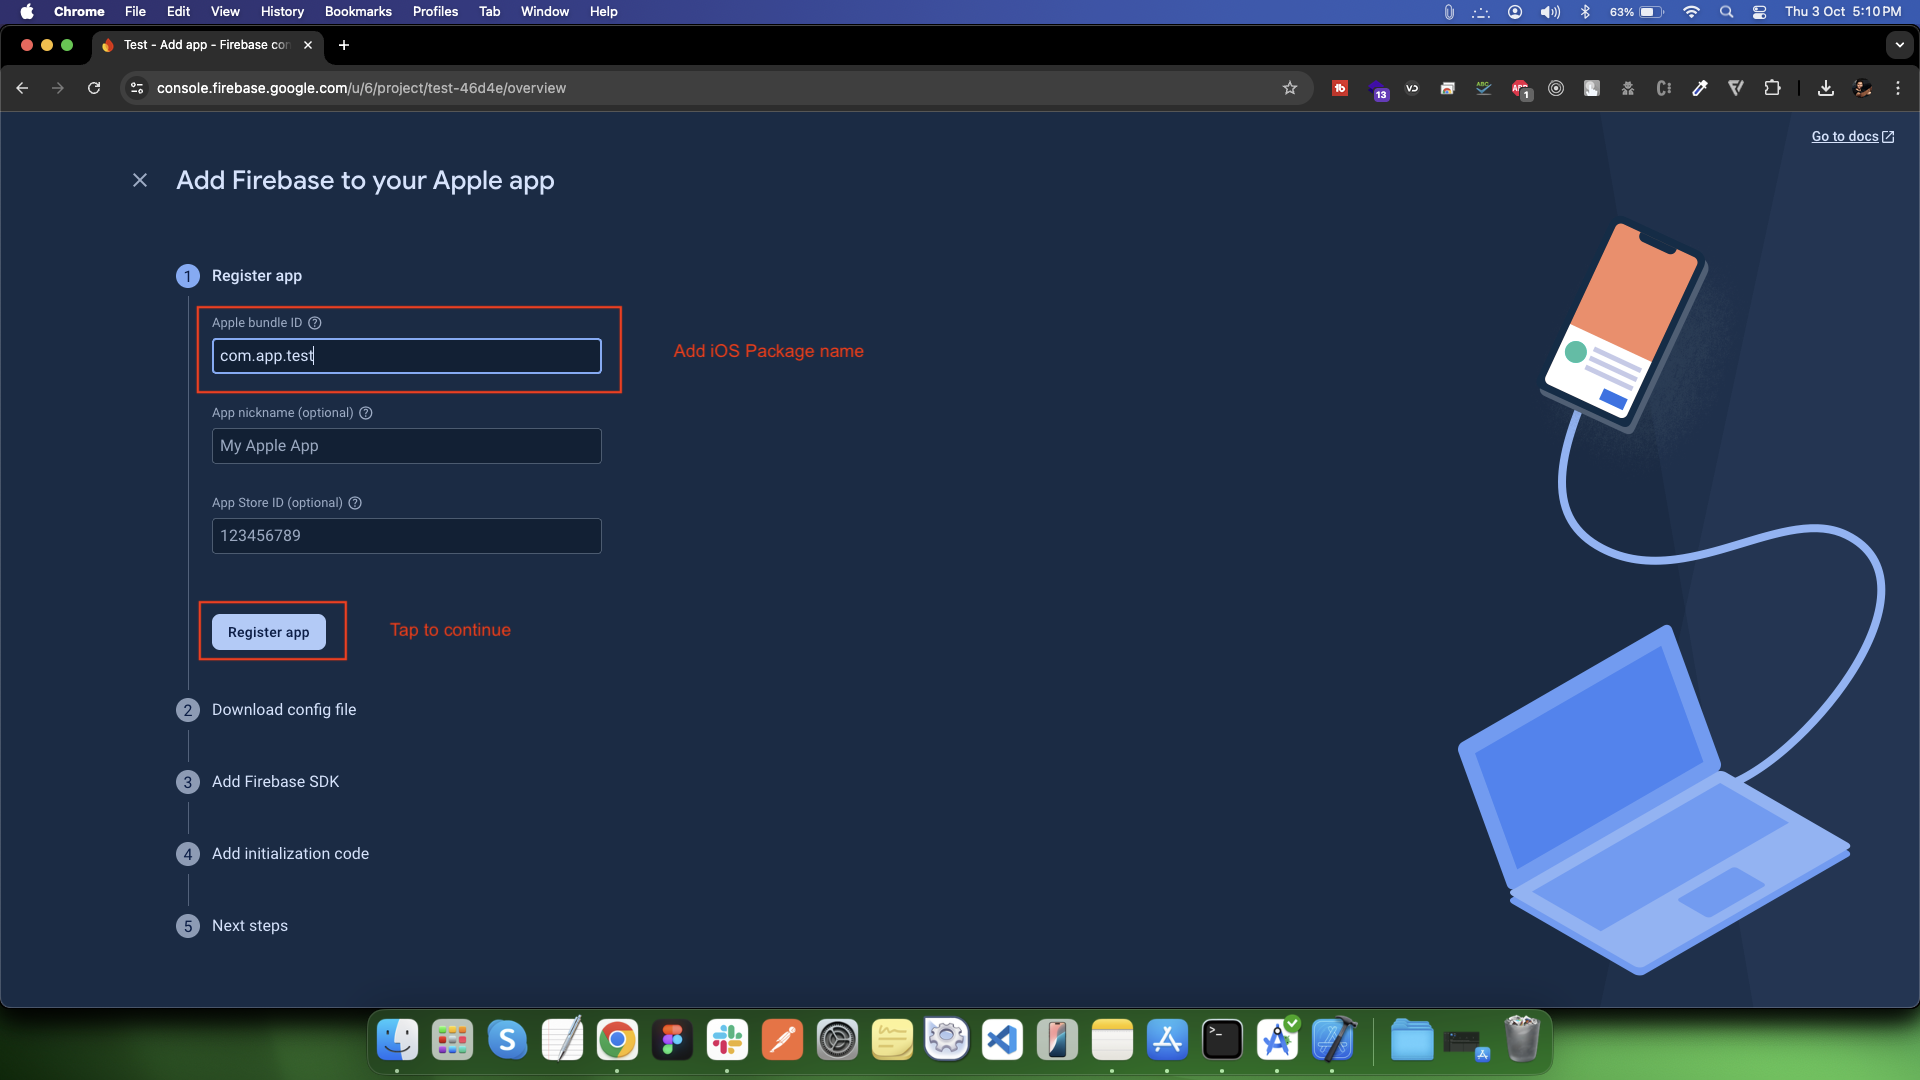
- Apple bundle ID (in Firebase):
-
• Must exactly match the one from Xcode (e.g., com.app.test).
-
• Once set, it cannot be changed.
-
-
- App nickname:
-
• Optional, just for your Firebase project display.
-
-
- App Store ID:
-
• Optional if not on App Store yet.
-
-
- Click Register app .
-
-
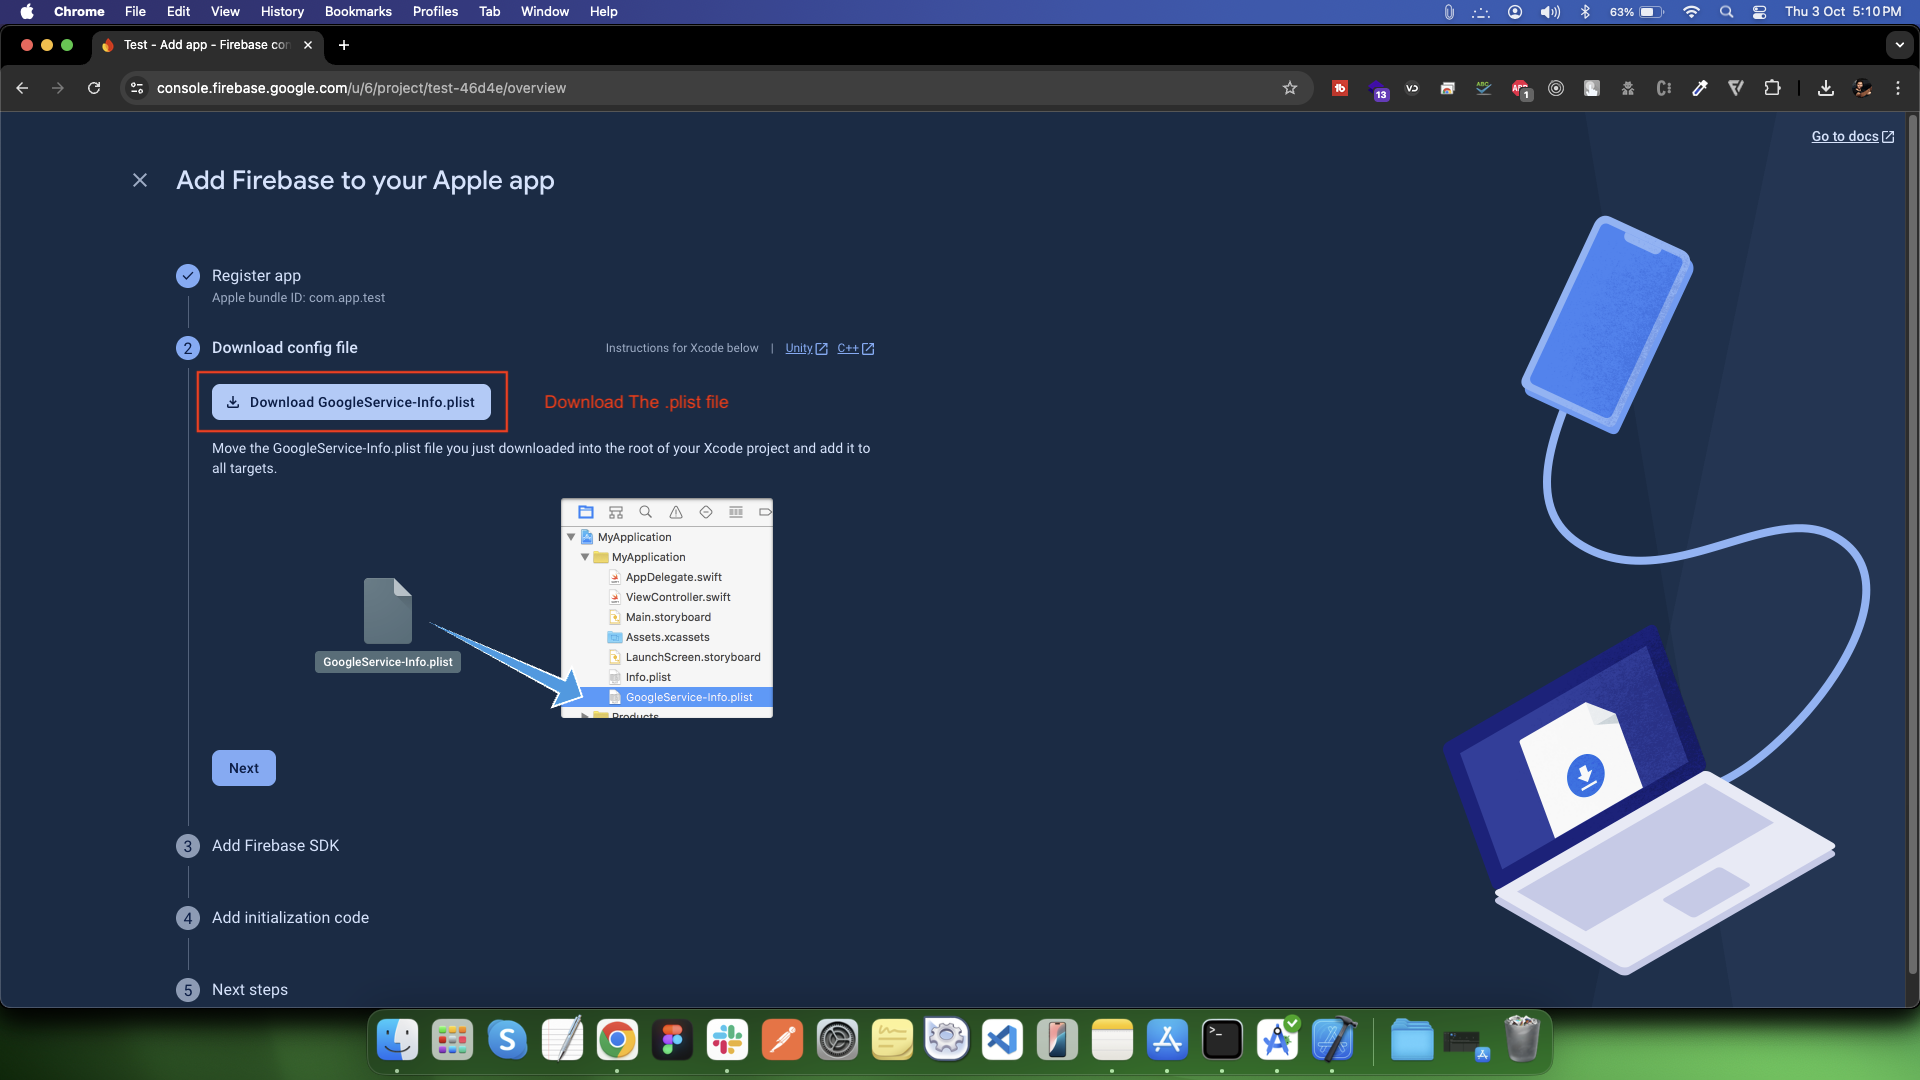
Download the file by clicking the “Download GoogleService-Info.plist” button.
-
Move it into your Xcode project directory: ios/Runner/
-
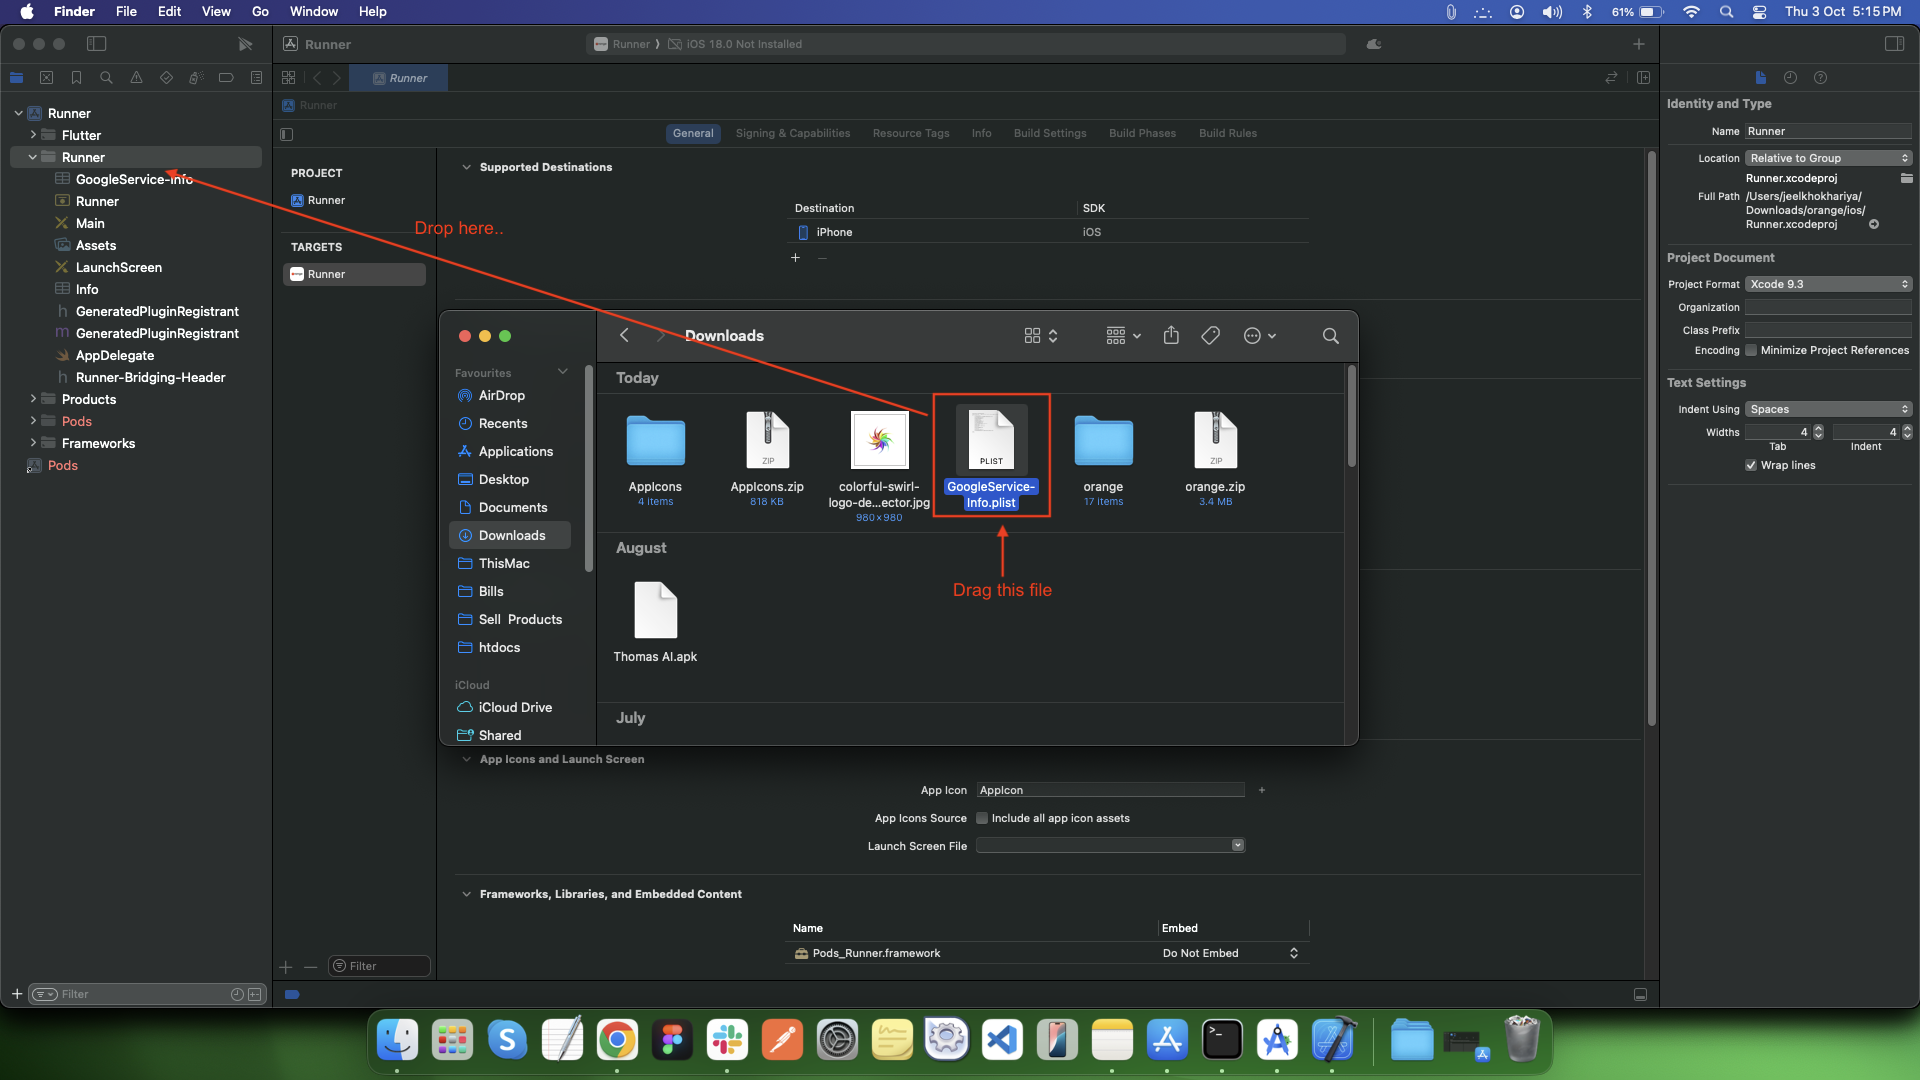
Steps to Drag GoogleService-Info.plist into Runner (Xcode):
-
- Locate the File:
-
• Find the downloaded GoogleService-Info.plist file in your Downloads folder (or wherever you saved it).
-
-
- Open Xcode:
-
• Open your Flutter project's iOS module using: ios/Runner.xcworkspace
-
-
-
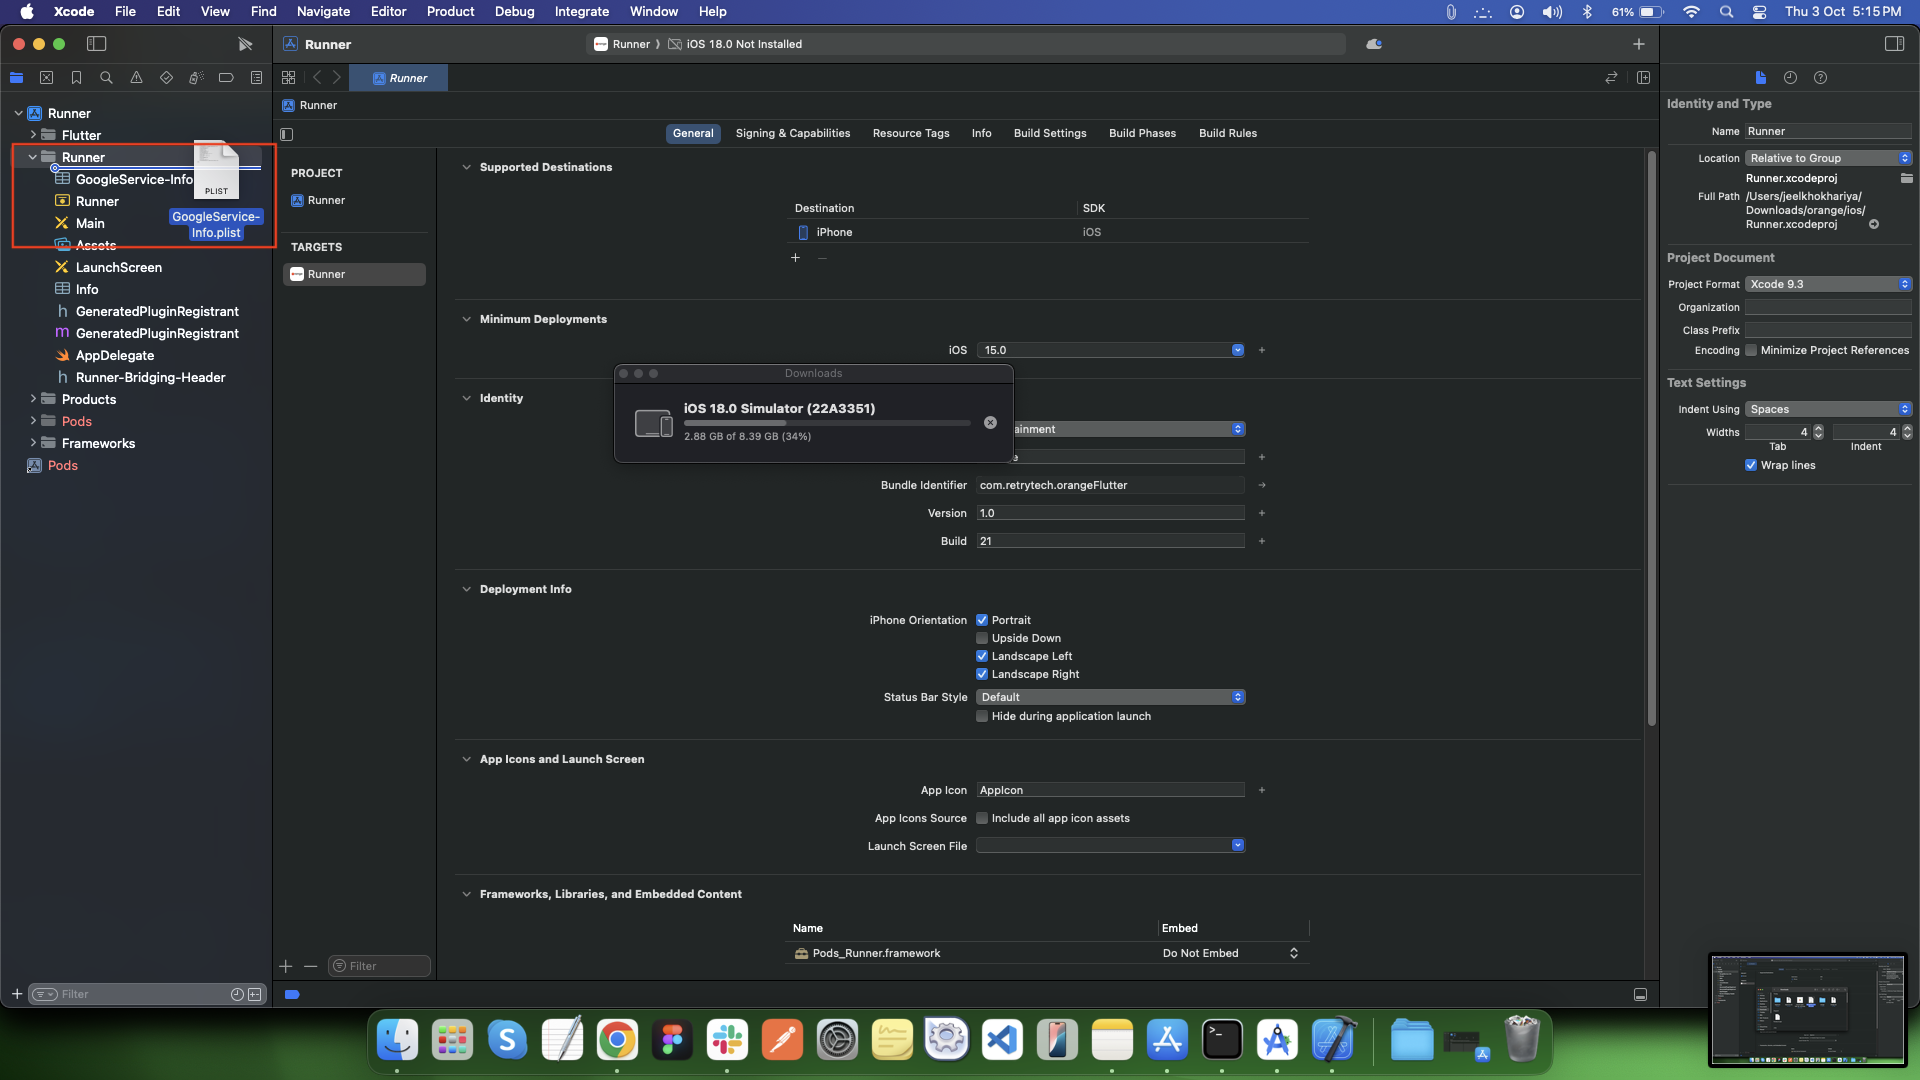
Drag and Drop:
-
- In Finder, click and drag the GoogleService-Info.plist file.
-
- Drop it inside the Runner folder in Xcode's Project Navigator (left sidebar).
-
- ⚠️ Make sure to drop it inside the actual folder, not just the top level.
-
-
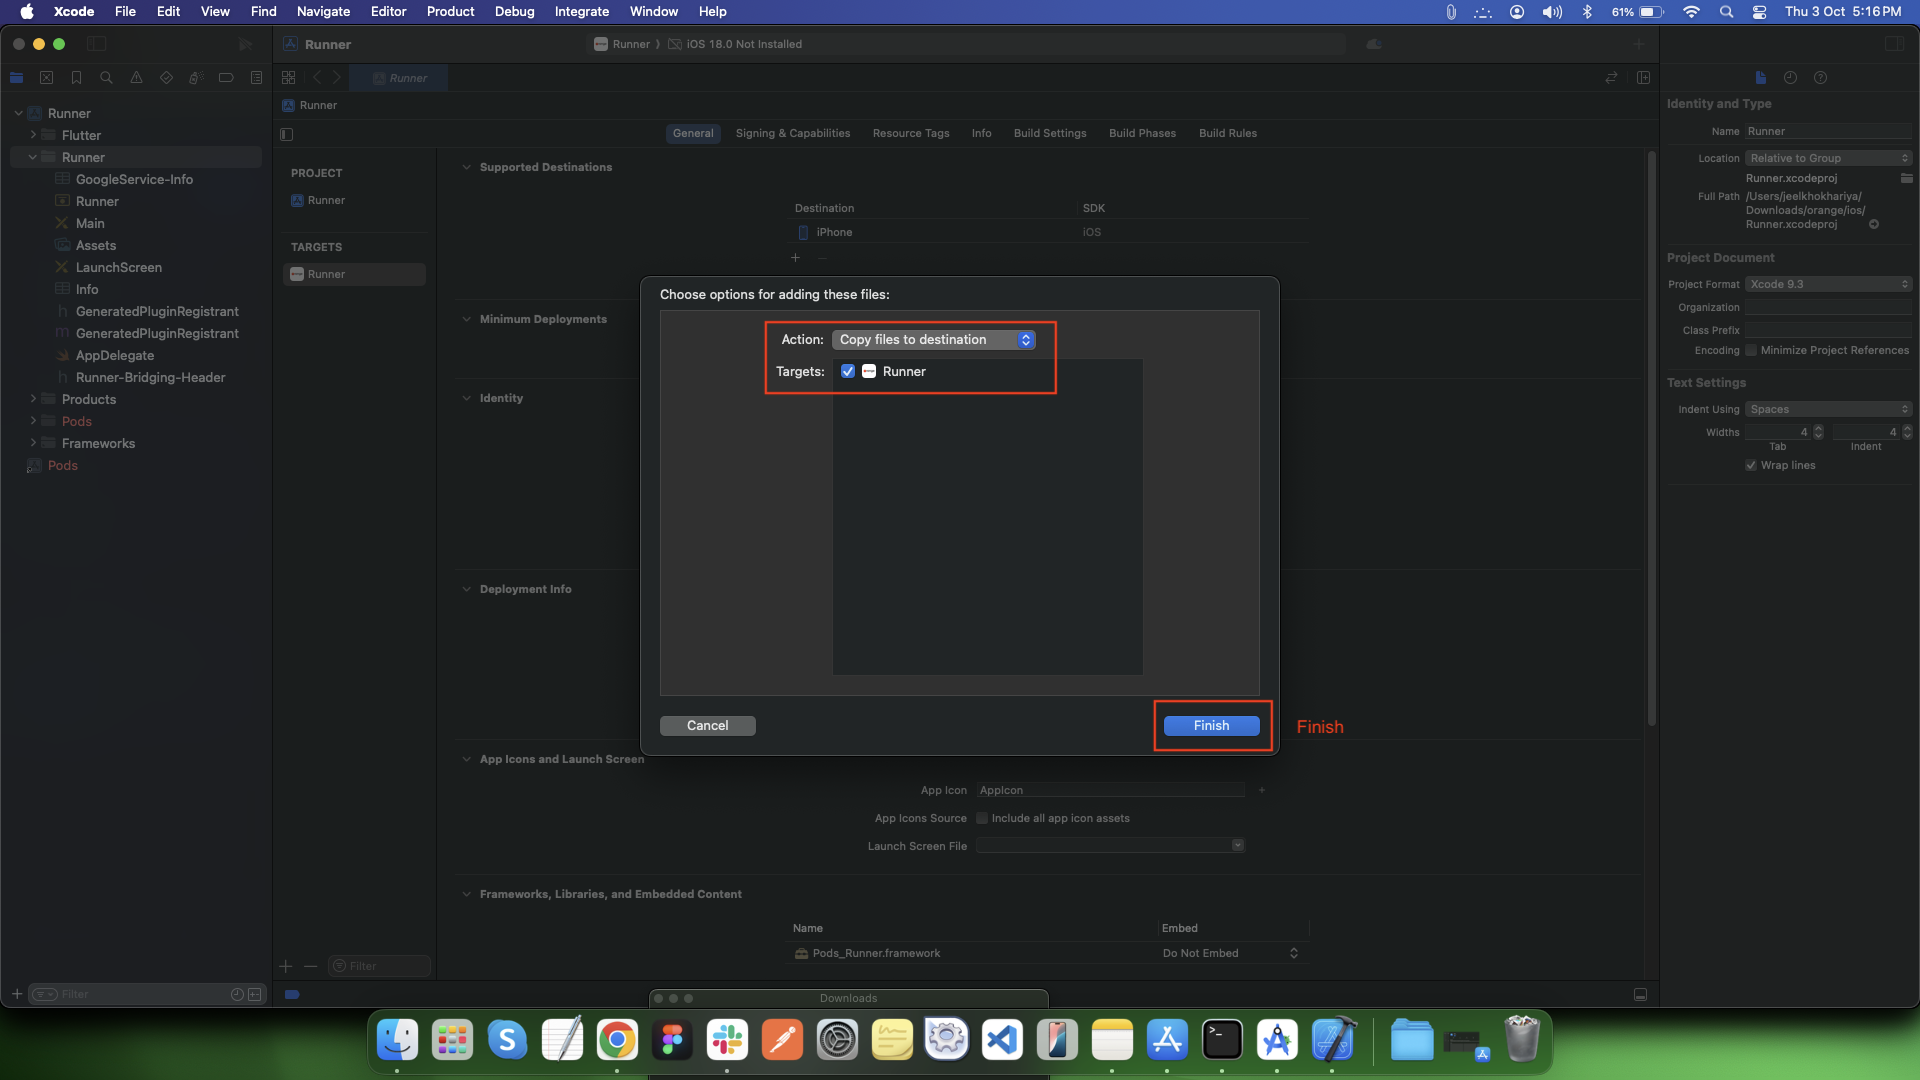
Confirm Dialog:
-
- A dialog will pop up.
-
- Ensure the following are selected:
-
✅ "Copy items if needed"
-
✅ "Add to targets: Runner"
-
-
- Then click Finish.
-
-
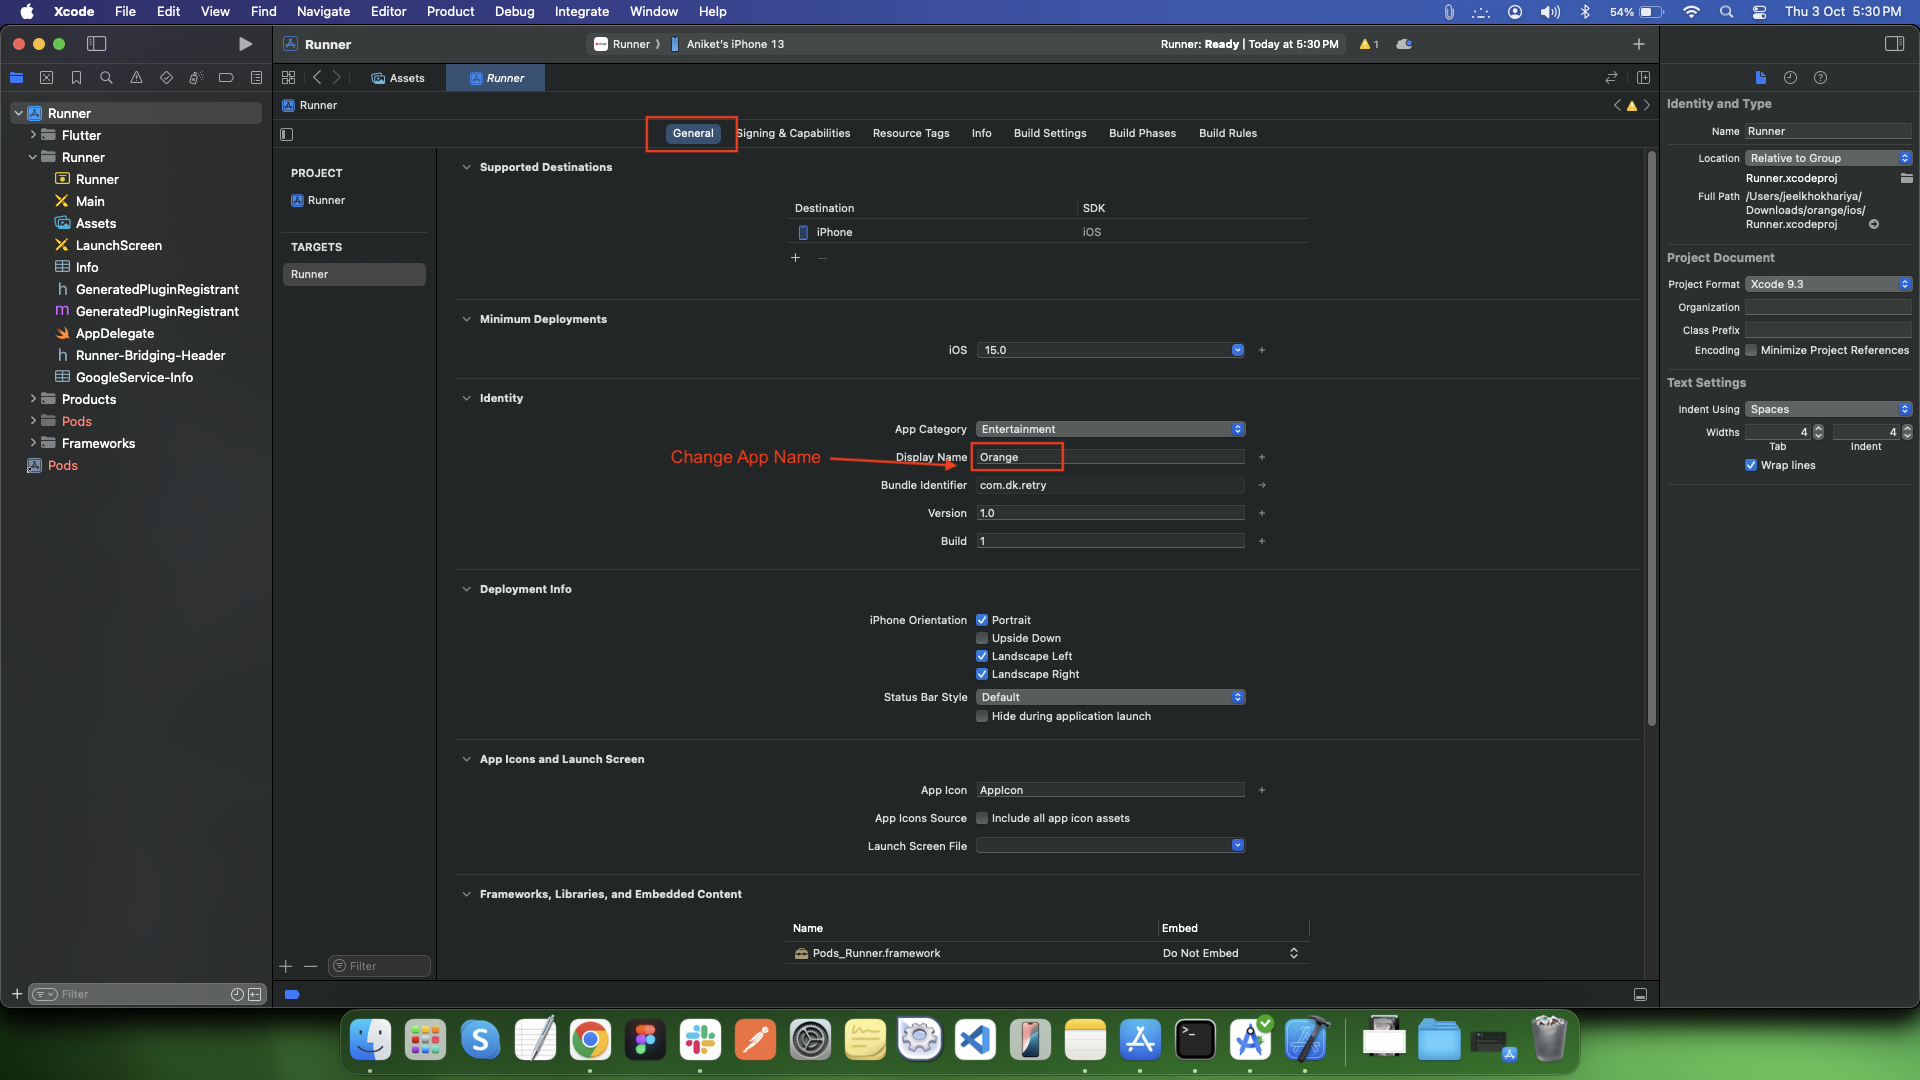
Change the App Name:
-
- To change the display name of the app:
-
• Under the general section, find the Display Name field.
-
• Change its value to the desired app name. This will change the app name that appears under the app icon on users' devices.
-
-
-
Open terminal in Android Studio.
-
Go to your Flutter project directory and run
-
Make sure you have an iOS device or an iOS Simulator set up.
-
In Android Studio, select the iOS Simulator or a connected iOS device from the device dropdown list.
-
Click on Run (the green play button) or run the following command in the terminal
⚠️ Important:
- The new bundle ID must be unique and match an App ID registered in your Apple Developer account.
Change app icon
Install Pods for Your Flutter Project
cd ios
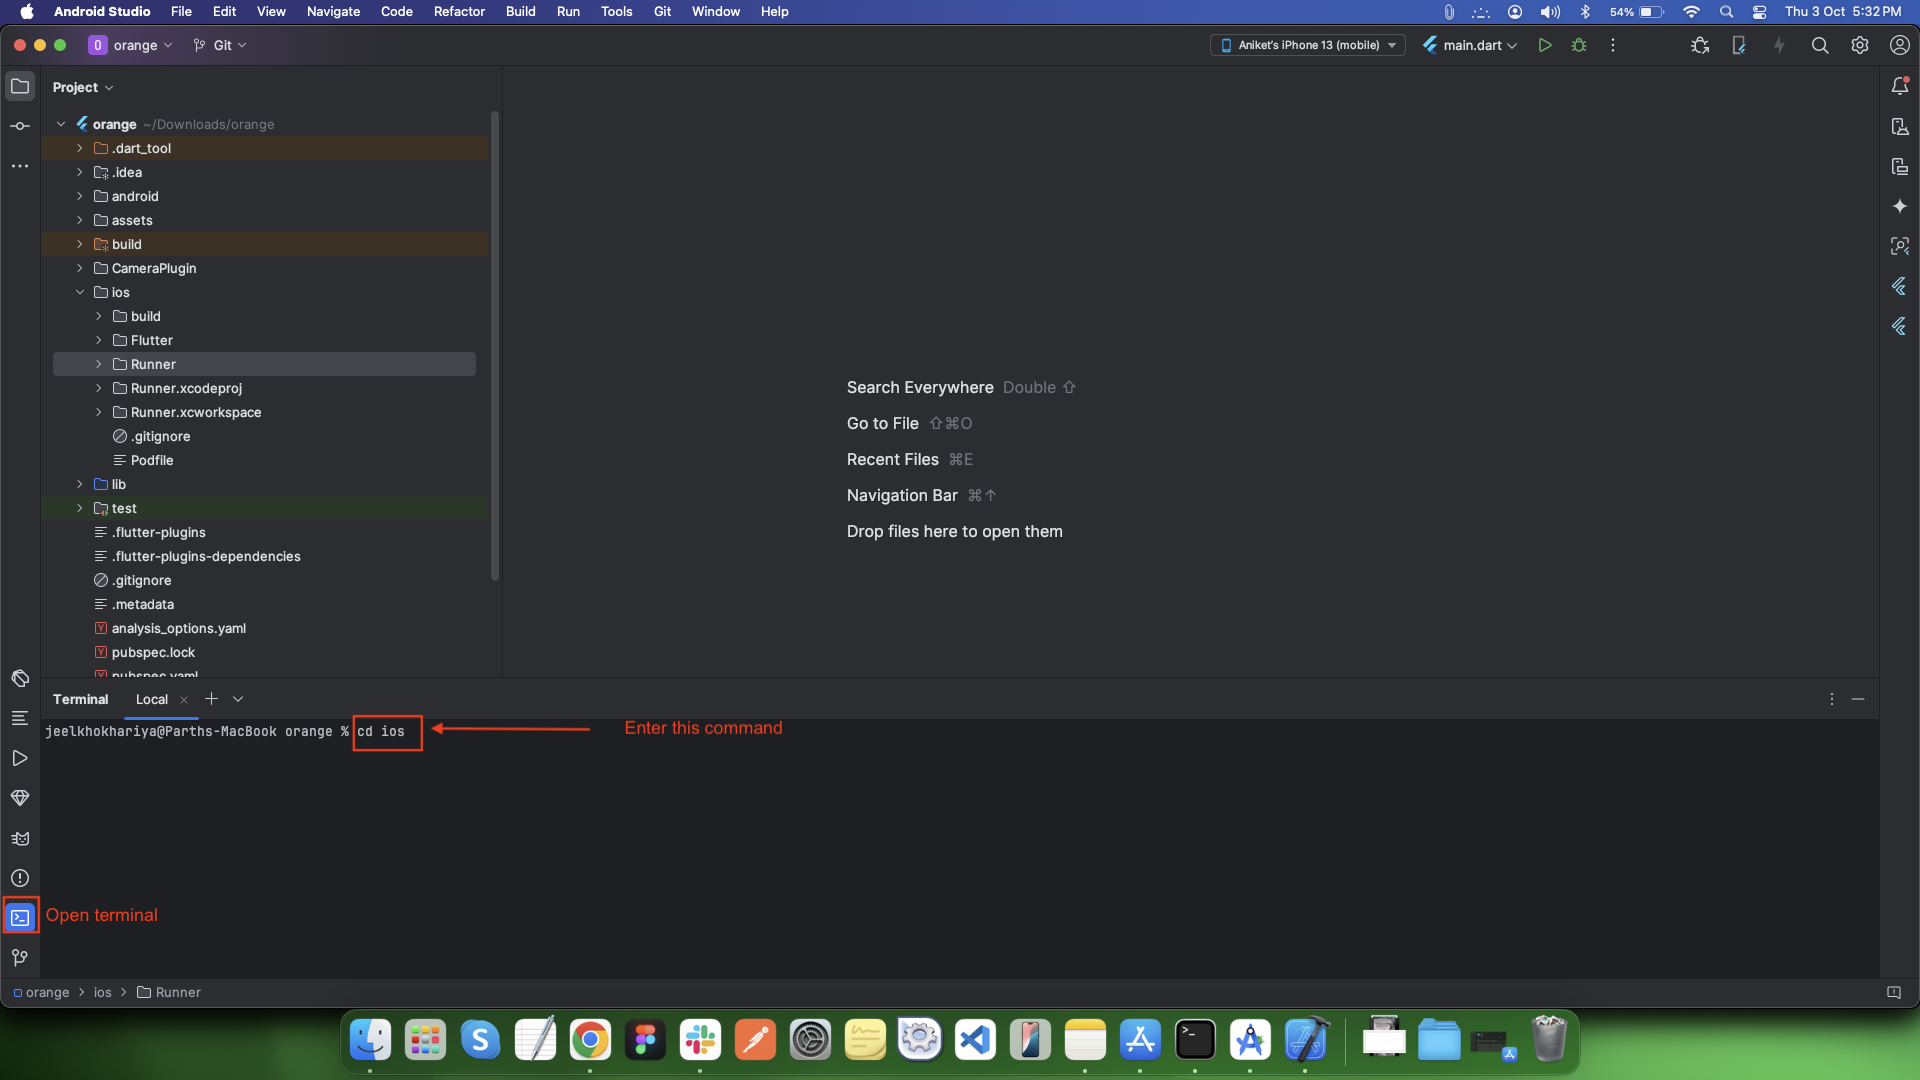
pod install
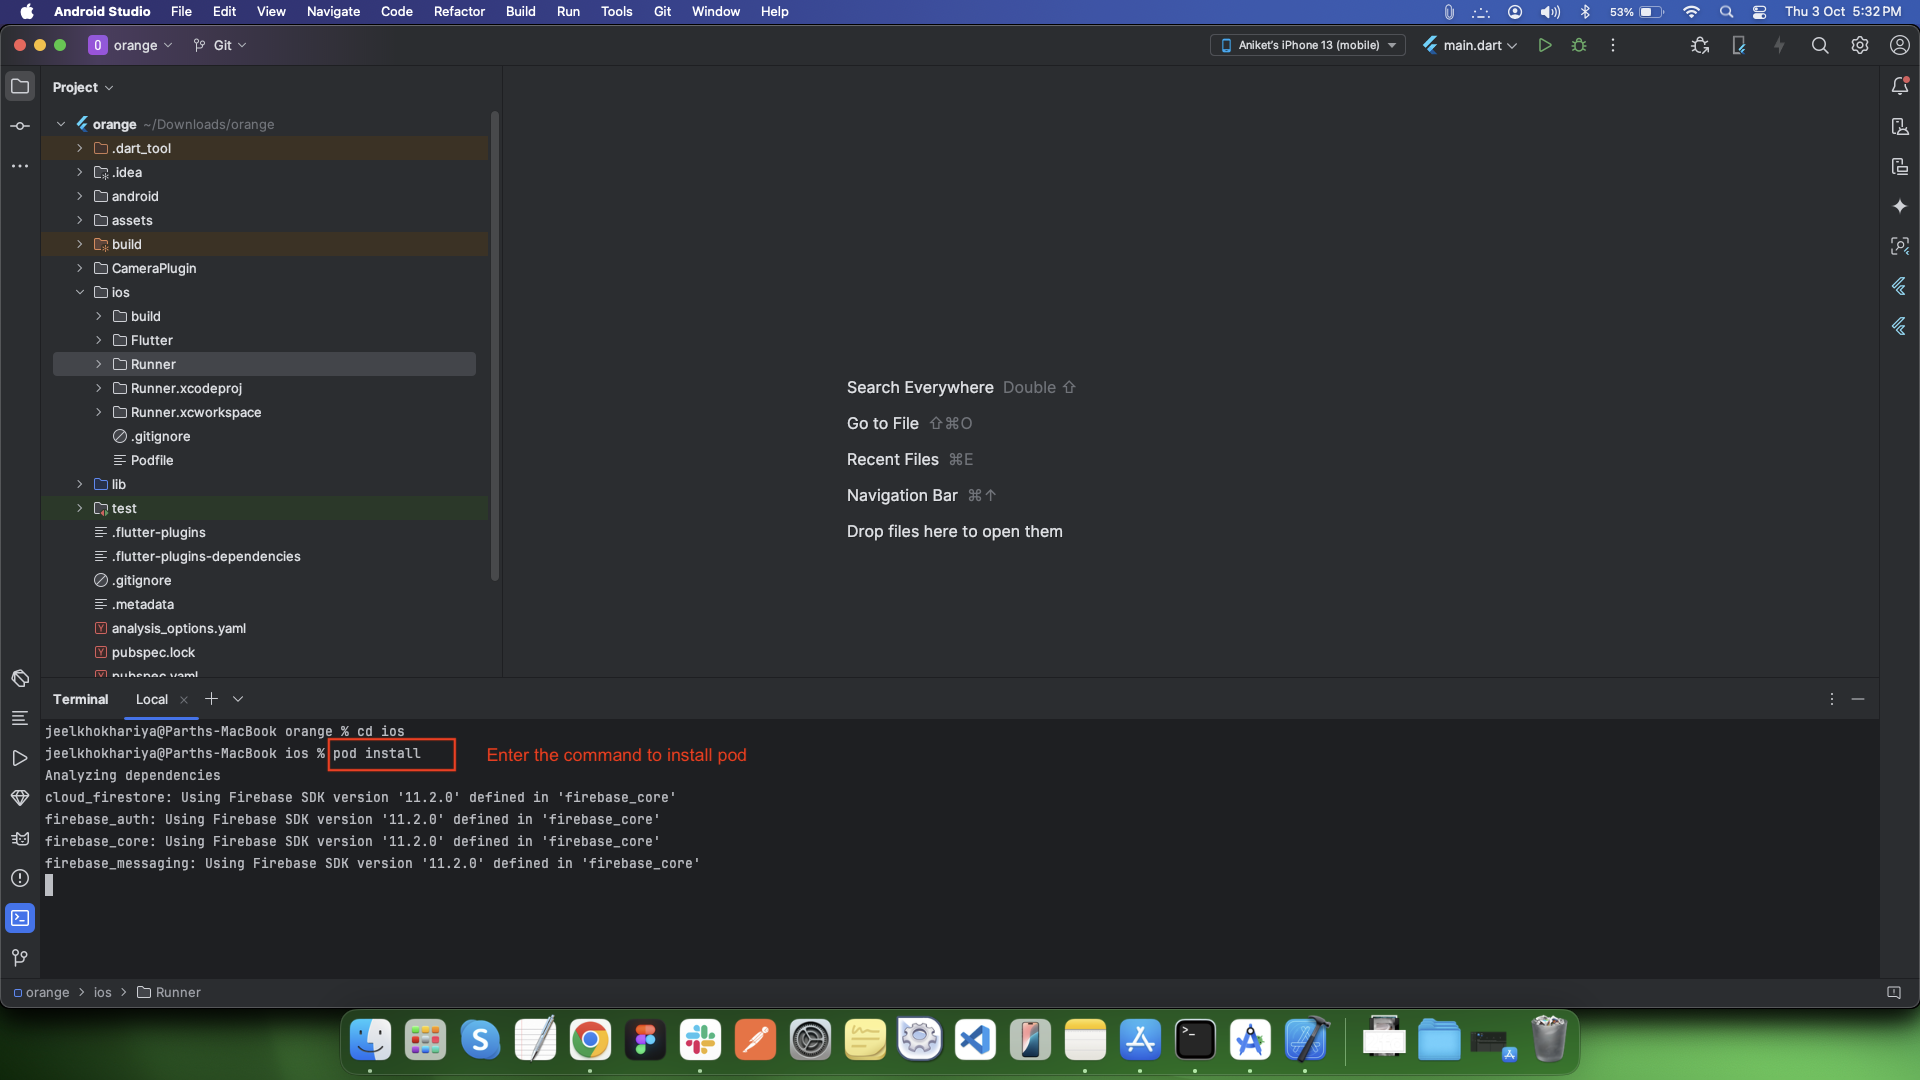
Run Your Flutter App
flutter run

Change Base URL
-
Open lib/utilities/const_res.dart
-
Add "base" (Enter your Admin panel url as a value) (Example below)
-
This can be found while following the backend documentation.
const String base = "https://yourdomain.com/"
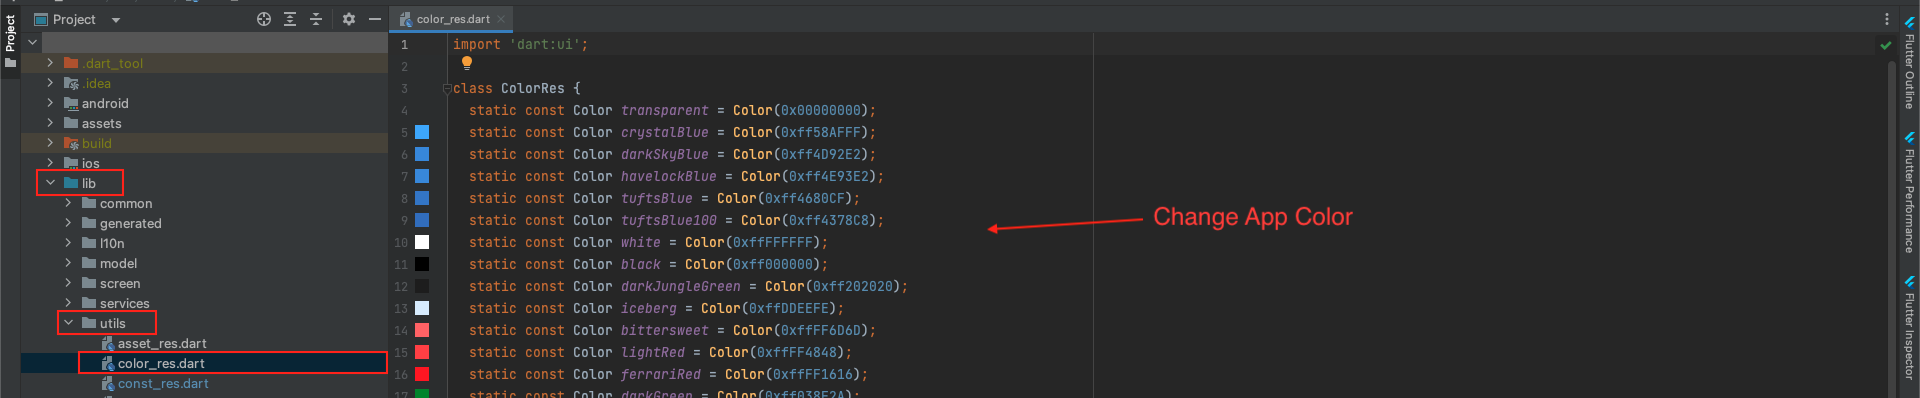
Change app color
-
Step 1 : Now go to your project lib > utilities > color file as shown in the below image.
Change app font family
-
Step 1 : Select any font from google font
-
Visit the https://fonts.google.com/
-
Search for your font.
-
Once you find it, click to open.
-
Click on the Download Family button on the top right side of your screen.
-
Extract the compressed file.
-
Step 2 : Import the Font into Project
-
Copy-Paste [font].ttf file into the fonts folder.
-
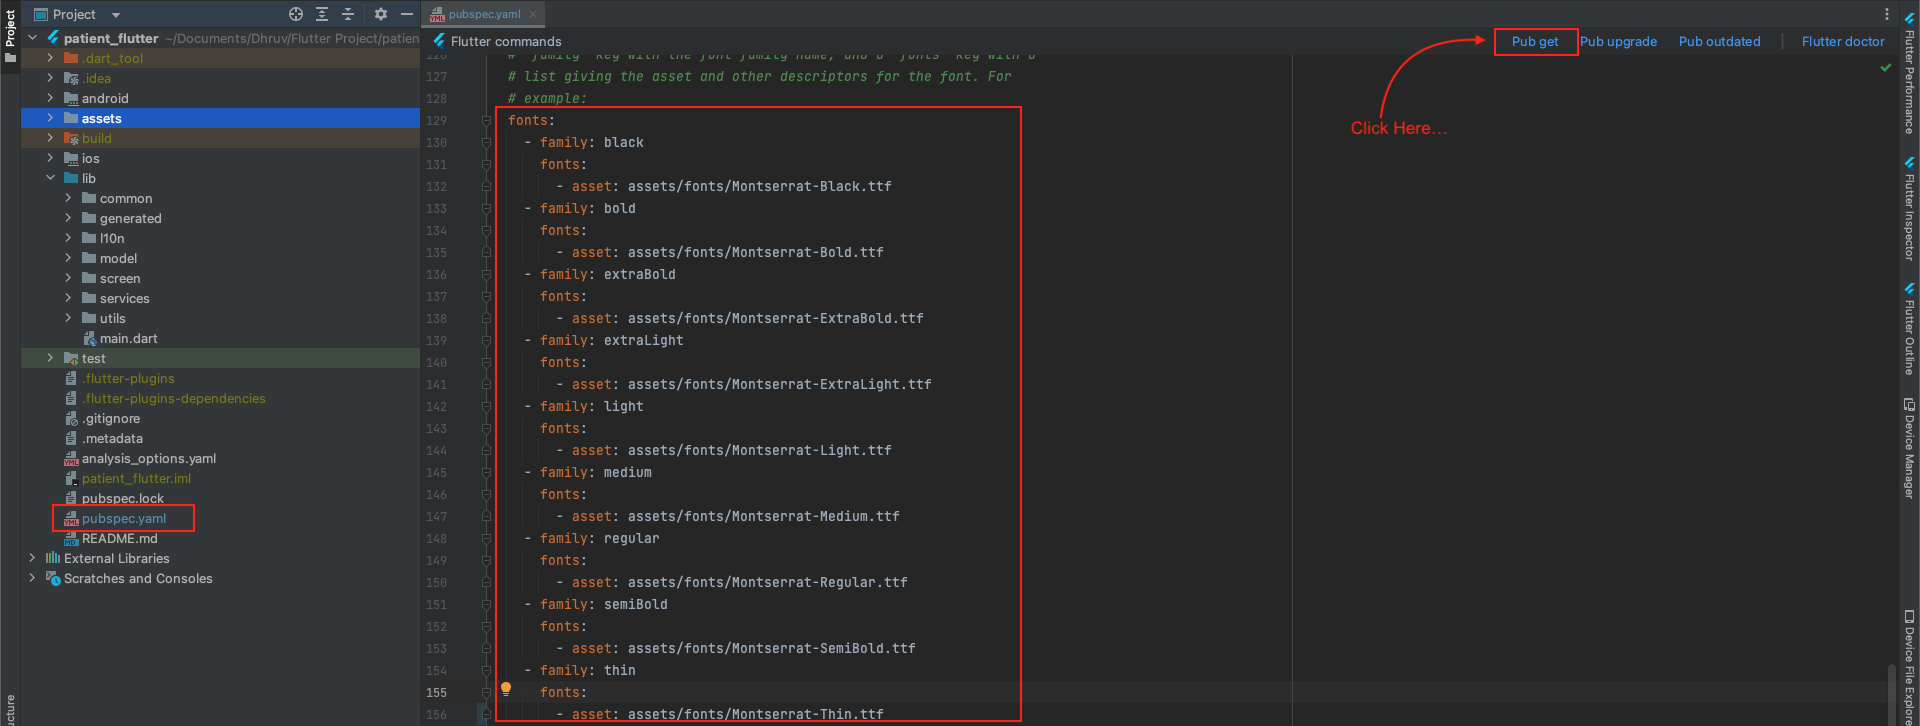
Step 3 : Add Font to Pubspec.yaml
-
Replace the family name with your font family. To get the family name, simply take the first part before the dash sign (-). For example, if the downloaded font name is Montserrat-Regular , take the Montserrat as your family name
-
Go to pubspec.yaml file:
-
Replace the asset path with the path where your font is residing.
-
Then pub get to successfully load your font
Here’s how you download the font:

To import the Font in your project:

To add Font to pubspec.yaml file:
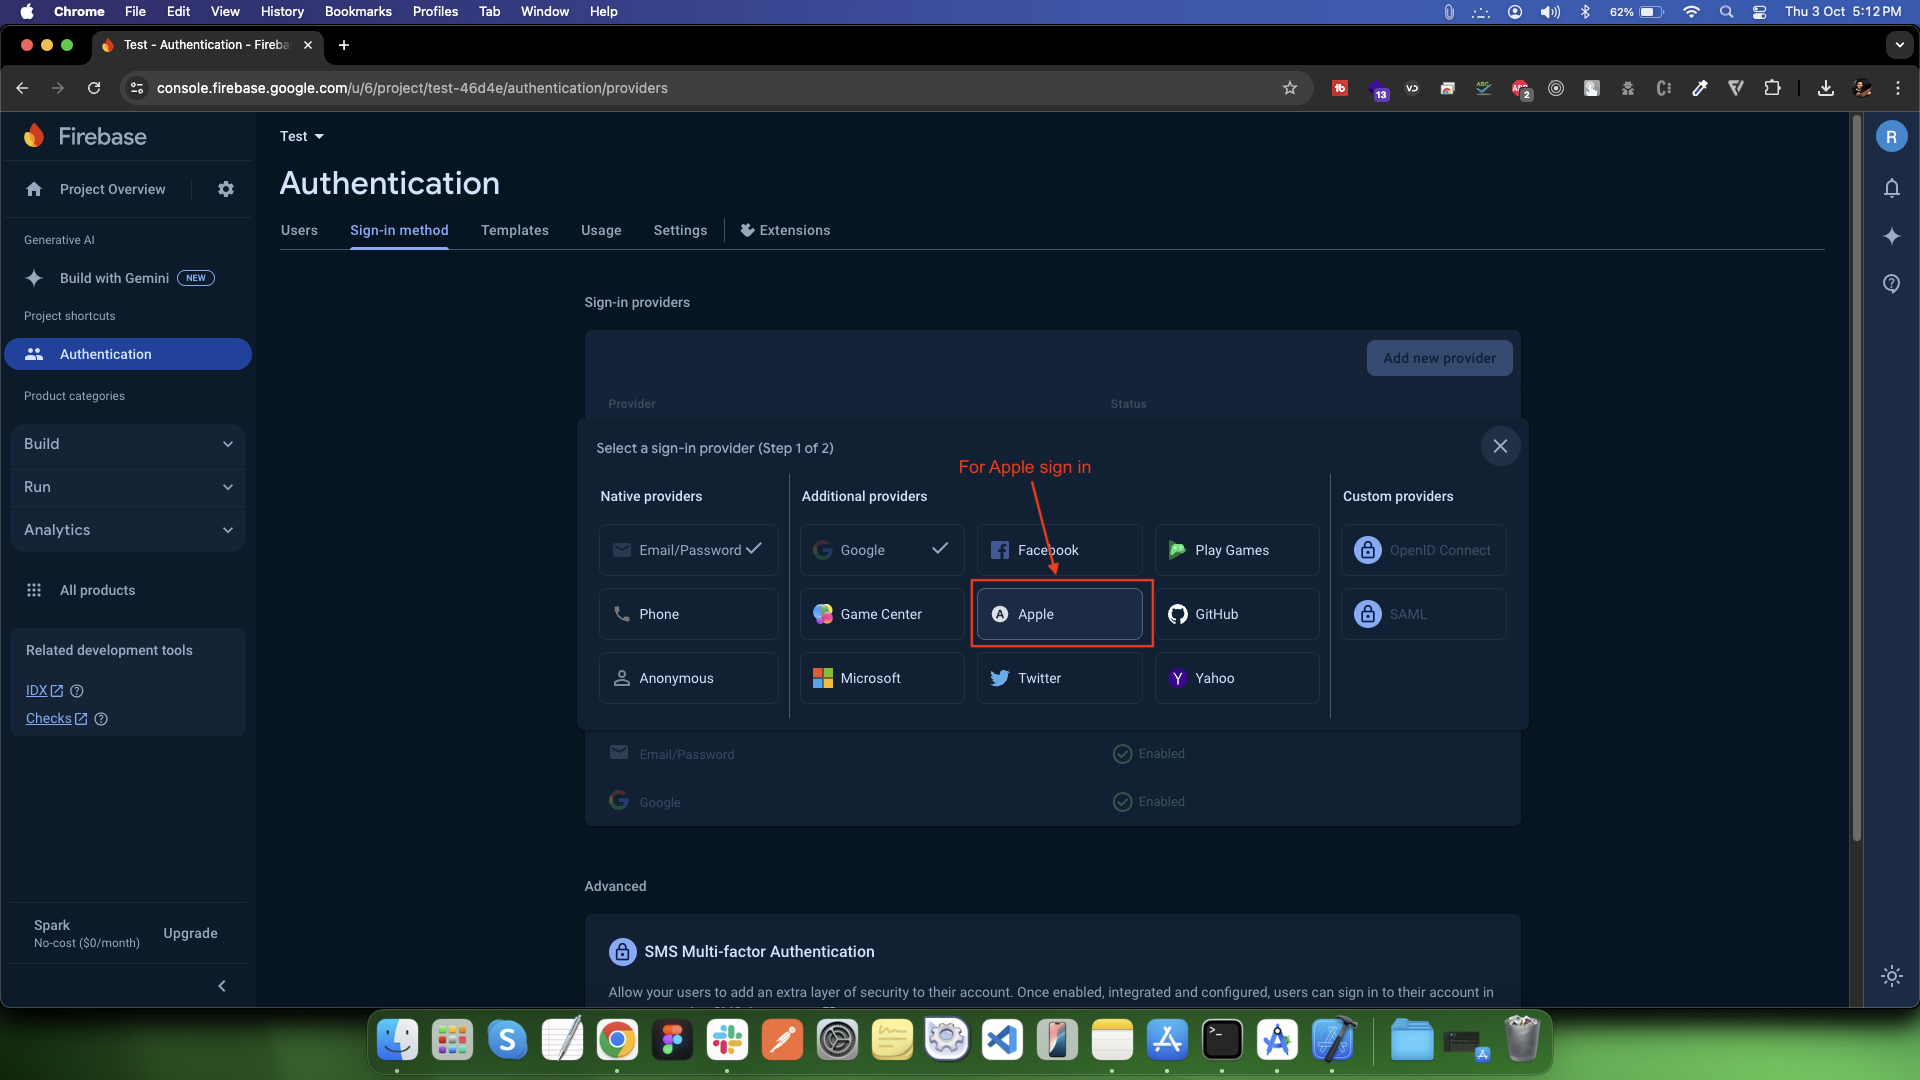
Firebase authentication
-
Our app supports the following authentication methods: Email, Google, and Apple Sign-In.
-
If you haven’t added the SHA1 key, go to this link.
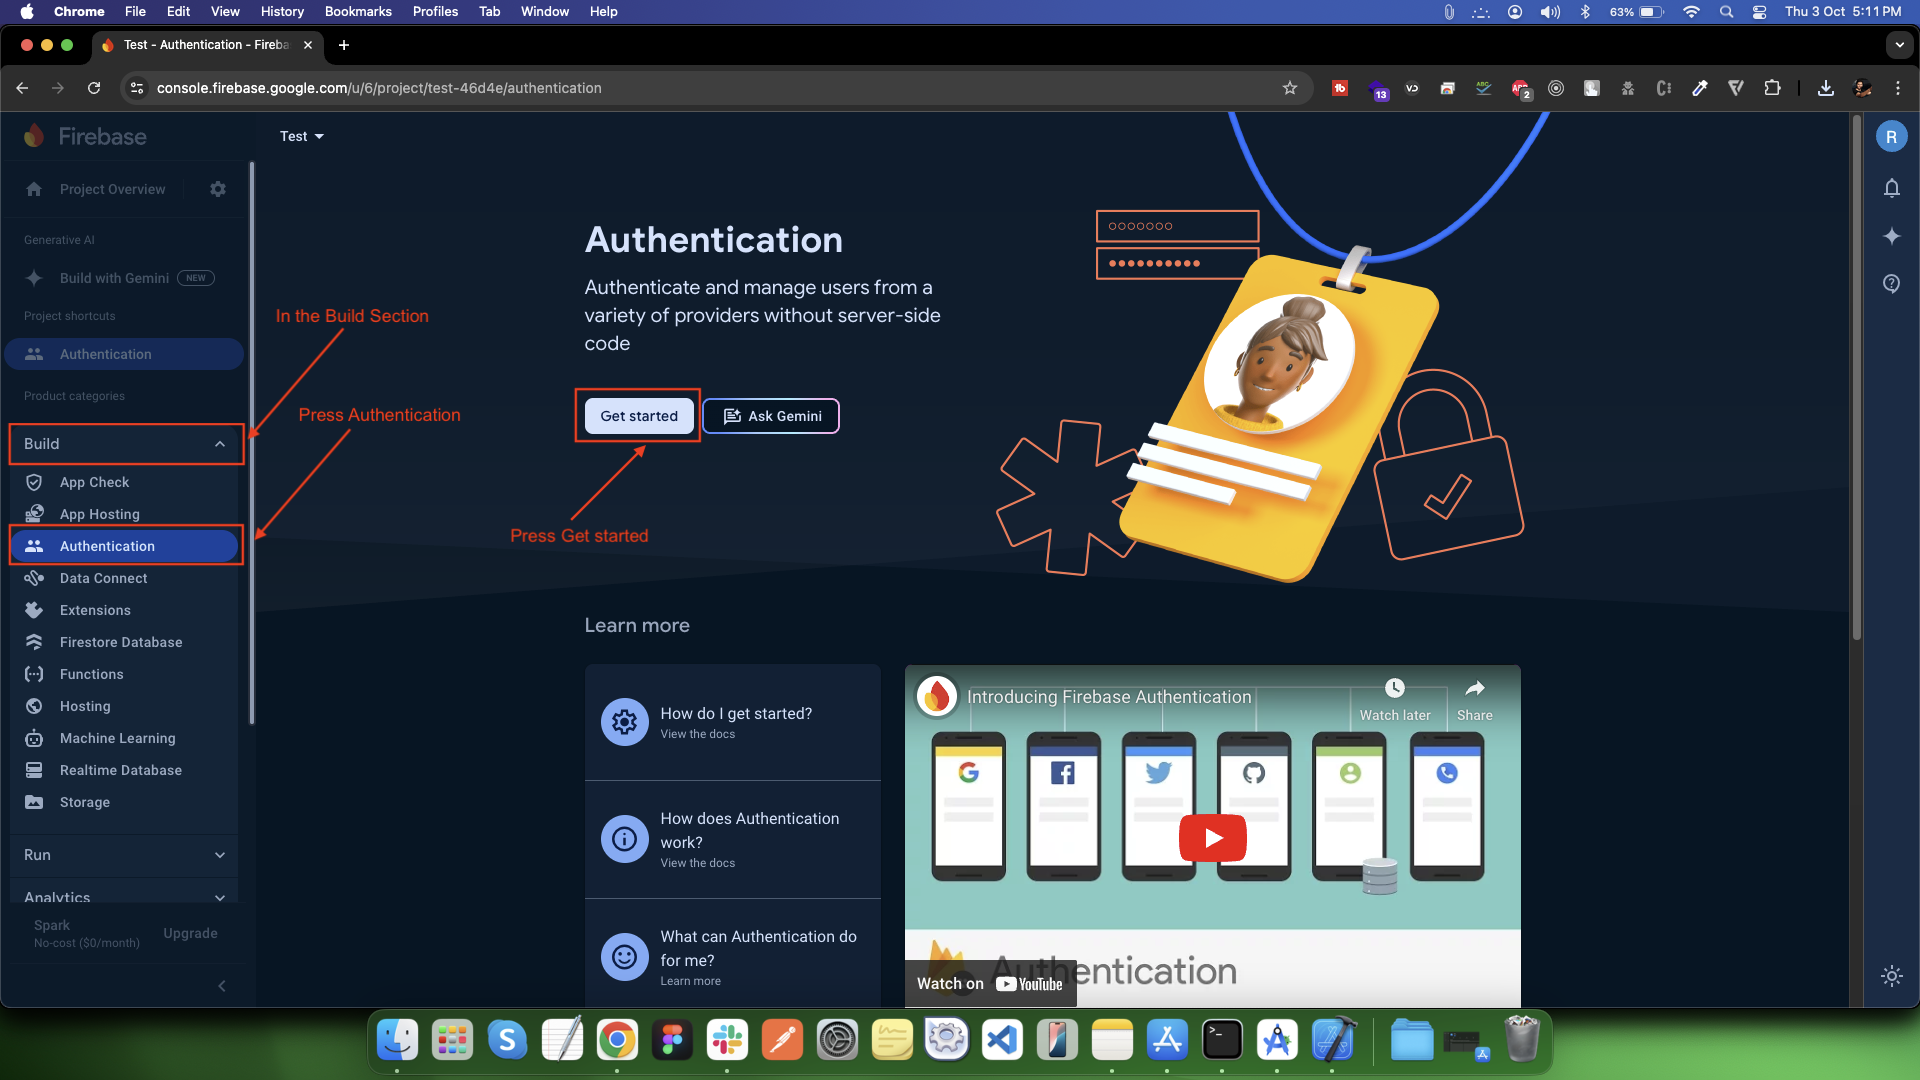
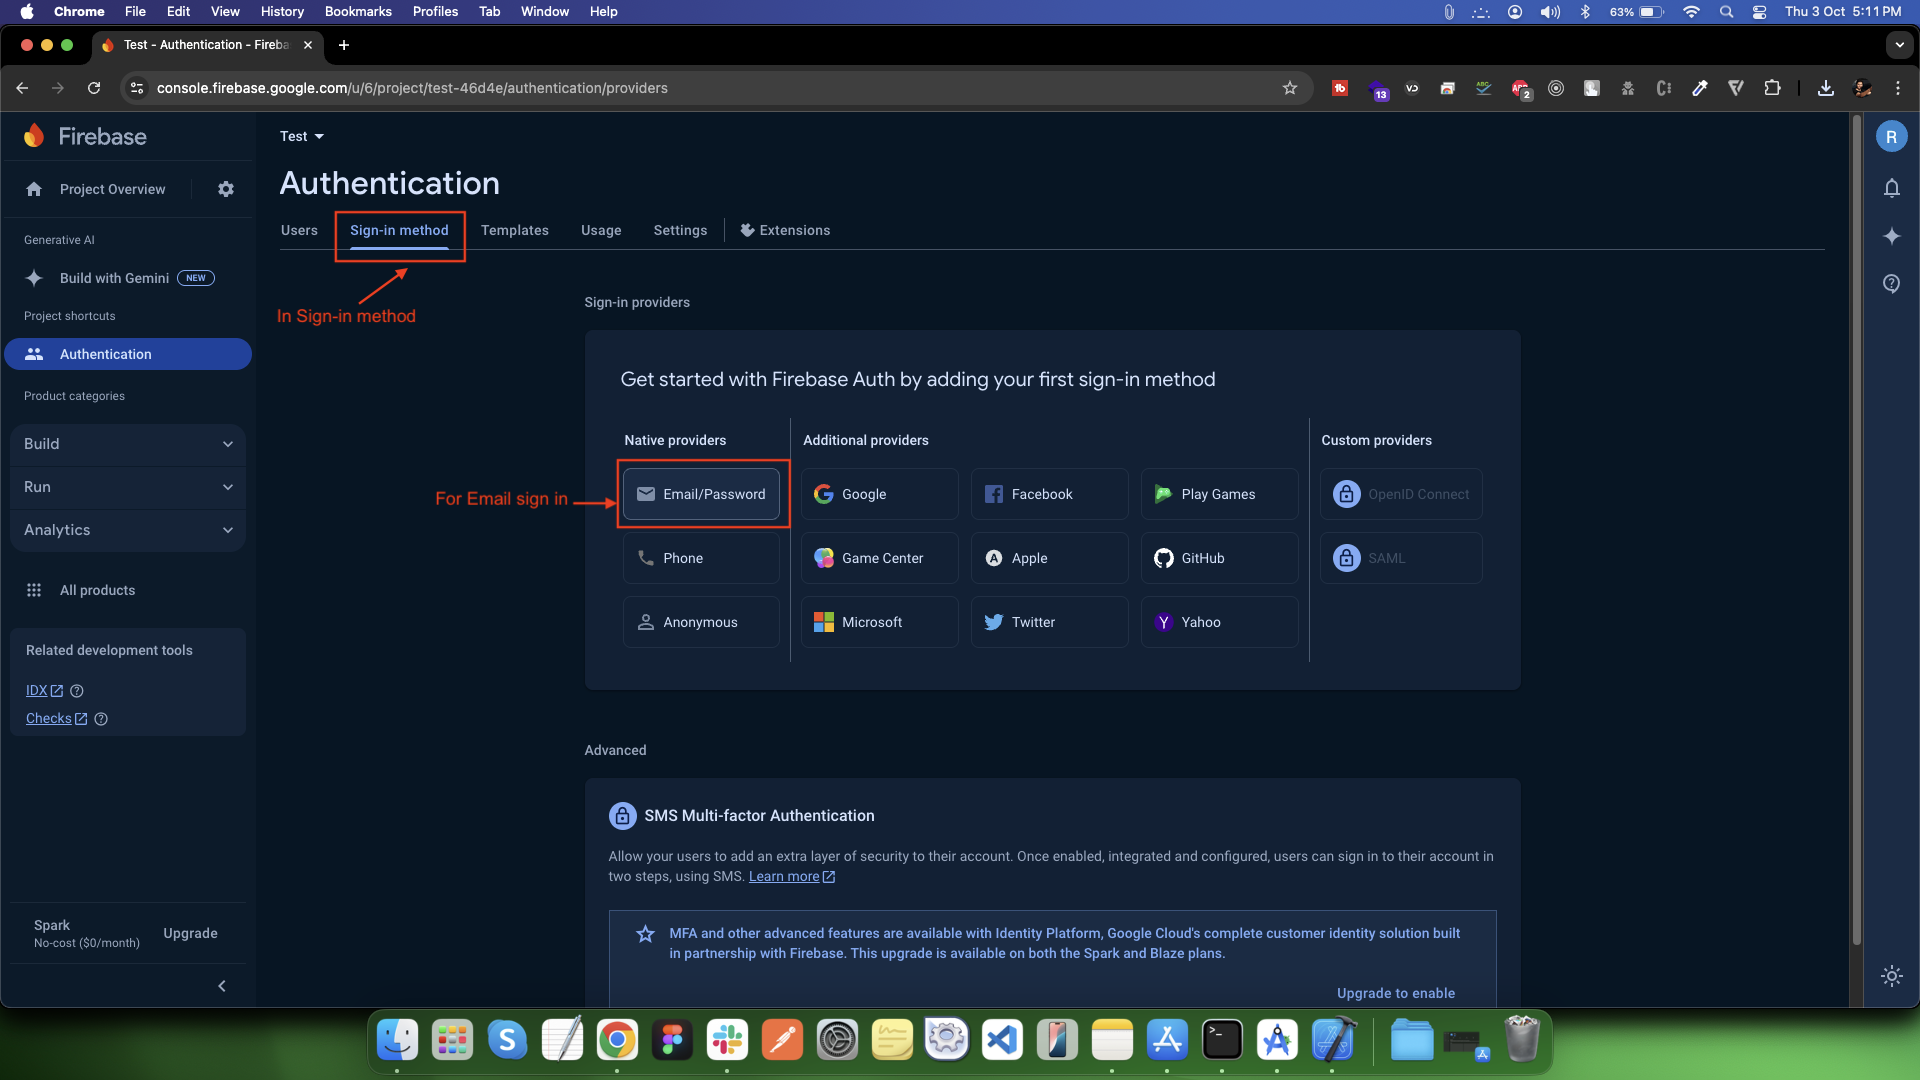
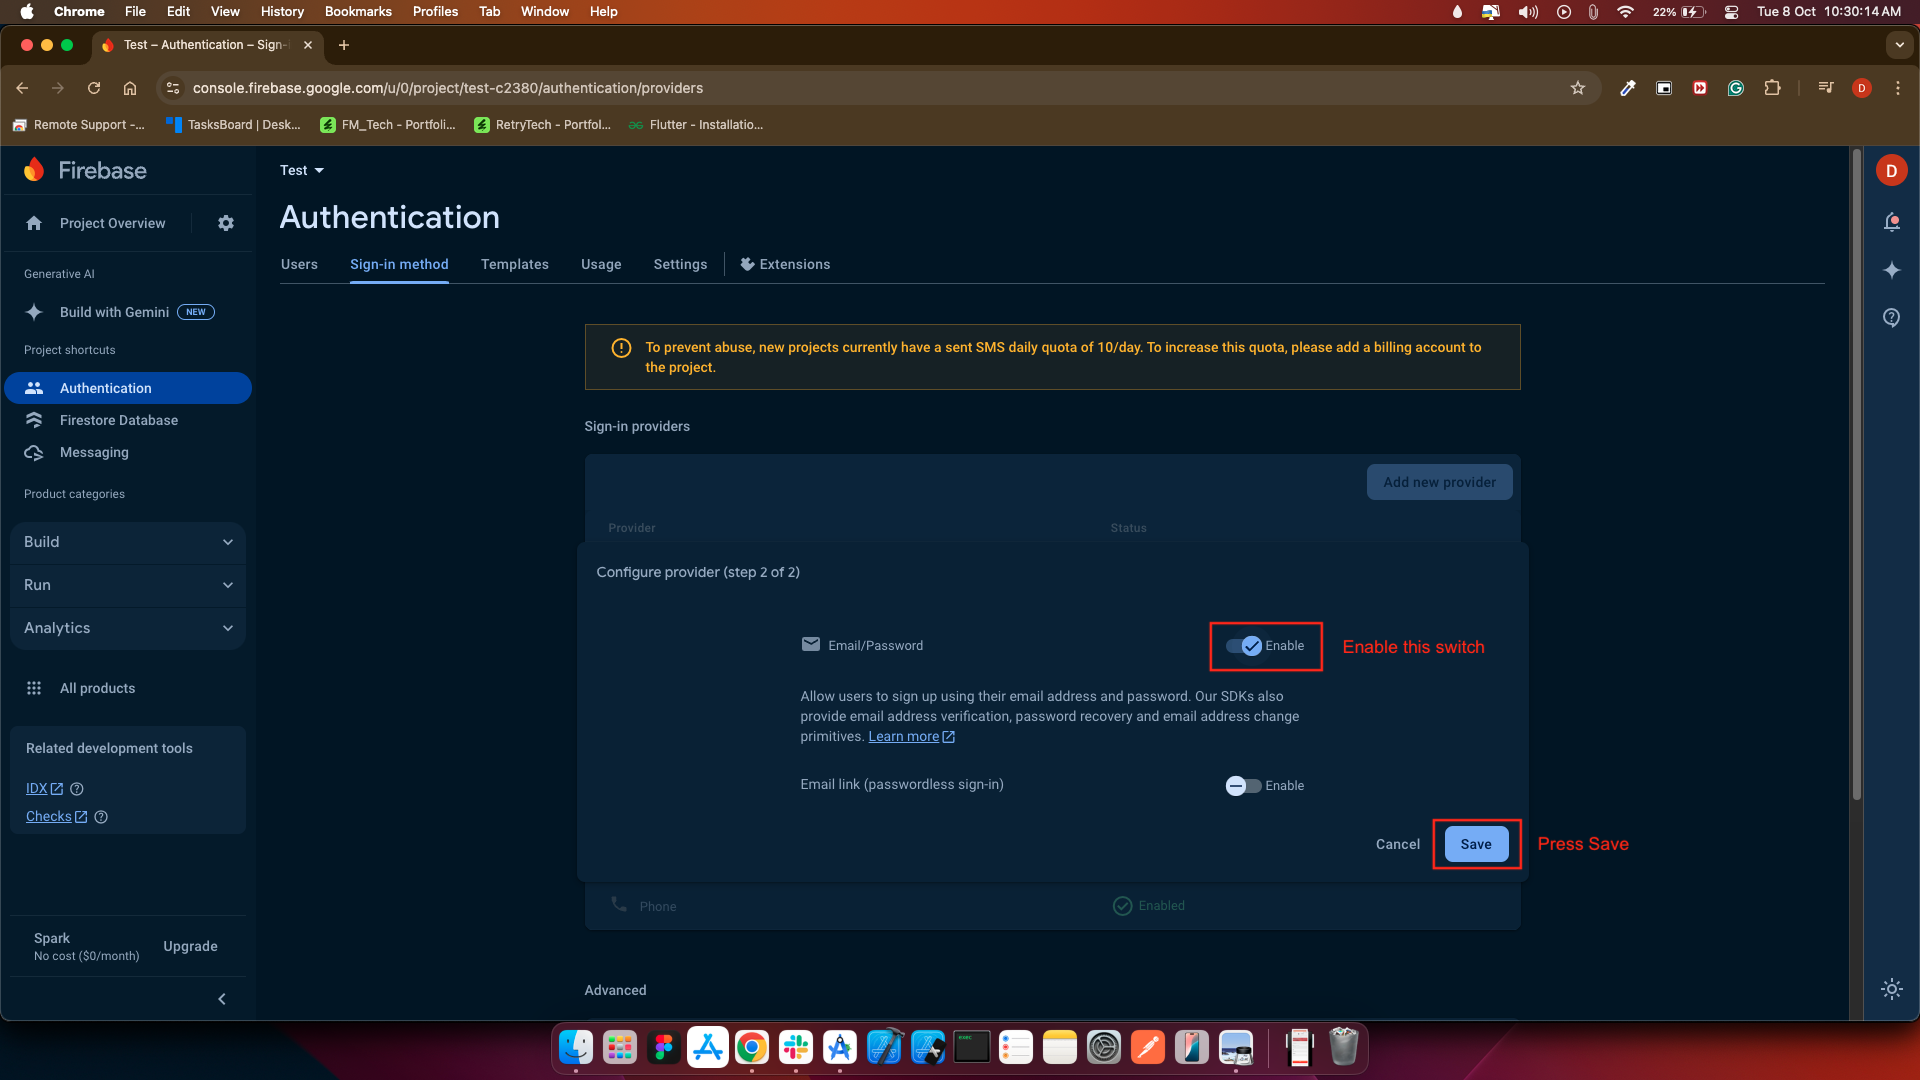
Email Authentication Only
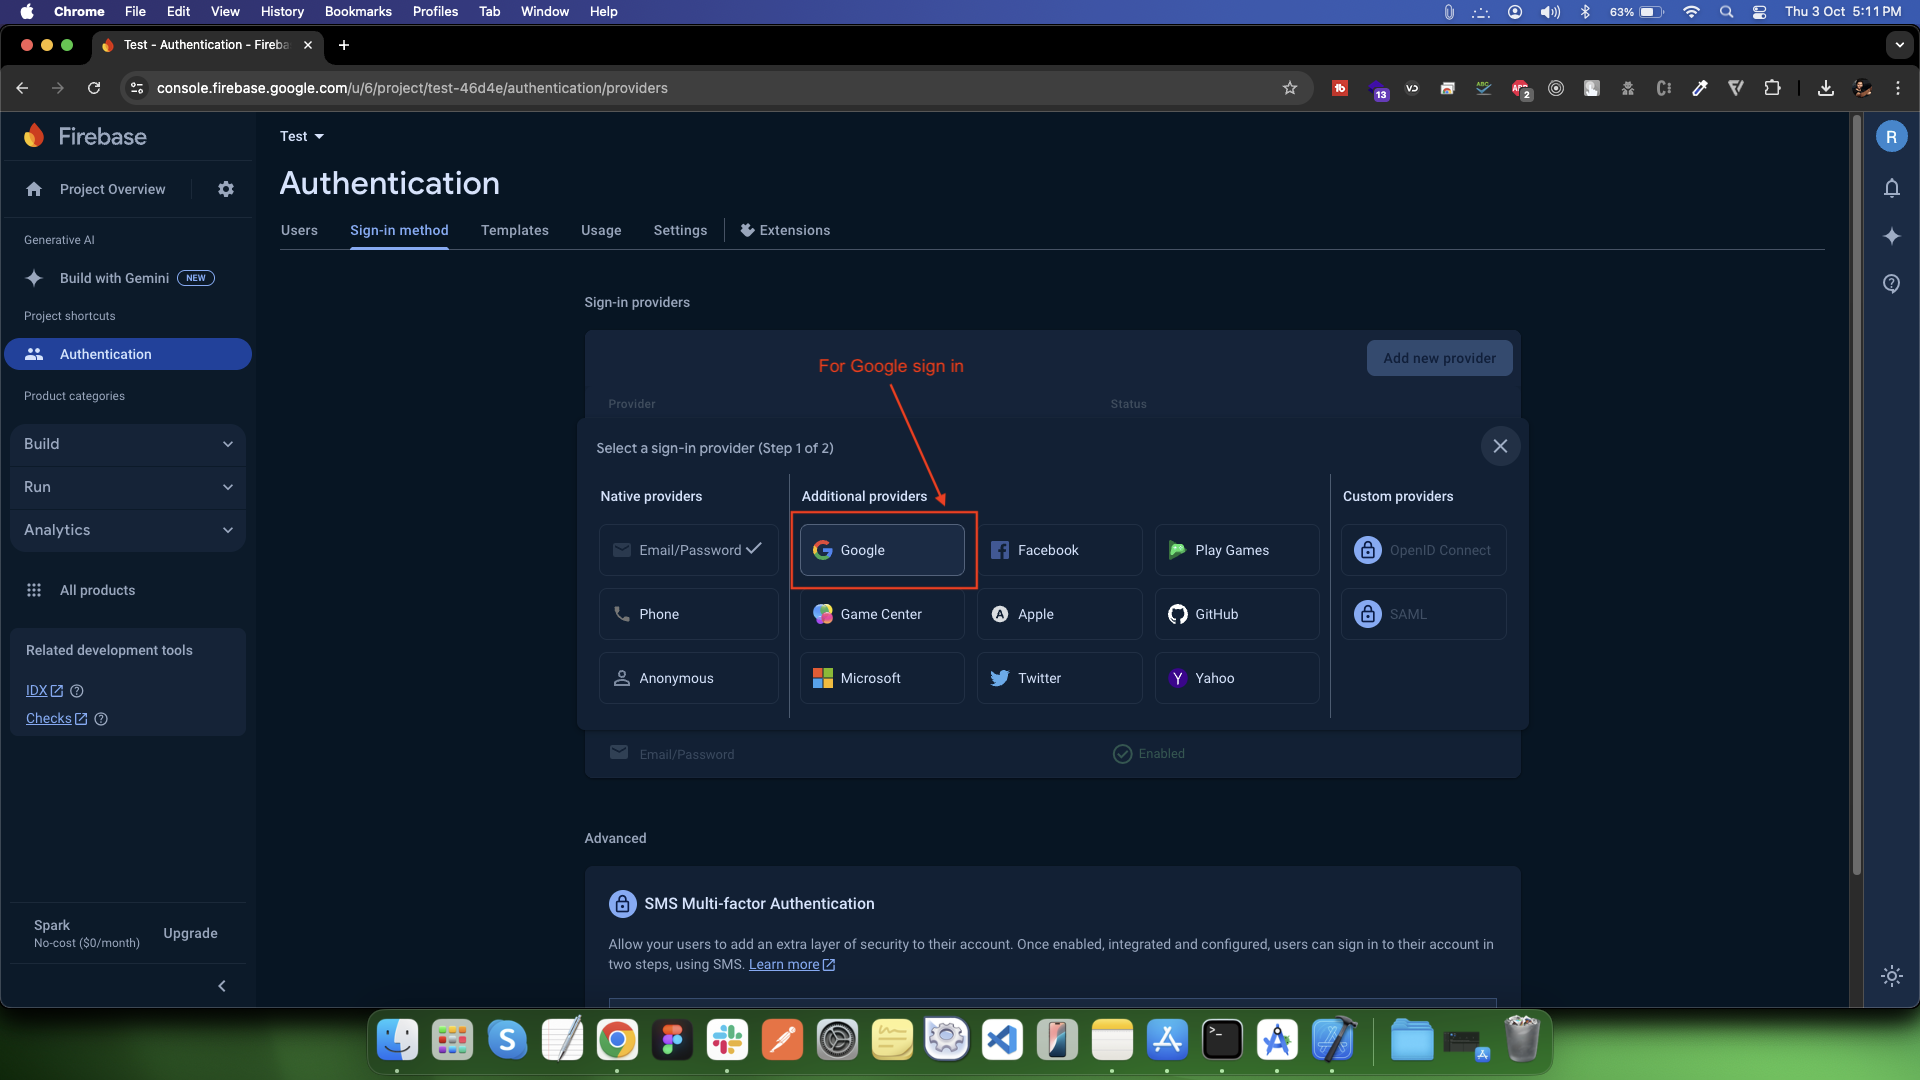
Google Authentication Only
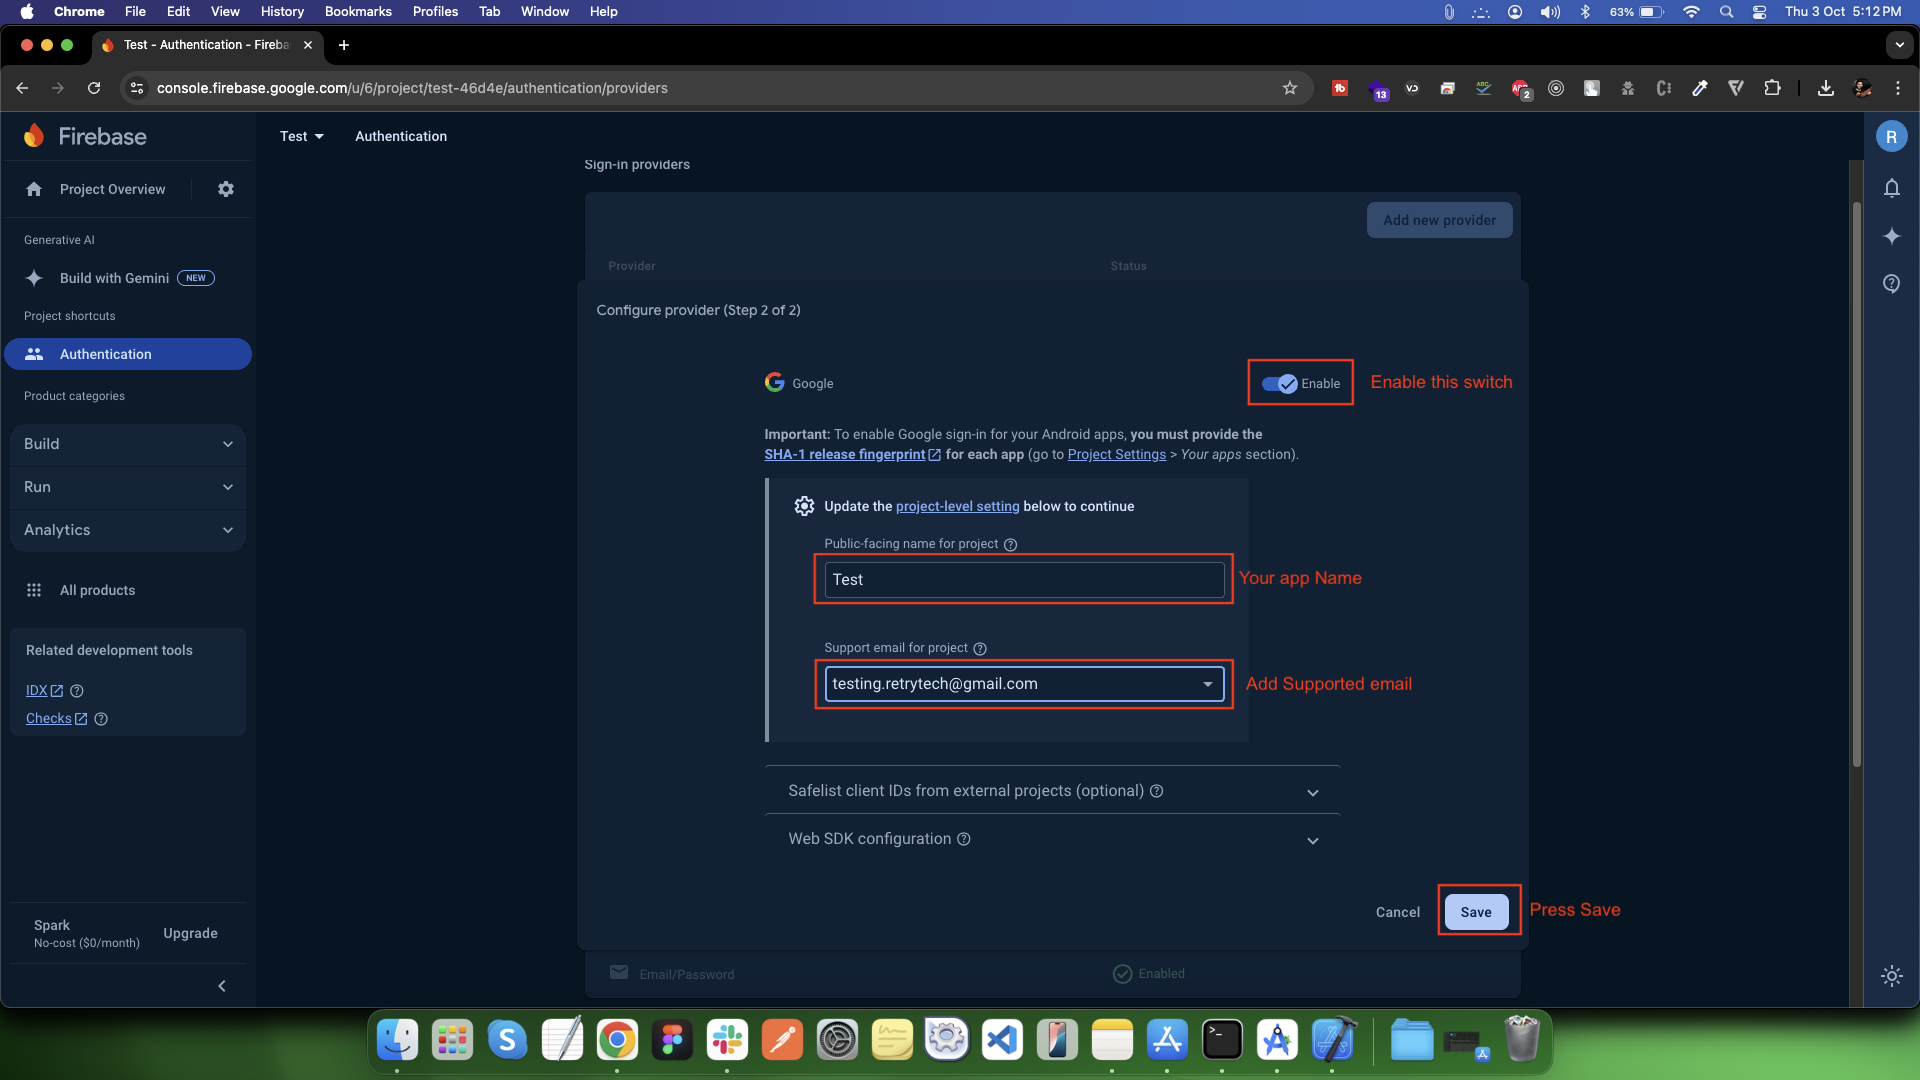
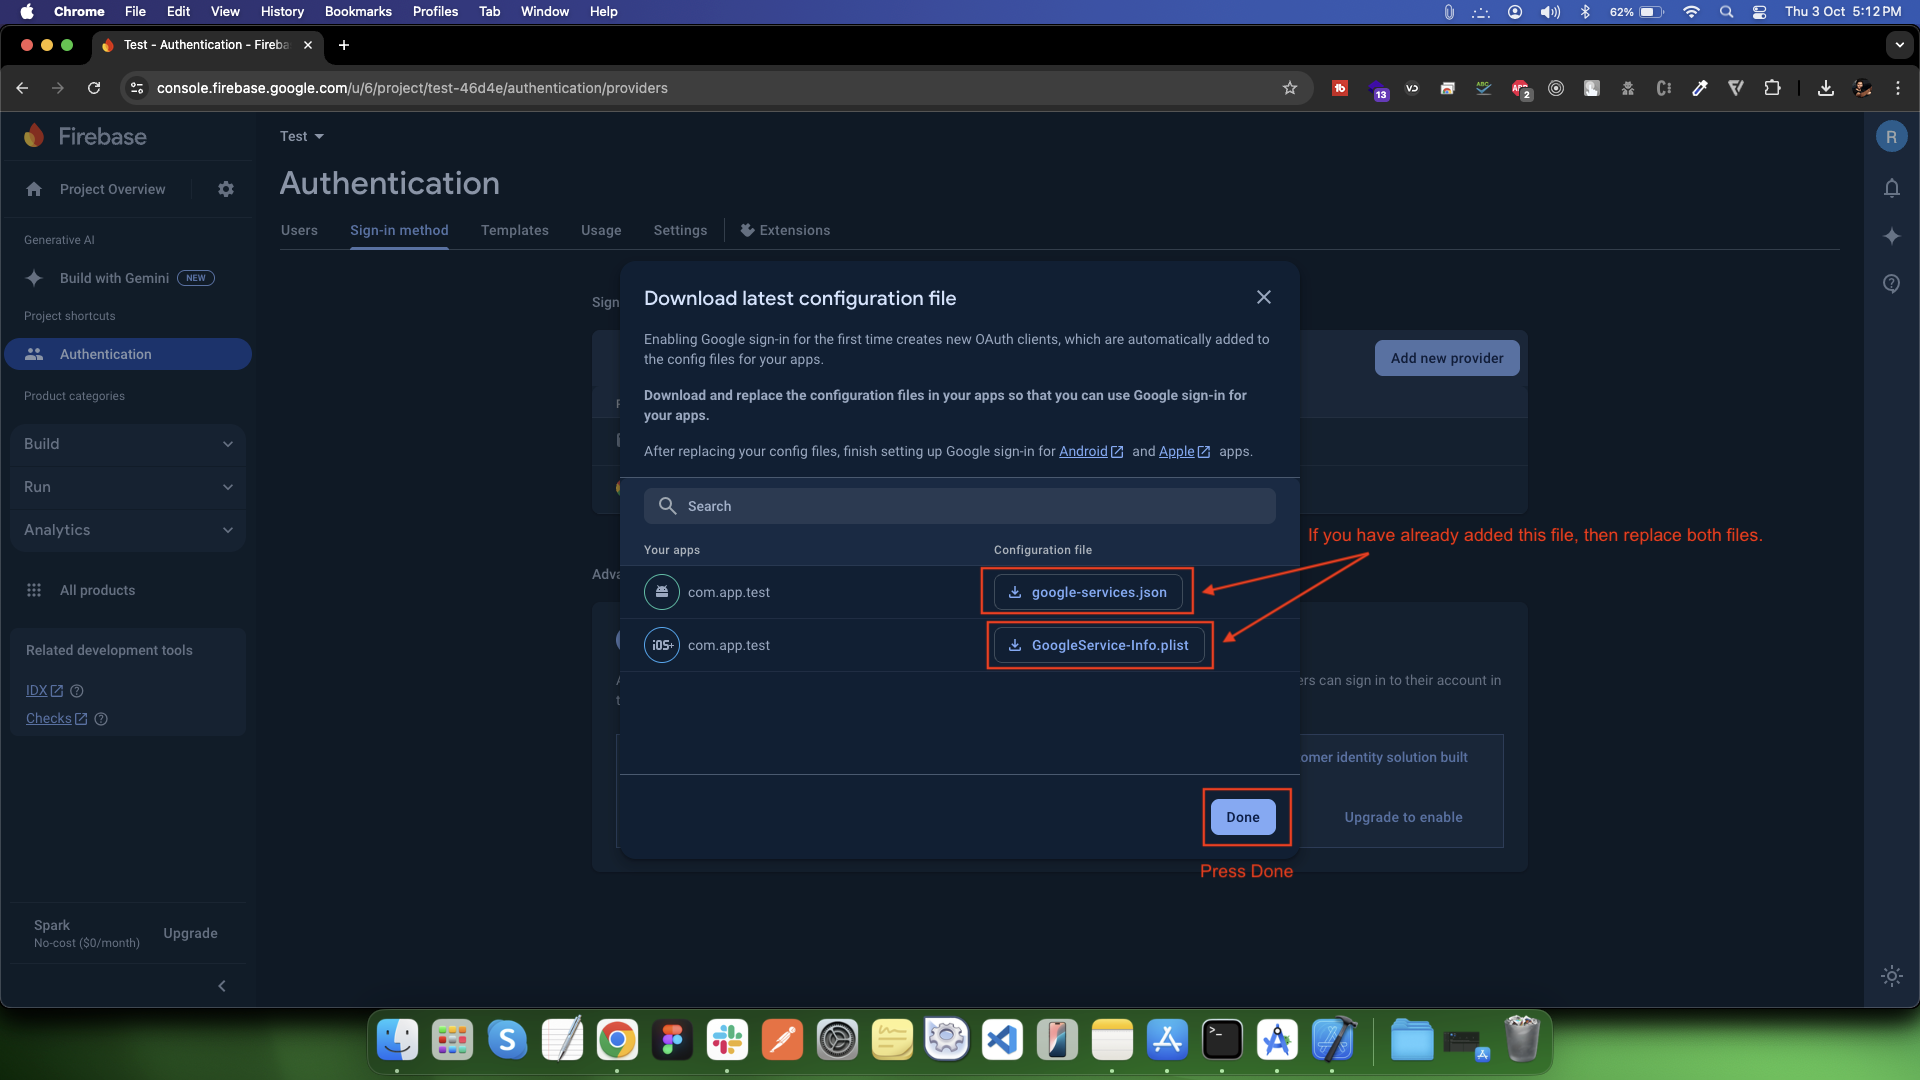
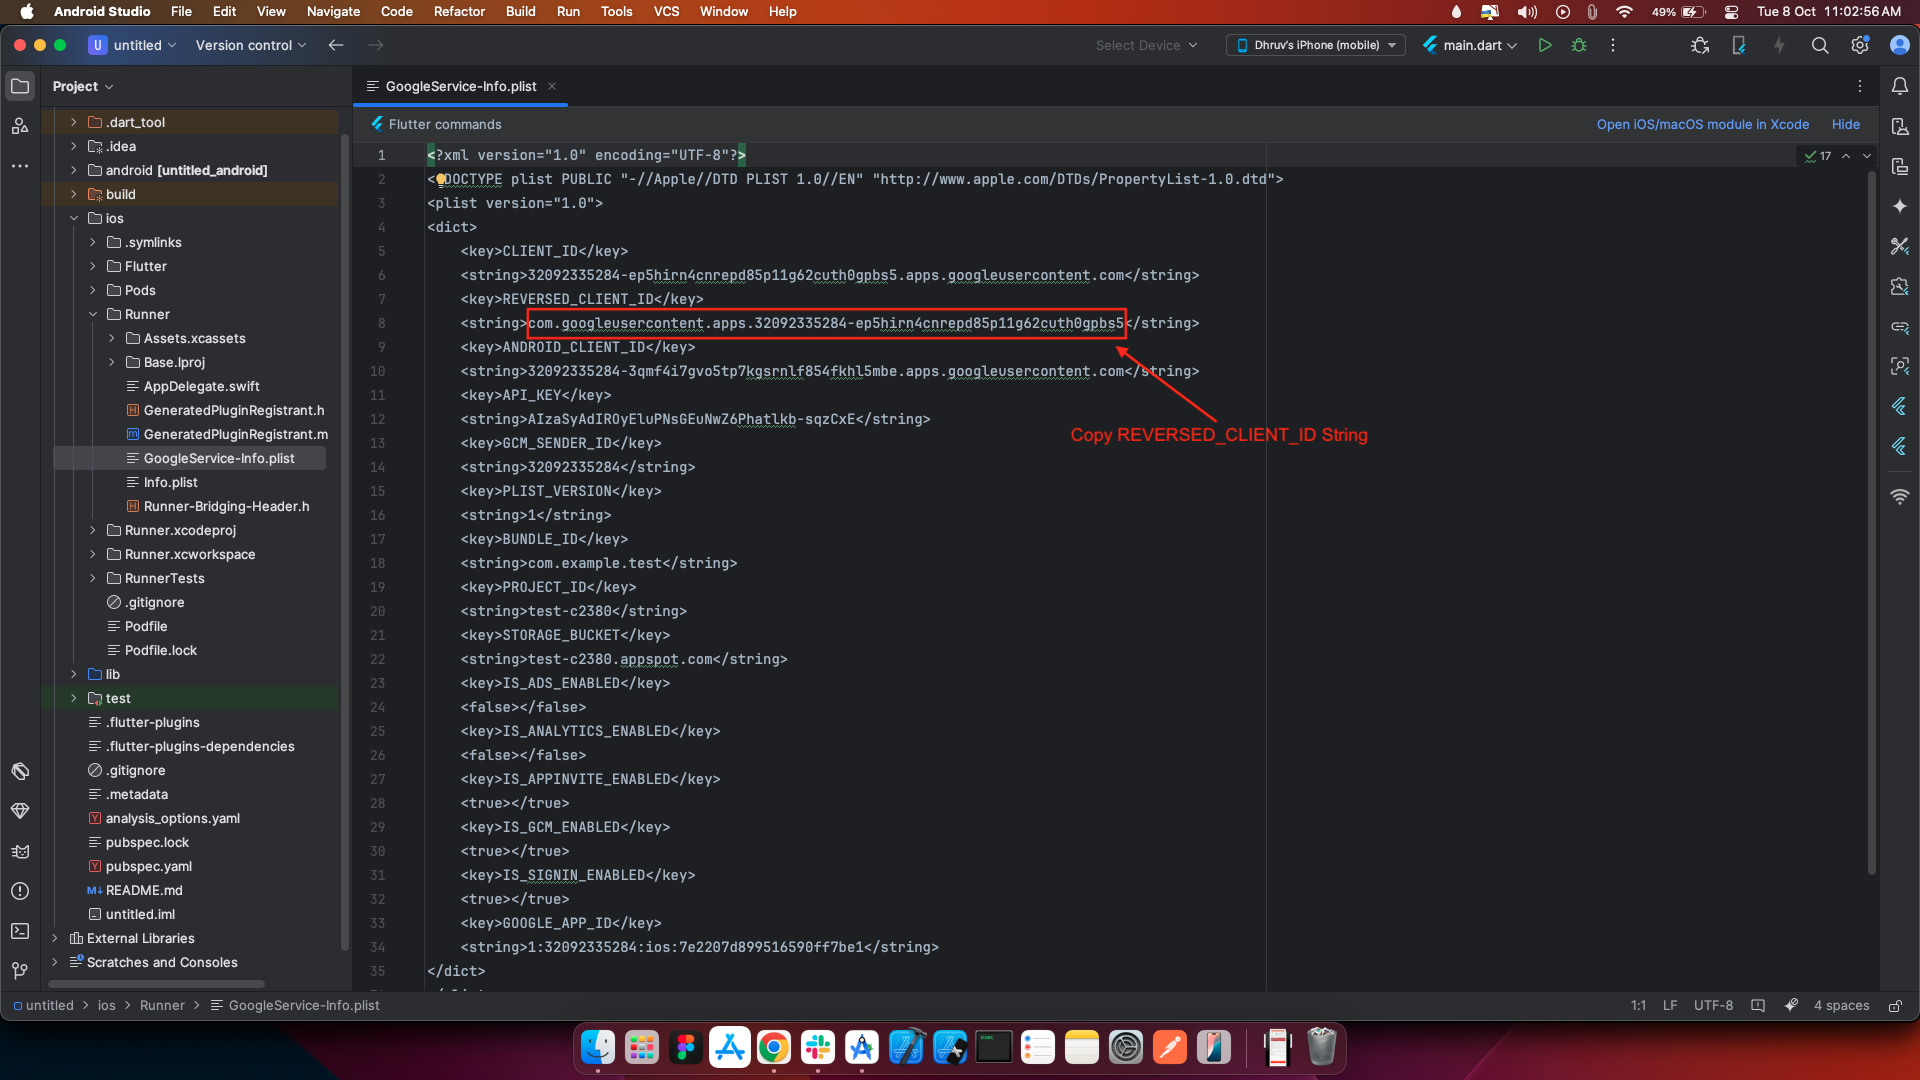
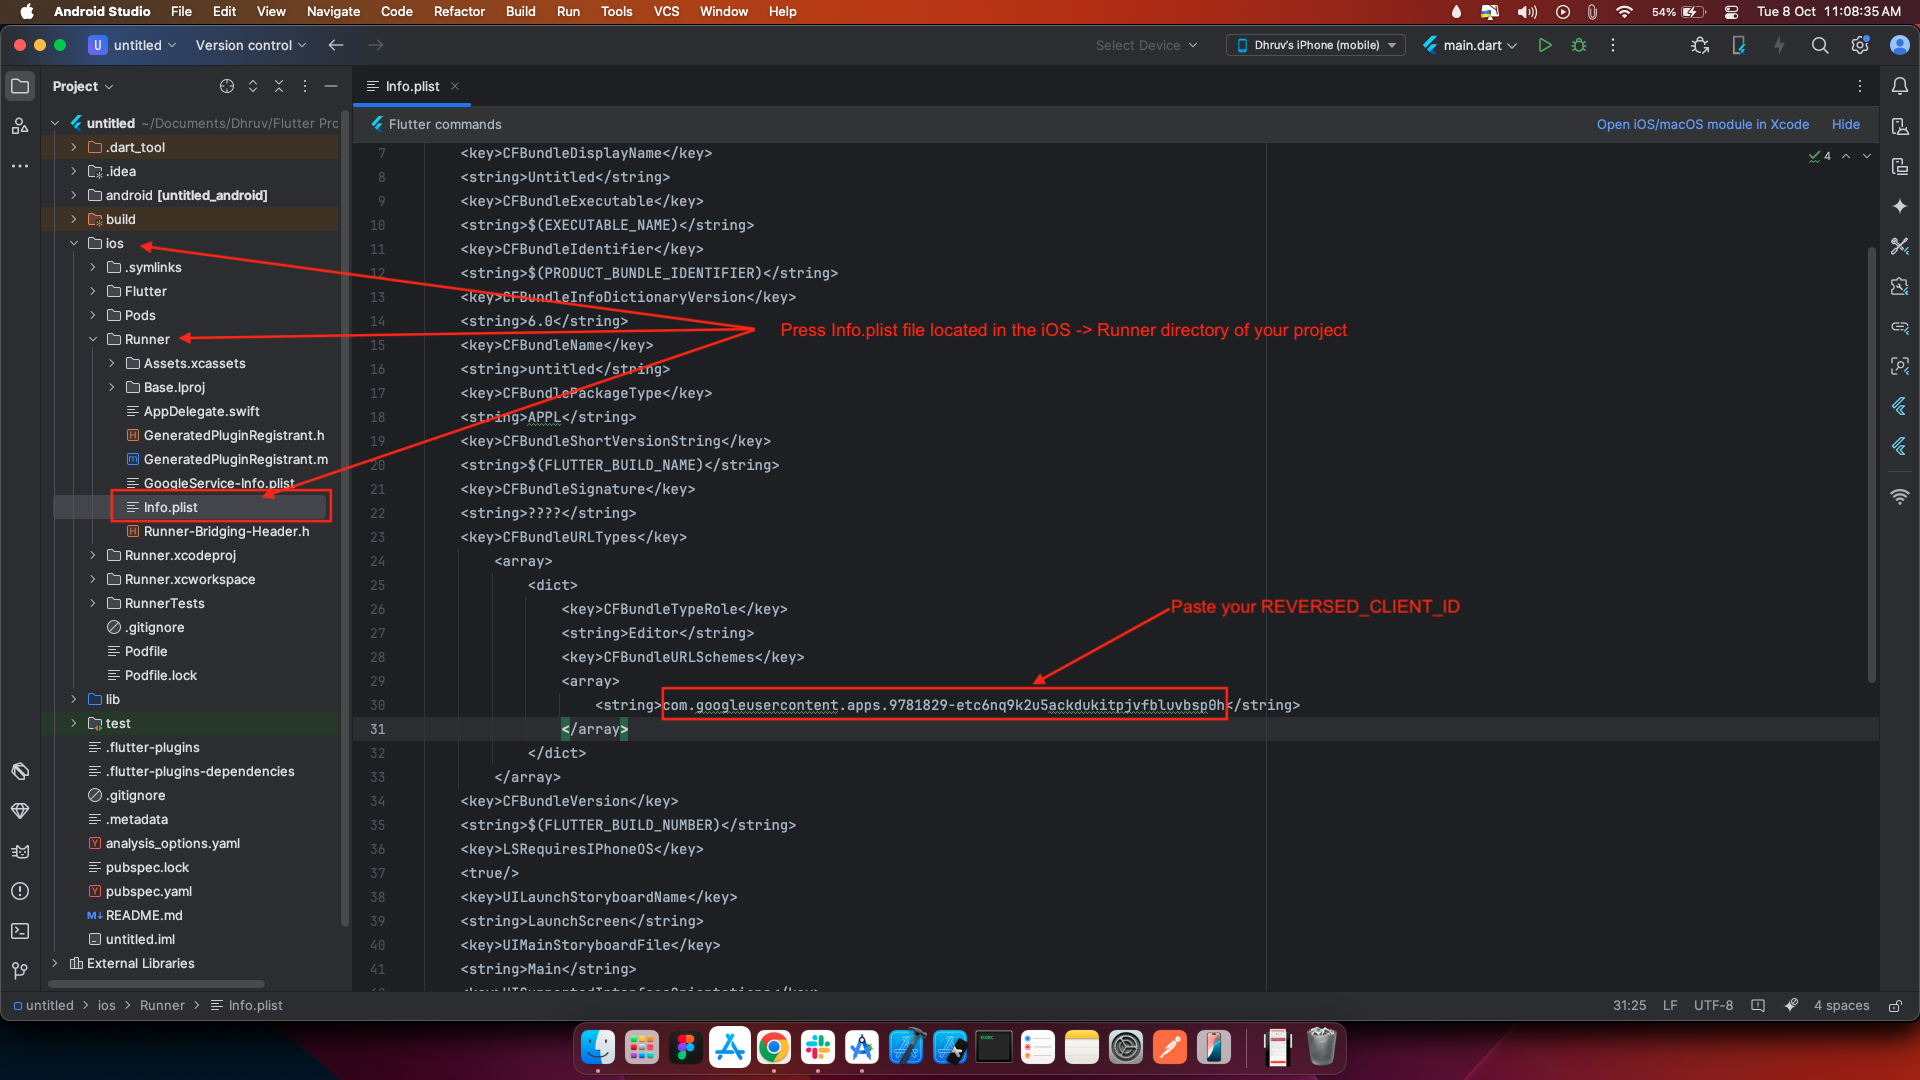
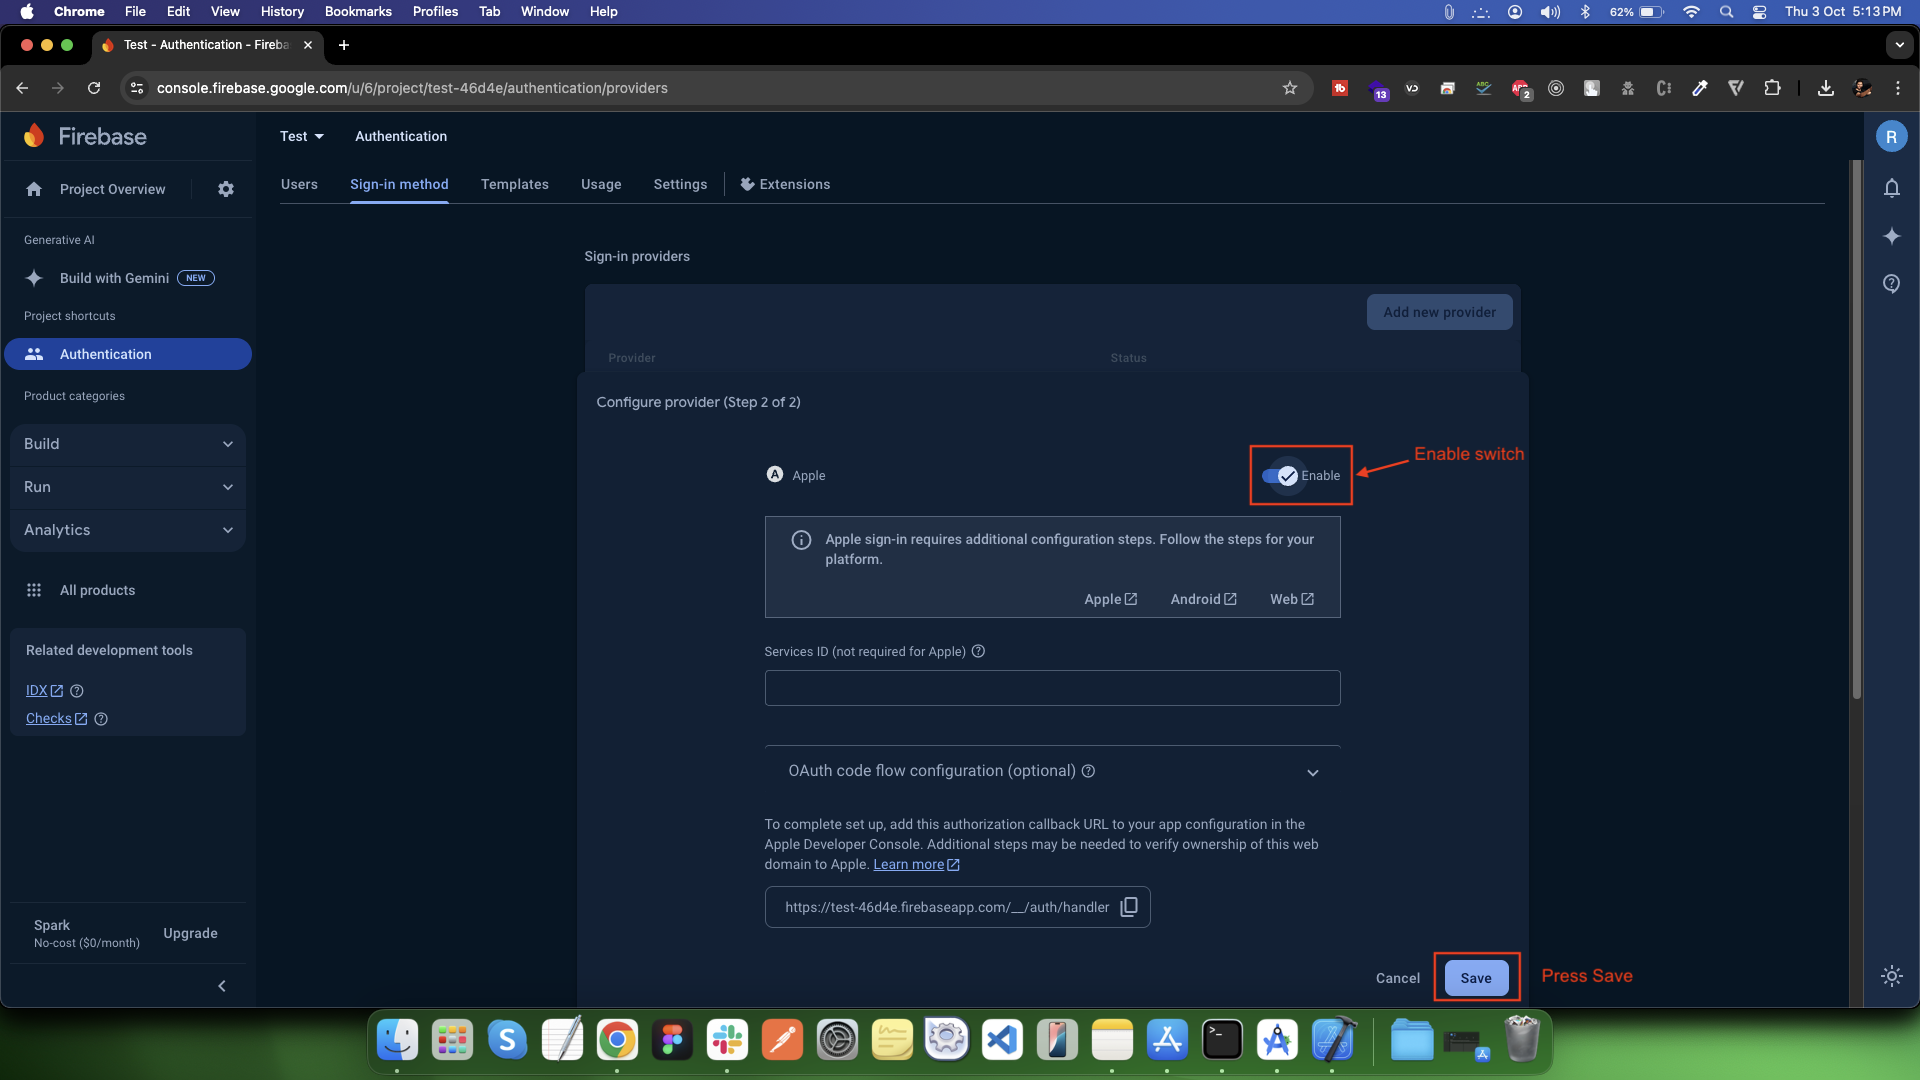
Apple Authentication Only
Create APNs Auth key for push notification
-
Login to Apple Developer Account
-
- Go to Apple Developer Account
-
- Log in with your Apple Developer credentials.
-
-
Navigate to Keys Section
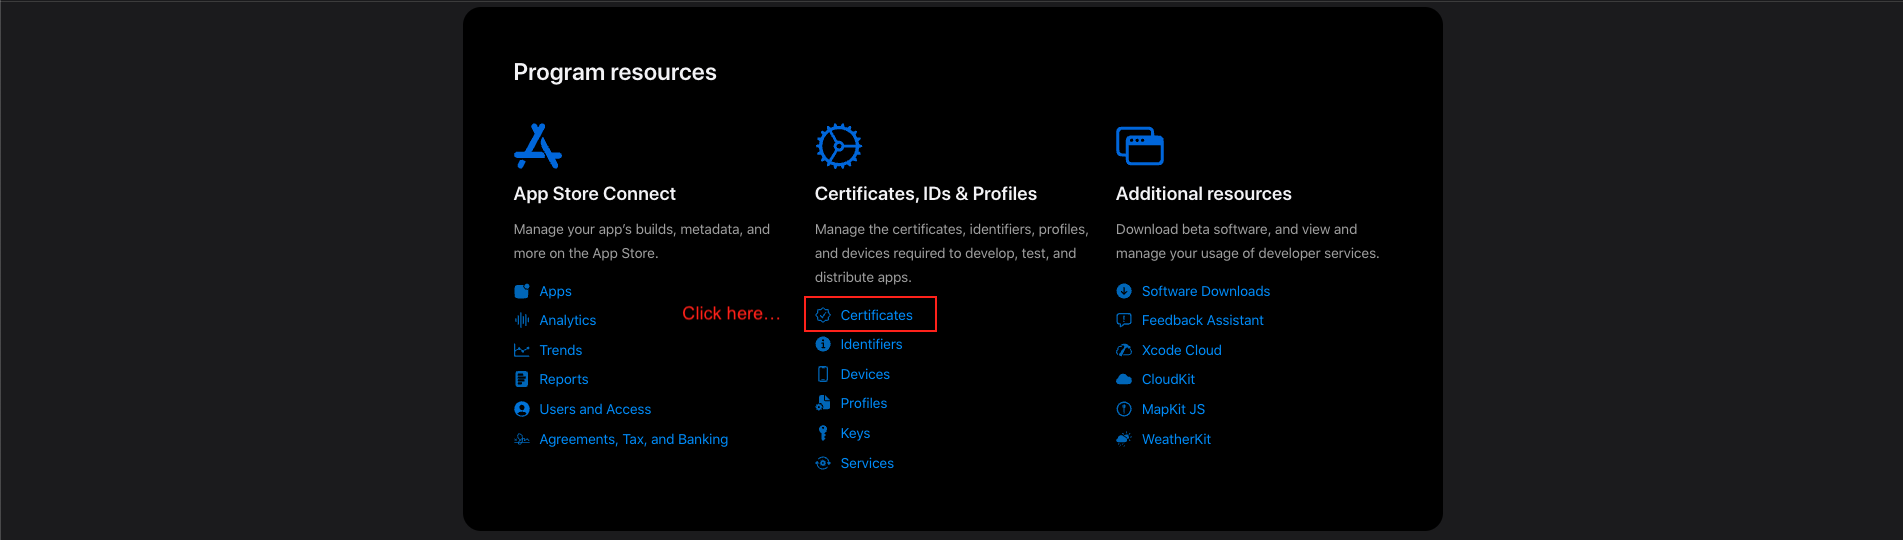
-
- Click Certificates, Identifiers & Profiles.
-
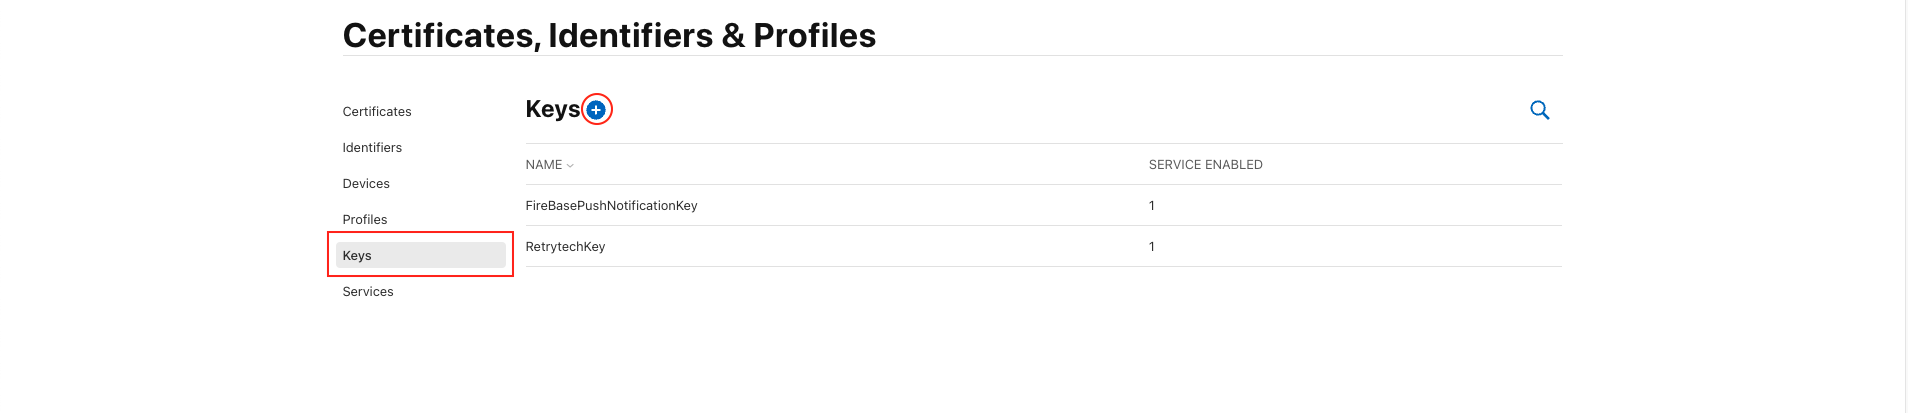
- In the left sidebar, click Keys.
-
-
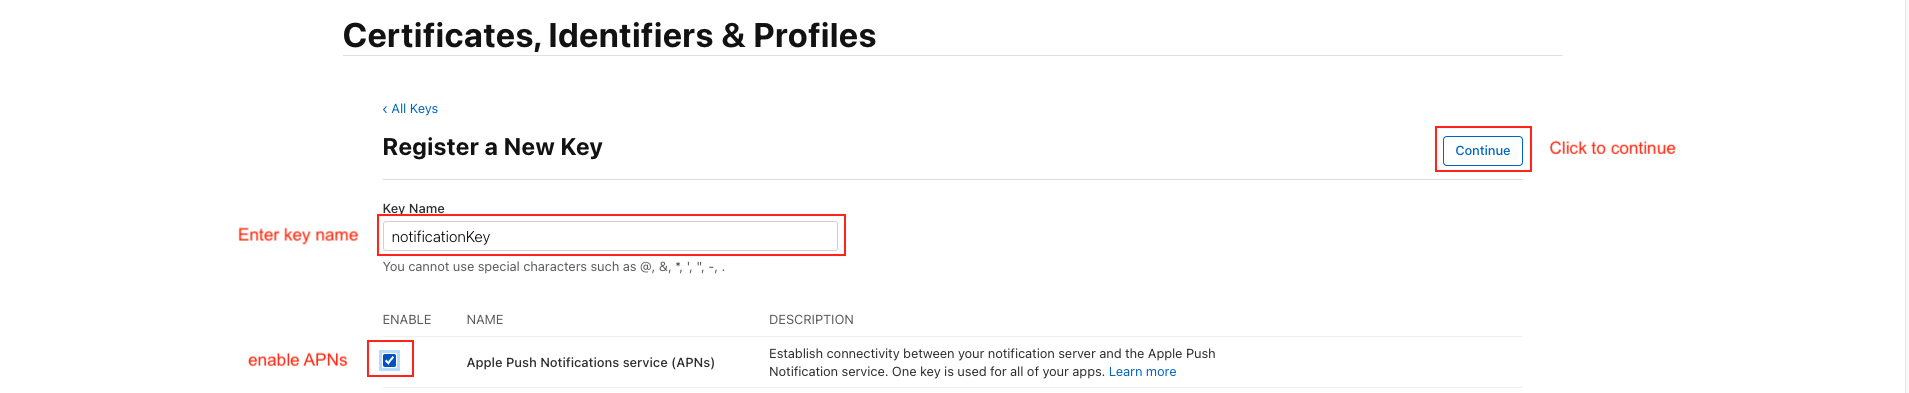
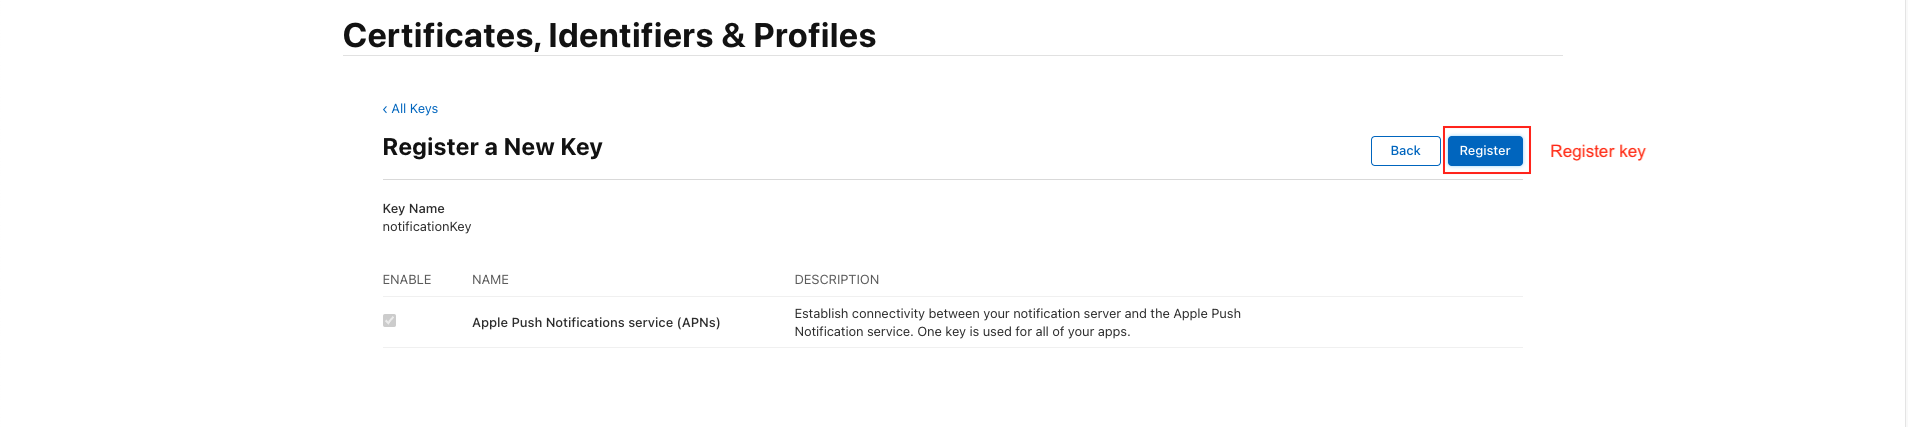
Enter a name (e.g., NotificationKey ).
-
Check the box for Apple Push Notifications service (APNs). then Configure button press
-
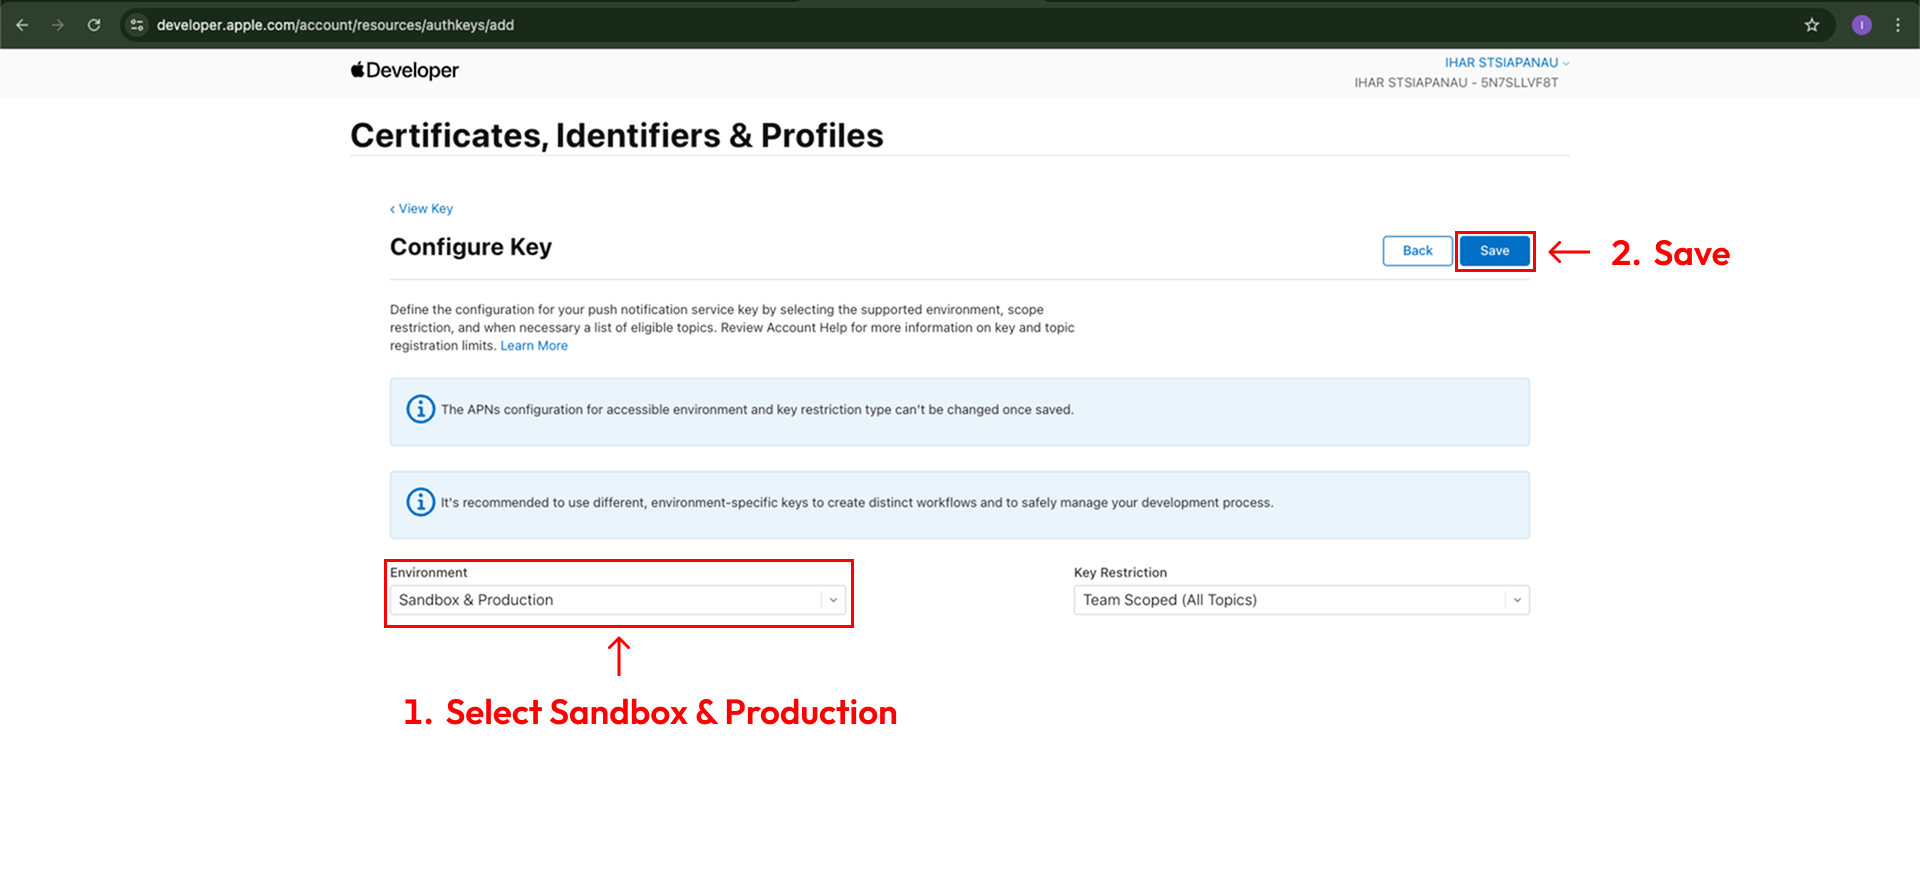
Select Environment section Select "Sandbox & Production" and Key Restriction section select "Team Scoped (All Topics)"
-
Click "Continue" & then "Save". Once saved, you will be presented with a screen displaying the private "Key ID" & the ability to download the key. Copy the ID, and download the file to your local machine:
-
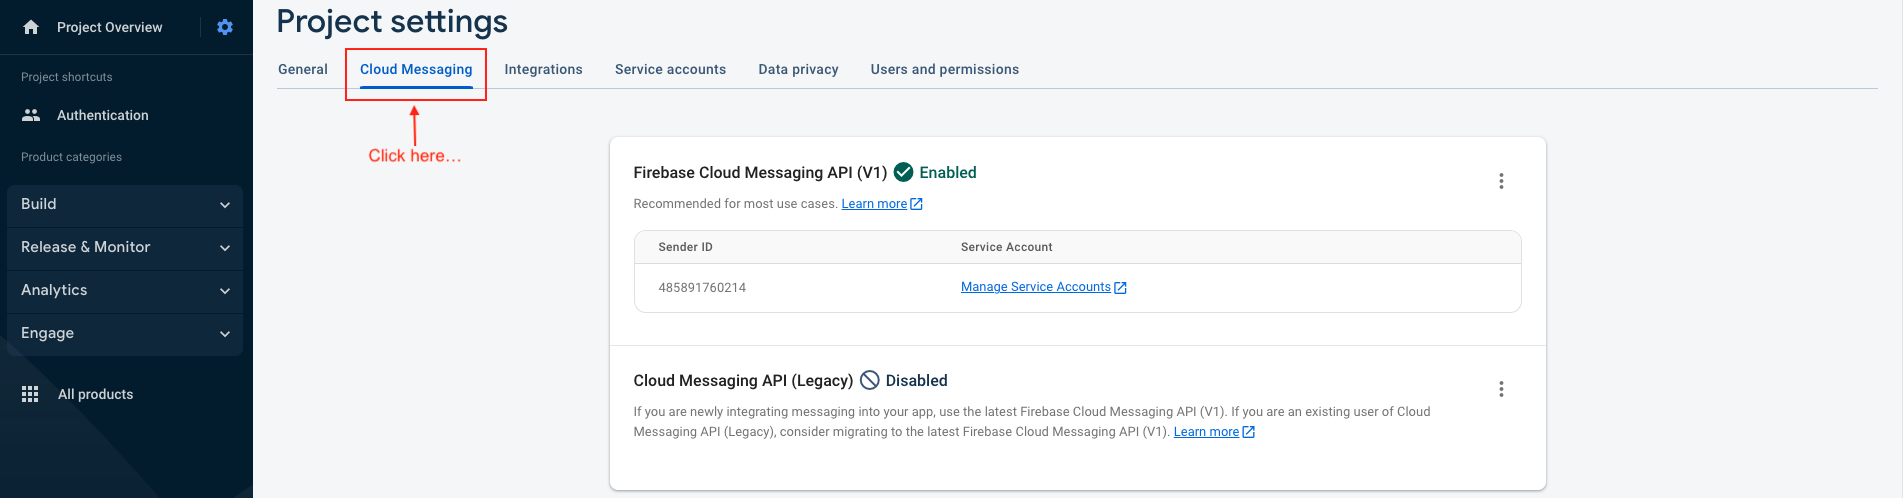
The file & Key ID can now be added to your Firebase Project. On the Firebase Console, navigate to the "Project settings" and select the "Cloud Messaging" tab. Select your iOS application under the "iOS app configuration" heading.s
-
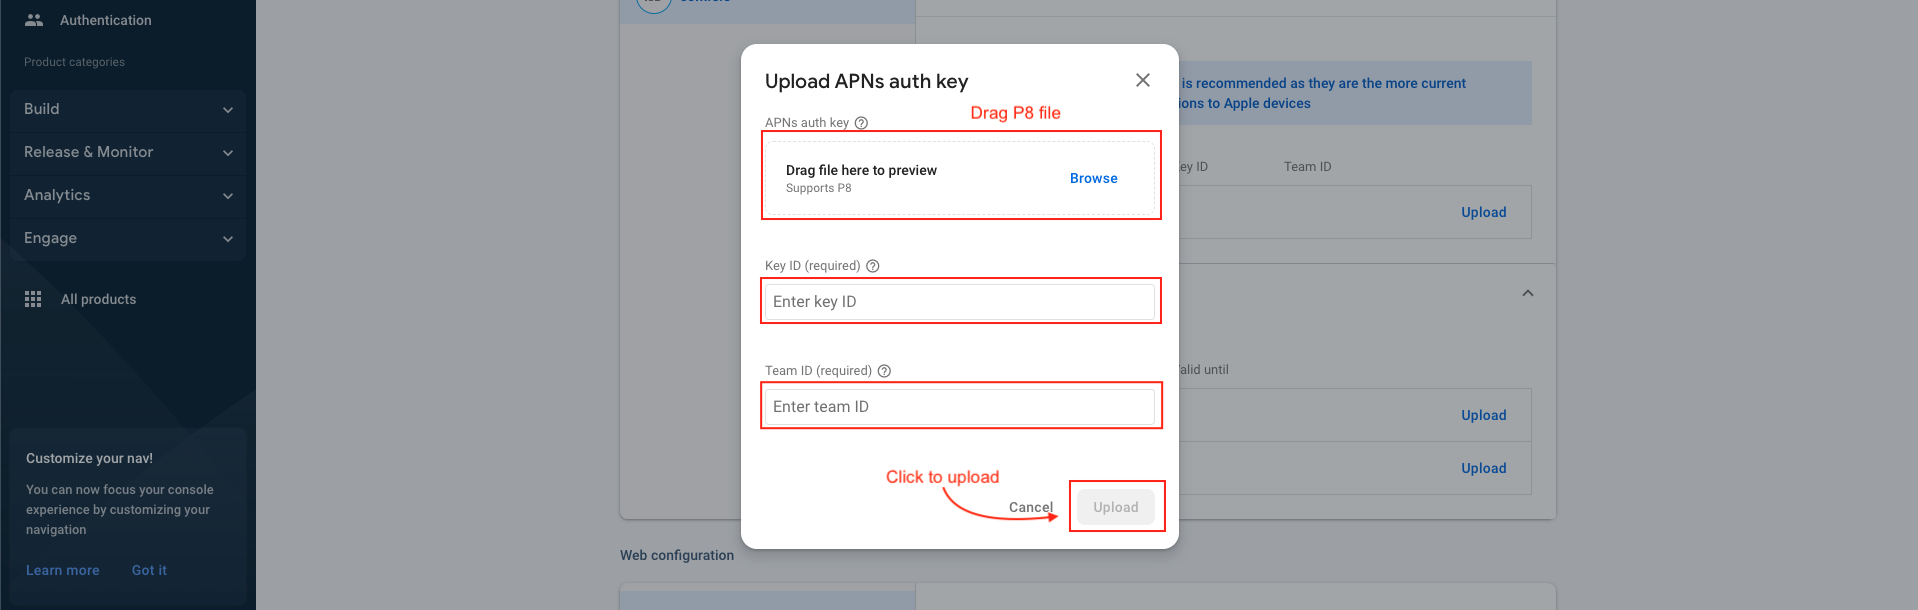
Upload the downloaded file and enter the Key & Team IDs;

Copy Key ID & Download File

Google map APIs
-
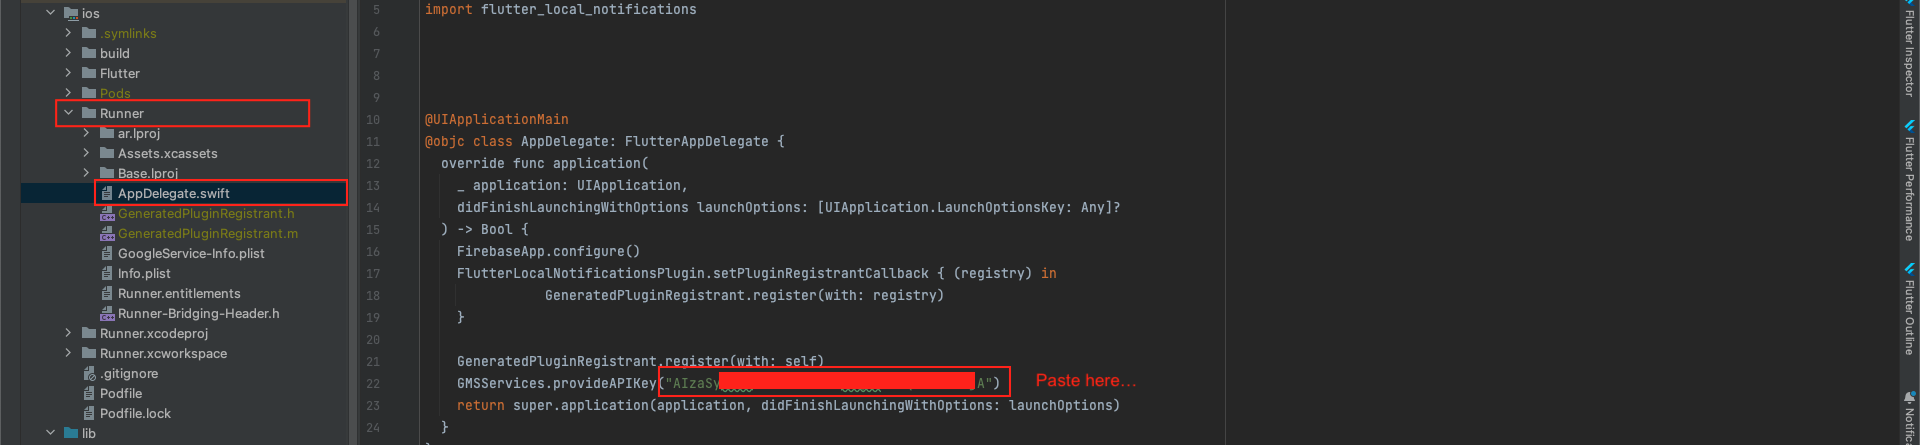
Follow This guide and get map api key
- Android path = android > app > src > main > AndroidManifest.xml
- iOS path = ios > Runner > AppDelegate.swift

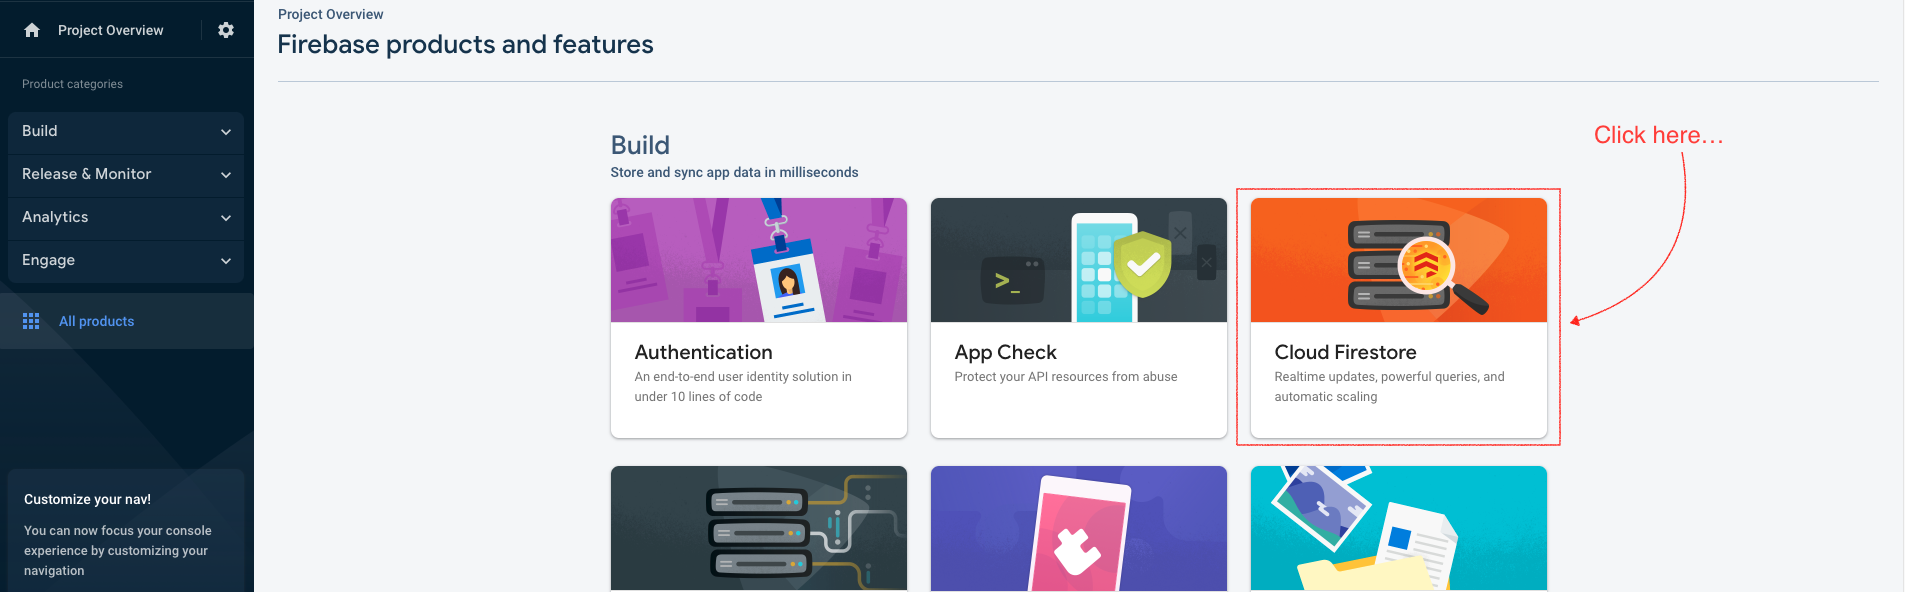
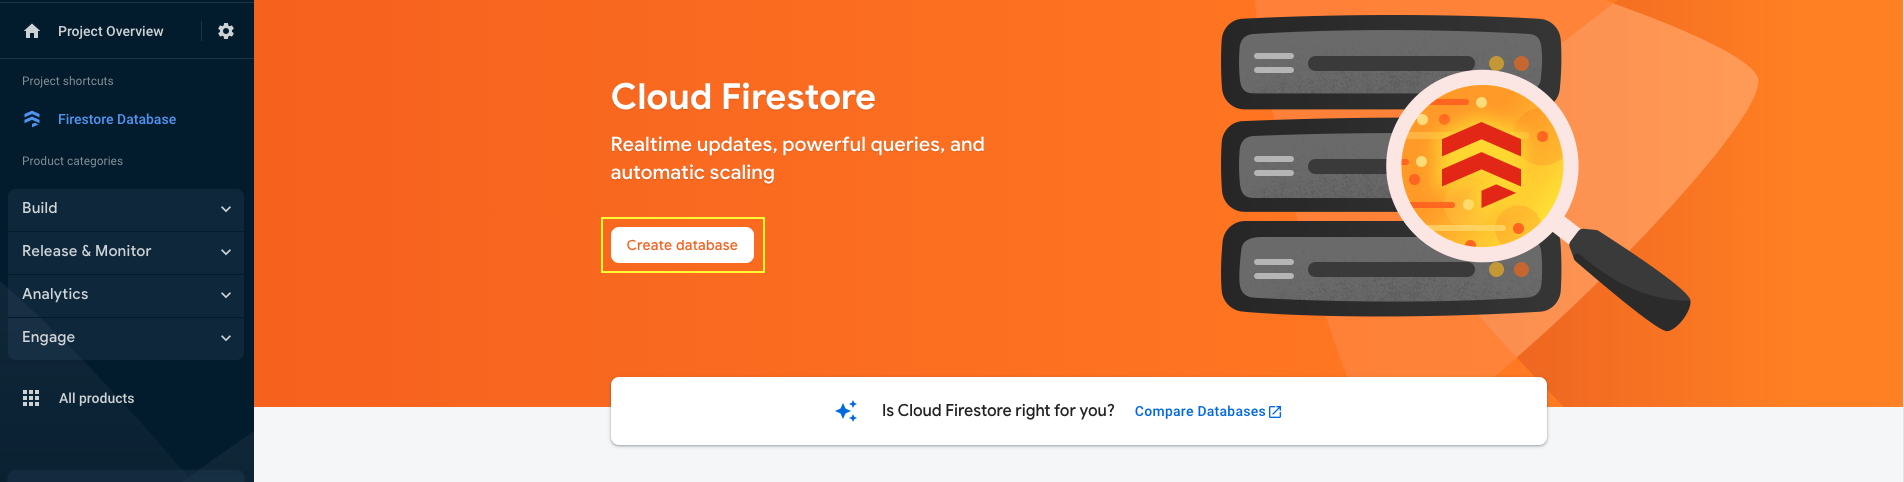
Enable firestore
-
Step 1 : Click on Firestore Database and Create database.
-
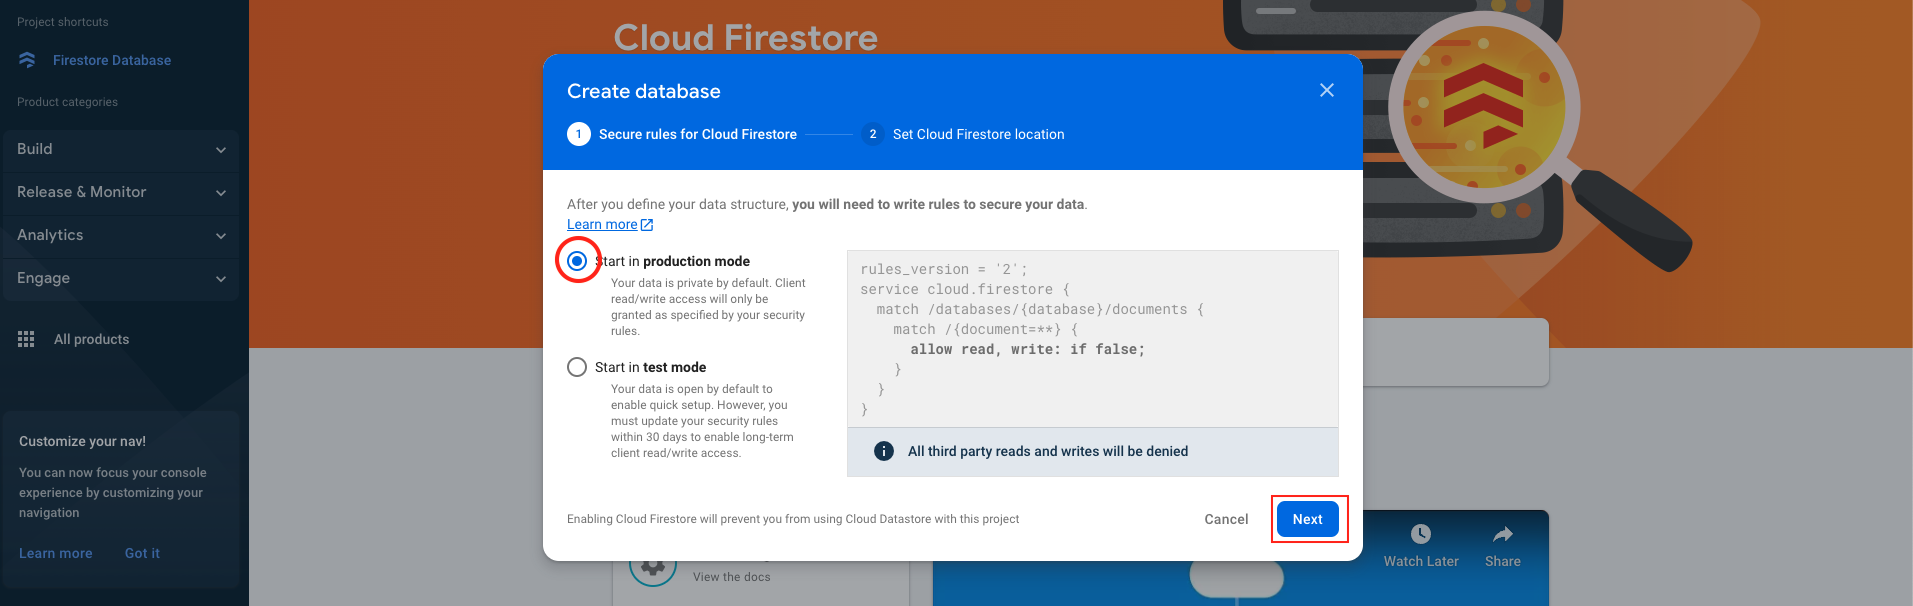
Step 2 : Model will be open click on Next.
-
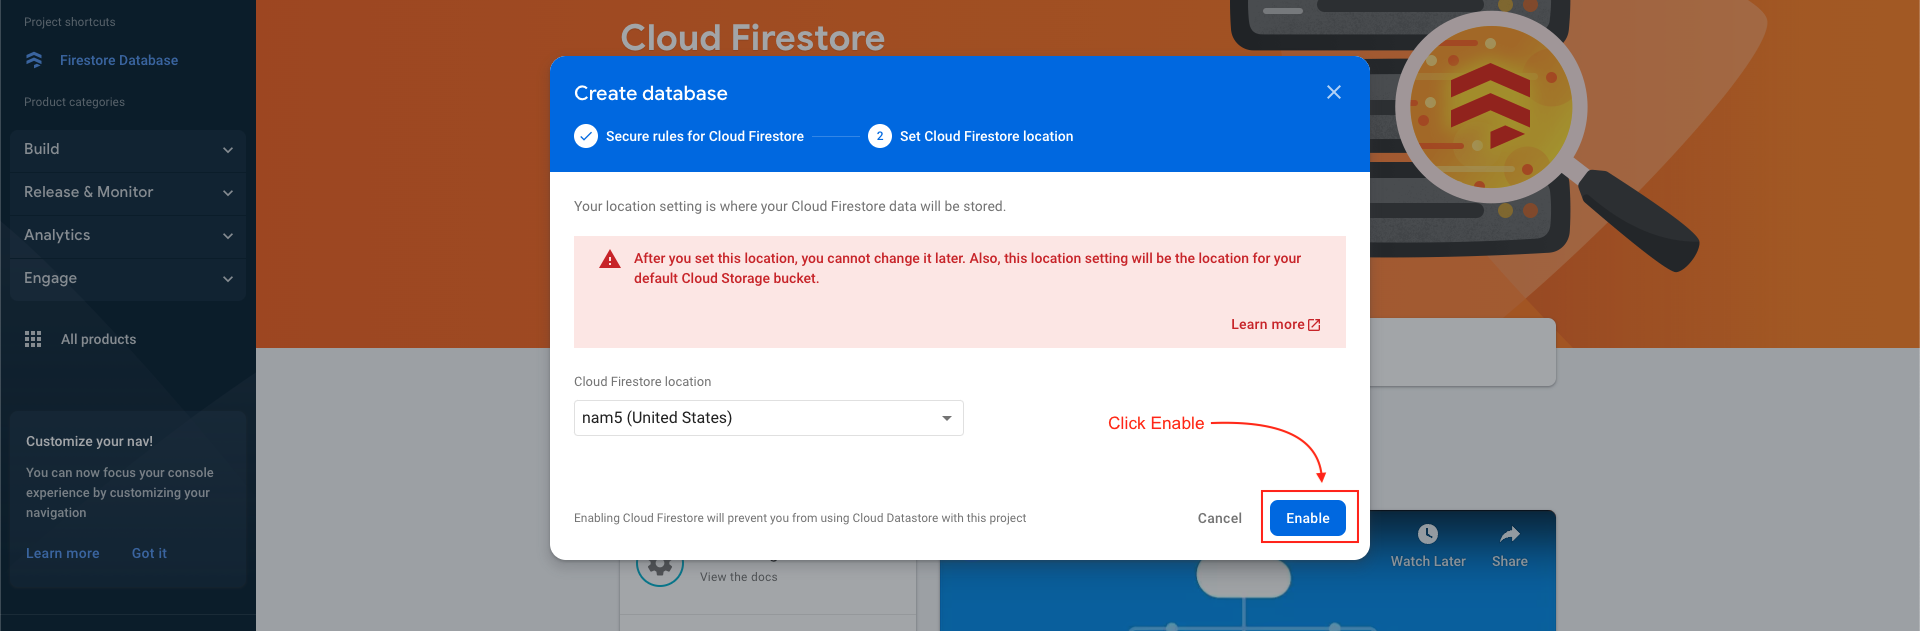
Step 3 : Then click Enable button
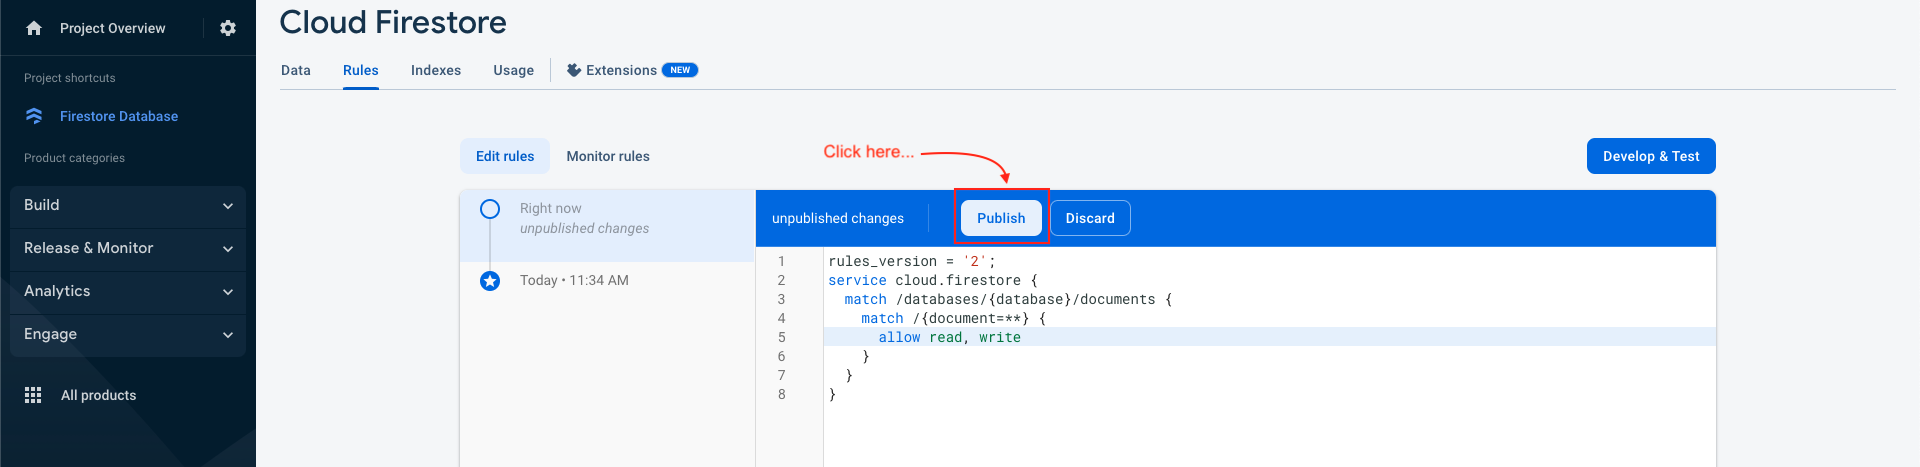
-
Step 4 : After create Database, You have to change rules of database then click publish button. Follow step, shown below.
-
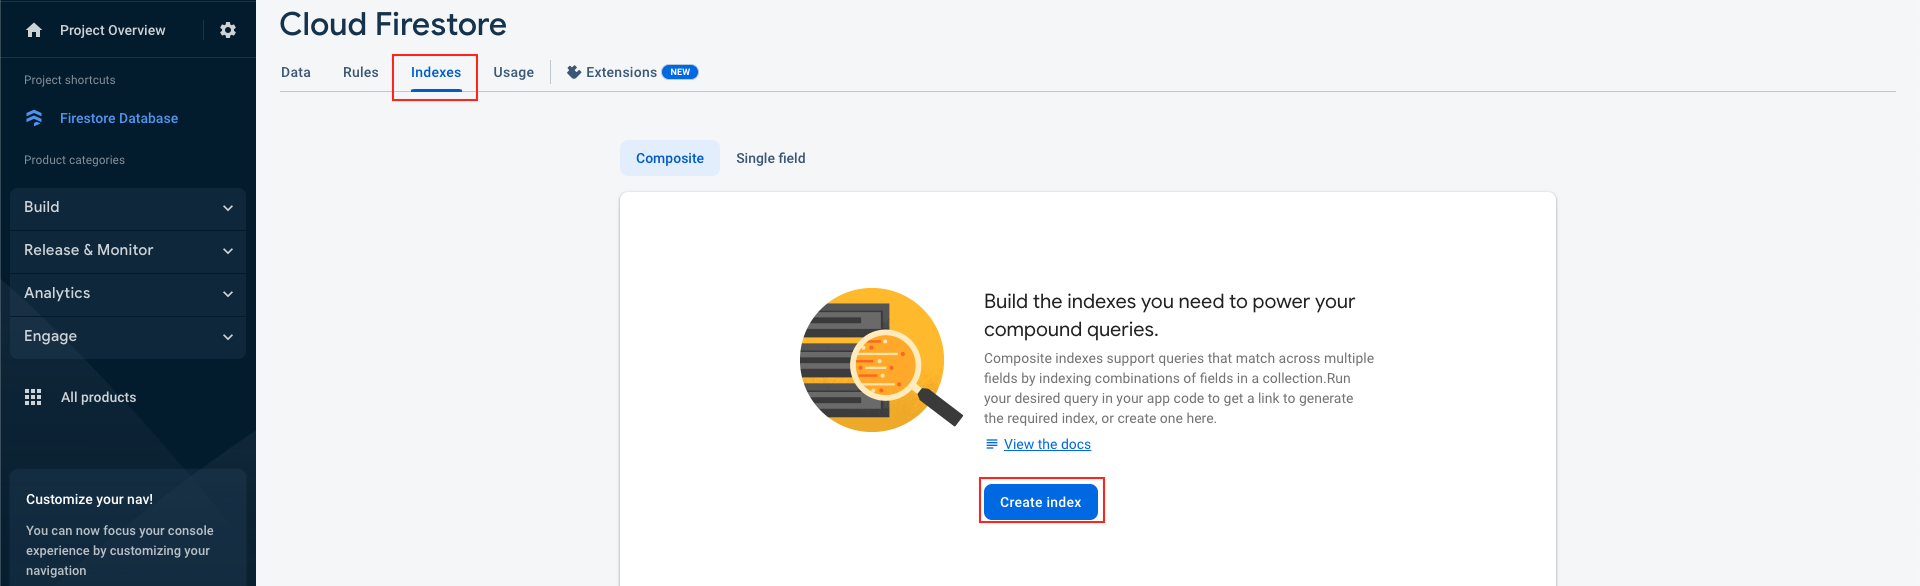
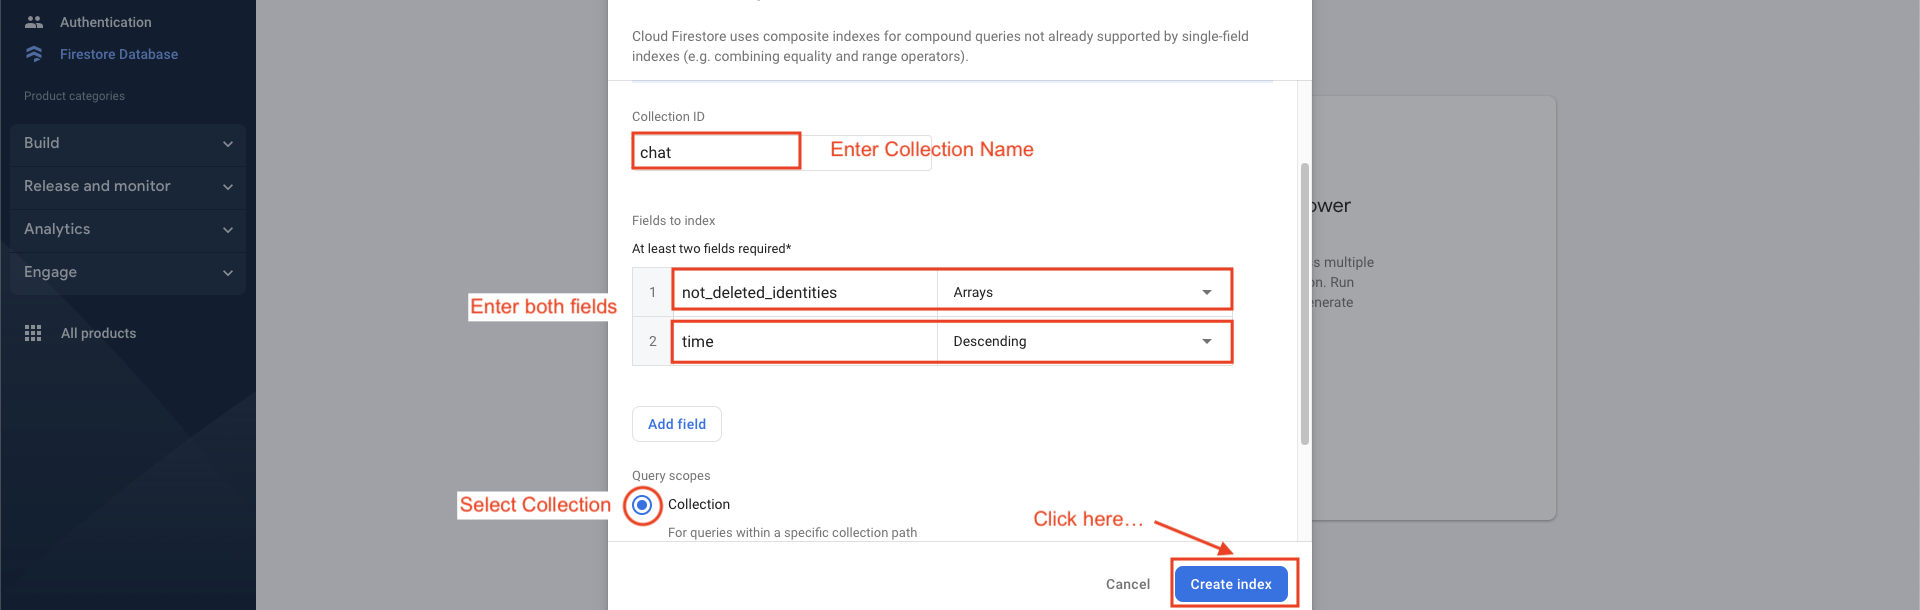
Step 5 : Create 2 indexes in firestore.


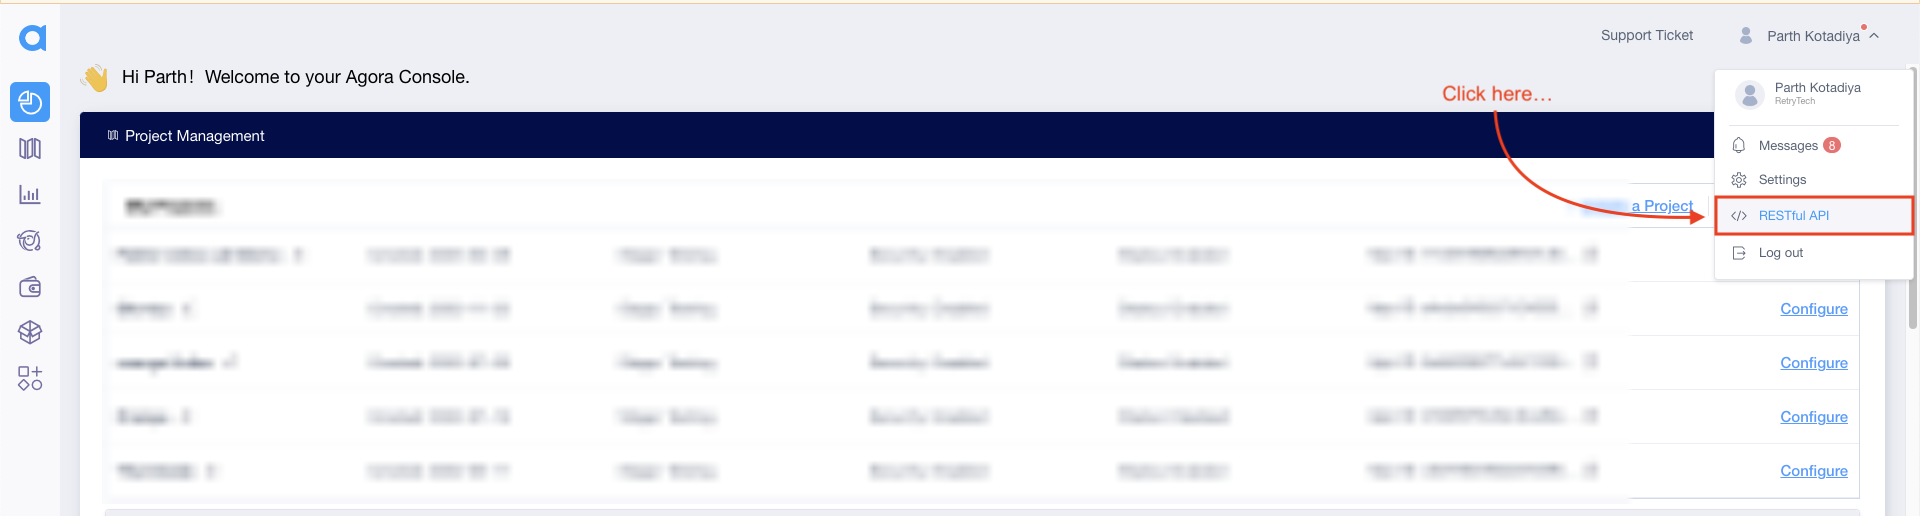
Setup Agora
-
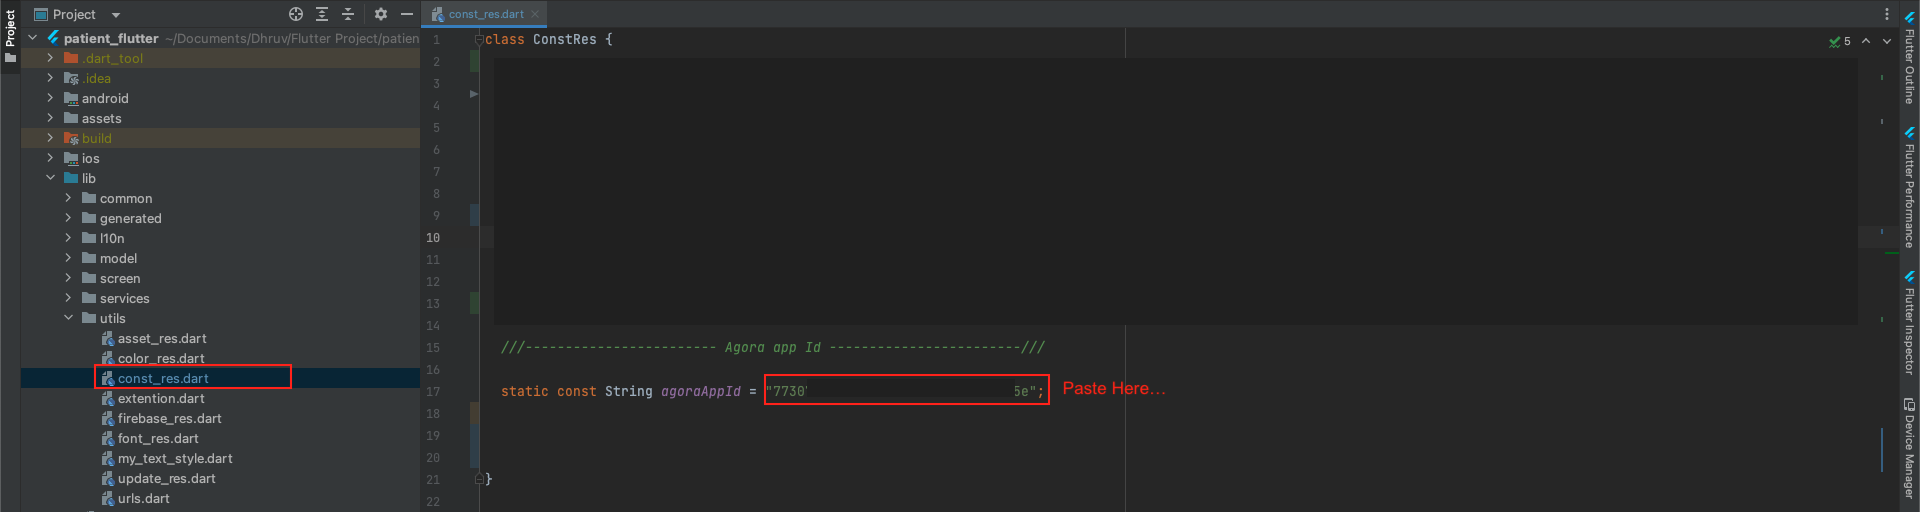
Follow This guide and setup project at agora and collect App id
-
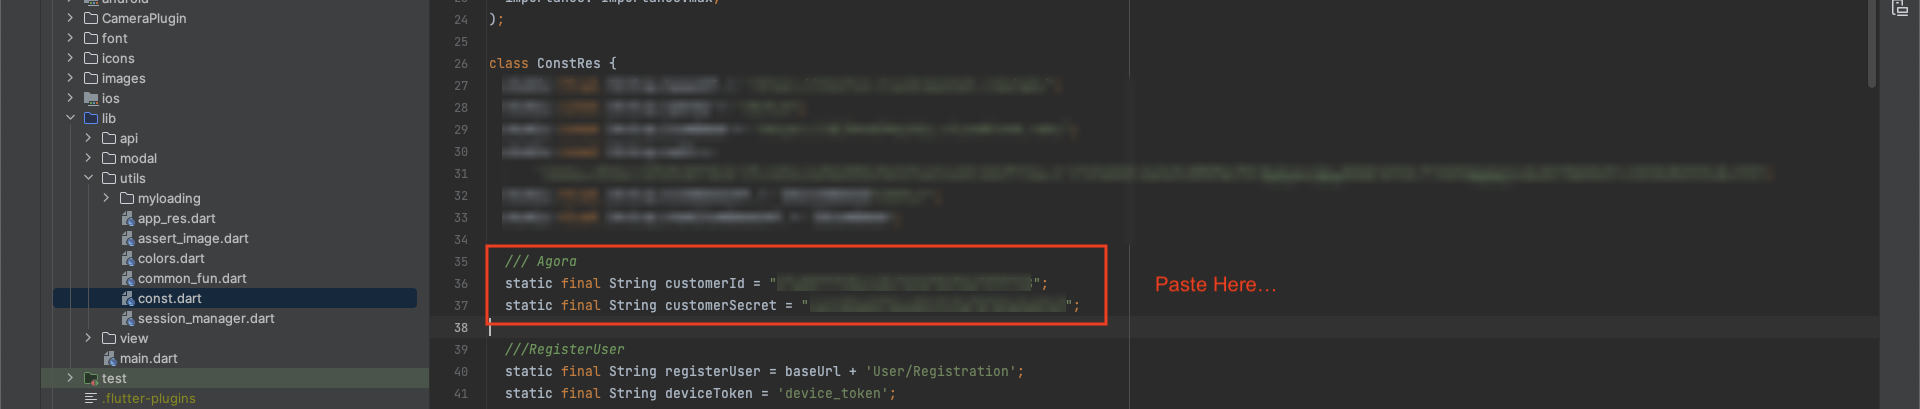
Go to your flutter project and Paste Here : orange>lib>utils>const_res.dart
-
In downloaded file, you will get customerID and customerSecret keys.
-
Please add these to the project file as shown below
-
Paste here : orange > lib > utils > const_res.dart

Deep Link
-
Follow This guide and setup project at DeepLink.
-
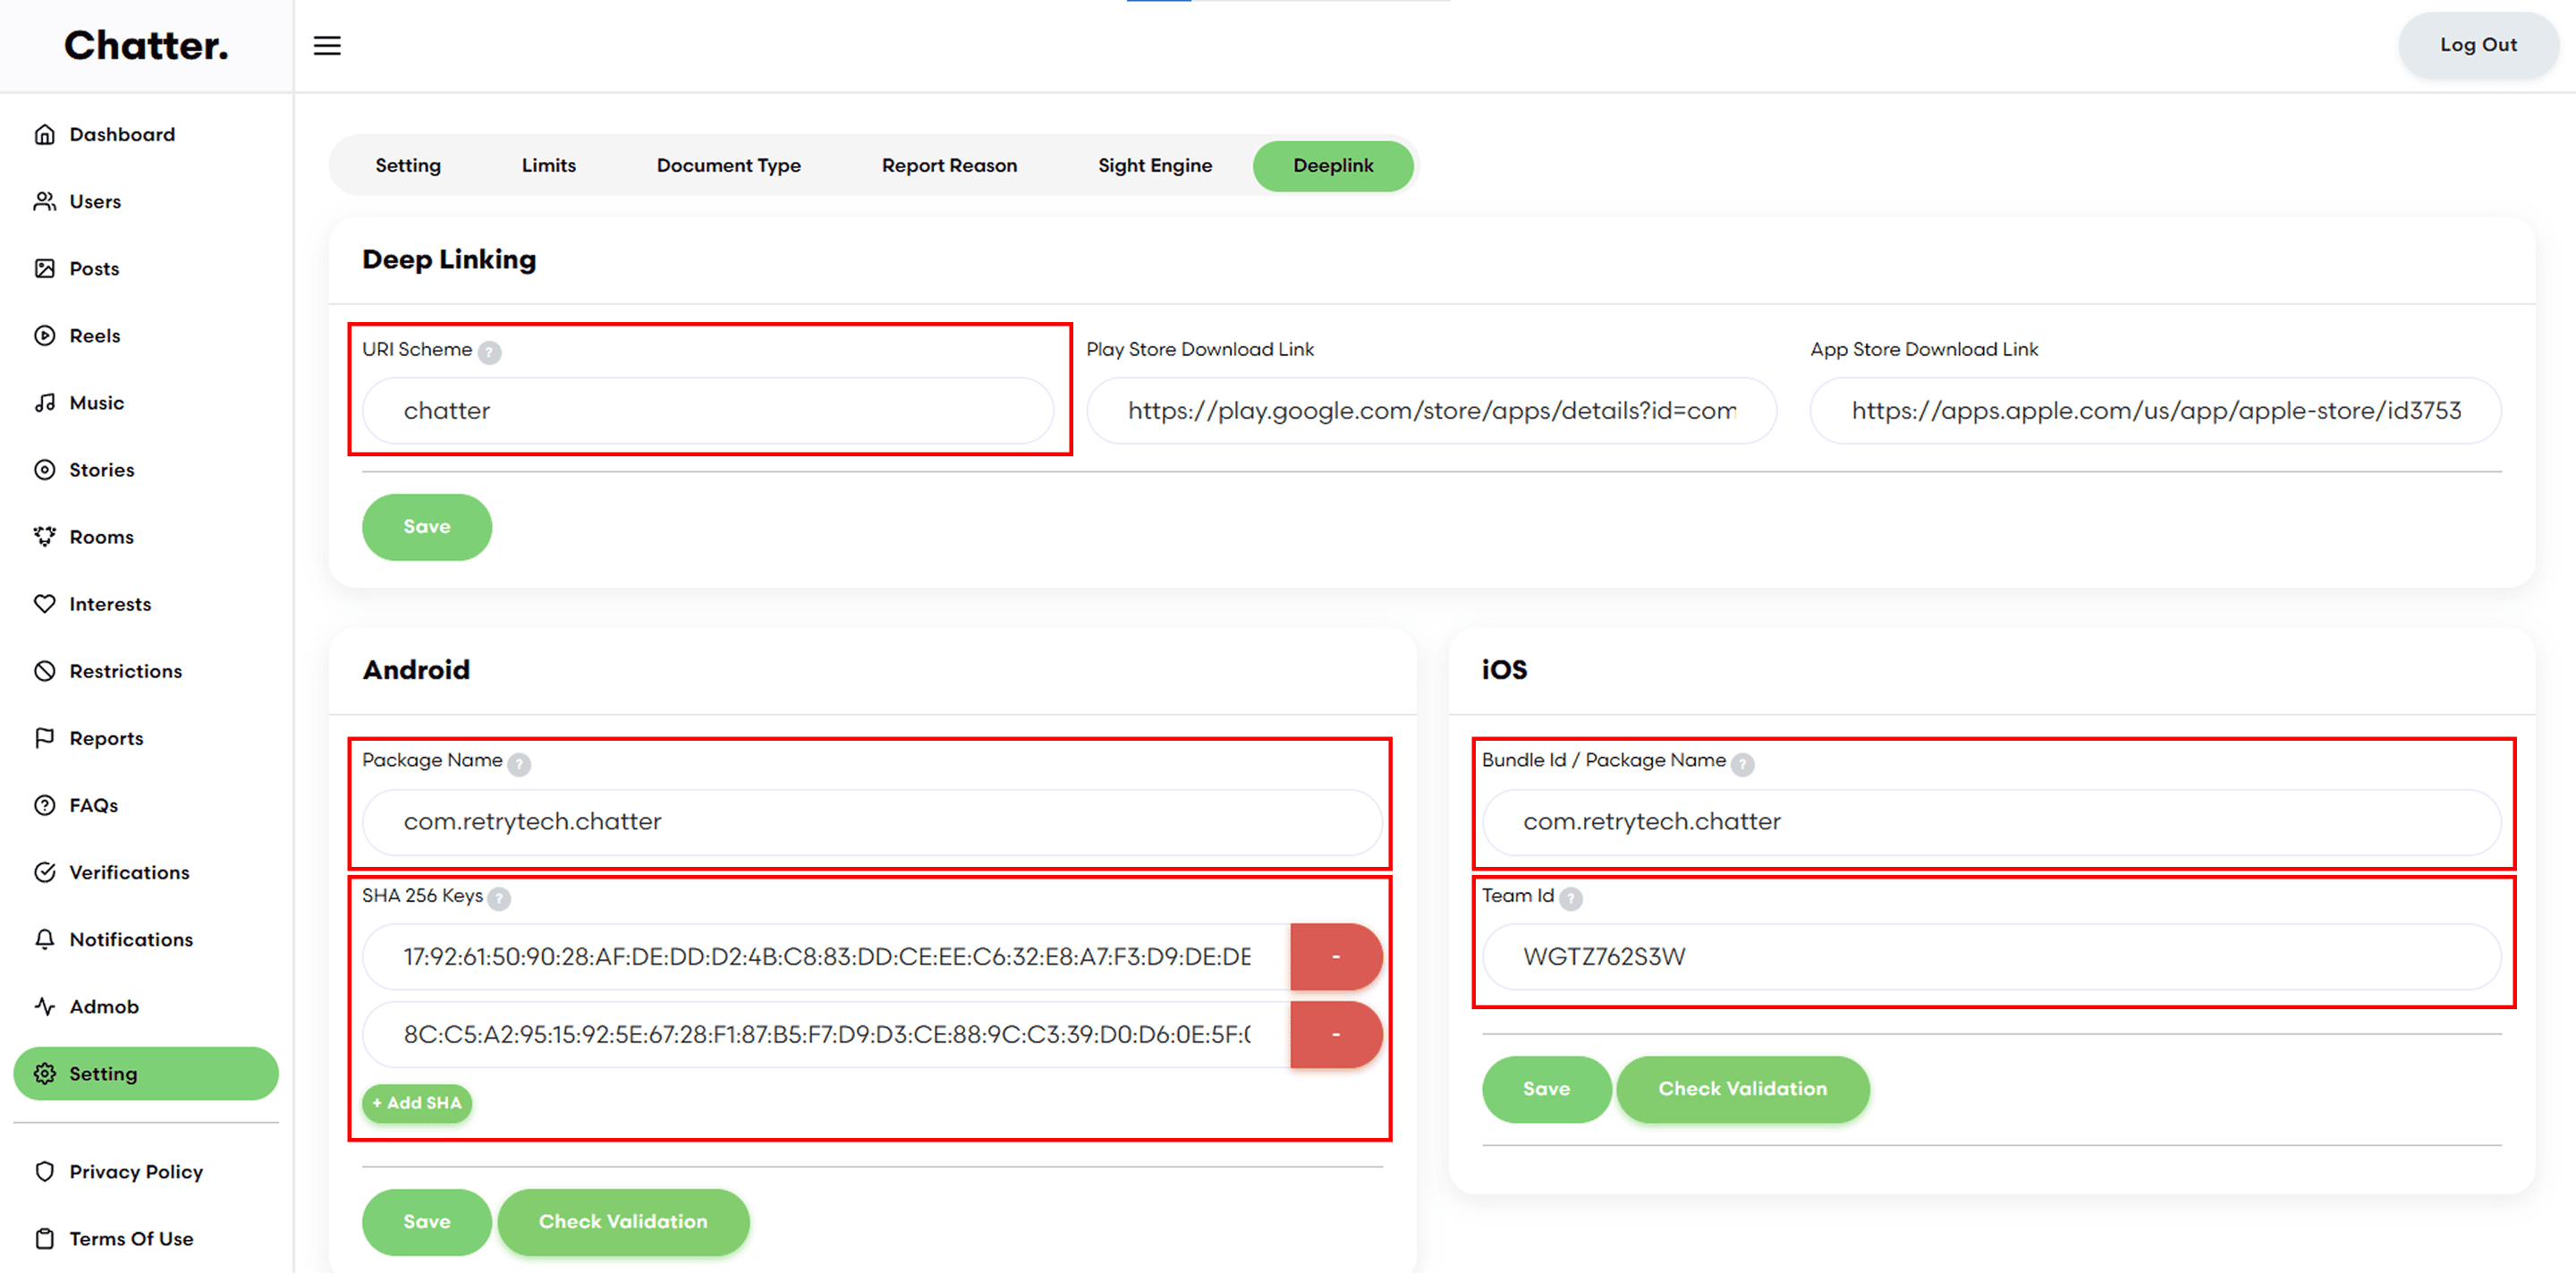
After completing the code integration steps from the above documentation, you now need to configure certain fields in the Admin Panel.
-
Required Fields
-
Scheme - Must be the same for both iOS and Android (already obtained from the above documentation).
-
Play Store Download Link
-
App Store Download Link
-
Android Package Name - (already obtained from the above documentation).
-
Android SHA-256 - Two values are required:
From Android Studio
From Play Store
-
Apple Bundle Identifier - (already obtained from the above documentation).
-
Apple Team ID - (instructions available in the documentation).
-
Once all fields are saved:
-
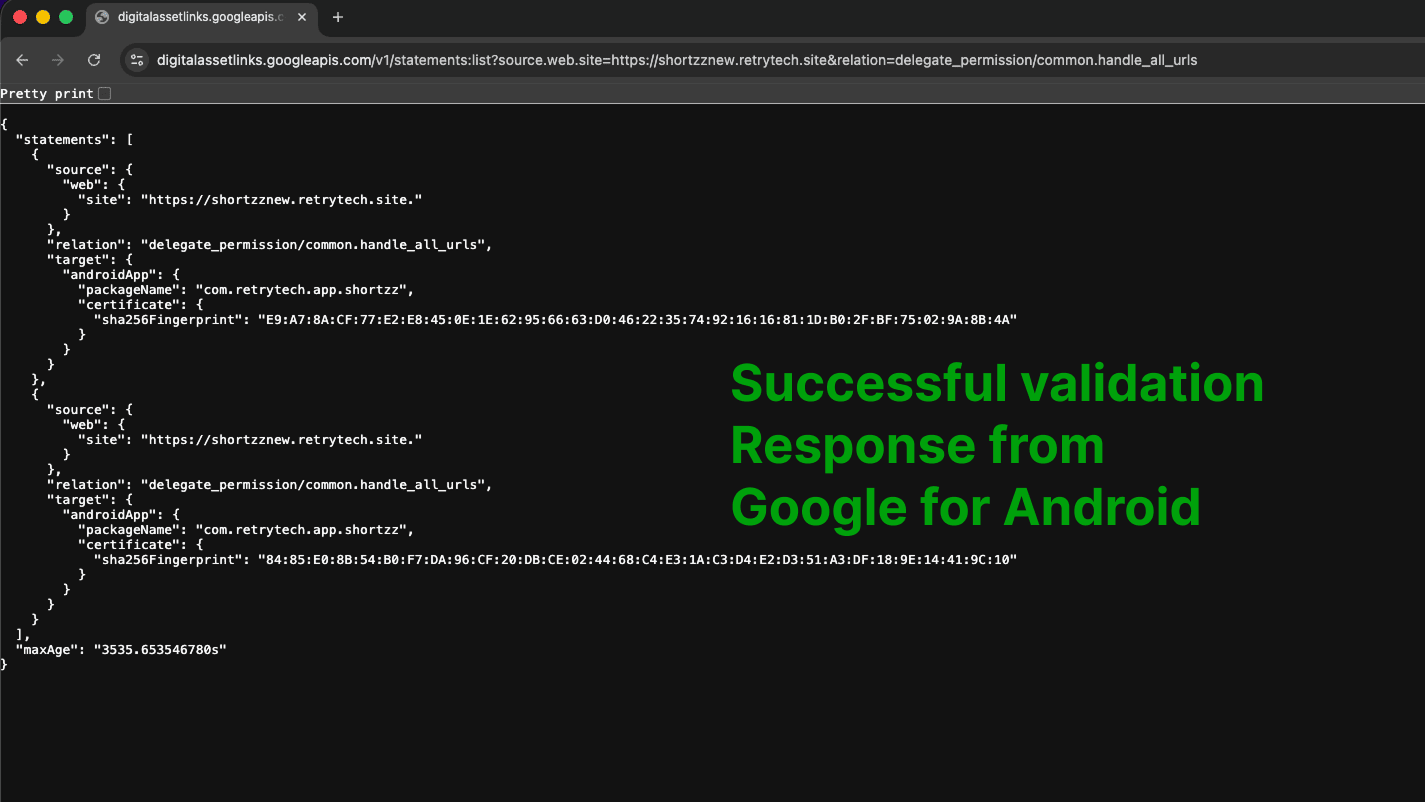
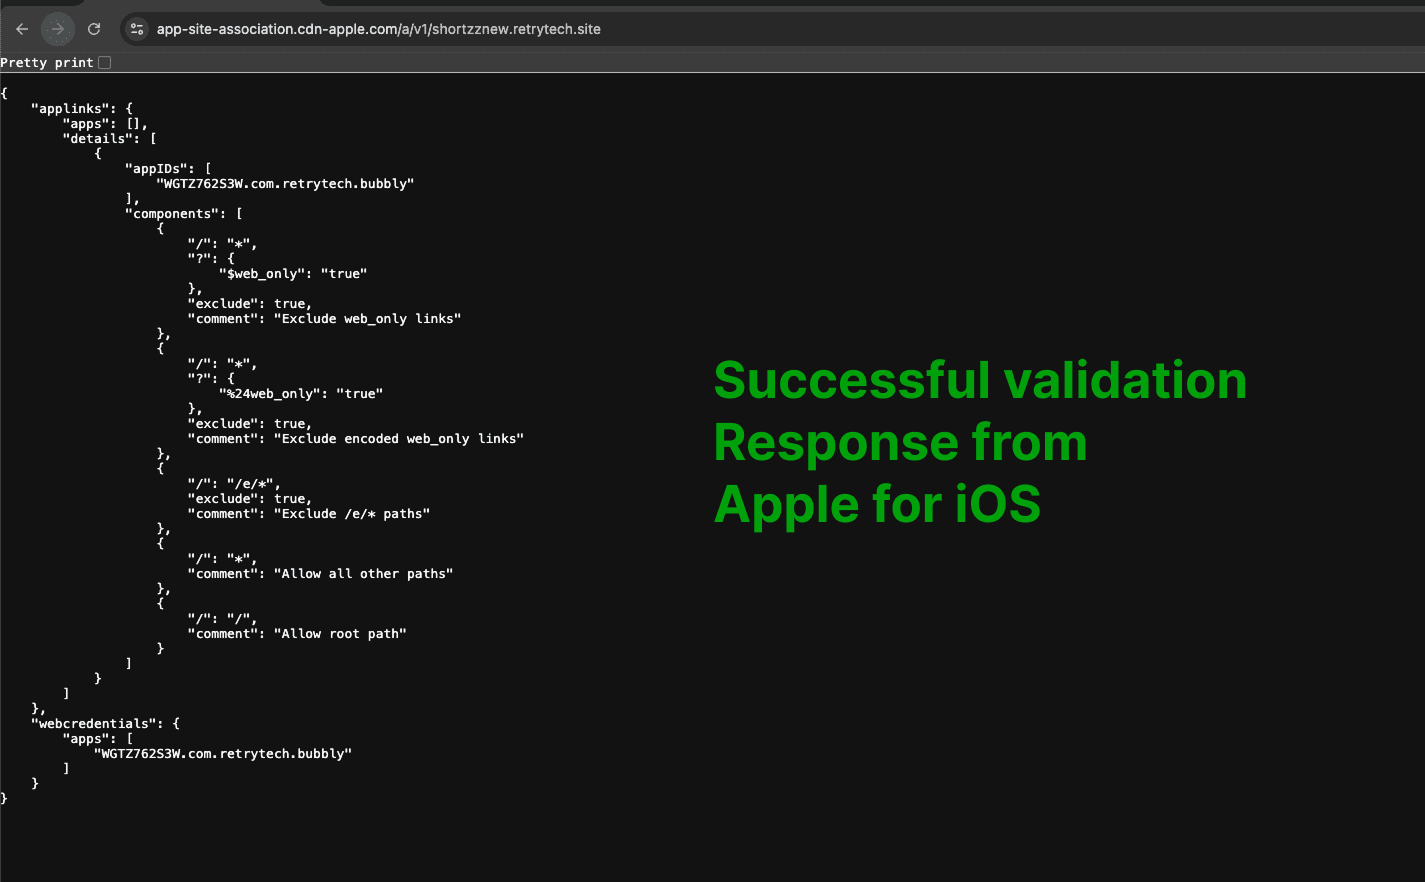
Verify whether the universal link file is available and your domain is validated.
-
A successful validation ensures that the sharing system works correctly.
-
Refer to the screenshots below to see how a validated domain response should look.
-
For check validation, There is a button Check validation beside the Save button. Click on that button.
-
During validation:
-
When clicking the shared link for the first time, you may be redirected to the browser before the app opens.
-
After successful validation, the app will open directly without going through the browser.
-
If the issue persists (i.e., the link still opens in the browser instead of the app):
-
Delete the app from your device.
-
Reinstall the app.
-
Test again on a real device (not just a simulator).
⚠️ Note : Each field has a ? icon beside it. Clicking on it will provide guidance on how to obtain the required value.
Validation Process
Subscription
-
Setup subscriptions on Google Play Store & Apple AppStore Connect
-
You need to define subscriptions on Google Play Console (For Android) and Apple App Store Connect (For iOS) before connecting with RevenueCat.
-
Check the guides below to configure subscriptions.
-
Configure Android subscriptions : Follow this guide
-
Complete Agreements at AppStore Connect : Follow this guide
-
Configure iOS subscriptions : Follow this guide
-
Now let's connect and configure subscriptions at revenuecat.
-
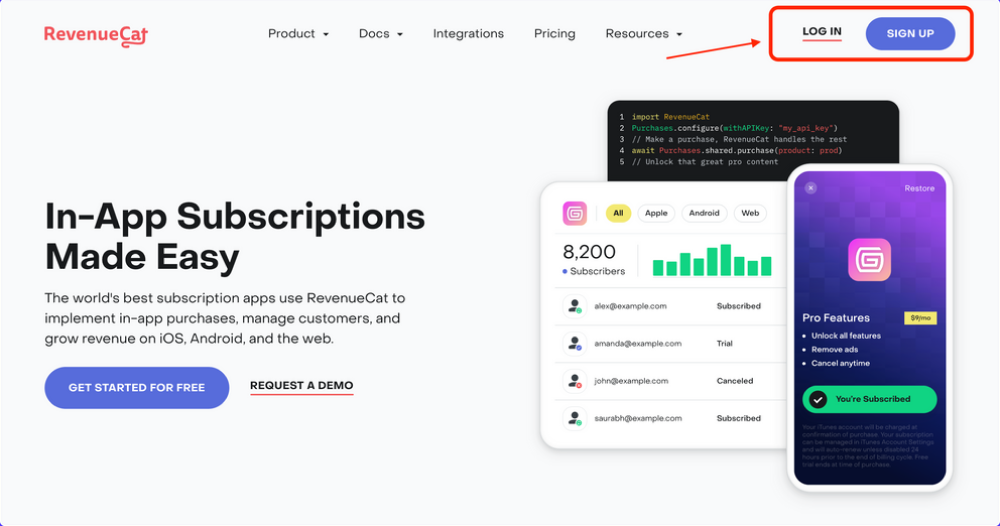
Create an account or log in to RevenueCat from here to get started.
-
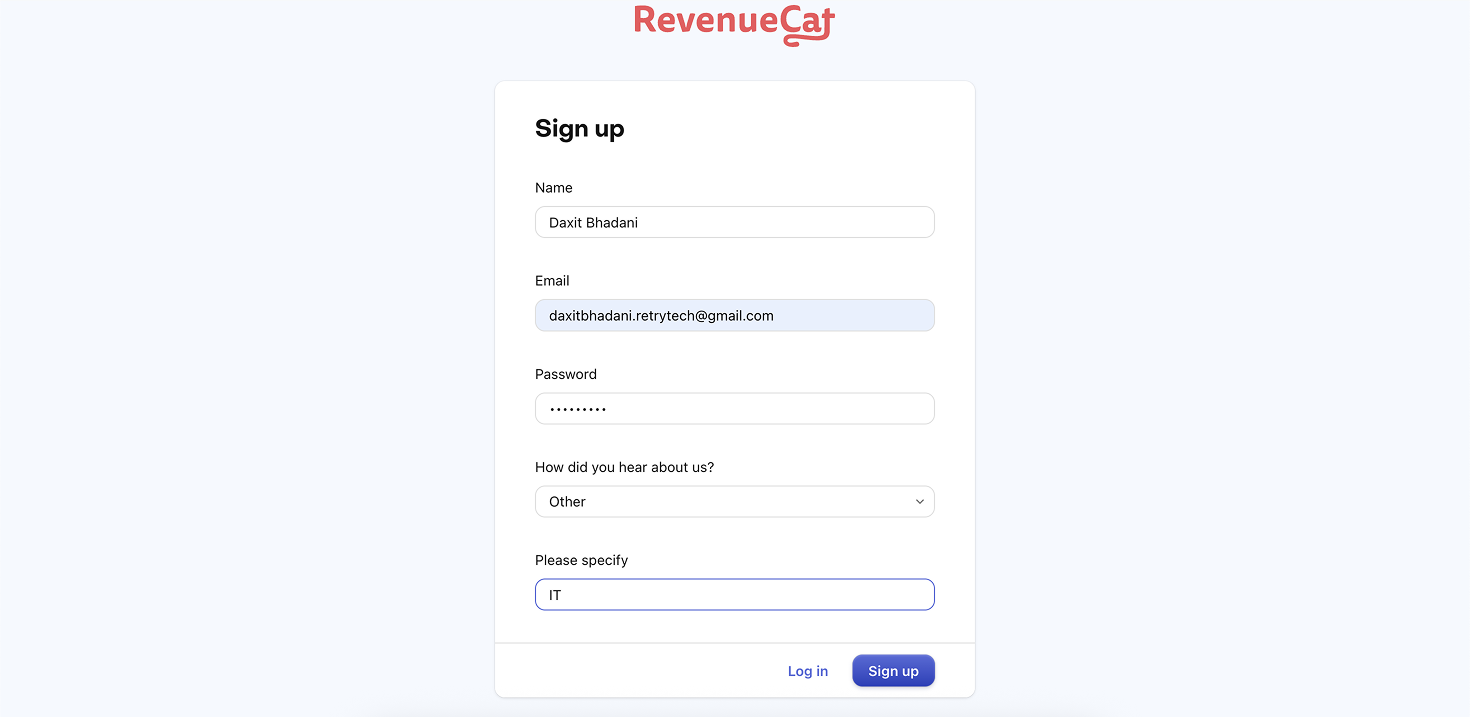
Sign up process
-
Please fill in all the questions shown in the image below and press submit.
-
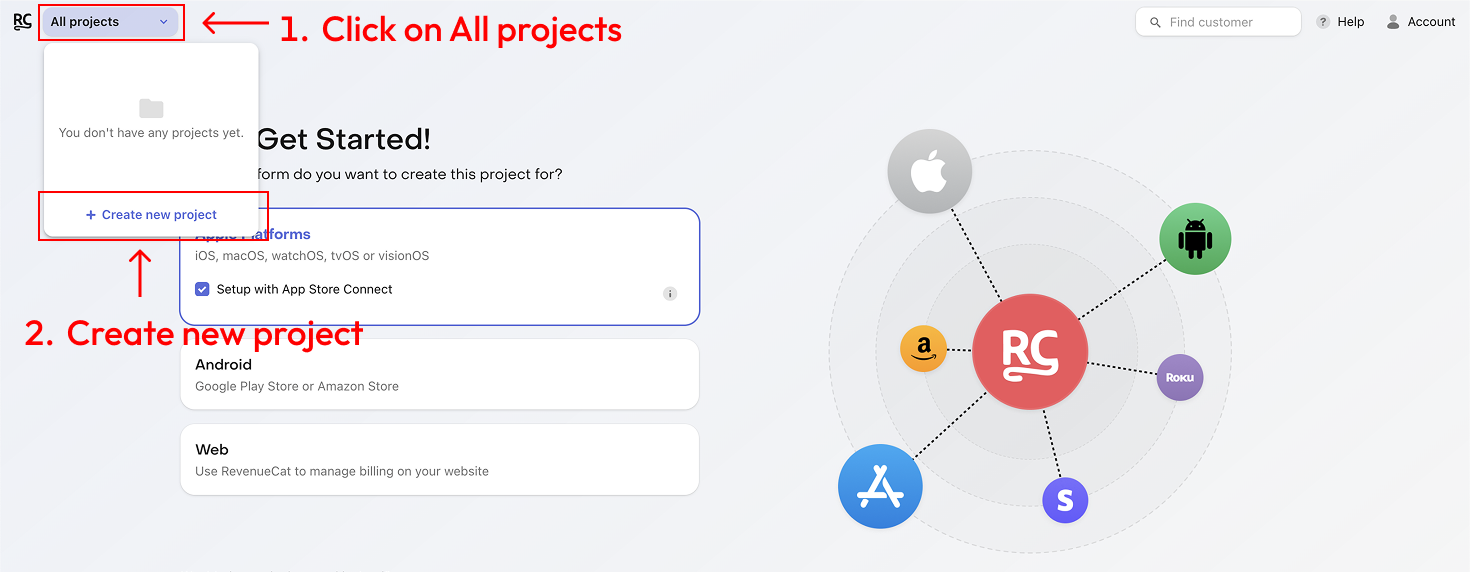
Create a New Project
-
Click on the dropdown at the top-left corner labeled All projects .
-
Since no projects exist yet, you will see a message: “You don’t have any projects yet.”
-
Click on + Create new project .
-
In the Project name field, type your desired name : Example: Shortzz
-
Press the Create Project button to proceed.
-
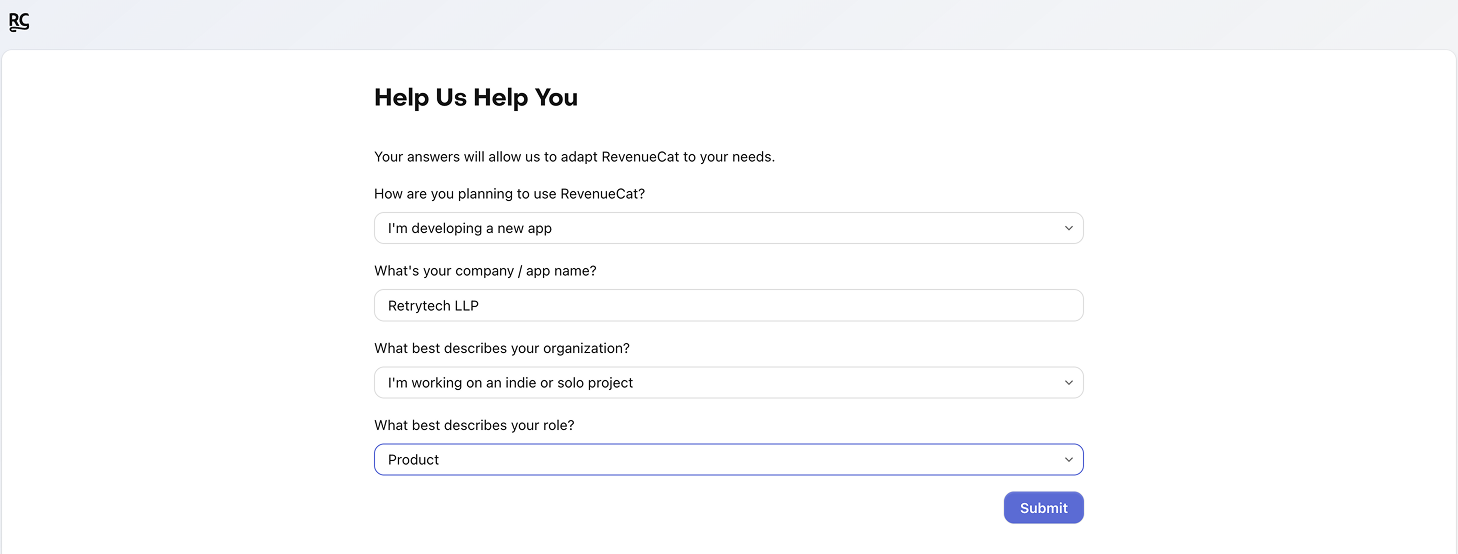
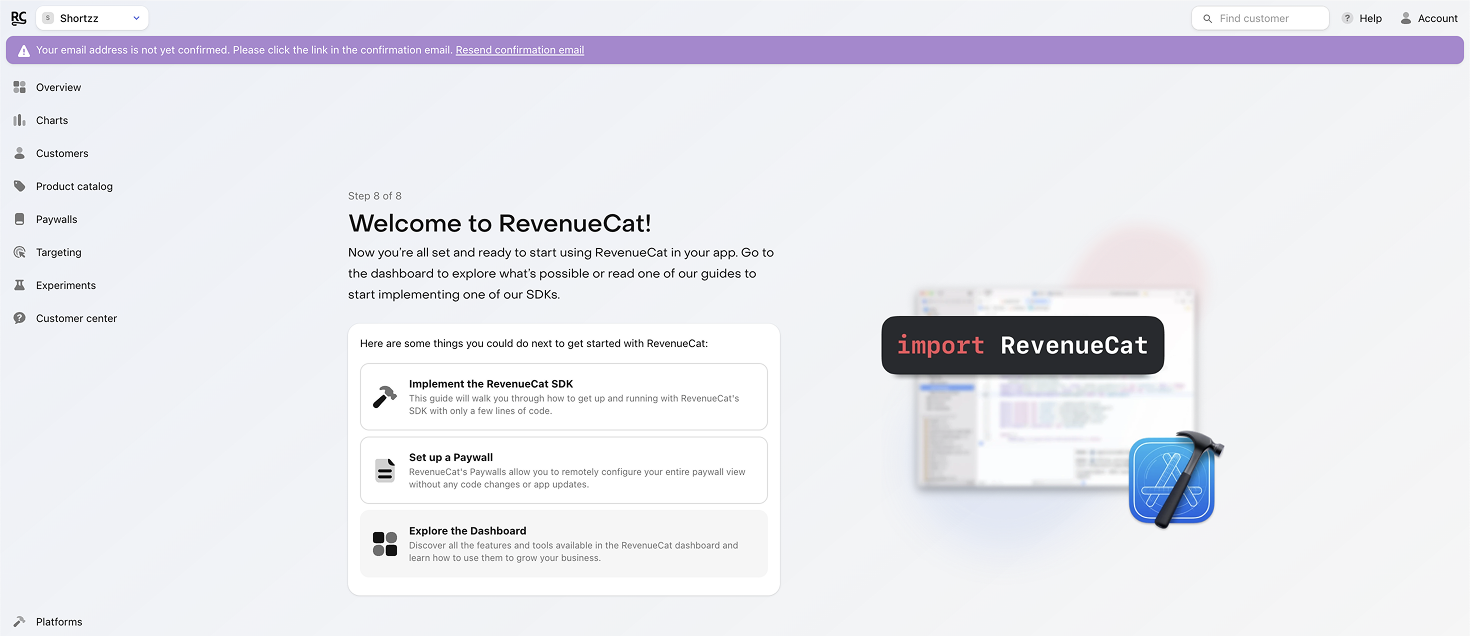
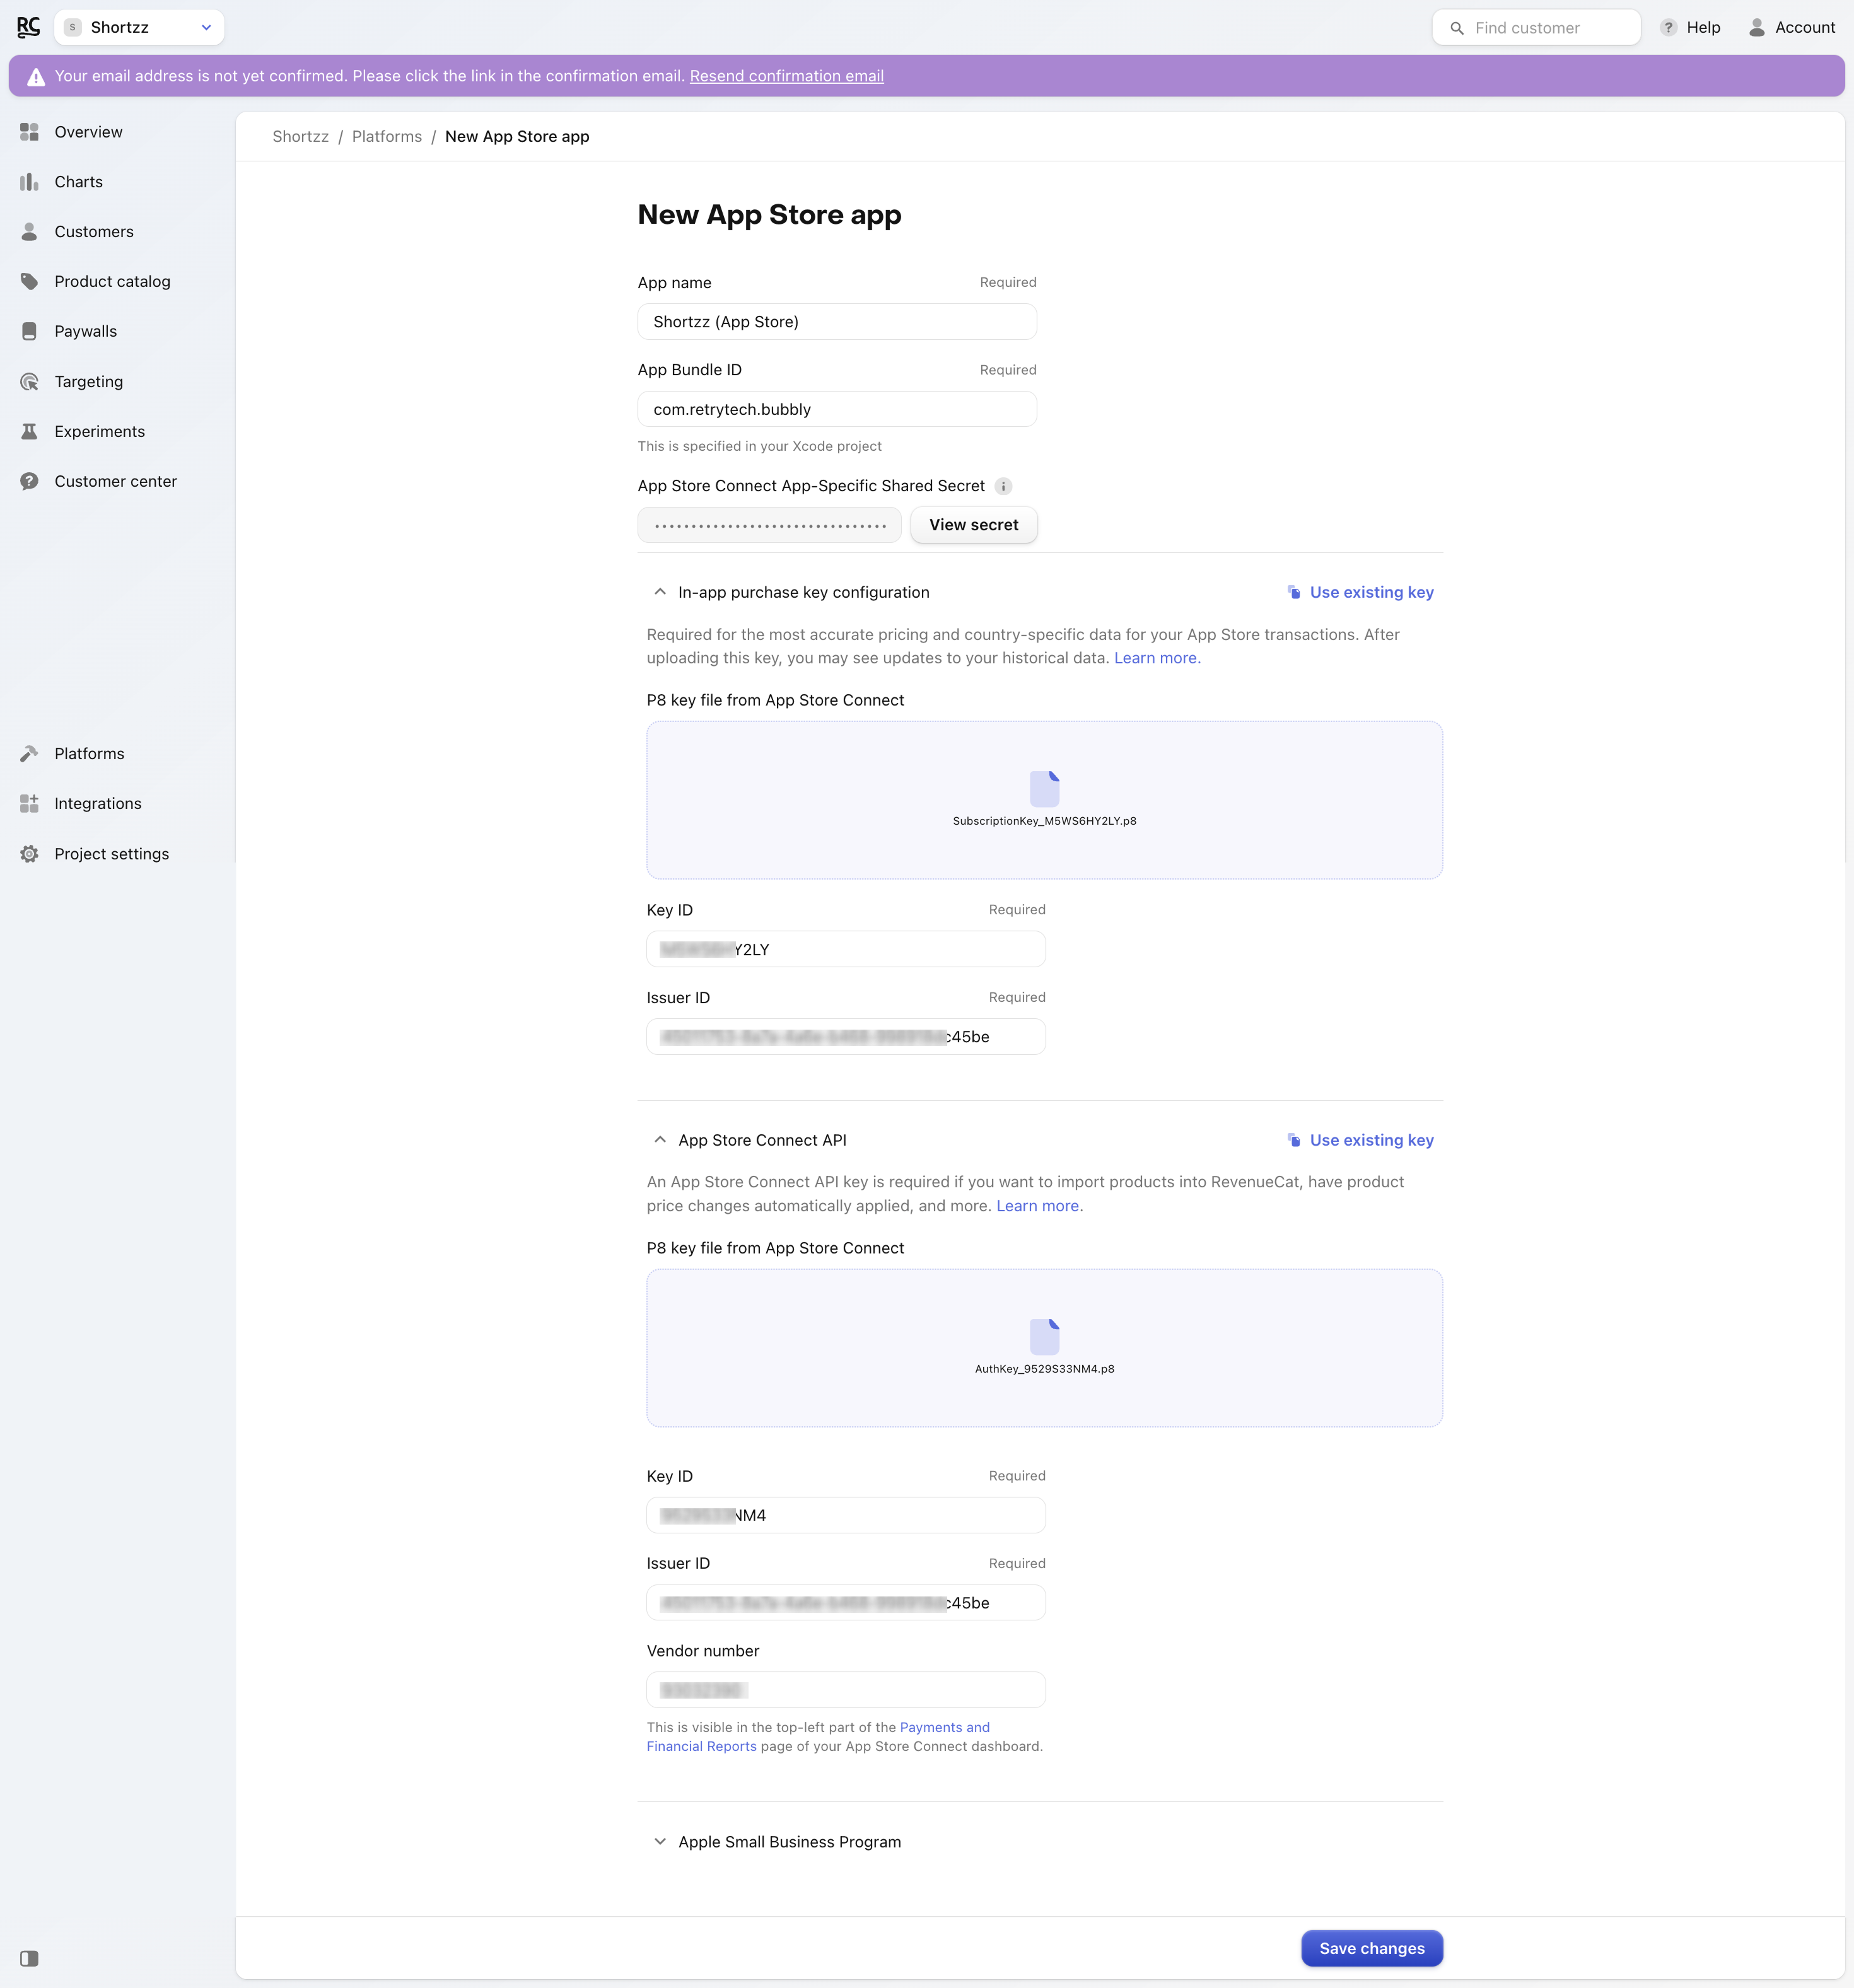
Welcome to the Dashboard
-
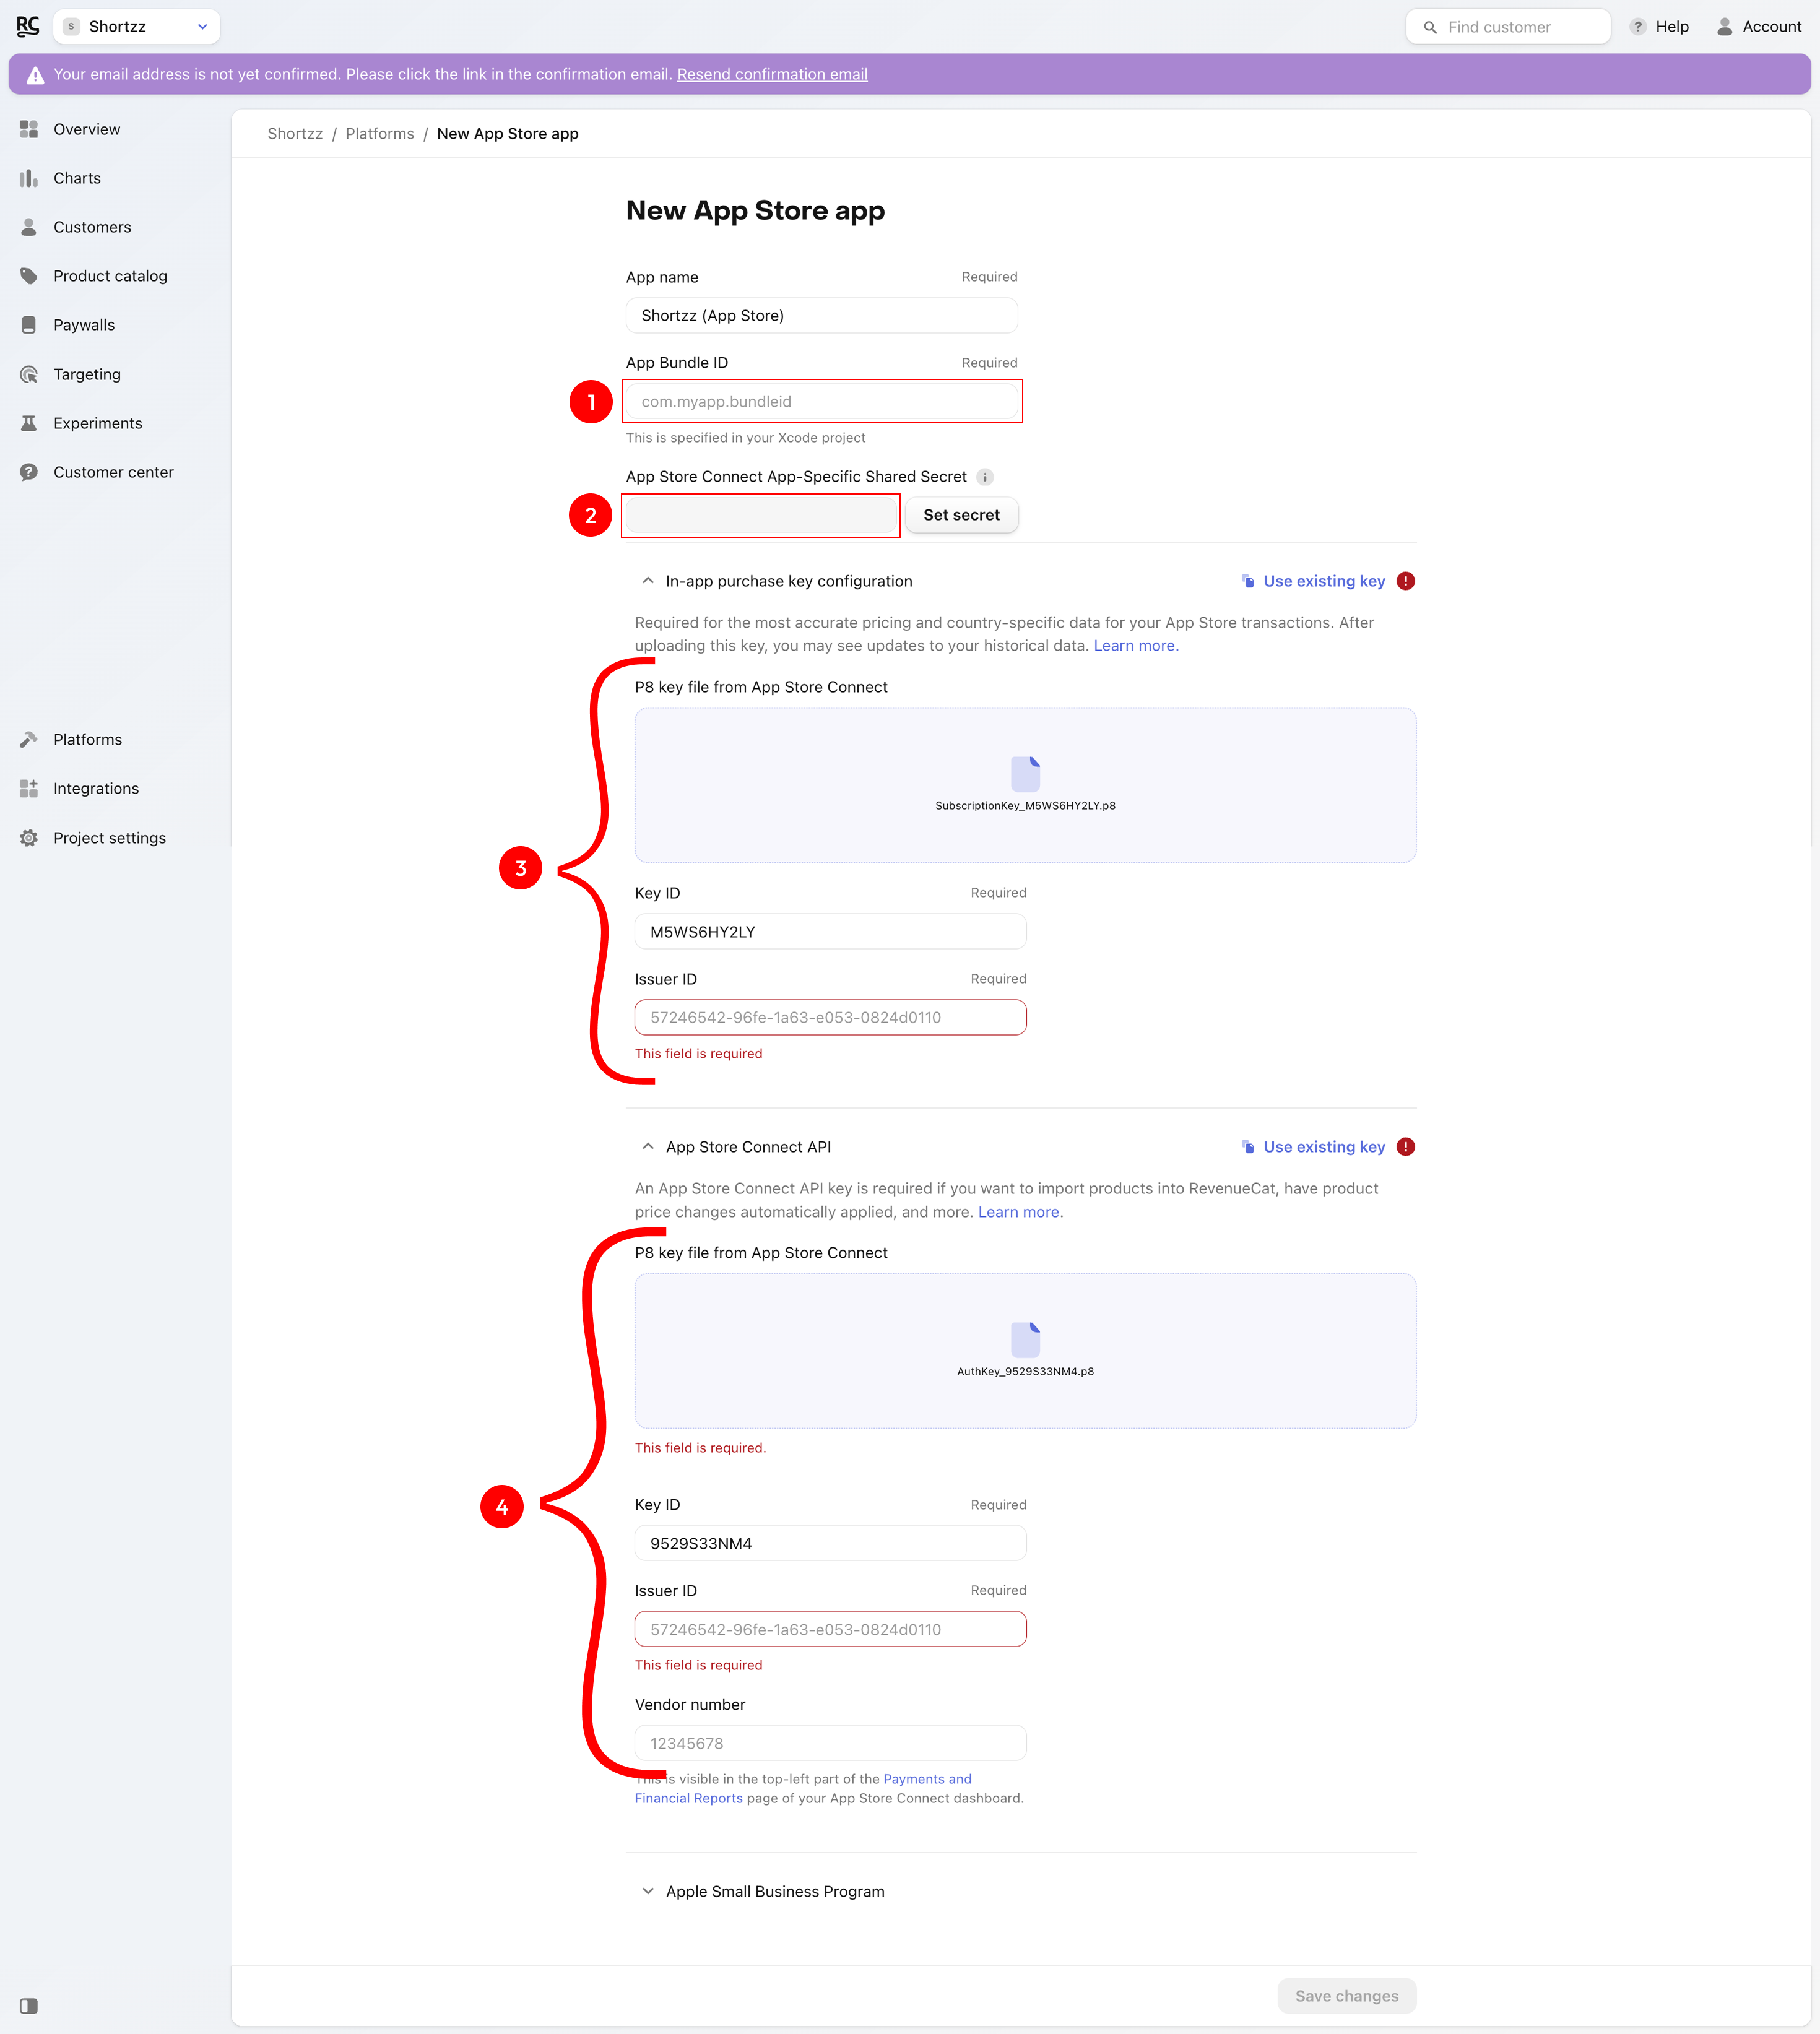
To connect your app to the App Store, you'll need to add your App name, App Bundle ID, App Store Connect App-Specific Shared Secret, P8 key, Key ID and Issuer ID.
-
Prerequisites
-
- ✅ Required Role: Account Holder (Admin) in App Store Connect
-
- ✅ Active Apple Developer Program Membership
-
Get iOS BundleId : Follow this link
-
Generating an App-Specific Shared Secret
-
- Log in to App Store Connect
-
- Navigate to My Apps and select your app
-
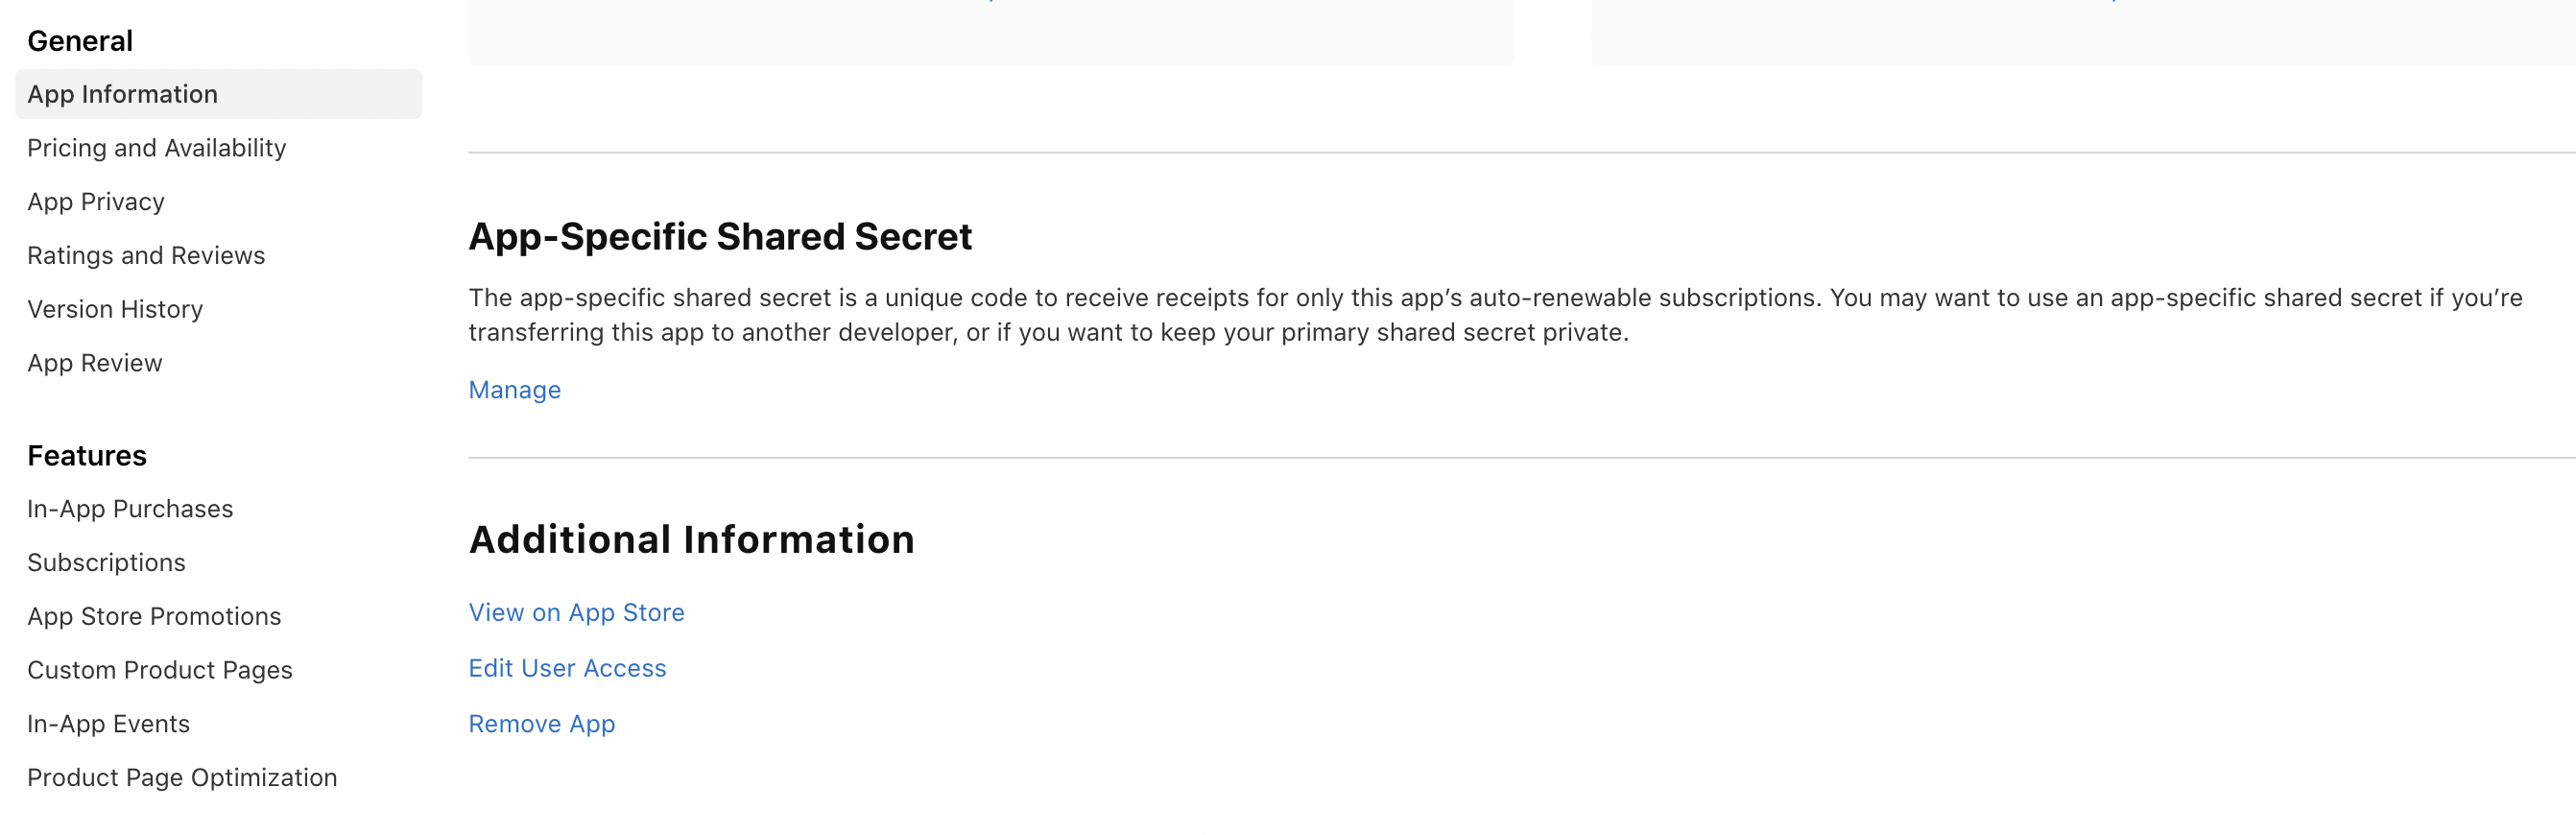
- Select App Information under the General section from the left side menu
-
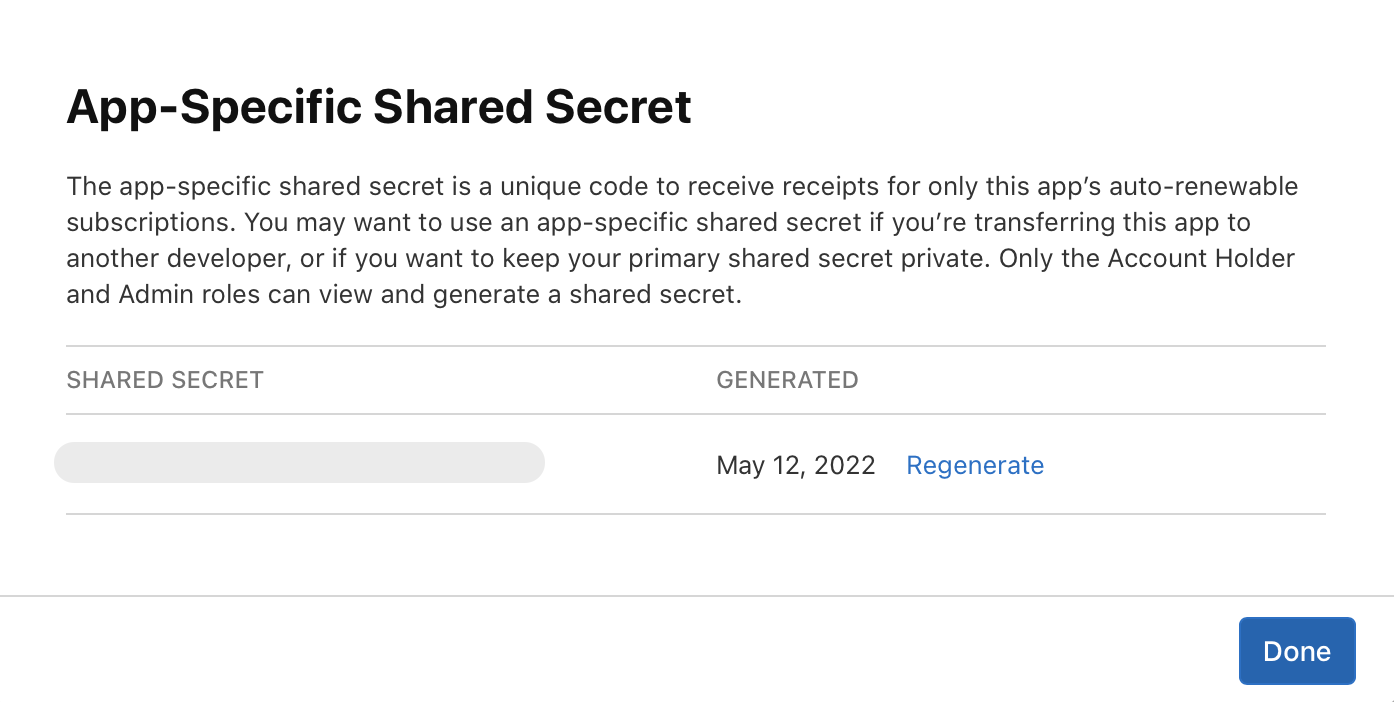
- Select Manage under the App-Specific Share Secret section from the right side
-
- Generate and copy your shared secret
-
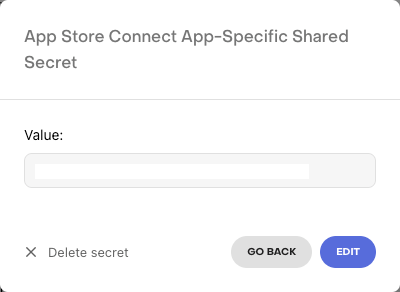
Enter the Shared Secret in RevenueCat
-
- Enter the secret in your iOS app settings in the RevenueCat dashboard:
-
Generating an In-App Purchase Key
-
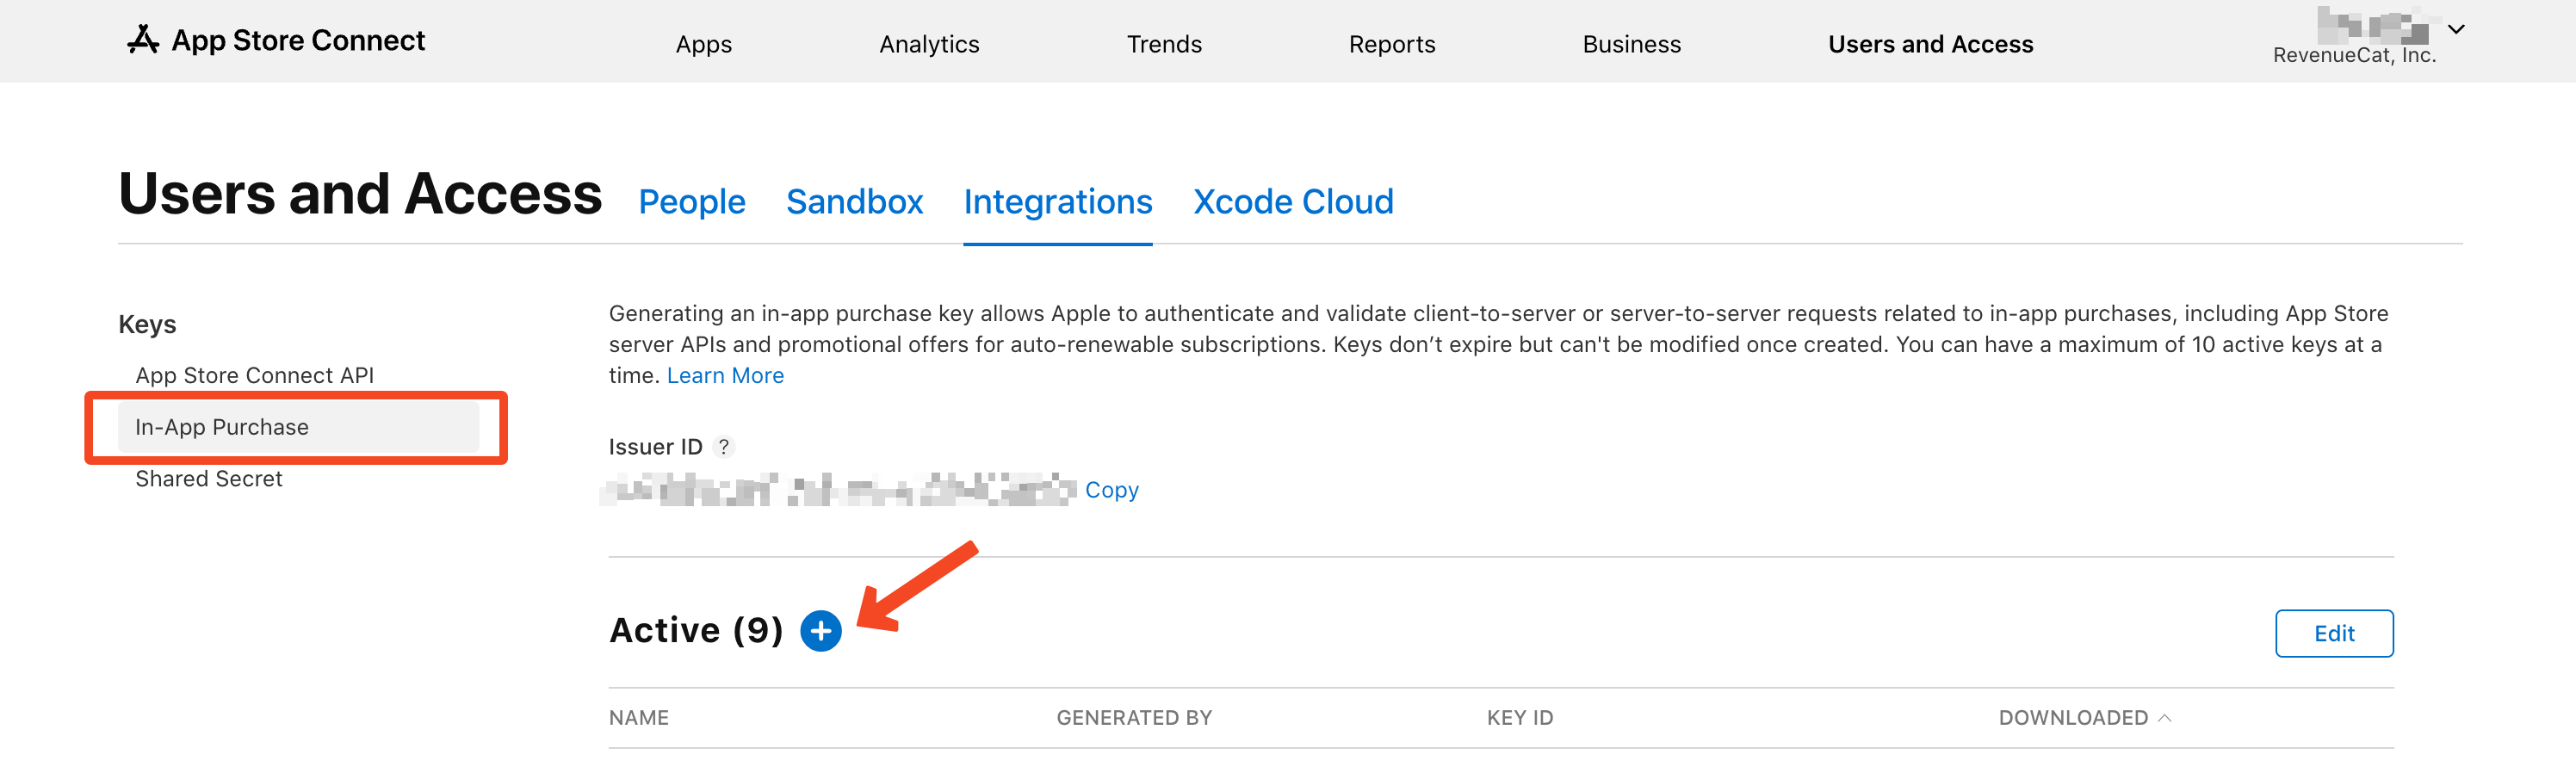
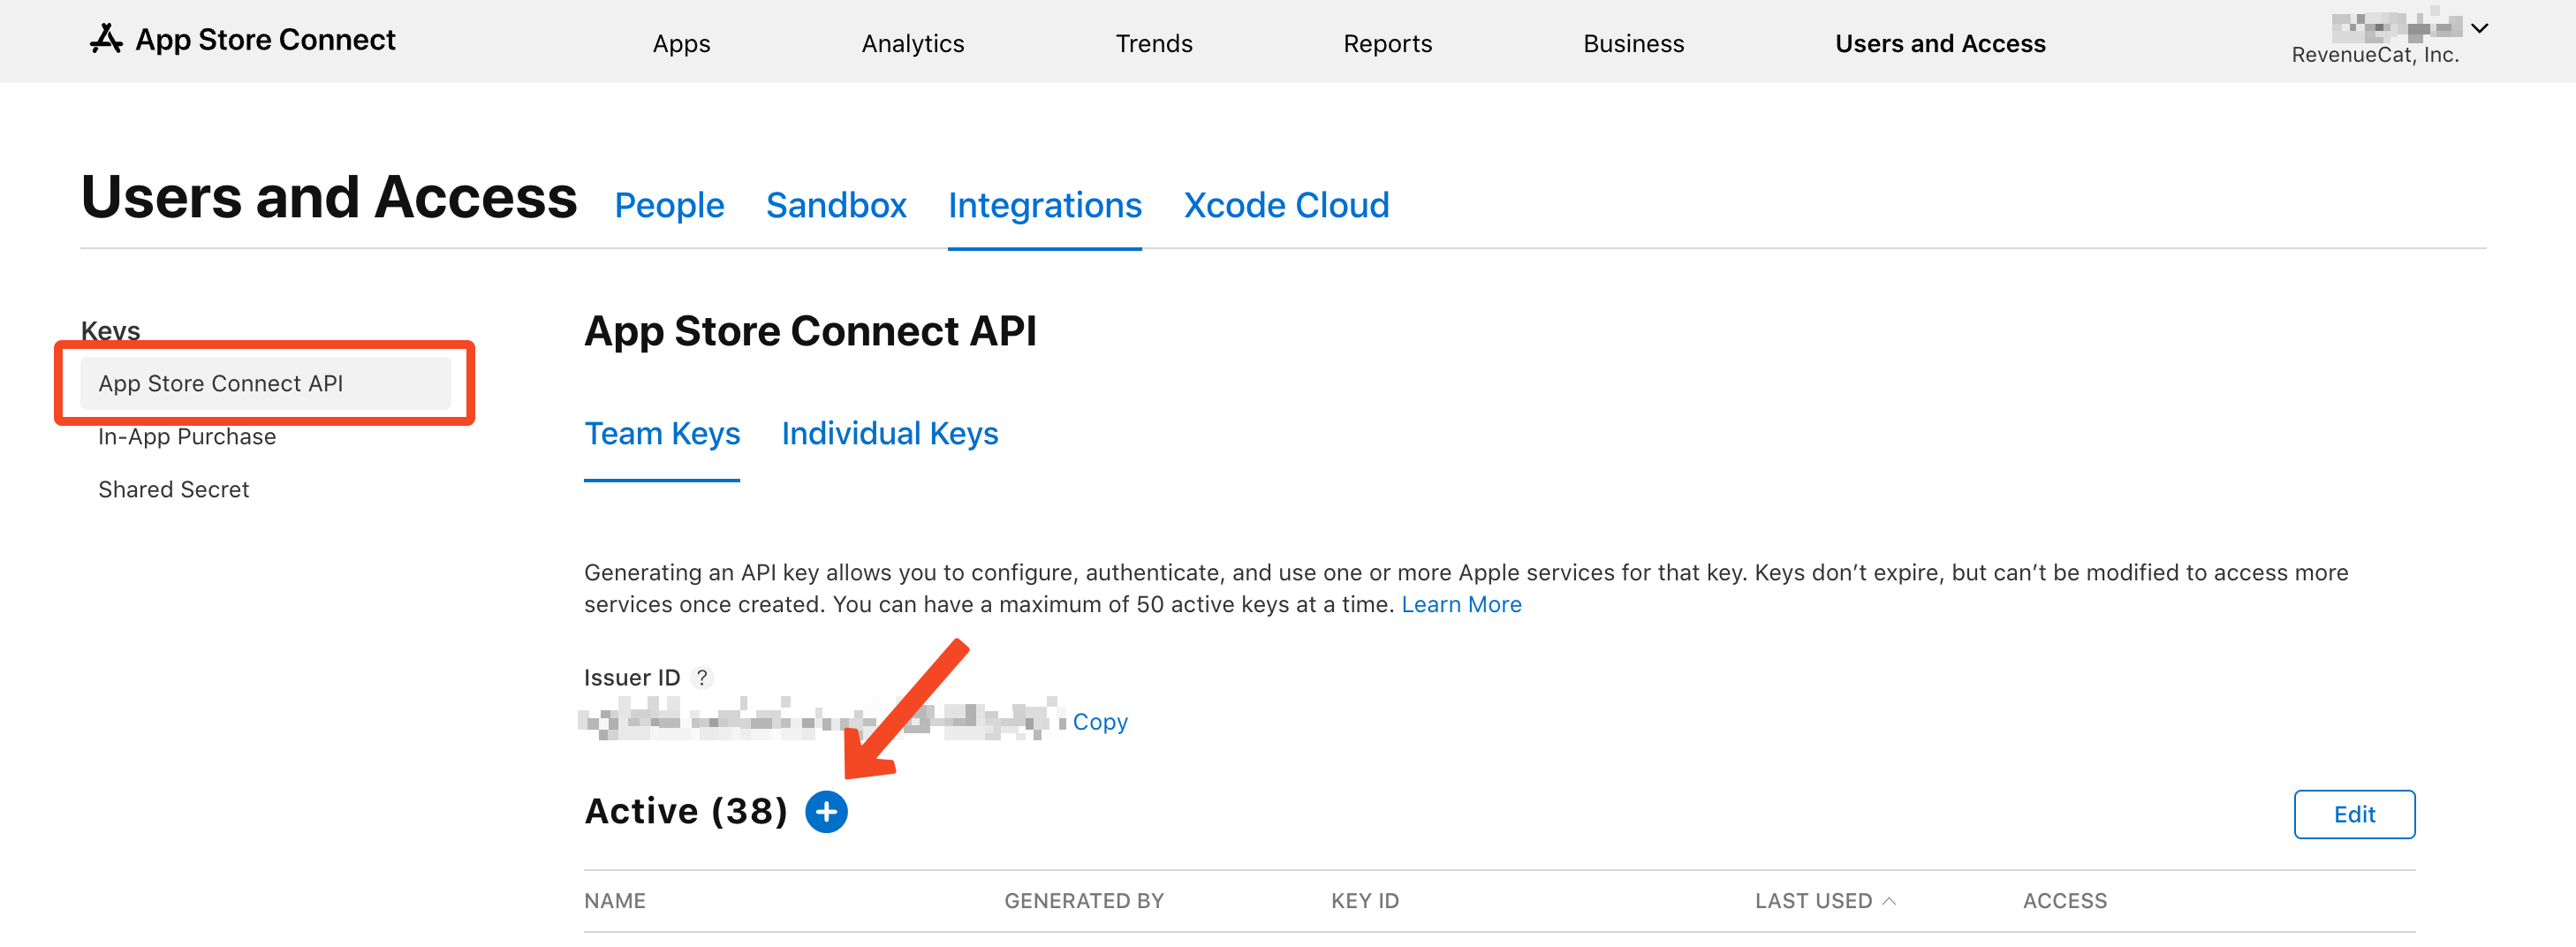
- In-app purchase keys are generated App Store Connect under Users and Access → Integrations → In-App Purchase .
-
- Select Generate In-App Purchase Key, or—if you've generated an In-App Purchase Key in the past—click on the + symbol next to the Active header. You'll be prompted to enter a name for the key.
-
- Once your key is generated, it will appear in Active Keys and you get one shot to download it.
-
- Select Download API Key and store the file in a safe place, you'll need to upload this to RevenueCat in the next step.
-
Uploading the In-App Purchase Key to RevenueCat
-
- Once everything is set up in App Store Connect, you need to upload the In-App Purchase Key from the previous step to RevenueCat.
-
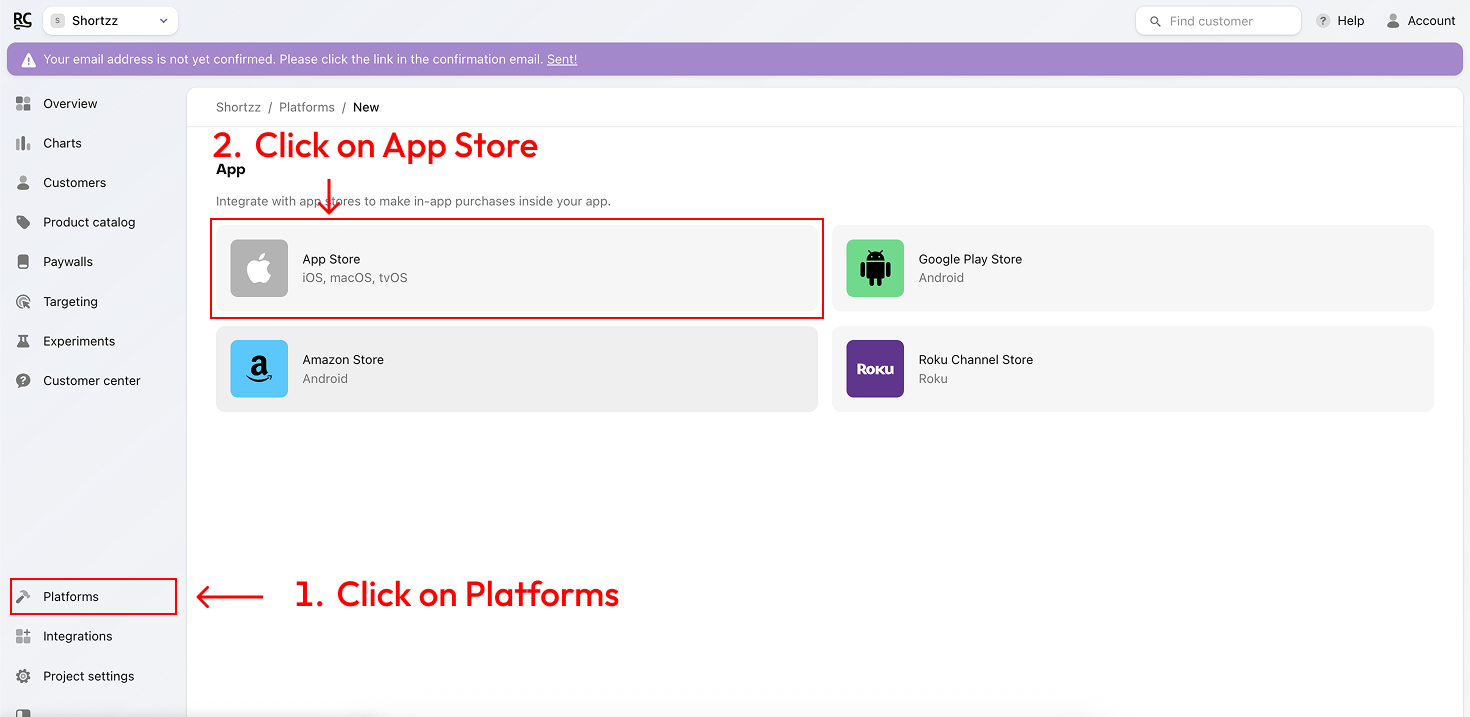
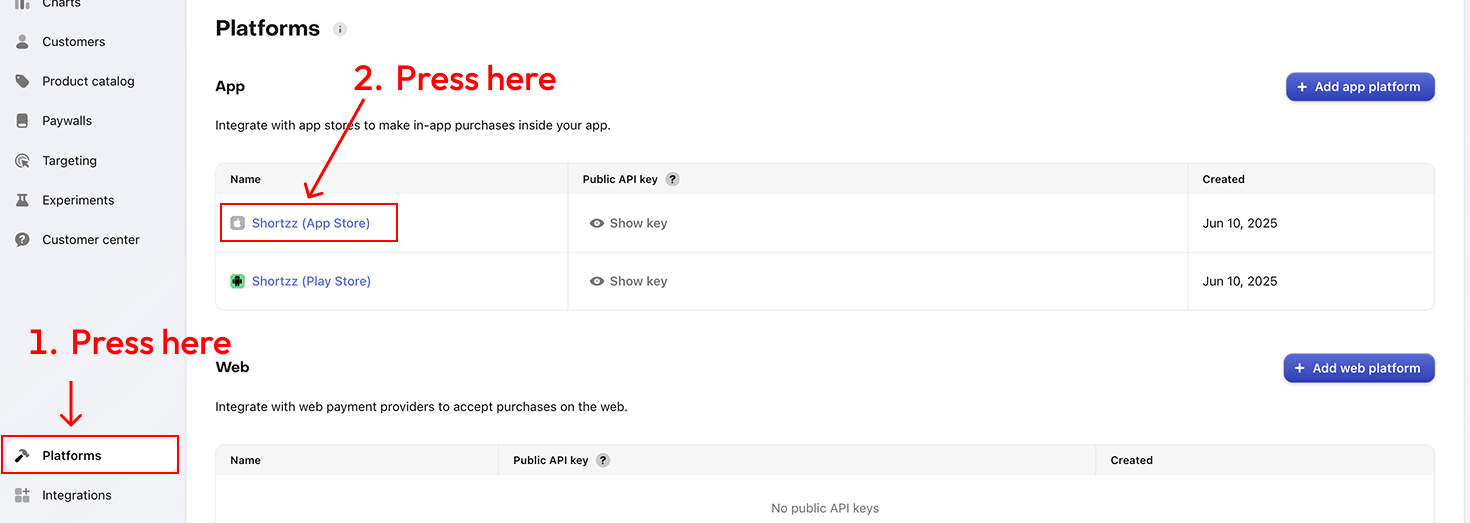
- In the RevenueCat dashboard, select Platforms then open your App Store app from the Apps tab in your project settings.
-
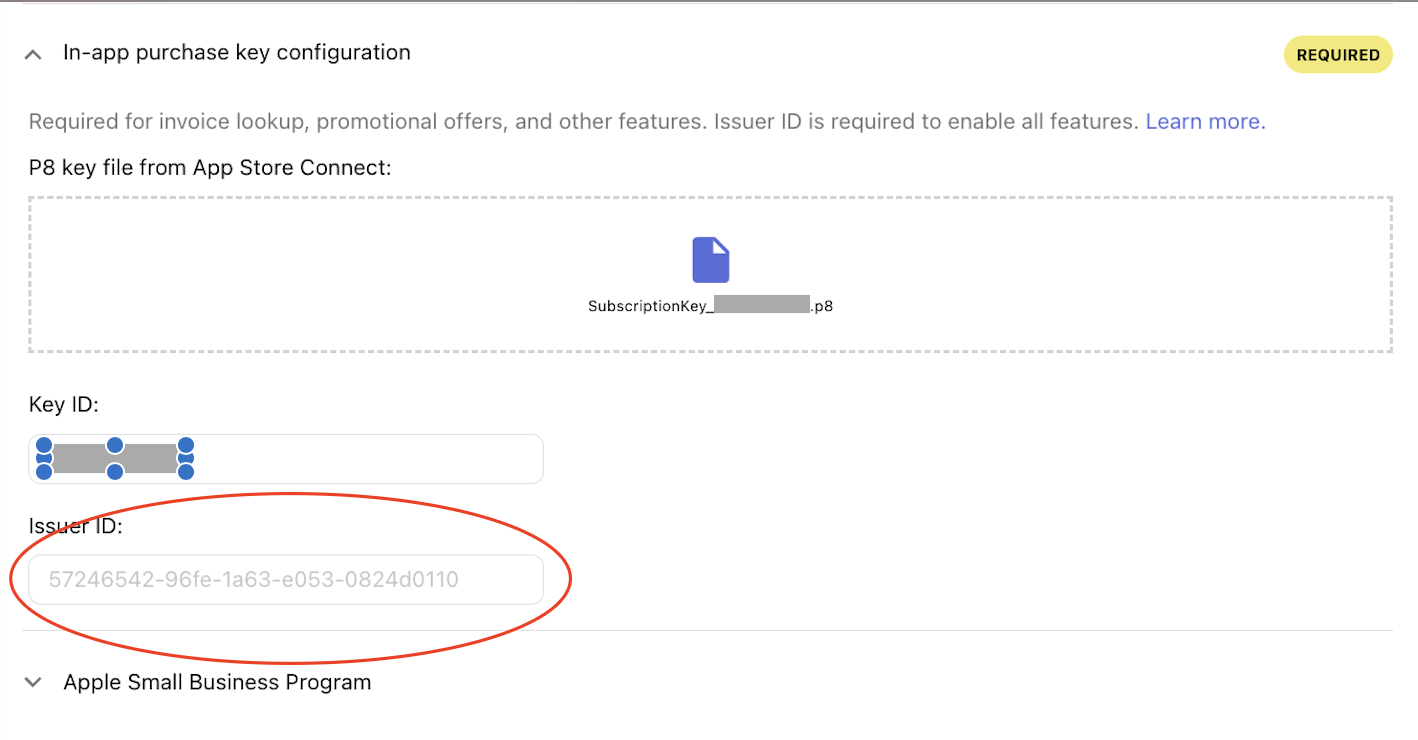
- Within your app settings, under the tab In-app purchase key configuration, you'll see an area to upload your In-App Purchase Key .p8 file that you downloaded from App Store Connect.
-
- Within your app settings, under the tab In-app purchase key configuration, you'll see an area to upload your In-App Purchase Key .p8 file that you downloaded from App Store Connect.
-
Providing the Issuer ID to RevenueCat
-
- Once you uploaded the in-app purchase .p8 file, you'll see an area to input Issuer ID.
-
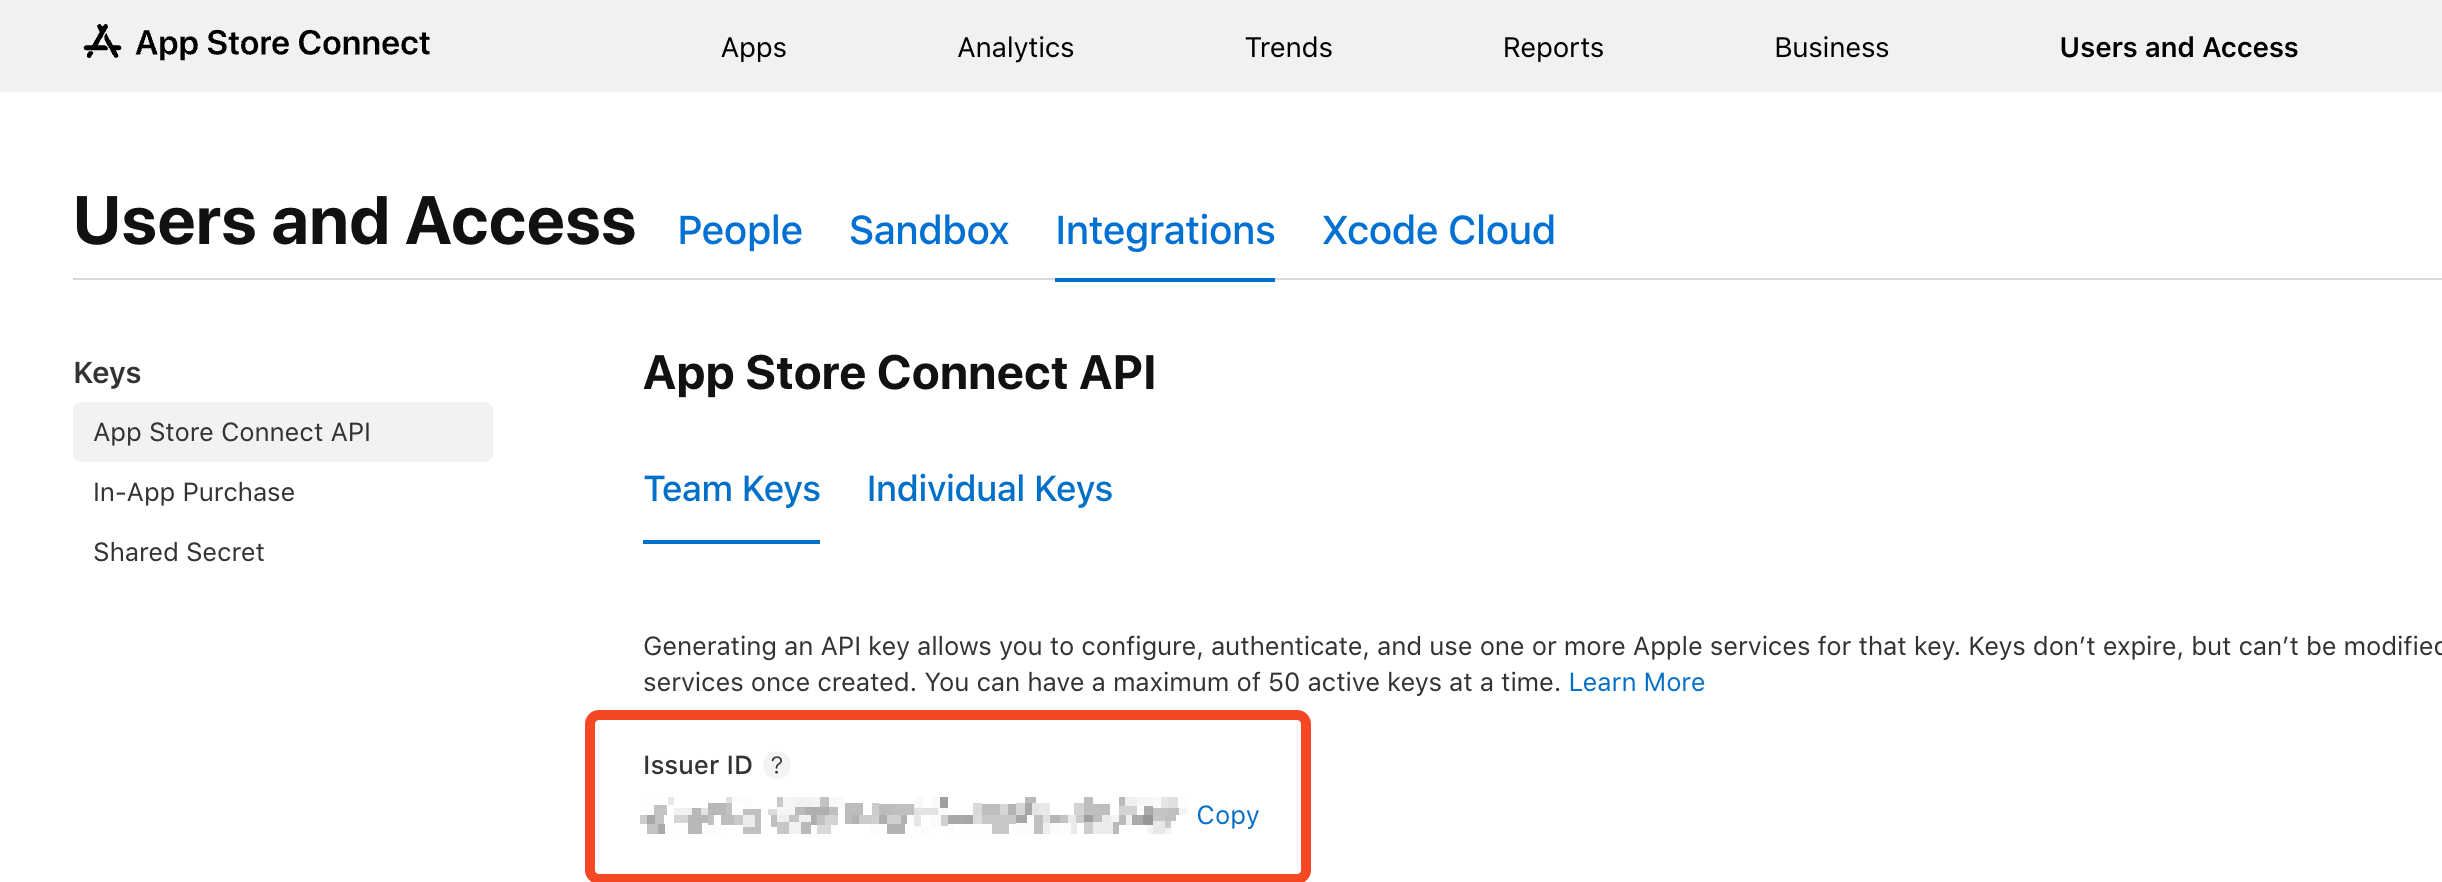
- You can find this Issuer ID in App Store Connect, under Users and Access → Integrations → In-App Purchase.
-
- Copy the Issuer ID and paste into the RevenueCat Issuer ID field
-
- Once your credentials are valid, you will see a Valid credentials message under your uploaded P8 key file with all permissions checked.
-
Create an App Store Connect API key
-
- On App Store Connect, create a new App Store Connect API key under Users and Access → Integrations → App Store Connect API :
-
- The newly created key needs to have at least the access level App Manager:
-
- Download the generated key. You will receive a .p8 key file. Also take note of the Issuer ID (shown above the "Active" table).
-
- This key can only be downloaded once, so make sure you store it in a safe location.
-
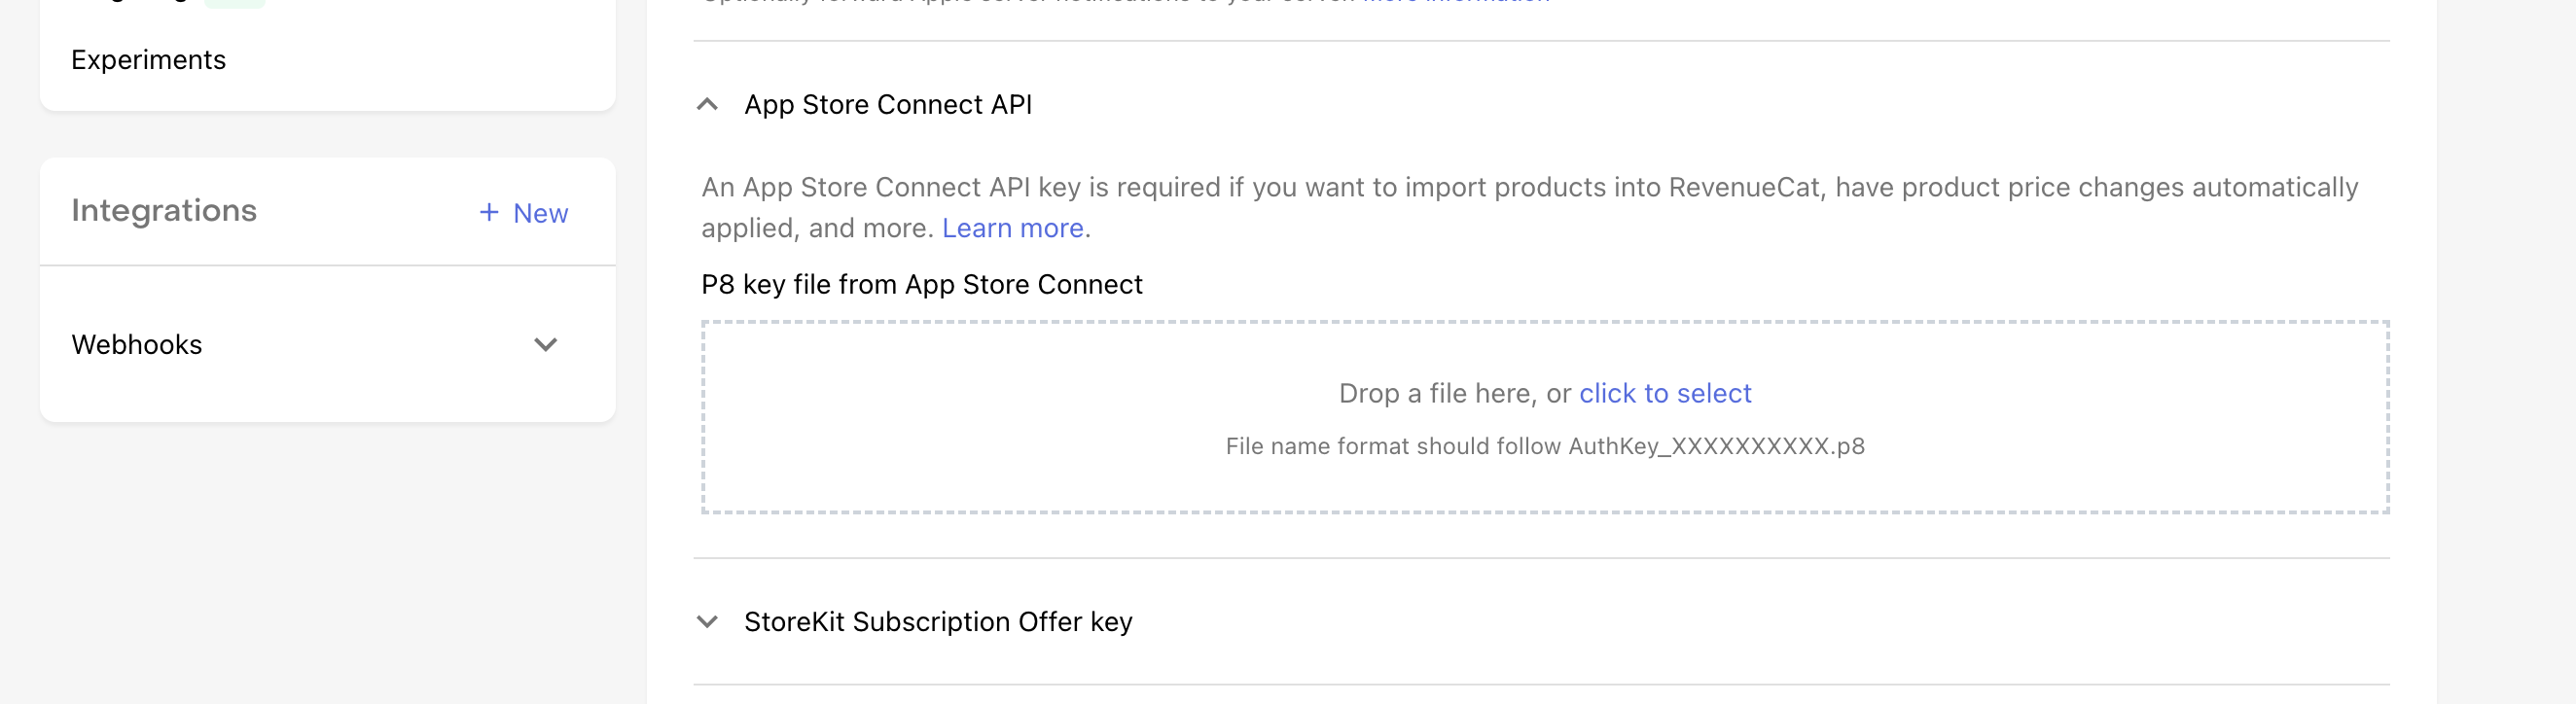
Upload the App Store Connect API key to RevenueCat
-
- Once everything is set up in App Store Connect, you need to upload the App Store Connect API key from the previous step to RevenueCat.
-
- In the RevenueCat dashboard, select Platforms then open your App Store app from the Apps tab in your project settings.
-
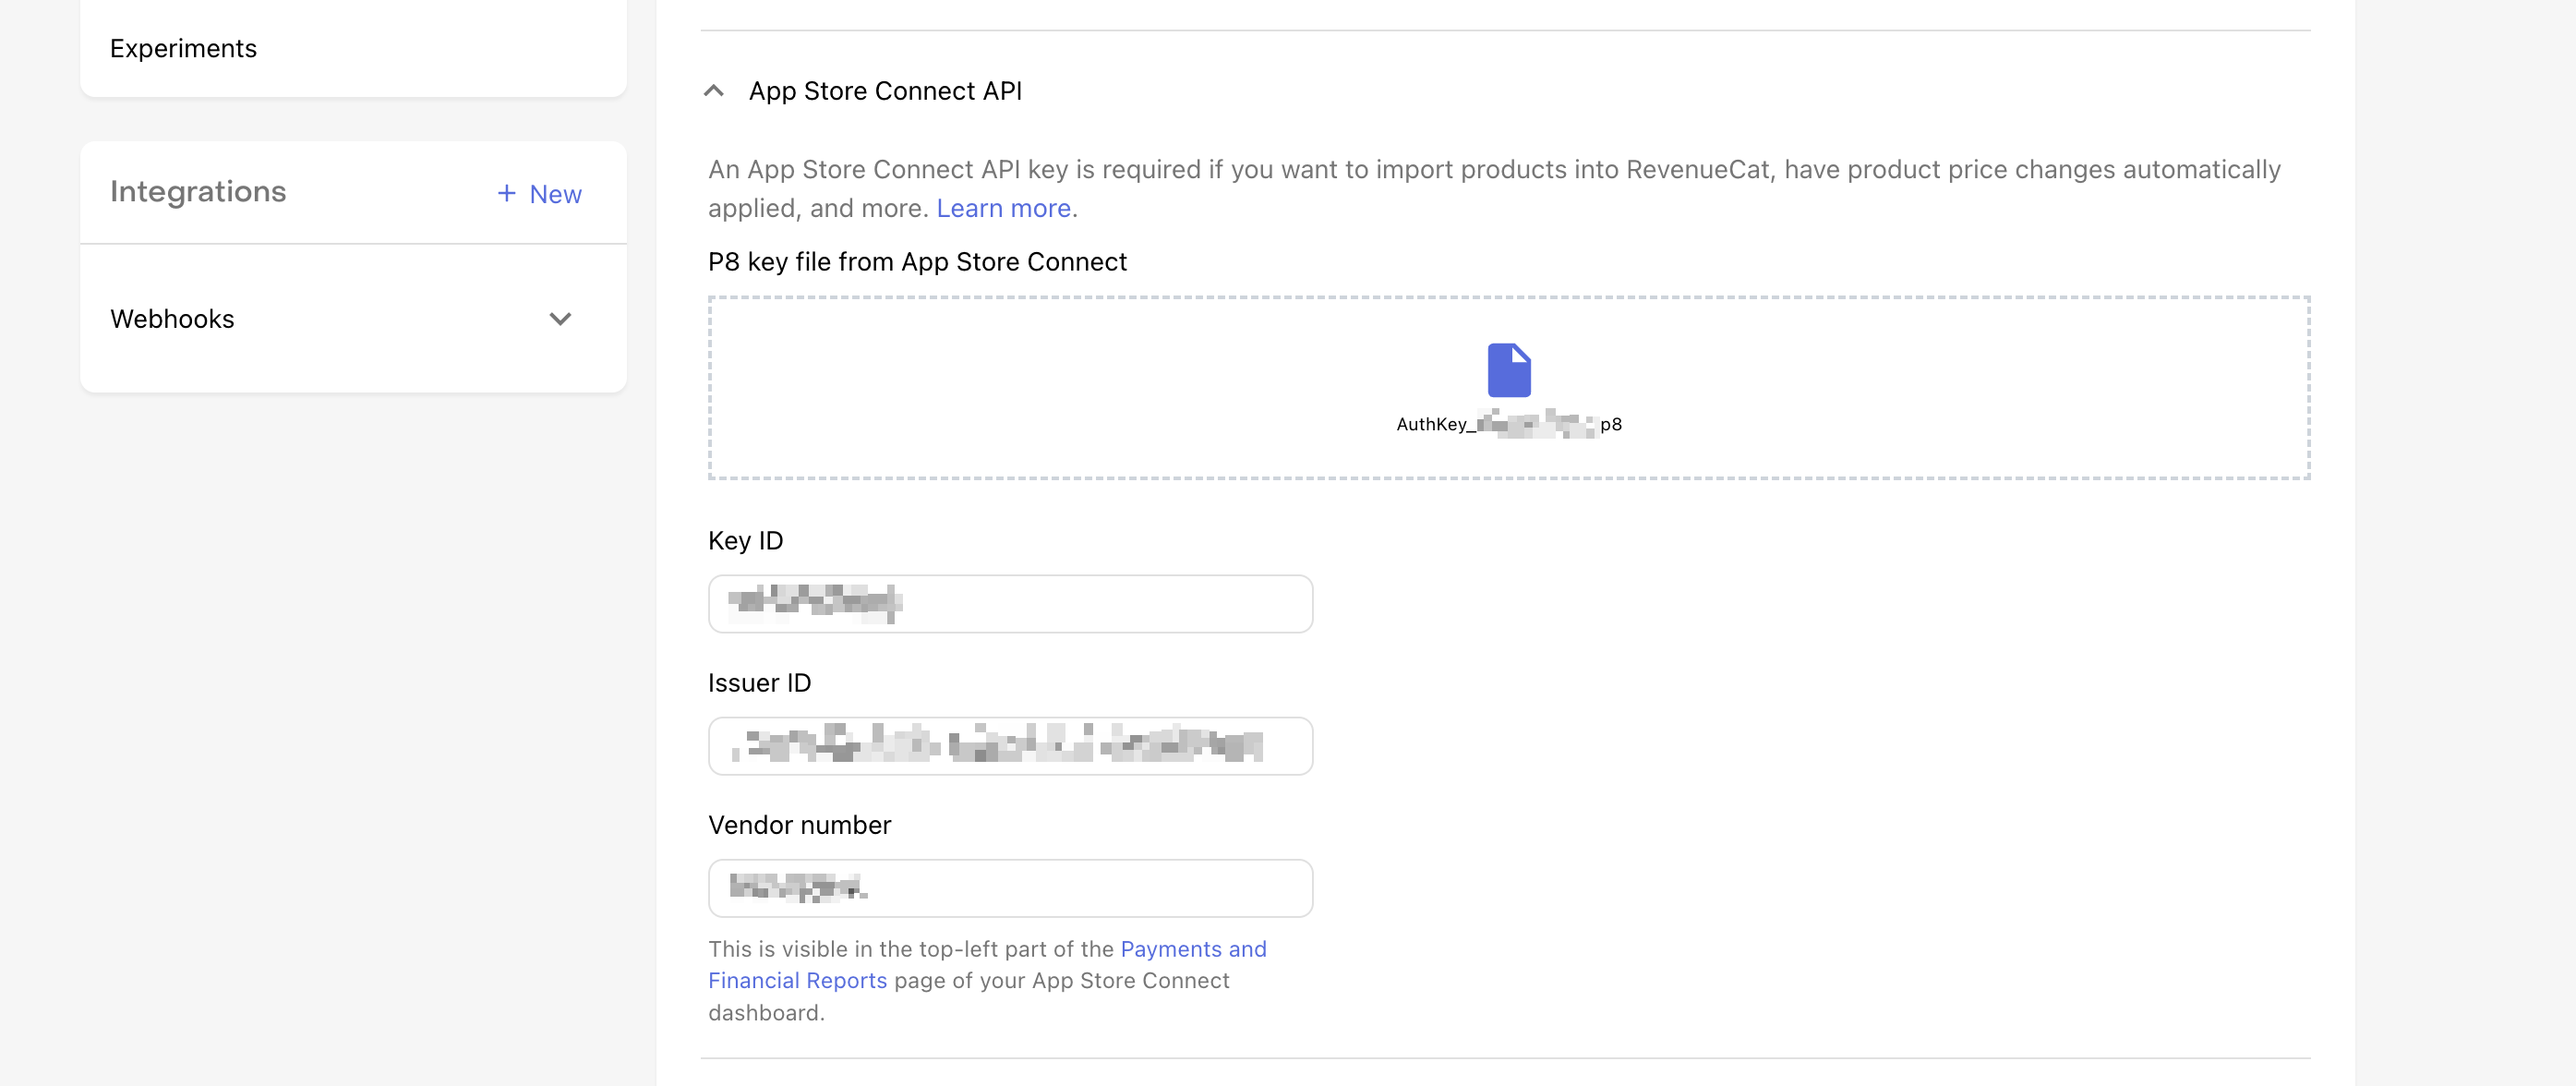
- Within your app settings, under the tab App Store Connect API, you'll see an area to upload your App Store Connect .p8 file that you downloaded from App Store Connect.
-
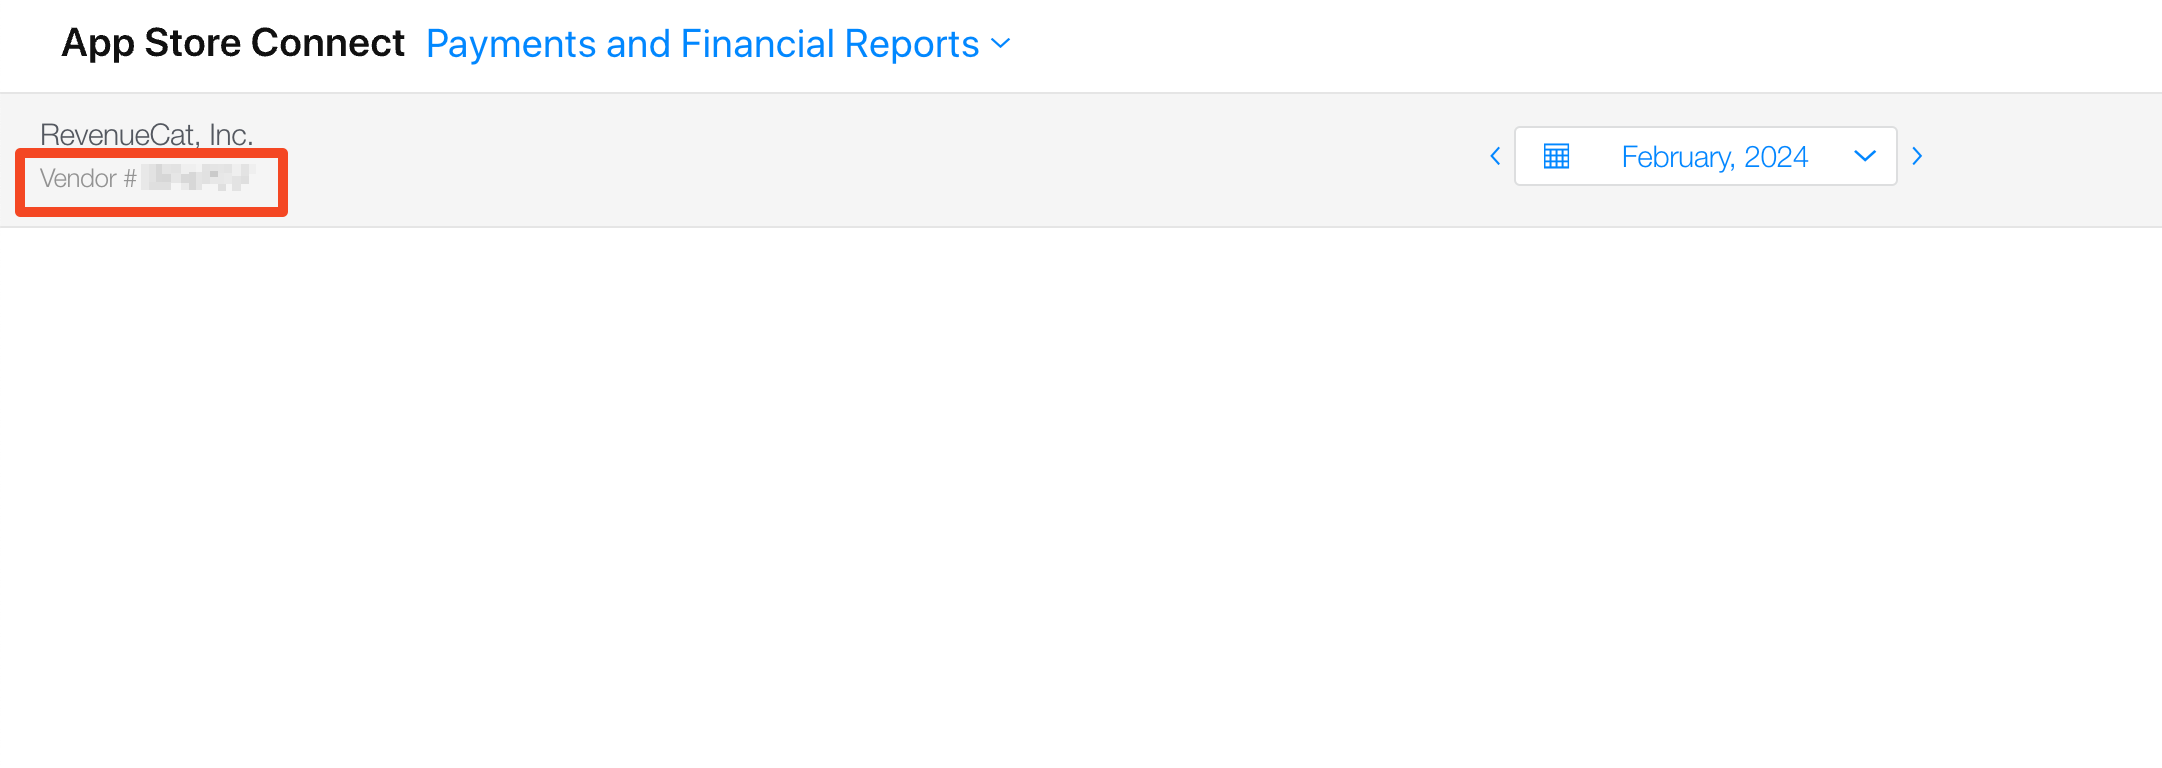
- After uploading the App Store Connect API .p8 file, you will be prompted to input the Issuer ID you saved in Step 1.
-
- You will also be prompted to input the Vendor number : https://appstoreconnect.apple.com/itc/payments_and_financial_reports#/ . This can be found in App Store Connect under Payments and Financial Reports, in the top left corner of the page.
-
Click Save changes
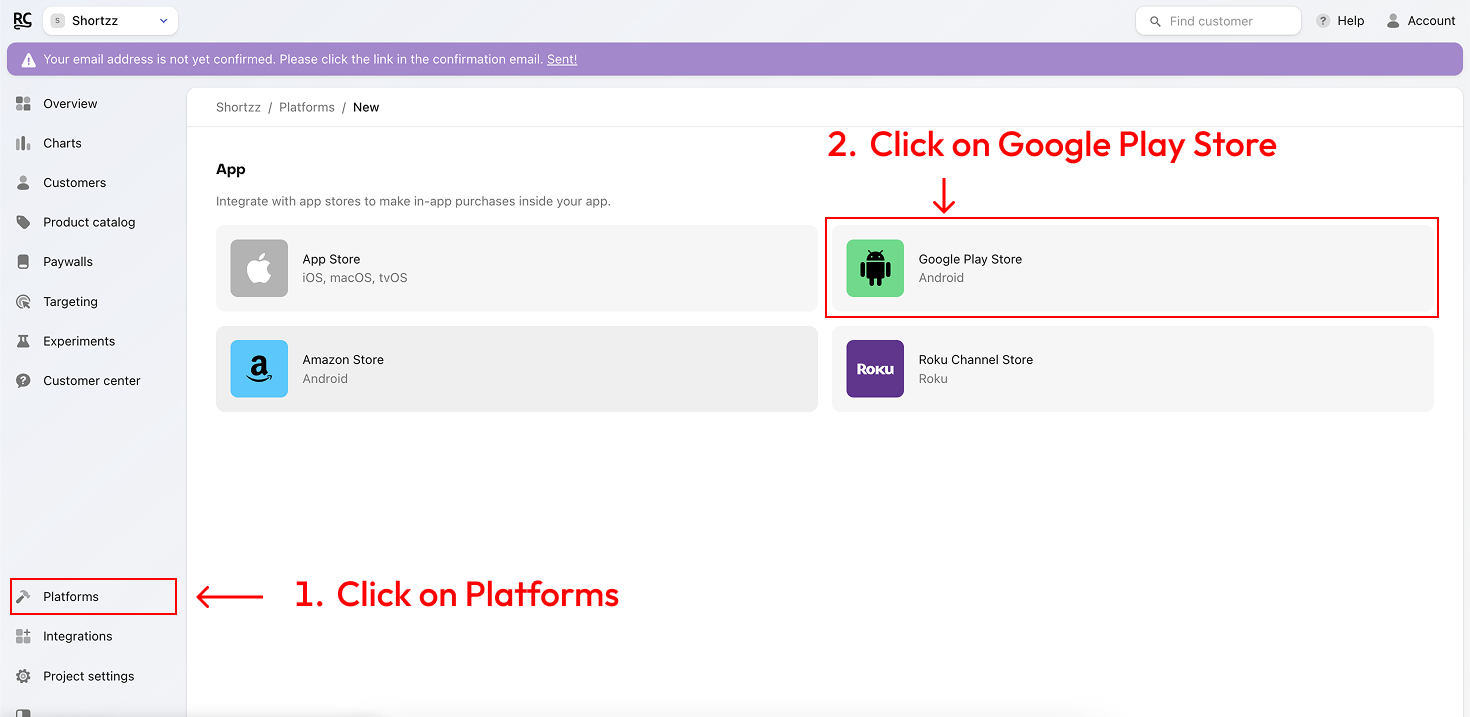
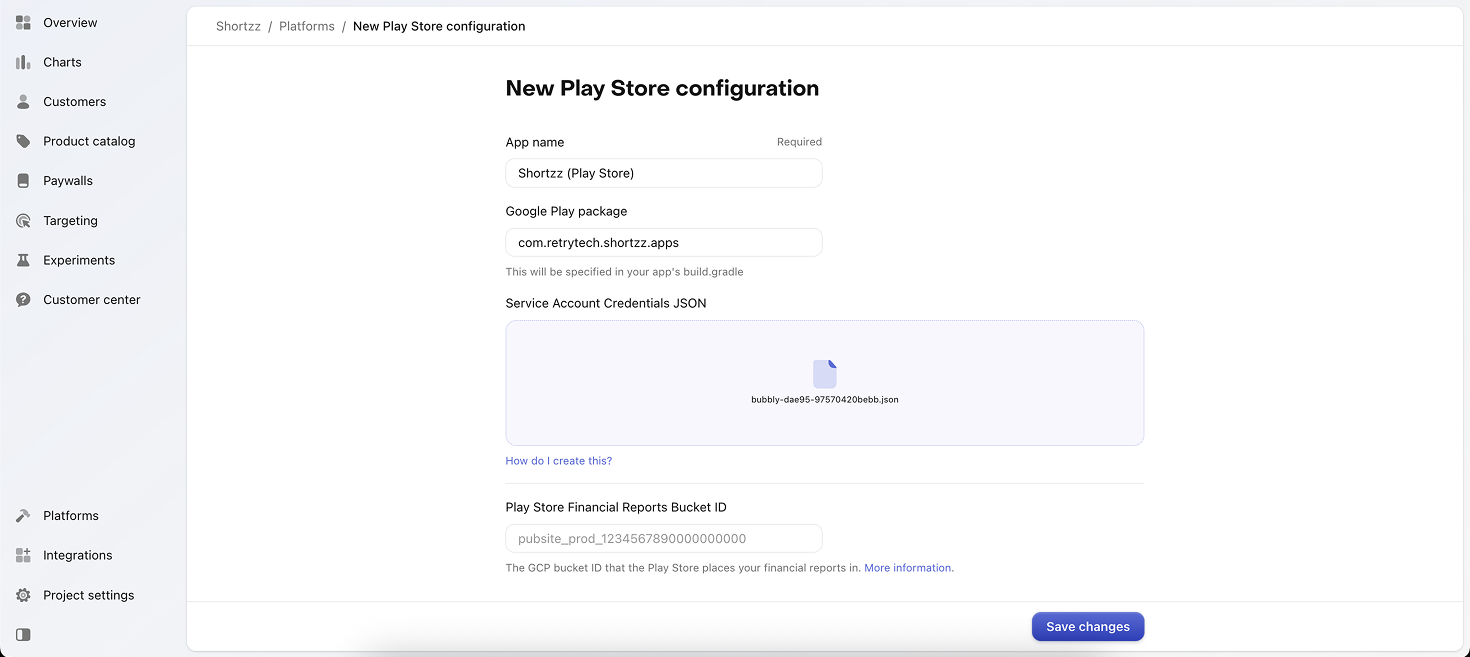
-
To connect your app to the Google Play Store, you'll need to add your App name, Package Name, and Service Credentials.
-
Where do I find my service credentials? : https://www.revenuecat.com/docs/service-credentials/creating-play-service-credentials
-
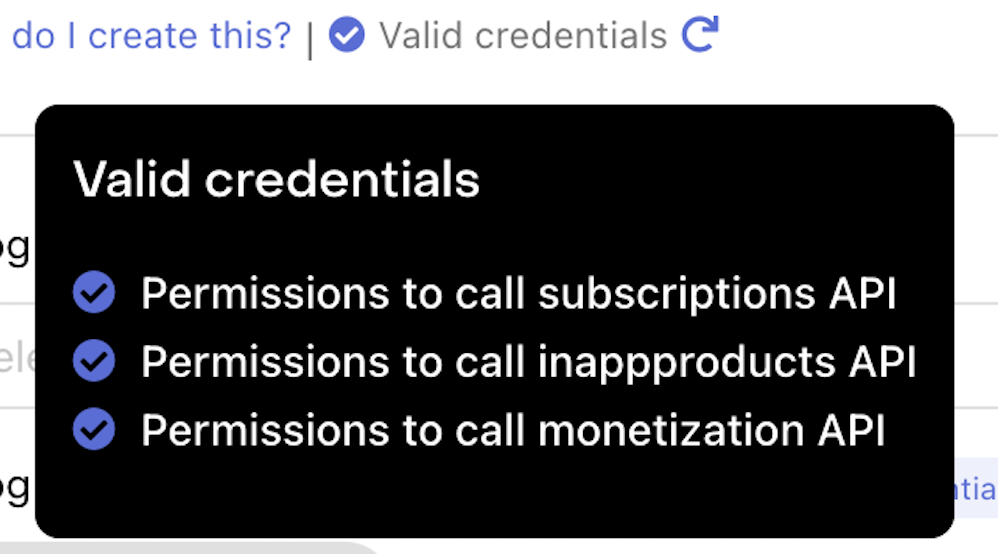
With our Google Play credential validation, we will validate every time Google credentials are (re)uploaded or at any time through a click of a button.
-
Once your credentials are valid, you will see a Valid credentials message under your uploaded JSON file with all permissions checked.
-
Note: This credential validation may take a few hours to complete.
-
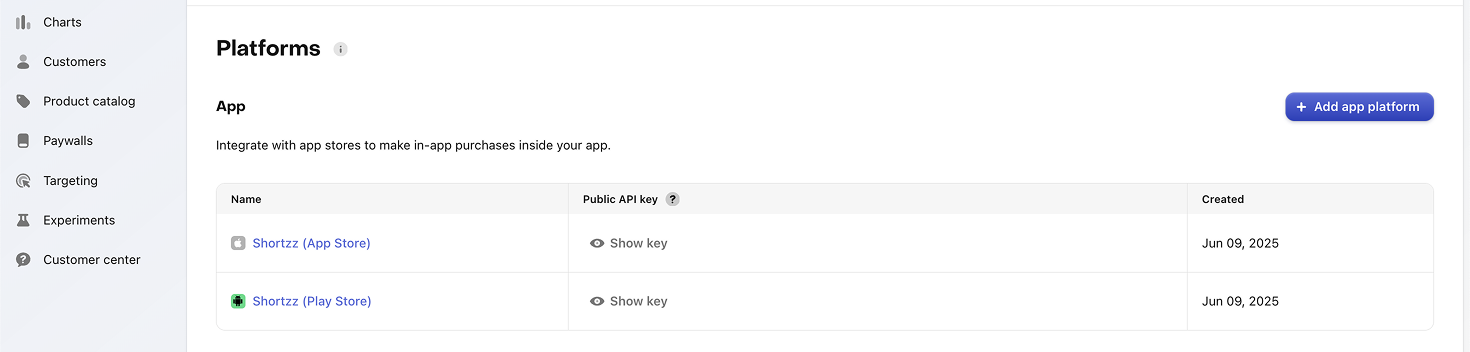
All done.
-
These are the public API keys for both Android and iOS platforms.
-
Tap Show Key to view the API key.
-
You can then copy and paste it into your project.
-
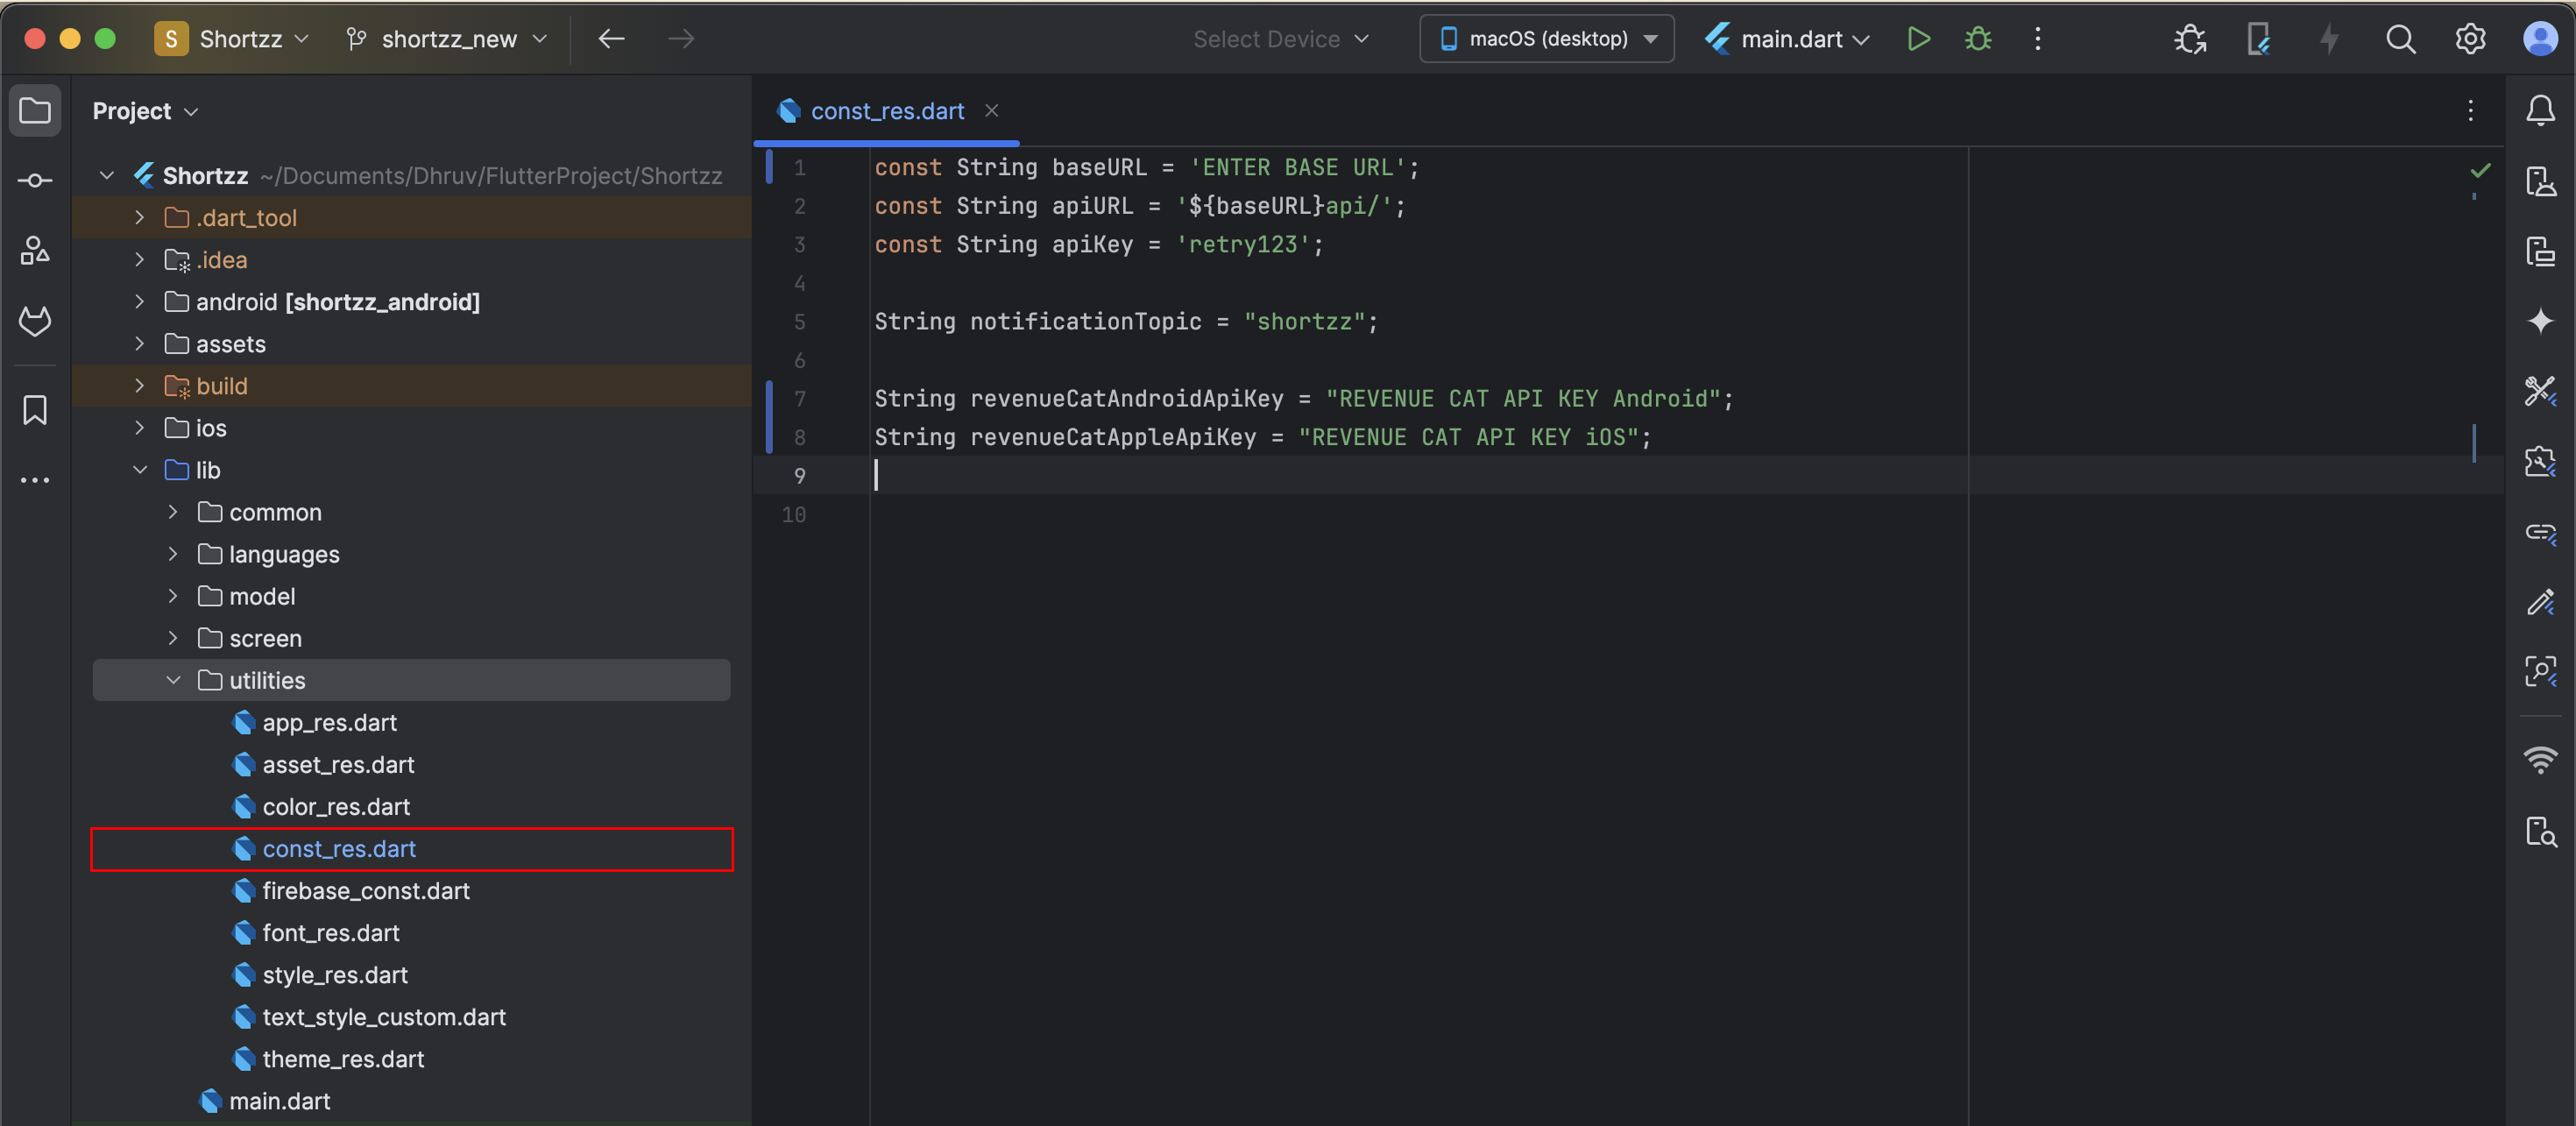
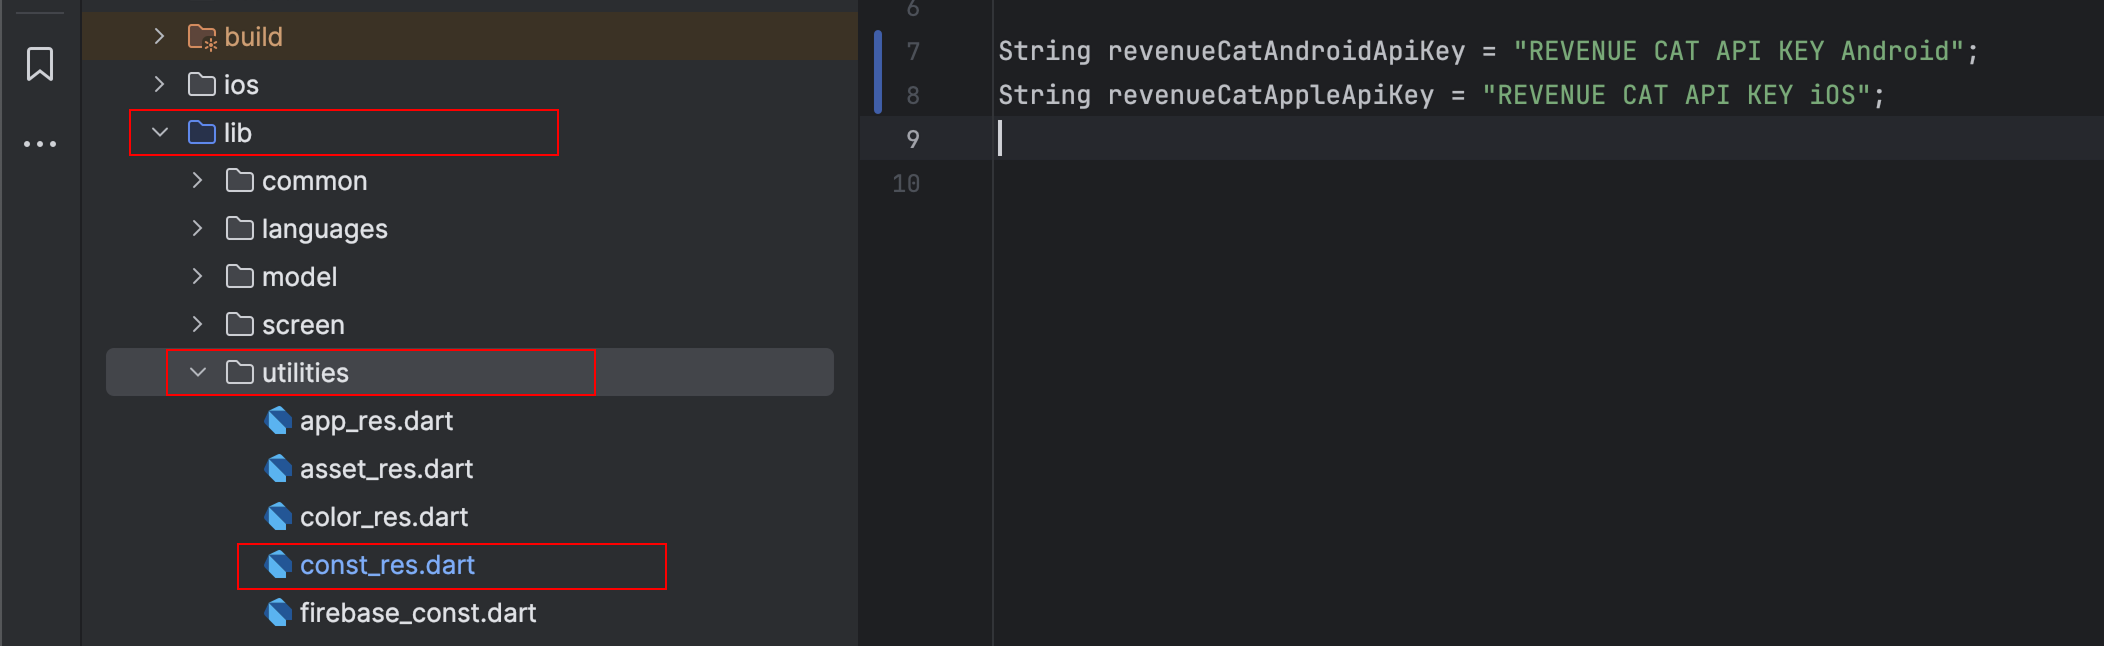
Go to your project and navigate to: lib > utilities (utils) > cont_res.dart file.
-
You will see two variables: revenueCatAndroidApiKey and revenueCatAppleApiKey.
-
Paste the API keys into these variables.
-
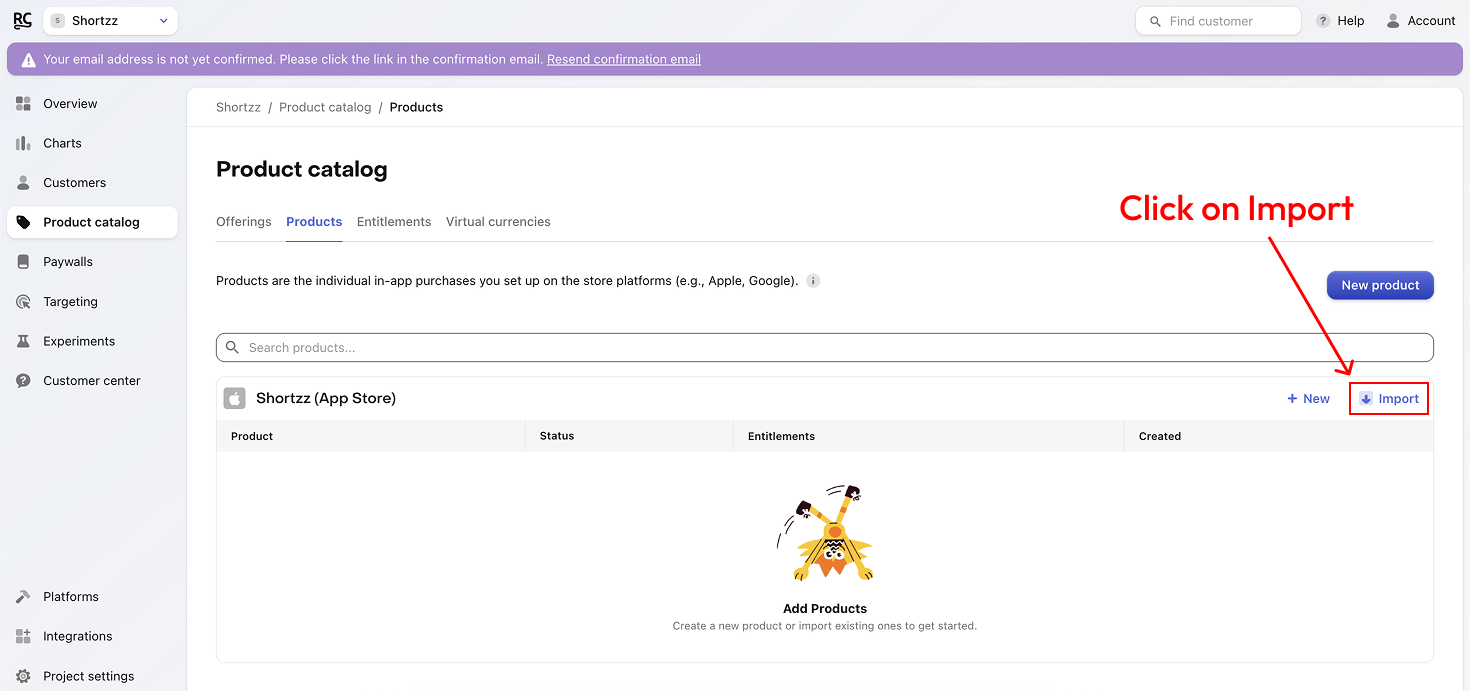
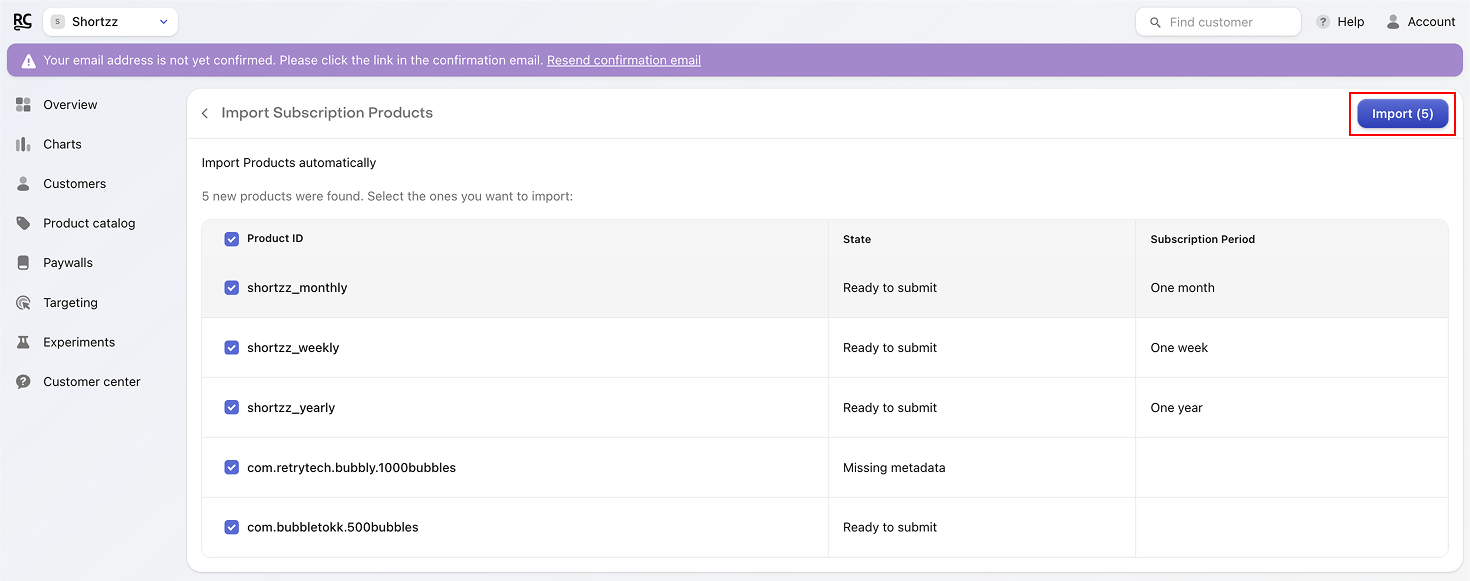
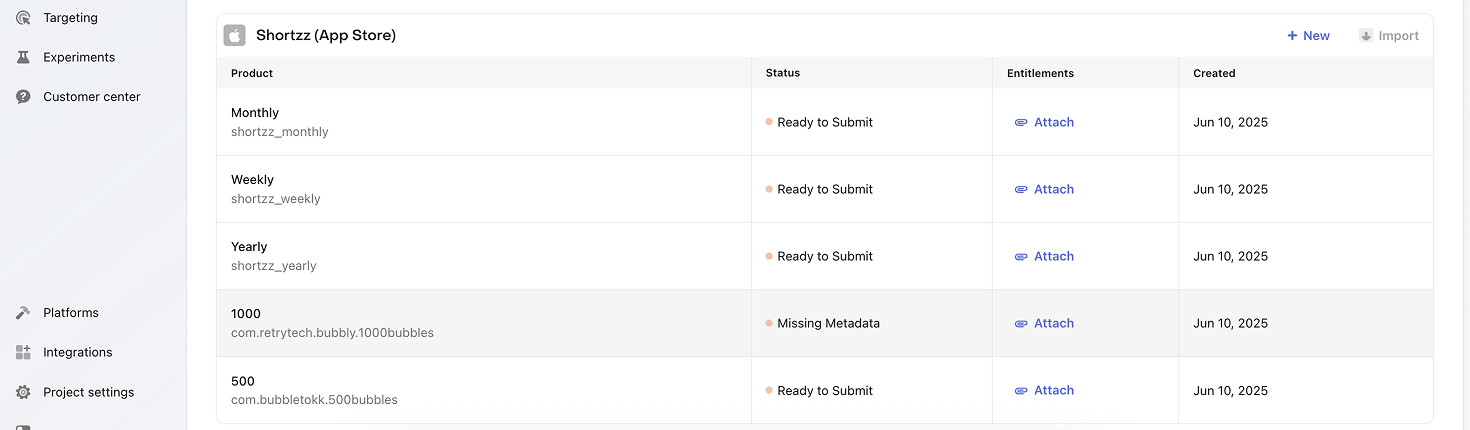
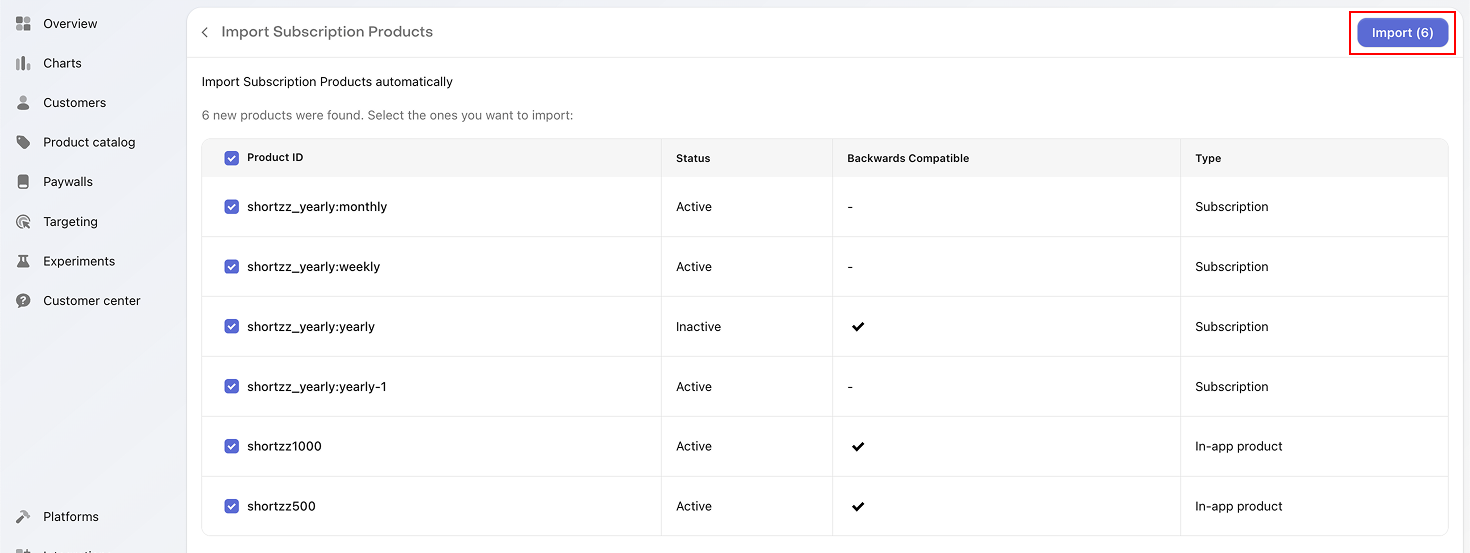
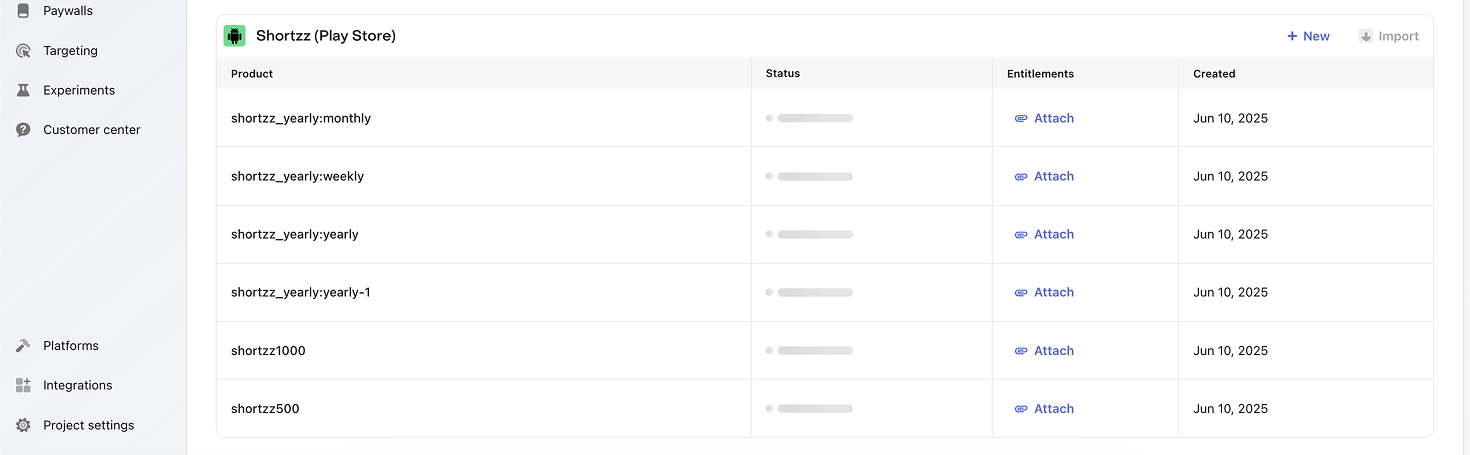
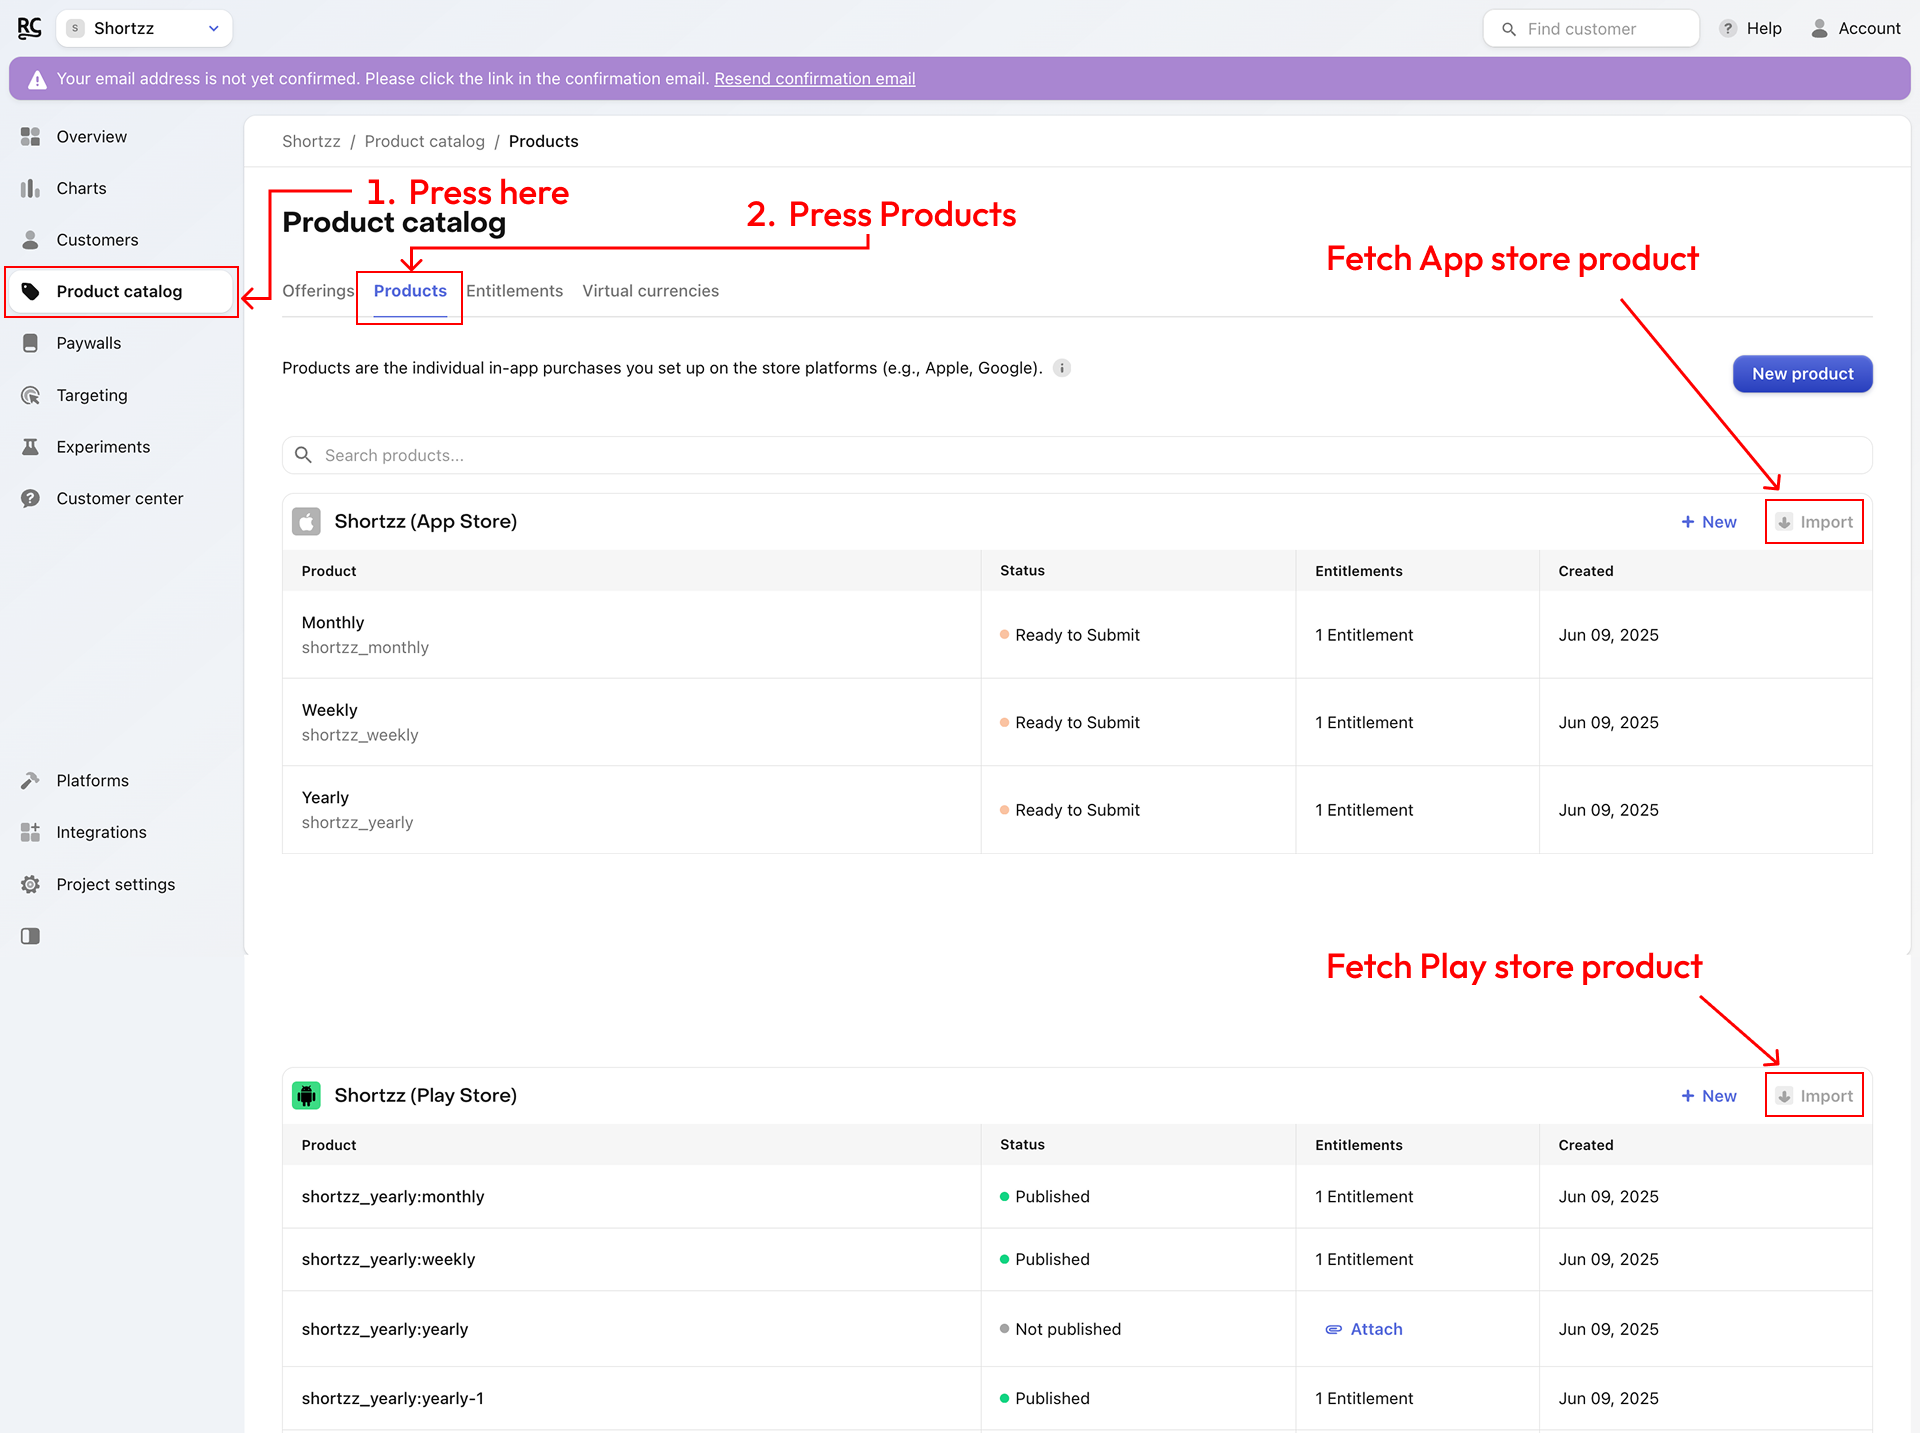
Fetch product.
-
Press the Product Catalog option from the Side bar
-
Then tap on the Product tab to view and manage your product list.
-
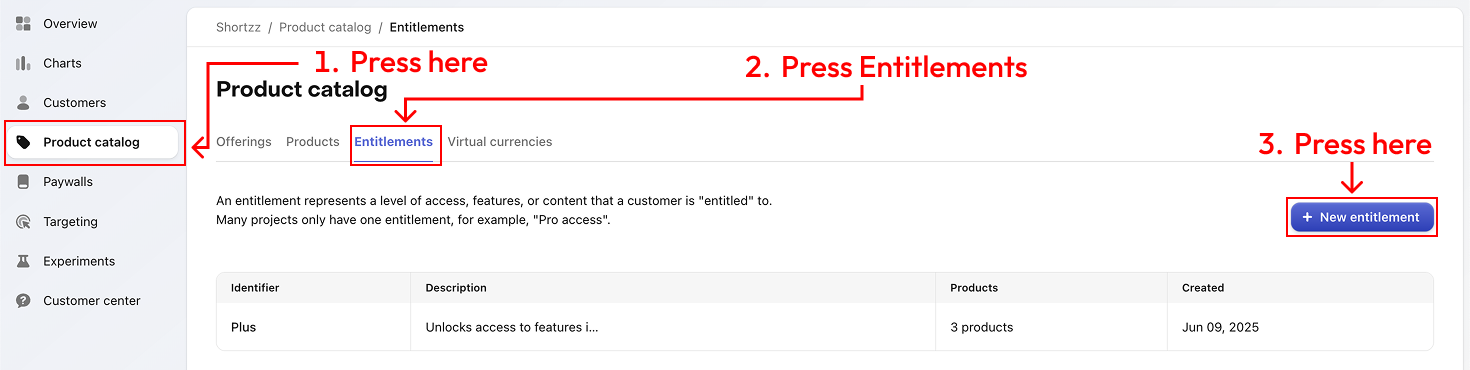
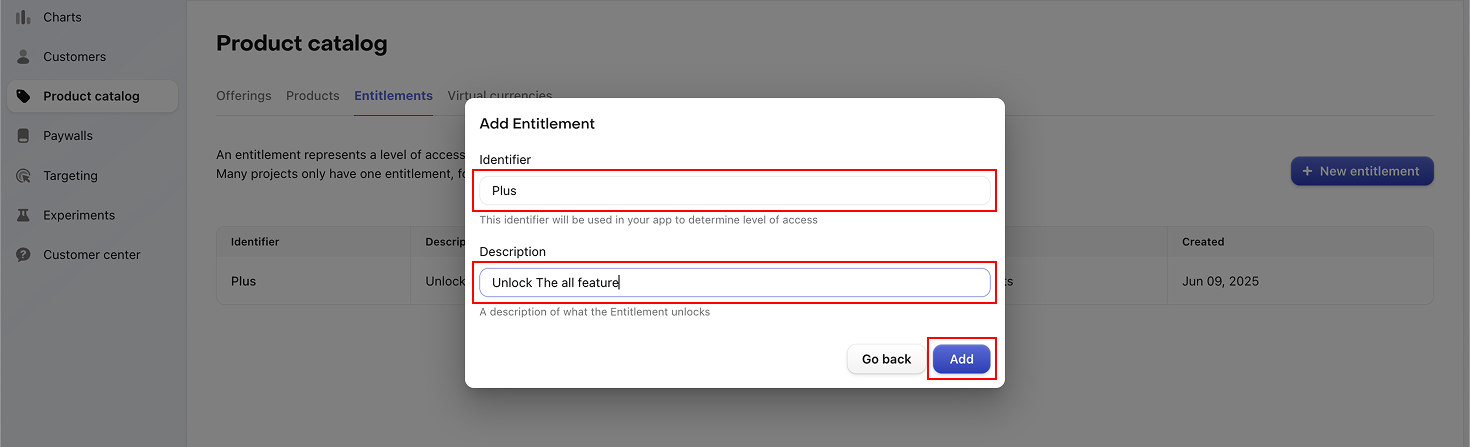
Creating an Entitlement
-
Press the Product Catalog option from the Side bar
-
Then tap on the Entitlements tab to view and manage your product list.
-
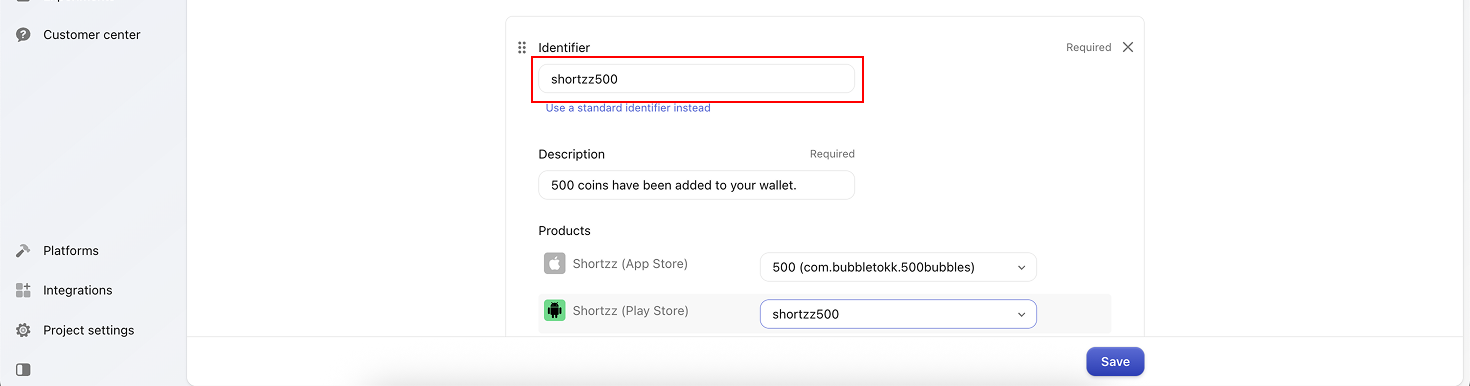
Enter a unique Identifier and provide a brief Description for the product.
-
Once done, press the Add button to save.
-
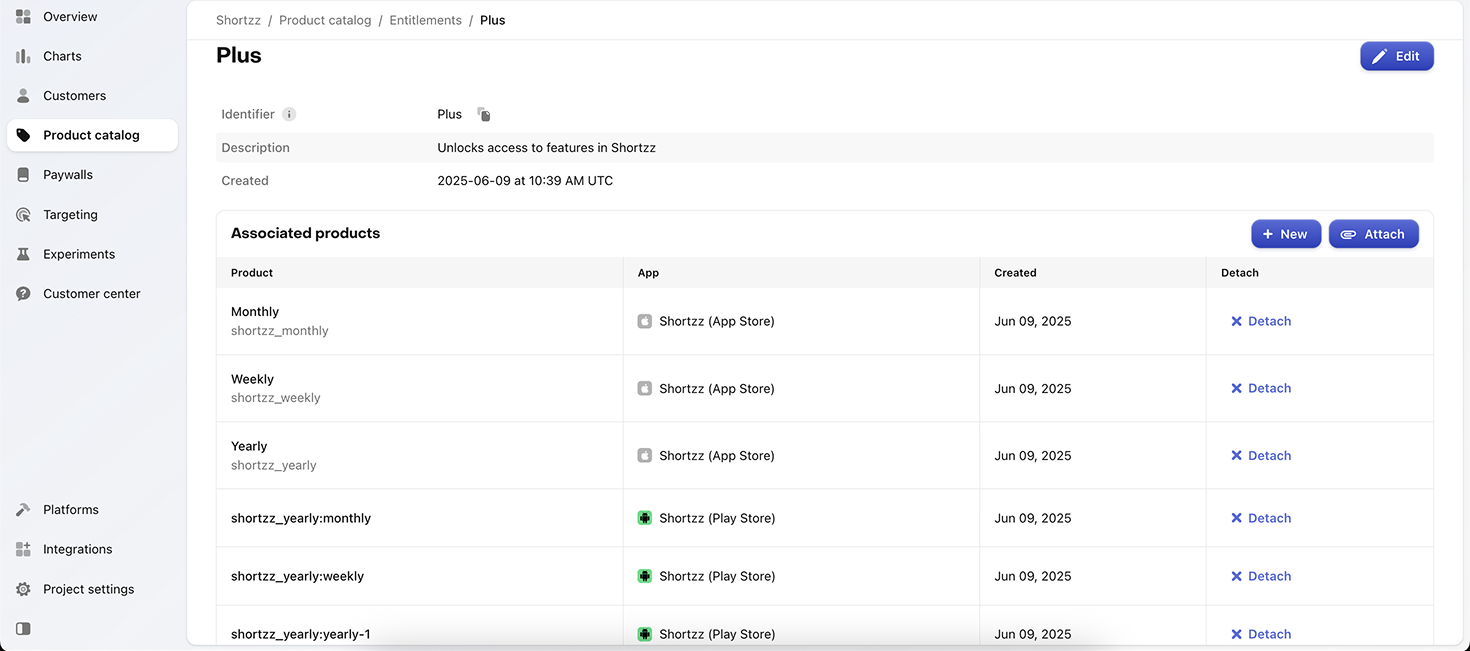
Attaching Products to Entitlements
-
Once the entitlement is attached, your entitlement list will appear similar to the one shown in the image.
-
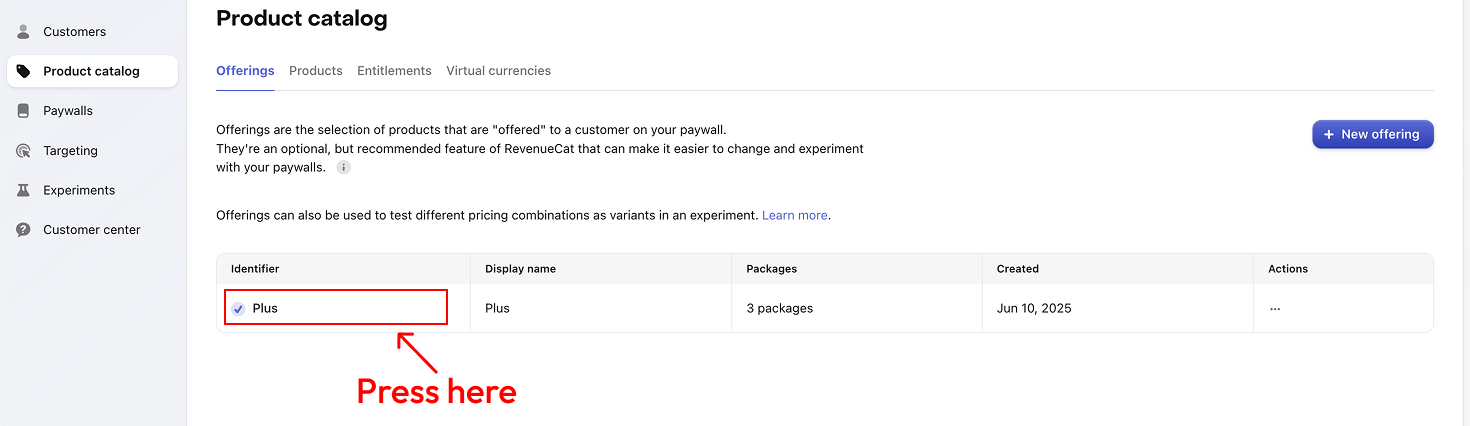
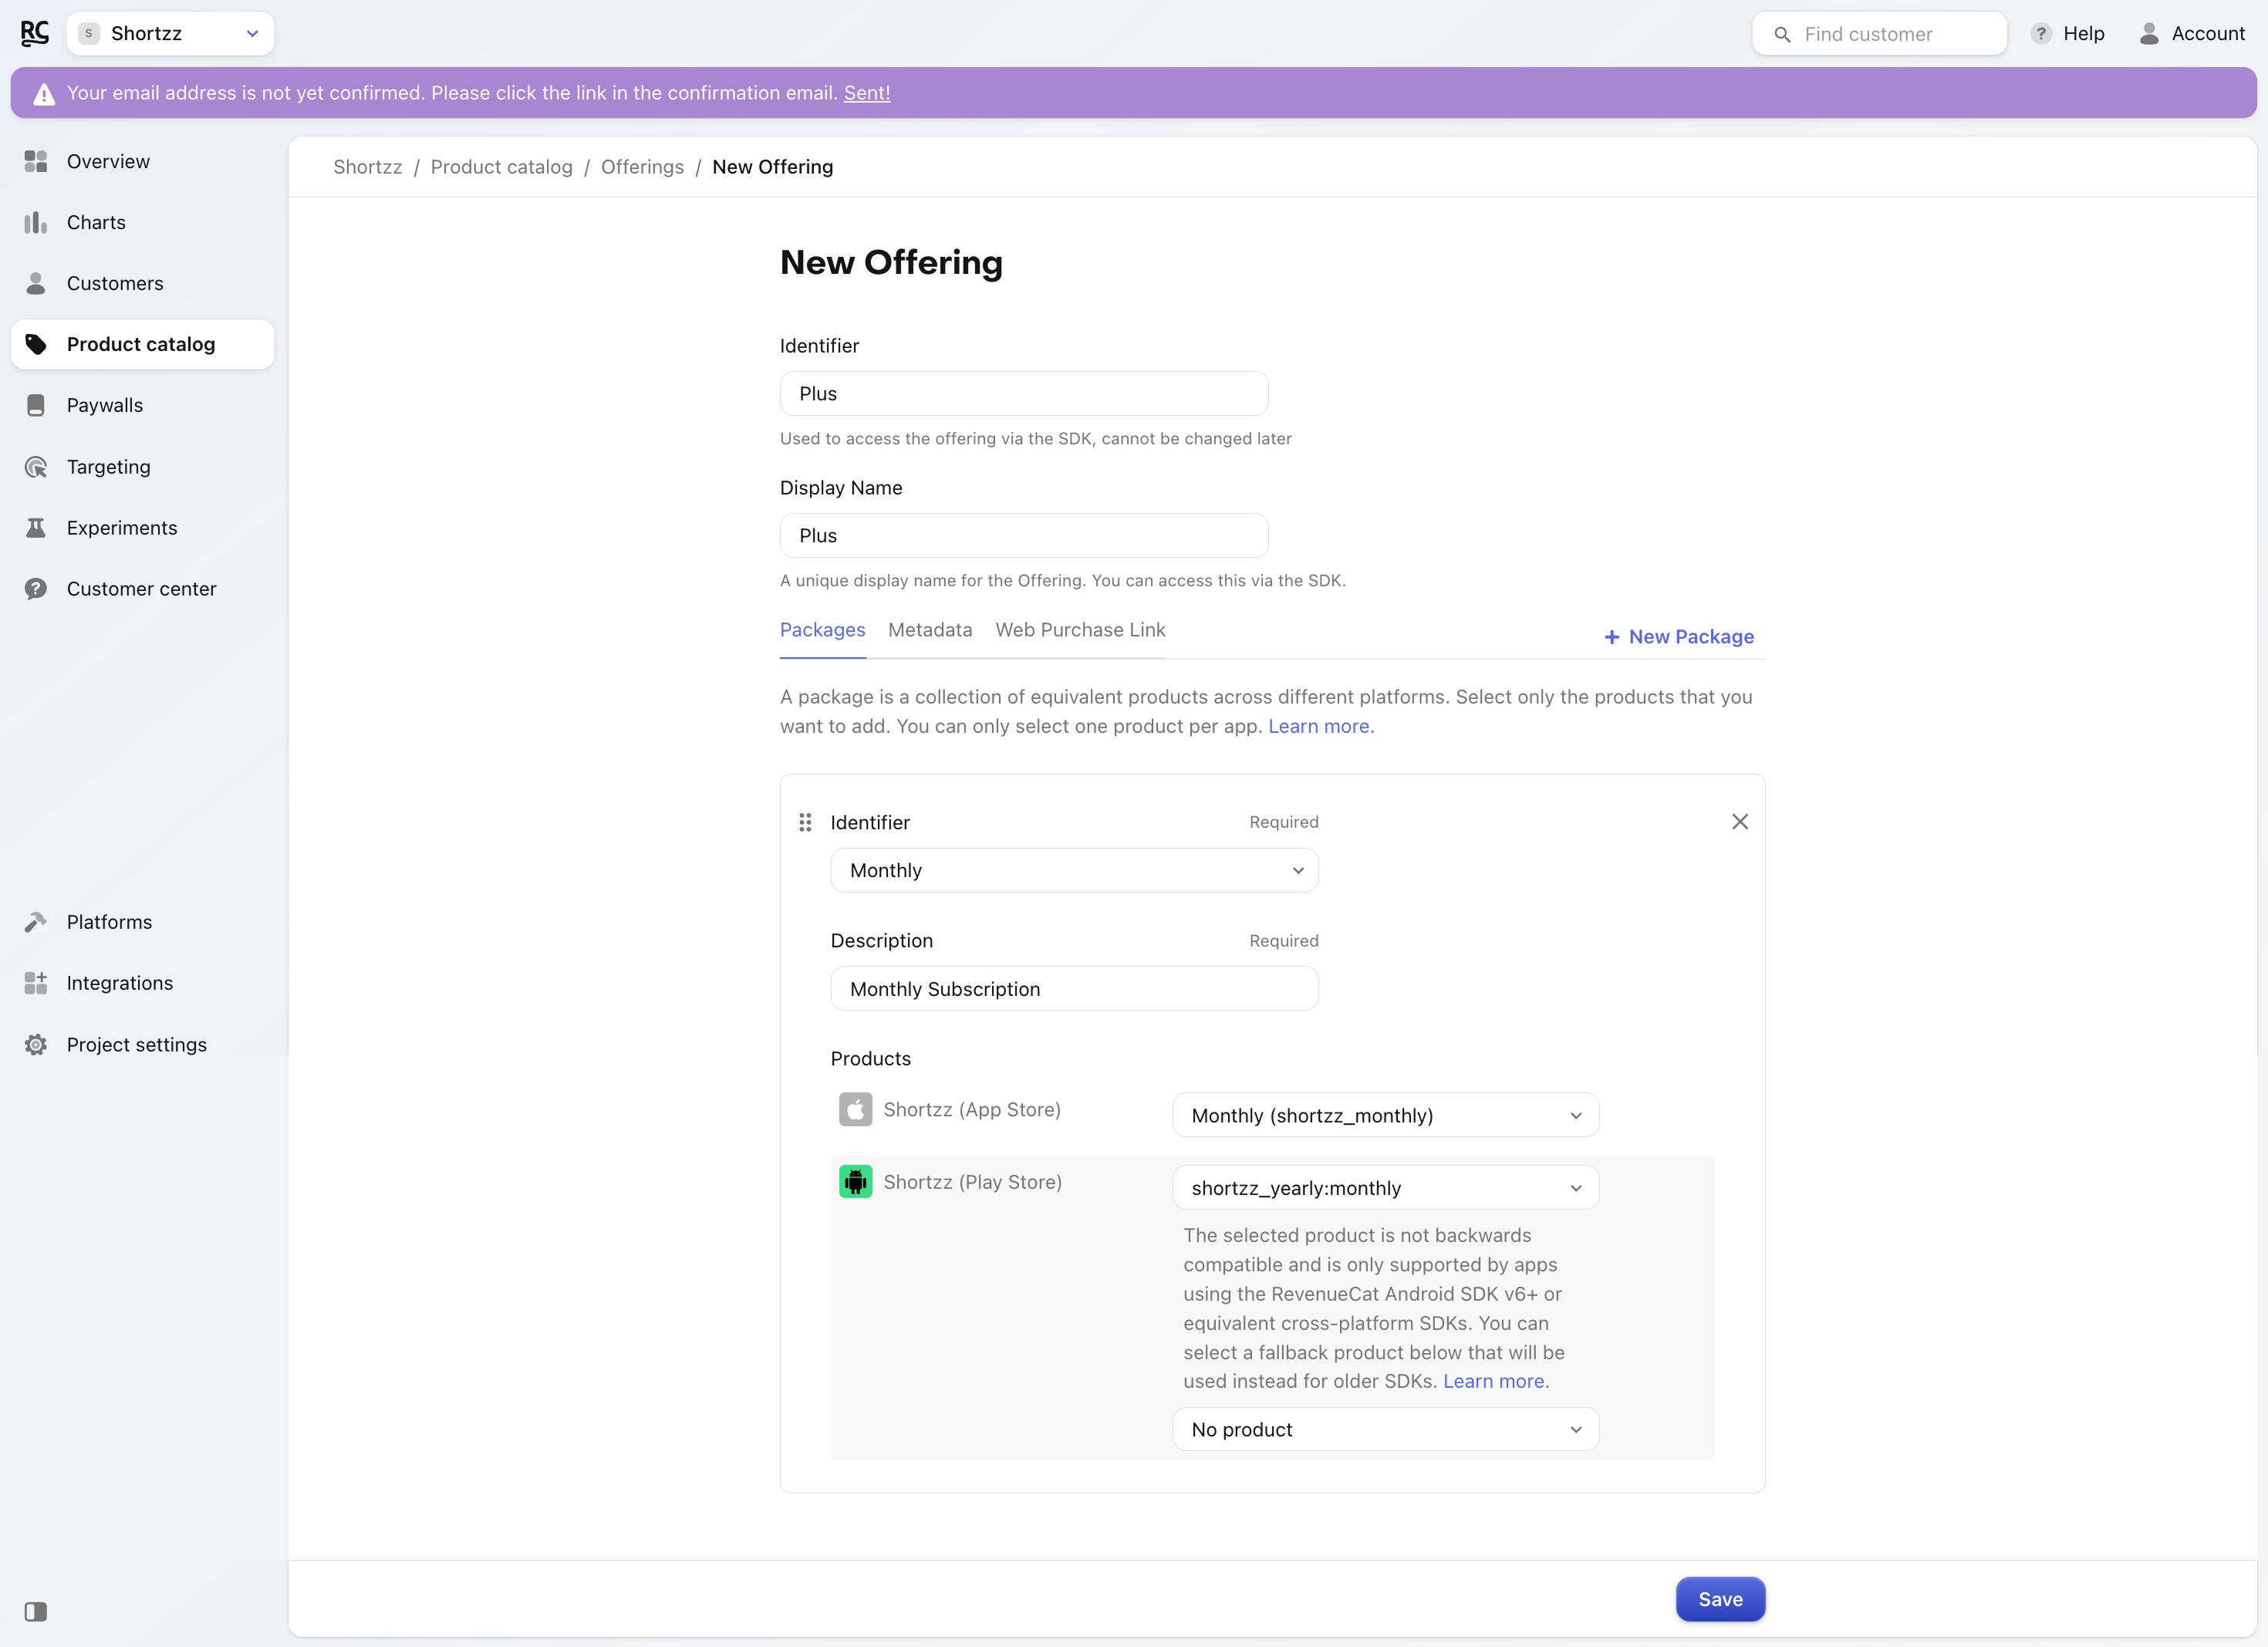
Creating an Offering
-
You'll be prompted to enter an Identifier and Display Name for your offering. Note that the offering identifier cannot be changed later. Once you've entered this information, click Save .
-
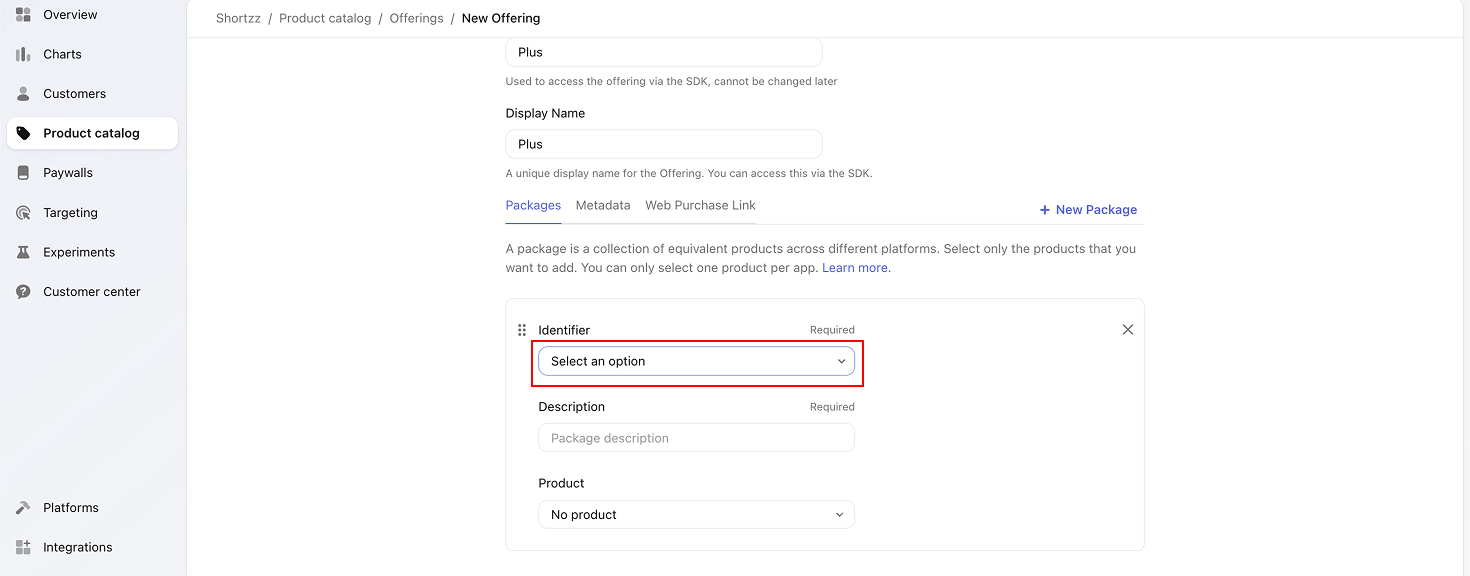
Adding Packages
-
Each Offering you create should contain at least one Package that holds cross-platform products.
-
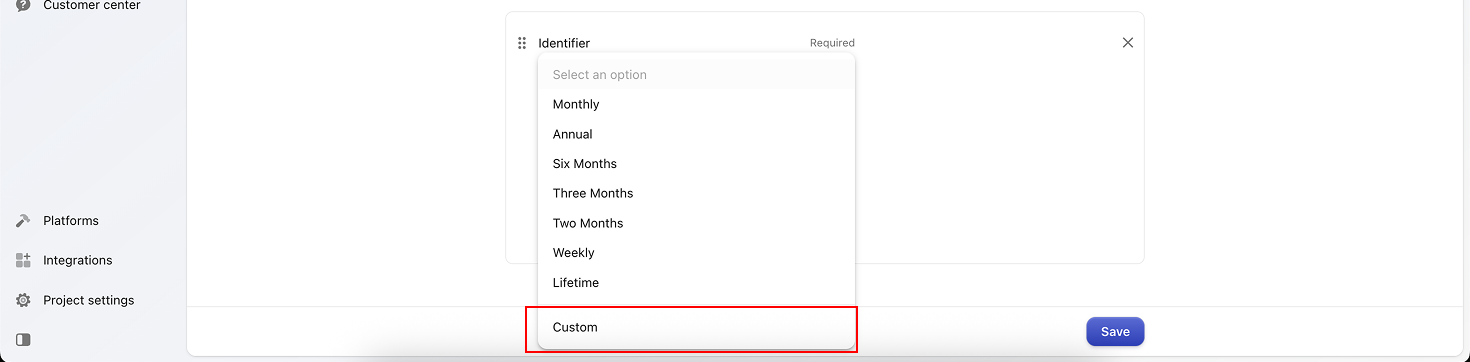
To create a package, click into your new Offering, then click + New Package in the Packages section. In the popup, choose an Identifier from the dropdown that corresponds with the duration of the package. If a duration isn't suitable for your package (e.g. consumable purchases), then you can choose a custom identifier. Include a Description, then click Save.
-
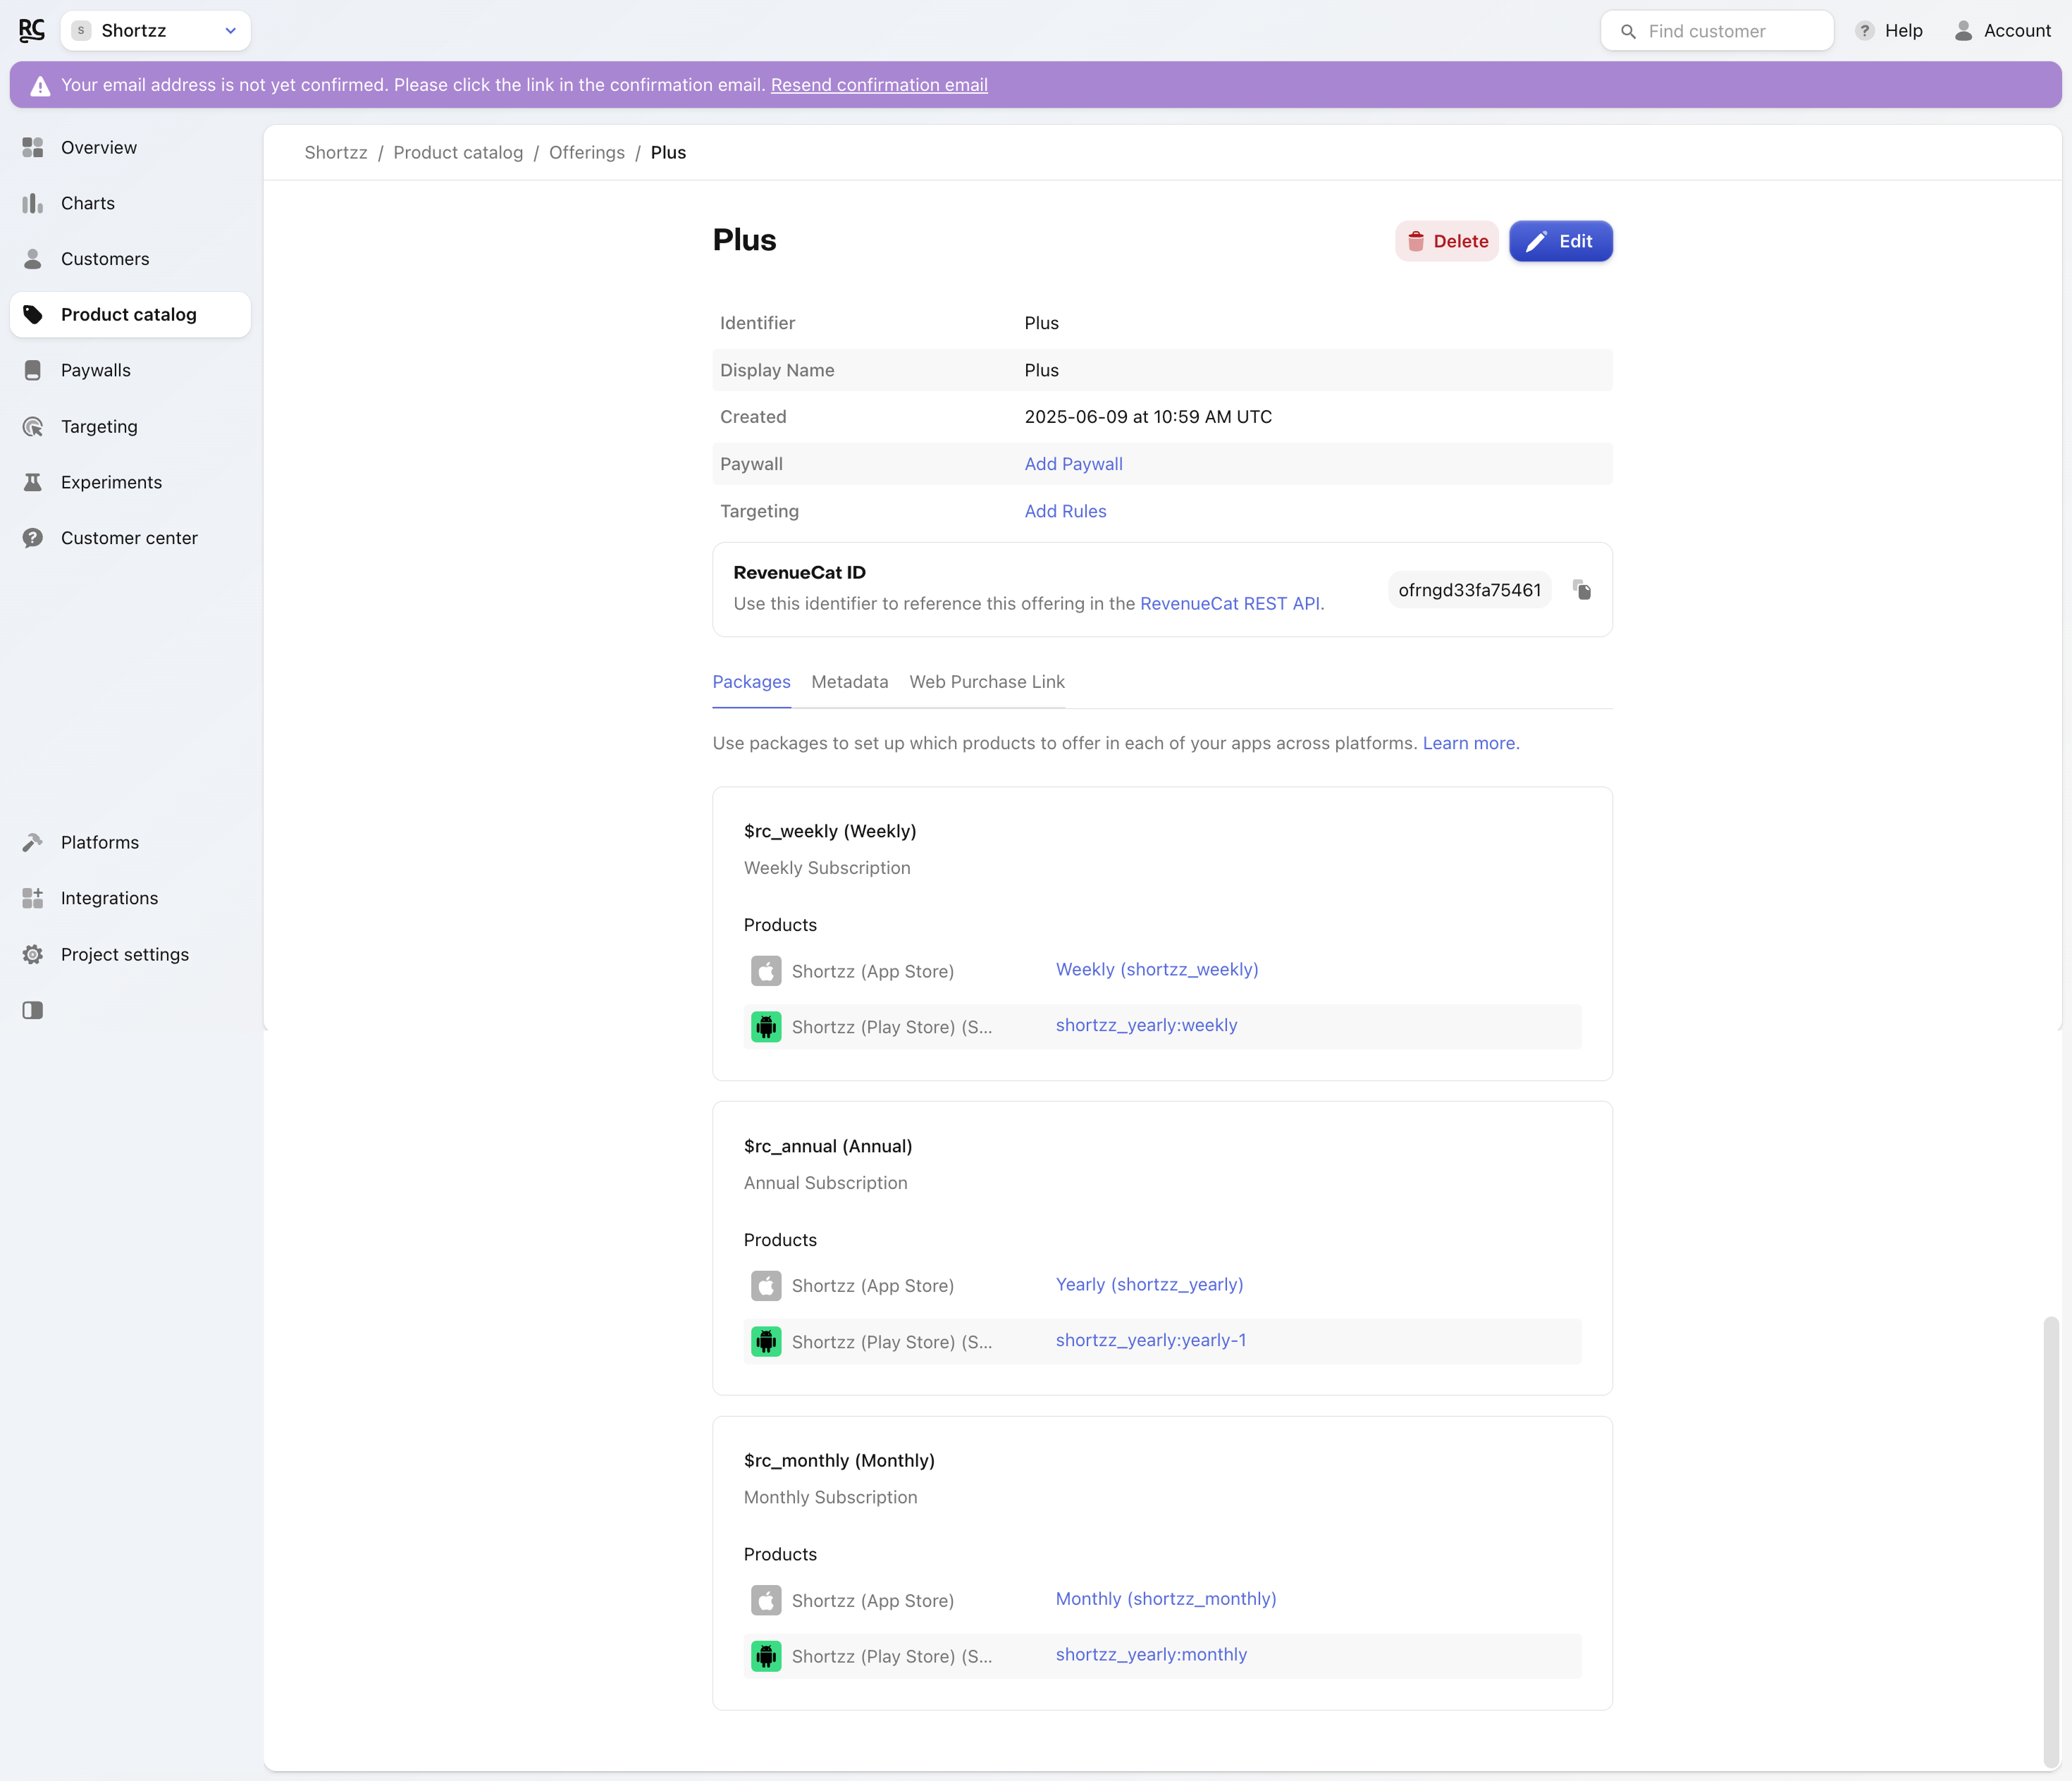
And add the other offerings in the same way.
-
- See the image below.
-
See the image below — your offerings should look like this.
-
iOS : Set up In App Purchase by following Documentation .
-
Android : Set up In App Purchase by following Documentation .
-
How to add a product in RevenueCat
-
If you haven't followed the Subscription tab , please do that first, then add the In-App Purchase product.
-
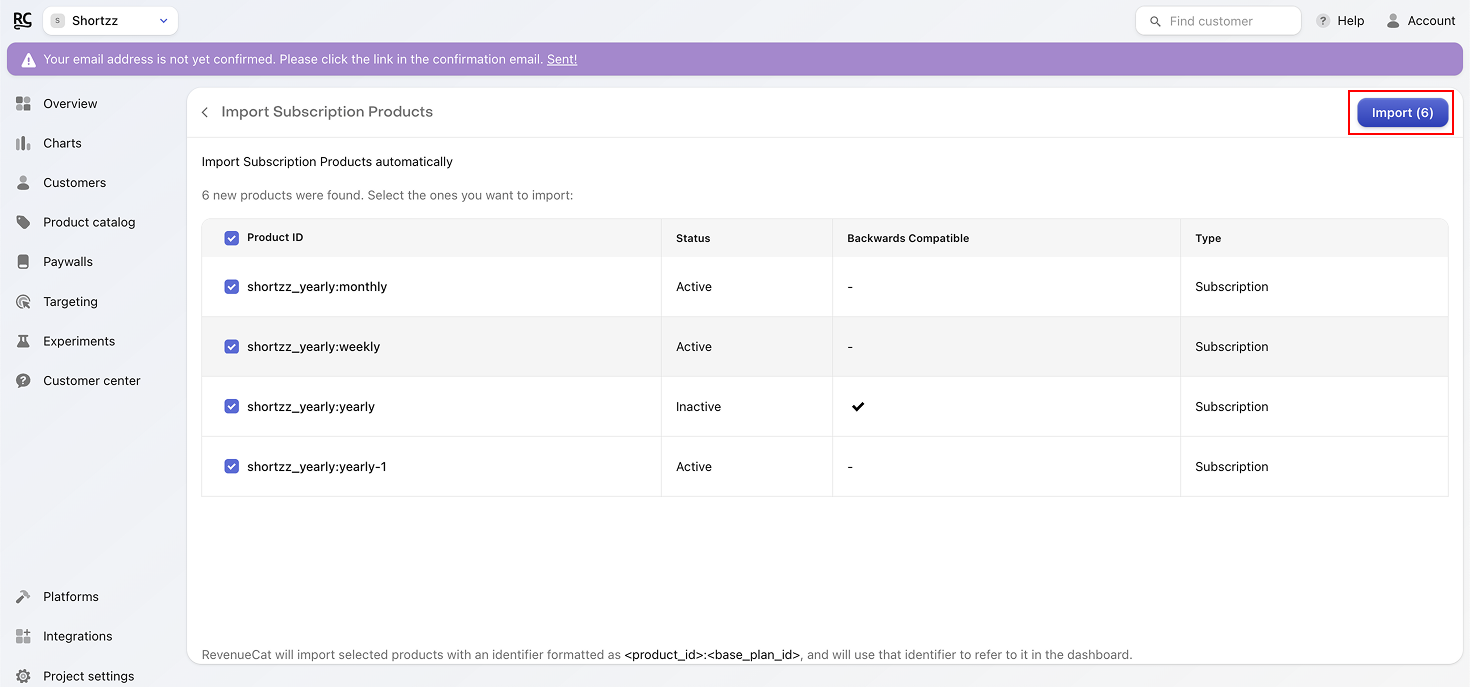
Fetch products
-
iOS :
-
Android :
-
Add products in offerings
-
If you’ve already added an offering, go to the existing offering shown in the image below.
-
🎉 Successfully added your product to offerings.
-
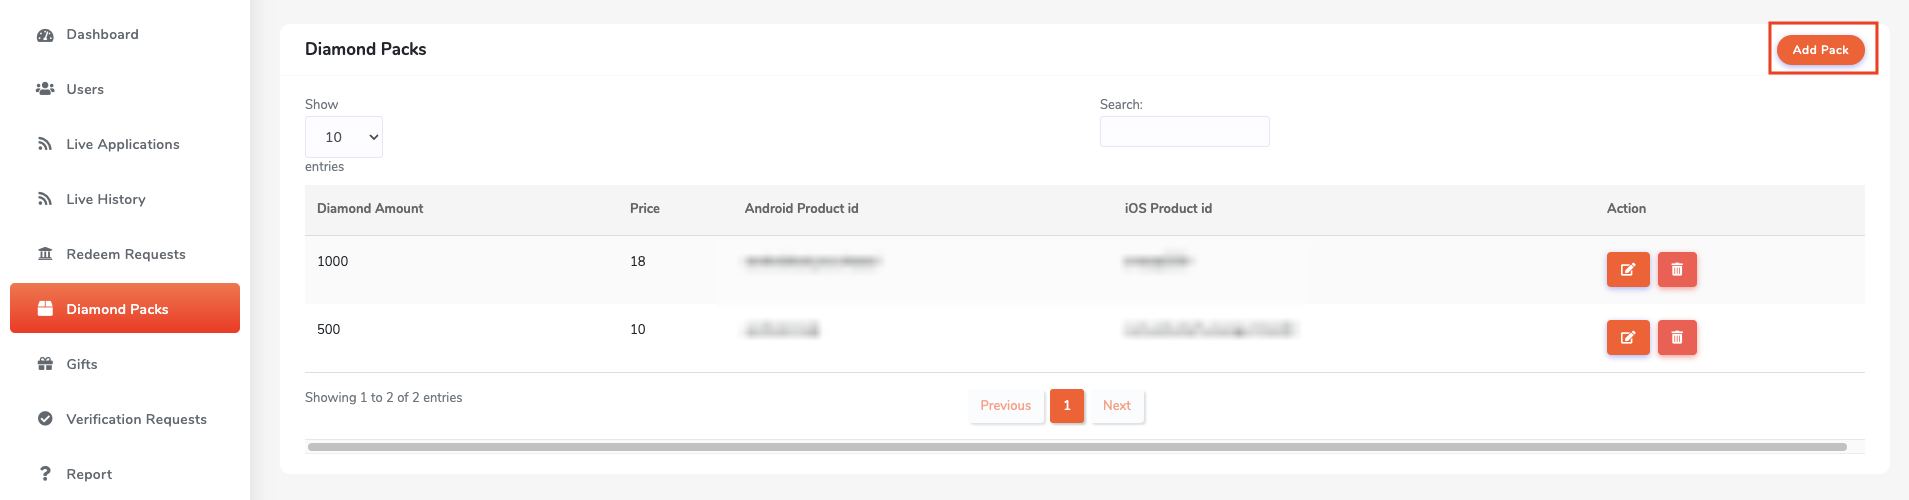
Create Coin Plans in Admin Panel.
-
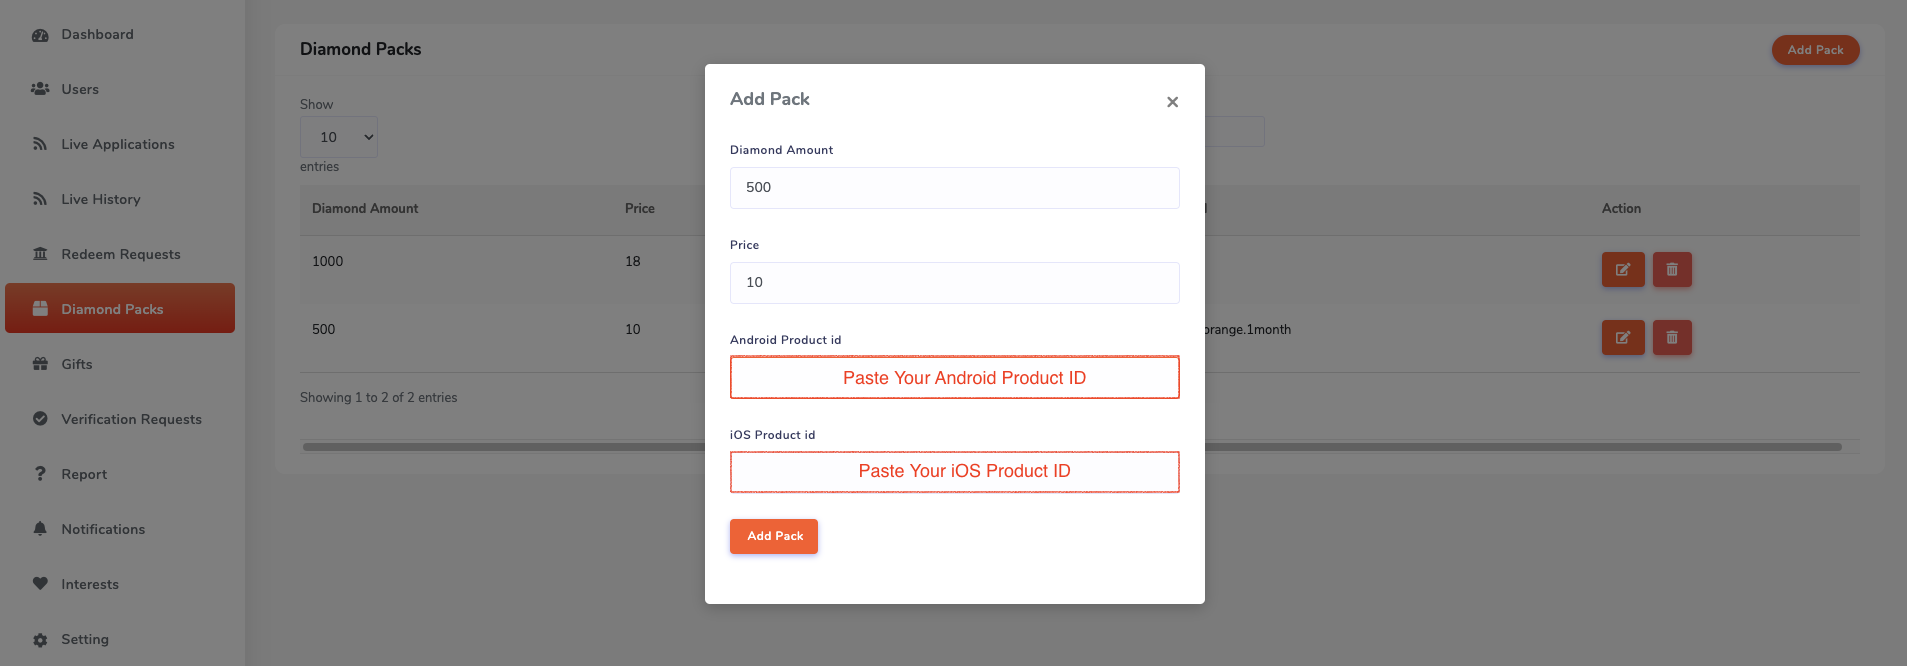
Click Add Coin Plan.
-
Set Price , Diamond and Play Store Id (a unique Product Id you created while following above Documentation).
-
Click Submit.
-
For Android, Purchase will start working once the app gets approved on playstore.
-
For iOS, Purchase will start working once in app purchases gets approved by apple on appstore connect.
-
Follow This guide and you can create build for android.
-
Follow This guide and you can create build for iOS.
-
To update your project (Whenever we update the project at Codecanyon), you have to Add/Update/Remove some files and fields in database (sometimes). Please check README.md file for the update information. (Mostly, can be found at root level directory of the project)
-
Please be careful while making an updates this way, It might result in errors sometimes.
-
If it comes any issues while making an update, you are absolutely responsible for that since updating existing project is not included in the support.
- Telegram (Support Desk) : +91 7990425274
- Email : help.retrytech@gmail.com
- Whatsapp (No Support Here) : +91 7990425274
Connect with RevenueCat
Add New App

Project Creation
1. Bundle Identifier

2. App Store Connect App-Specific Shared Secret
3. In-App Purchase Key Configuration


4. App Store Connect API Key Configuration


In App Purchase