

Introduction
Hey there, We are happy to see you as our valuable customer of Flixy app. Here is the easy documentation to set the app and ready to launch. Please follow all the instructions carefully and don't skip any step. Feel free to contact us if you face any problems while set up.
Version Details
Android: targetSdk 36
Swift : 5
Laravel/framework: "^9.52.19"
Developer Friendly
Specially built for developers to give them freedom while coding.
Well Documented
Comes with nice documentation to help you get started fast and ASAP.
Continuous Updates
Comes with continuous updates to keep you safe from exploitable holes
Multiple Languages
The App Comes with multiple languages (More than 20). RTL supported.
Powerful Admin Panel
Admin dashboard to manage the data of the app and control them.
Attractive UI/UX
Amazing UI/UX designed and developed by world class designers.
Active Support
Our support and developer team helps you solve any issues during installation.
Prerequisites
-
PHP 8.0 and above and it will work on any kind of hosting
-
Hosting with cPanel (Strictly Recommended)
-
memory_limit should be 500M
-
upload_max_filesize : 500M
-
post_max_size : 500M
-
max_input_time : 60
-
If you face any issue in video upload or it takes time in uploading video to the server that might be because of your server. Sometimes server gives this error if you check your error log file
-
The Allowed memory size of 33554432 bytes exhausted (tried to allocate 15756752 bytes)
-
If you see this error then you would need to upgrade your server or increase PHP memory limit by going into php.ini file. you need to google about where this file is. This file resides in different locations in different servers
Extracting the project and settings up database
-
Extract the folder you have downloaded from codecanyon and open the folder
-
Open it and find the database.sql file
-
Then open your cPanel provided by your web hosting provider.
-
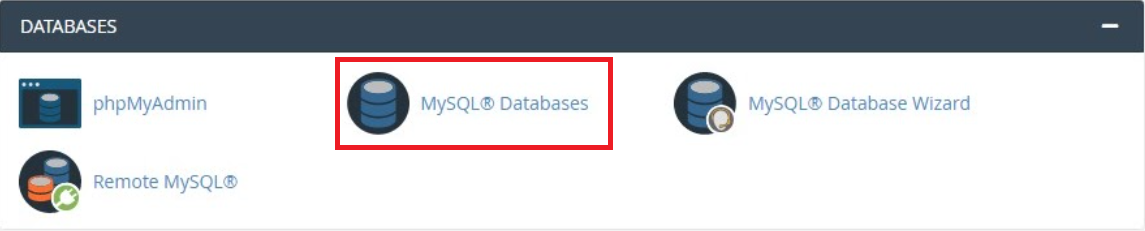
Click the MySQLDatabase option under DATABASES section and create database for your app as shown in the images below.
-
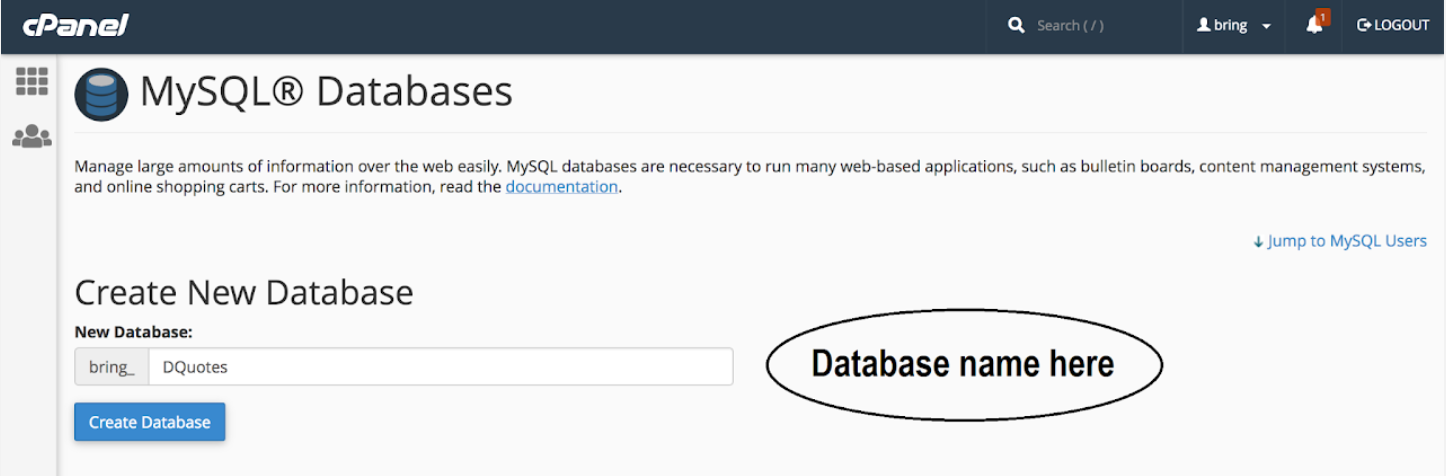
Add database name and click on create database.
-
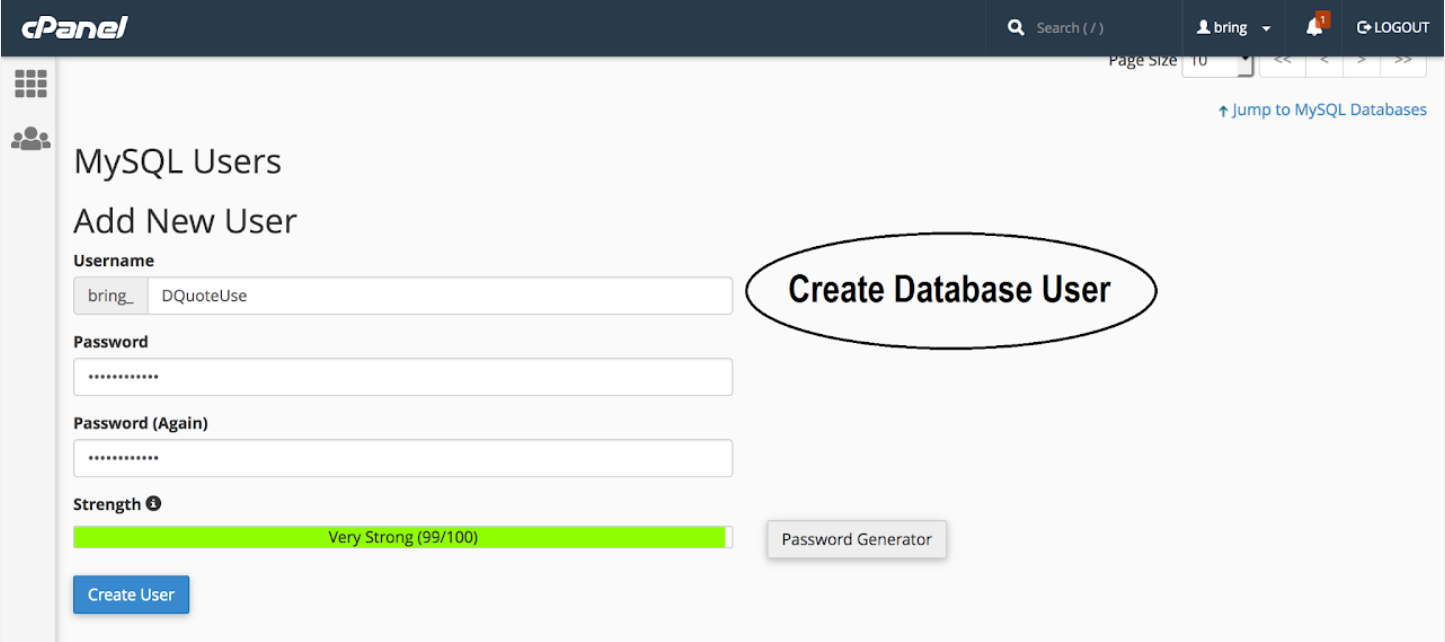
Now we will create a user to access the database
-
Like as shown in the image, enter username and password (save it to use later)
-
Click on create user and user will be created
-
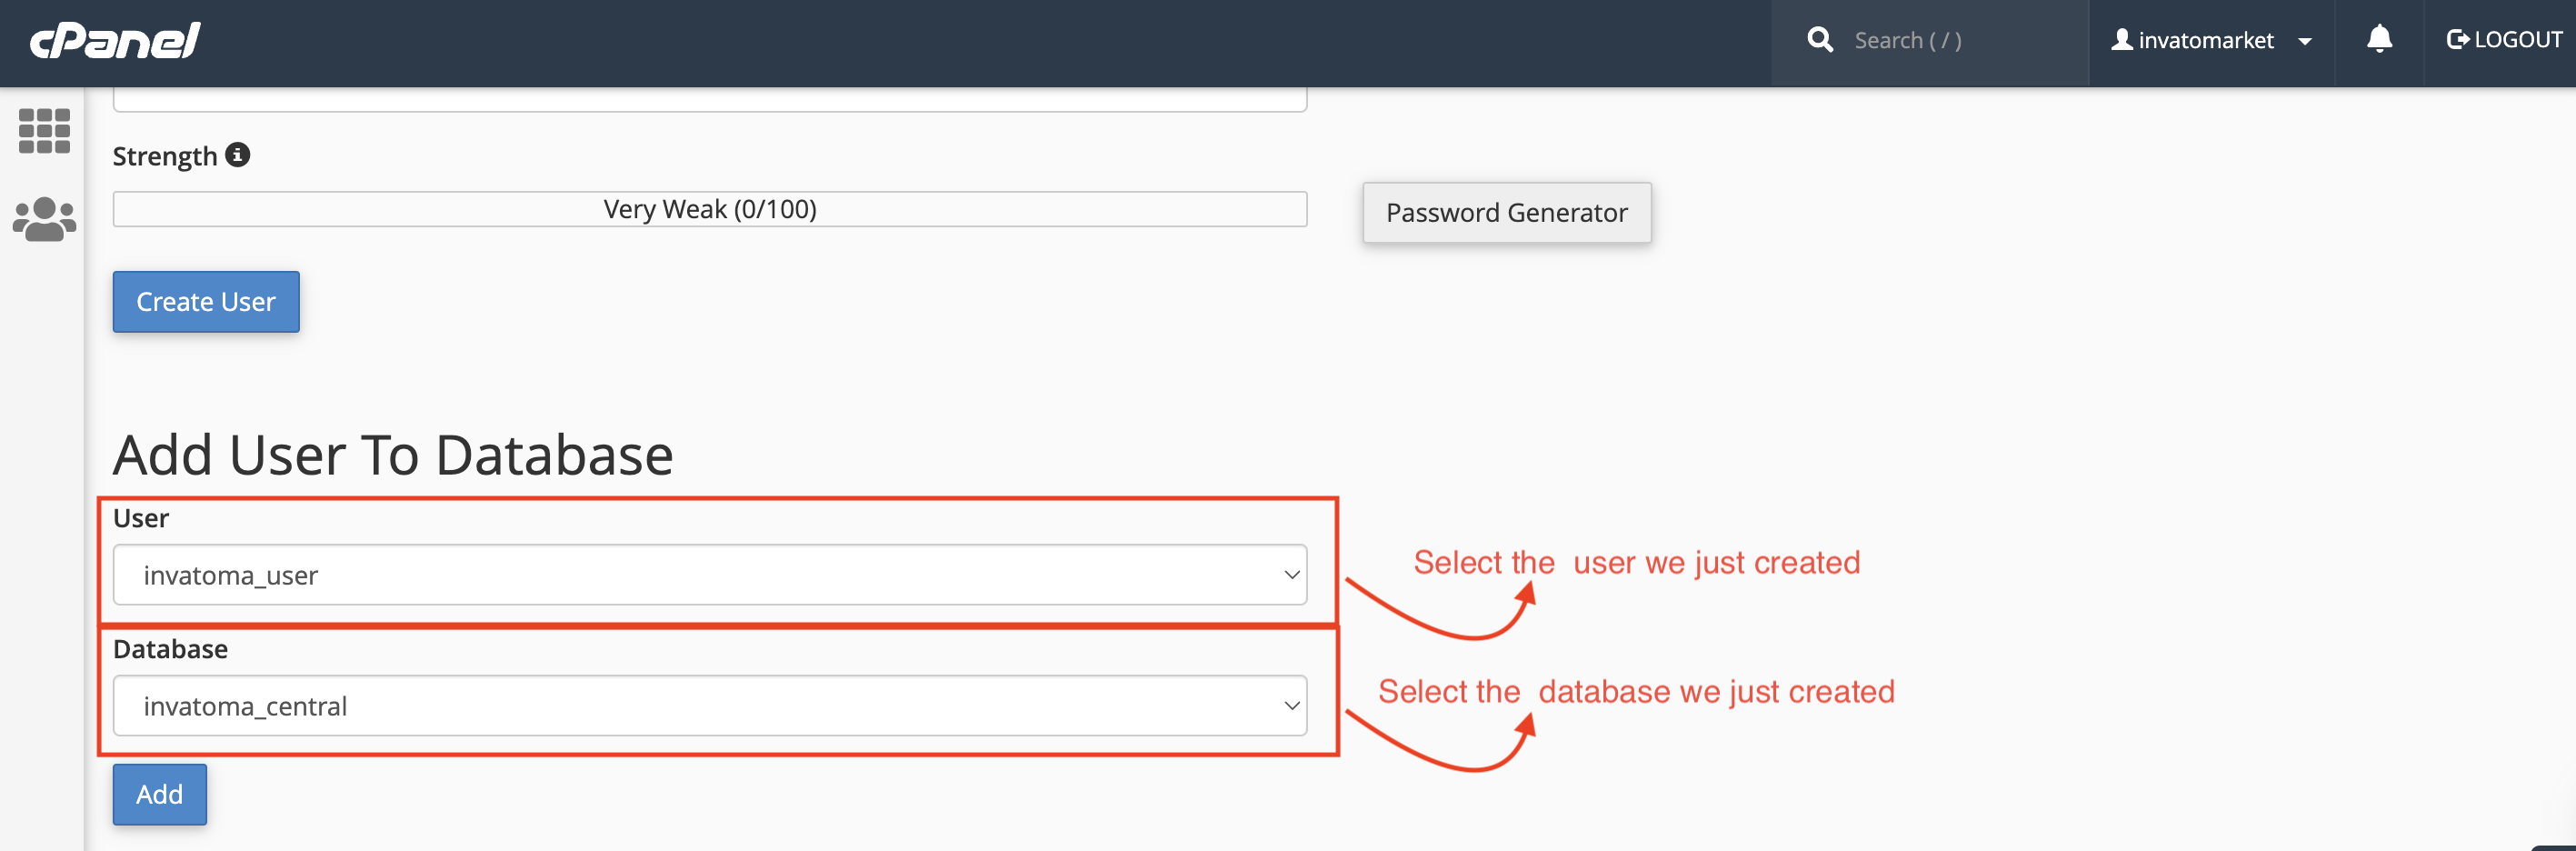
Now we have to add that created user to database. so scroll down and you can see like image below
-
Select the user from the list and select the database, and click on add button below
-
After clicking on add button you will see like below.
-
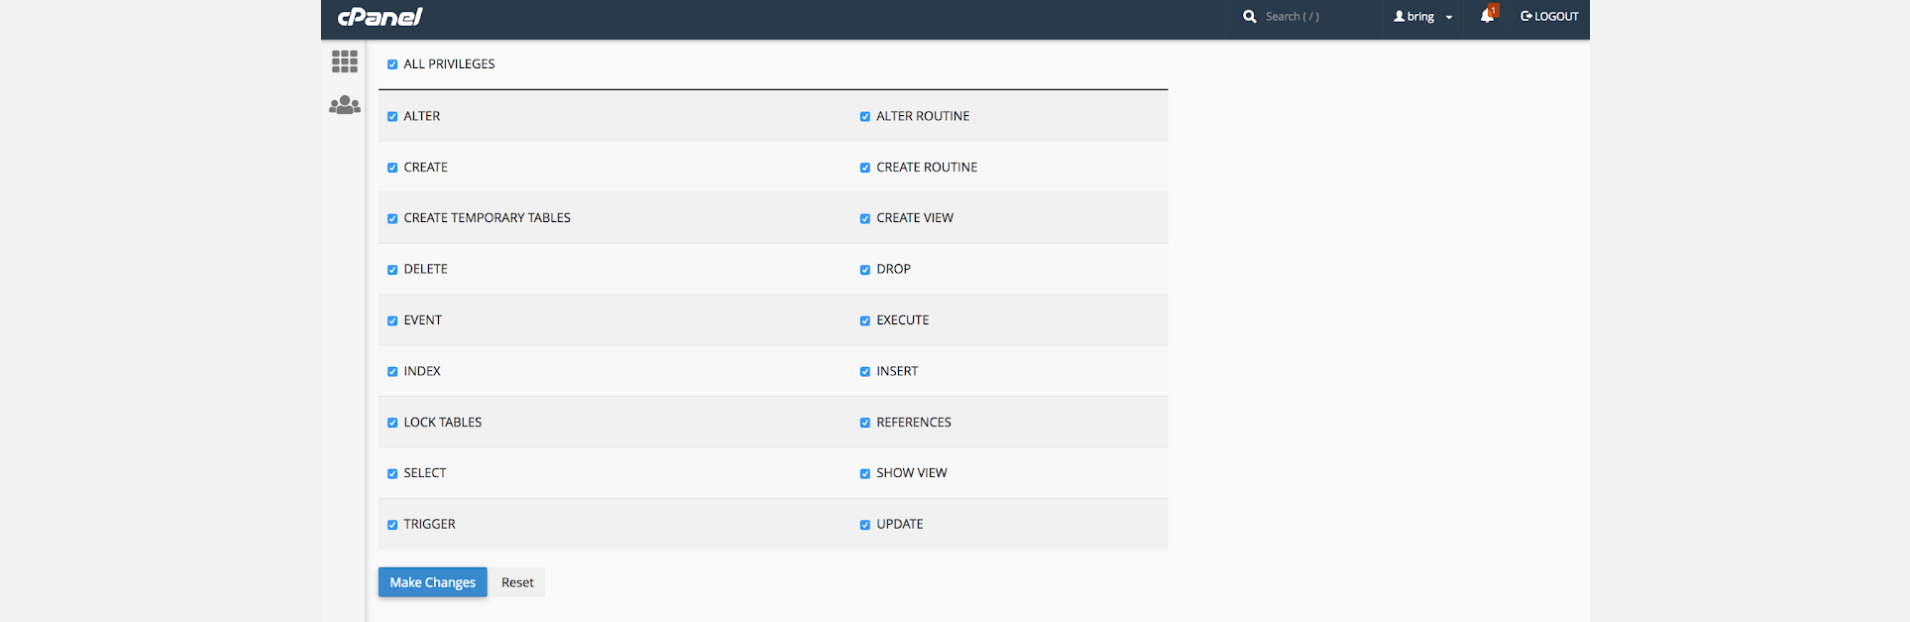
There you can see ALL PRIVILEGES option, check the box before that
-
This will tick all the boxes shown below (Check the image below). Click on make changes and you are done.
-
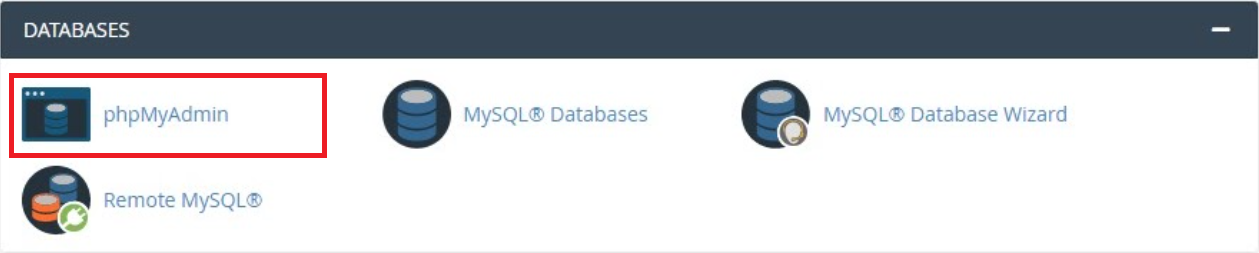
Now we have to import the database file. Search for phpMyAdmin and click on it.
-
Then system will redirect you to the phpMyAdmin where you will be able to find the database we just created
-
Click on that database
-
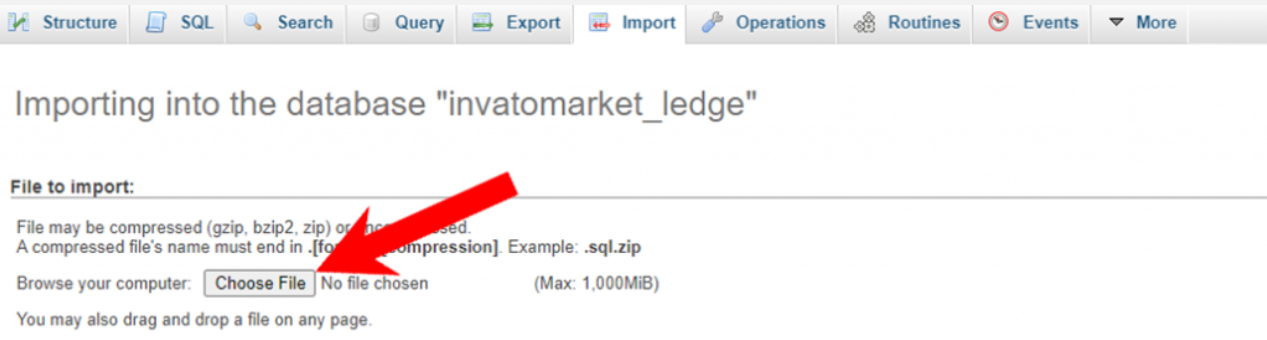
Then find the import button on the Top bar and click on it
-
It will open the page like below
-
Click on Choose File button and load the database.sql file which will be there in the folder you have extracted.
-
Click on import button at the bottom of the page.
-
Now database is ready to use.

Setting Up Database credentials to the backend project
-
Now come back to the project folder and then extract flixy_backend.zip file
-
In that folder, find the .env.example file and copy it to create a .env file. Then open it with any text editor and make the changes as shown below.
-
Open VS Code and and then open terminal in that and run the command
-
There in the APP_URL Replace the https://yourdomain.com/ to Your Domain
-
Make sure that your APP_URL ends with " / " as above.
-
Change Database Configuration, as shown in the example below (With the credentials you just created at cPanel)
-
APP_NAME should be without space.
-
And save the file by pressing Ctrl + s
composer install

DB_DATABASE = database_name
DB_USERNAME = database_username
DB_PASSWORD = "database_password"
Configure Firebase
-
Go to the firebase project you might created while following backend documentation.
-
If you don't have, follow the steps below and create one project.
-
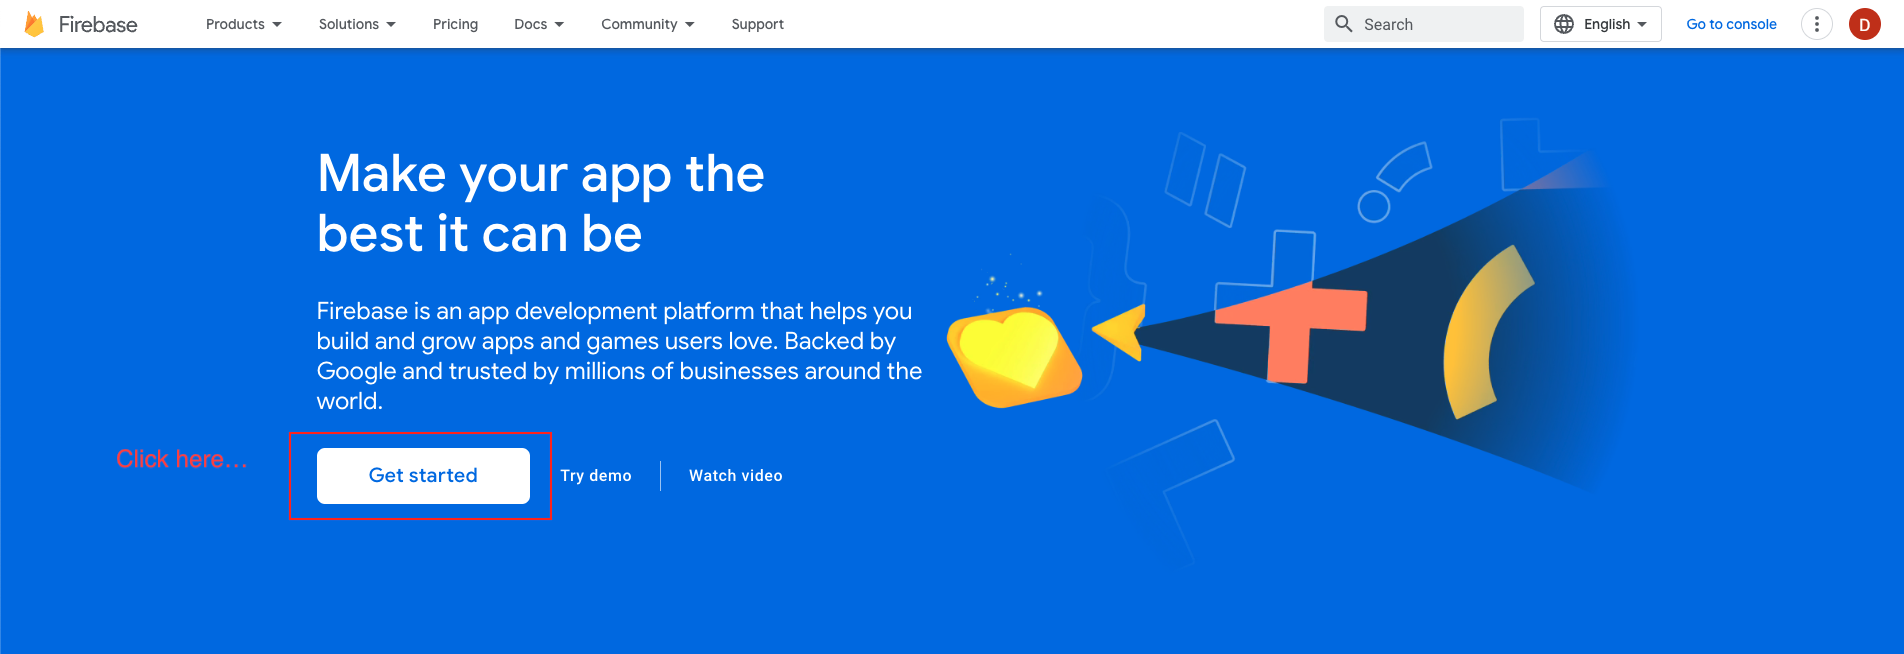
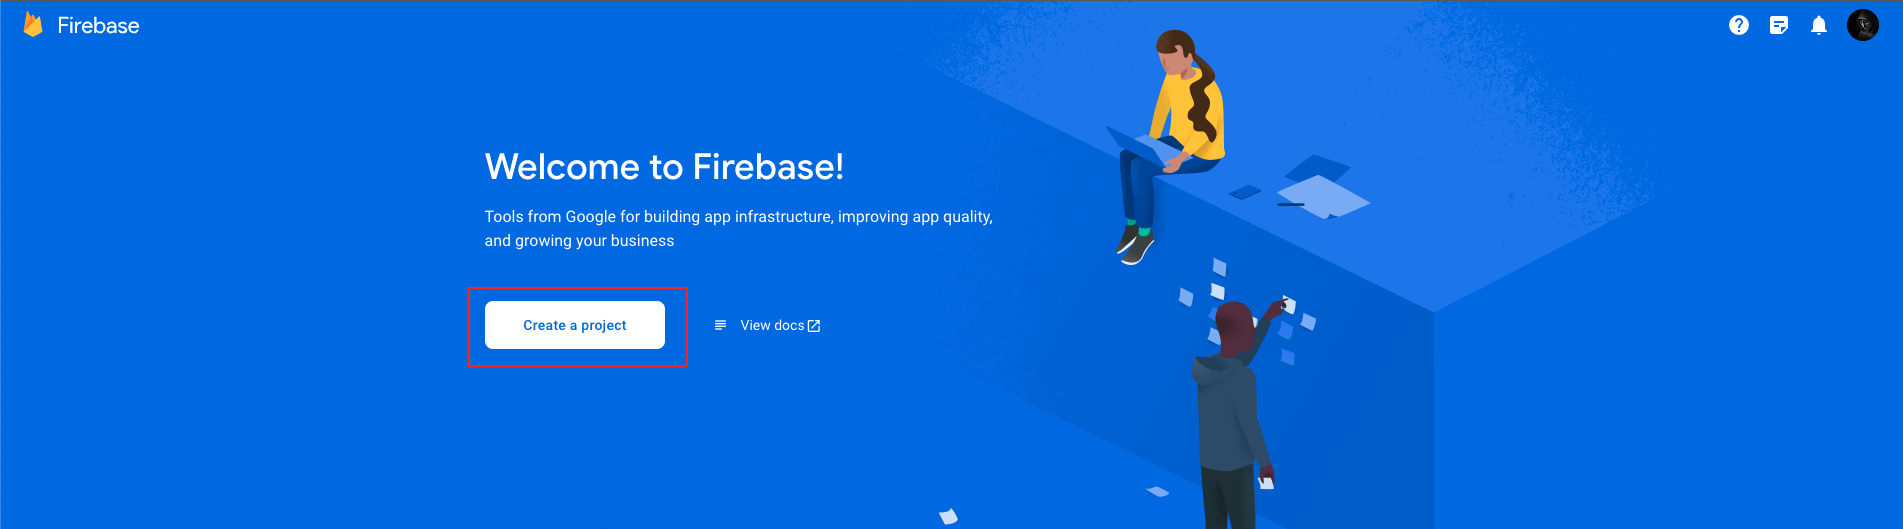
At first, follow this link https://firebase.google.com/
-
Now, we first have to create a Firebase project. Firebase project will go through and describe what it is. This allows us to add an app to that project. It can have many projects inside of Firebase.
-
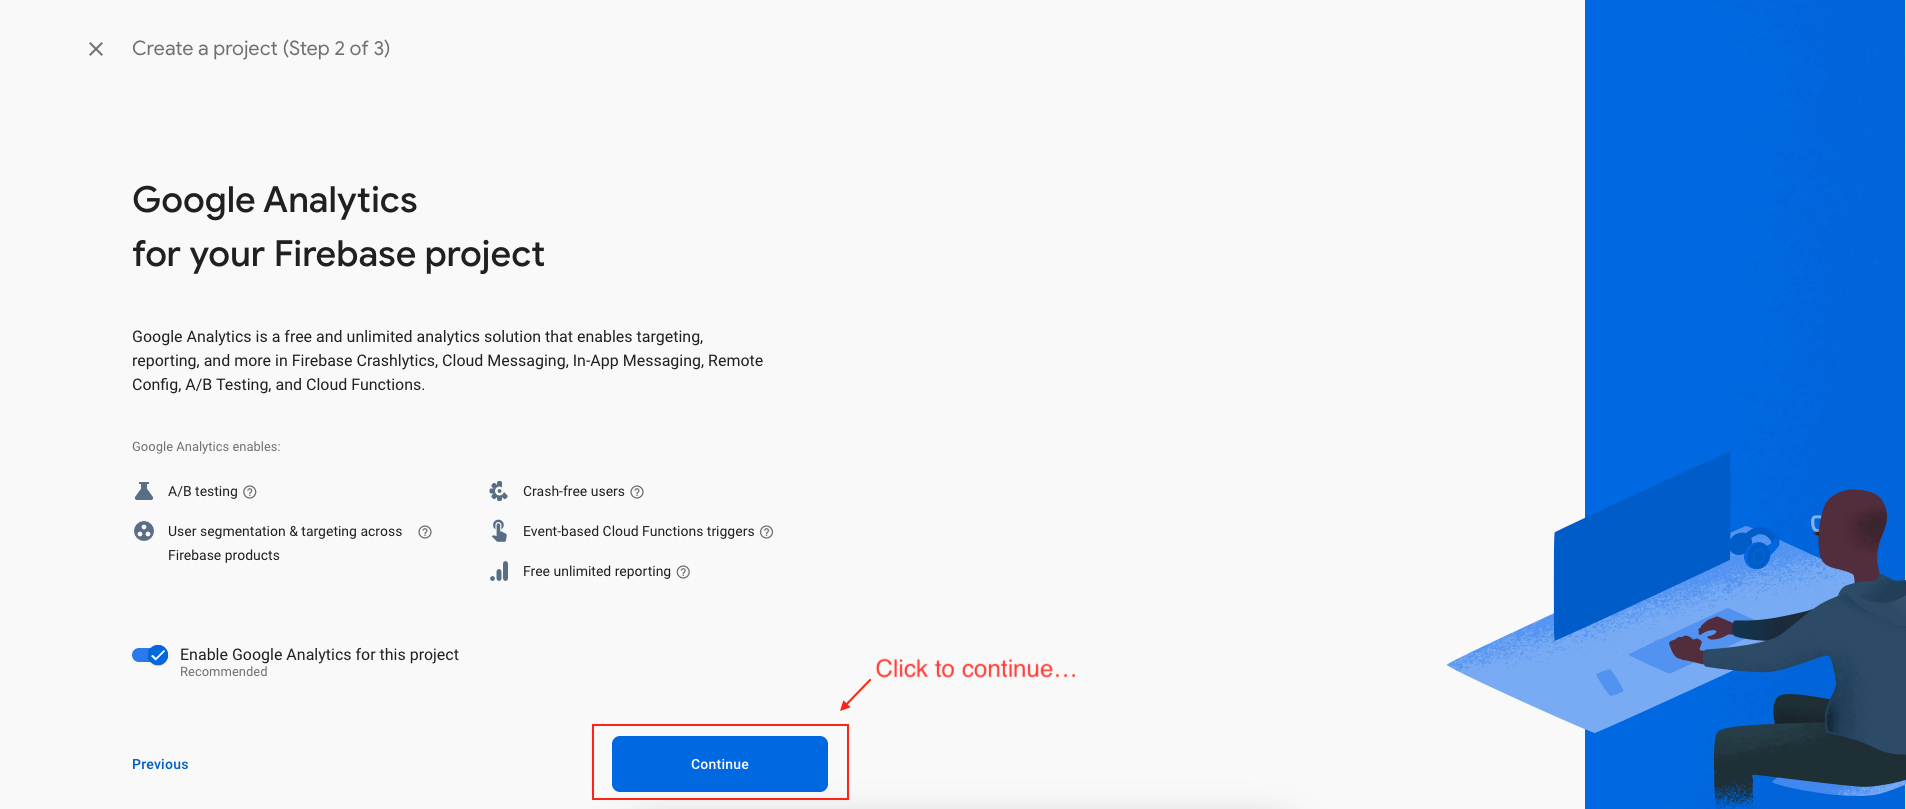
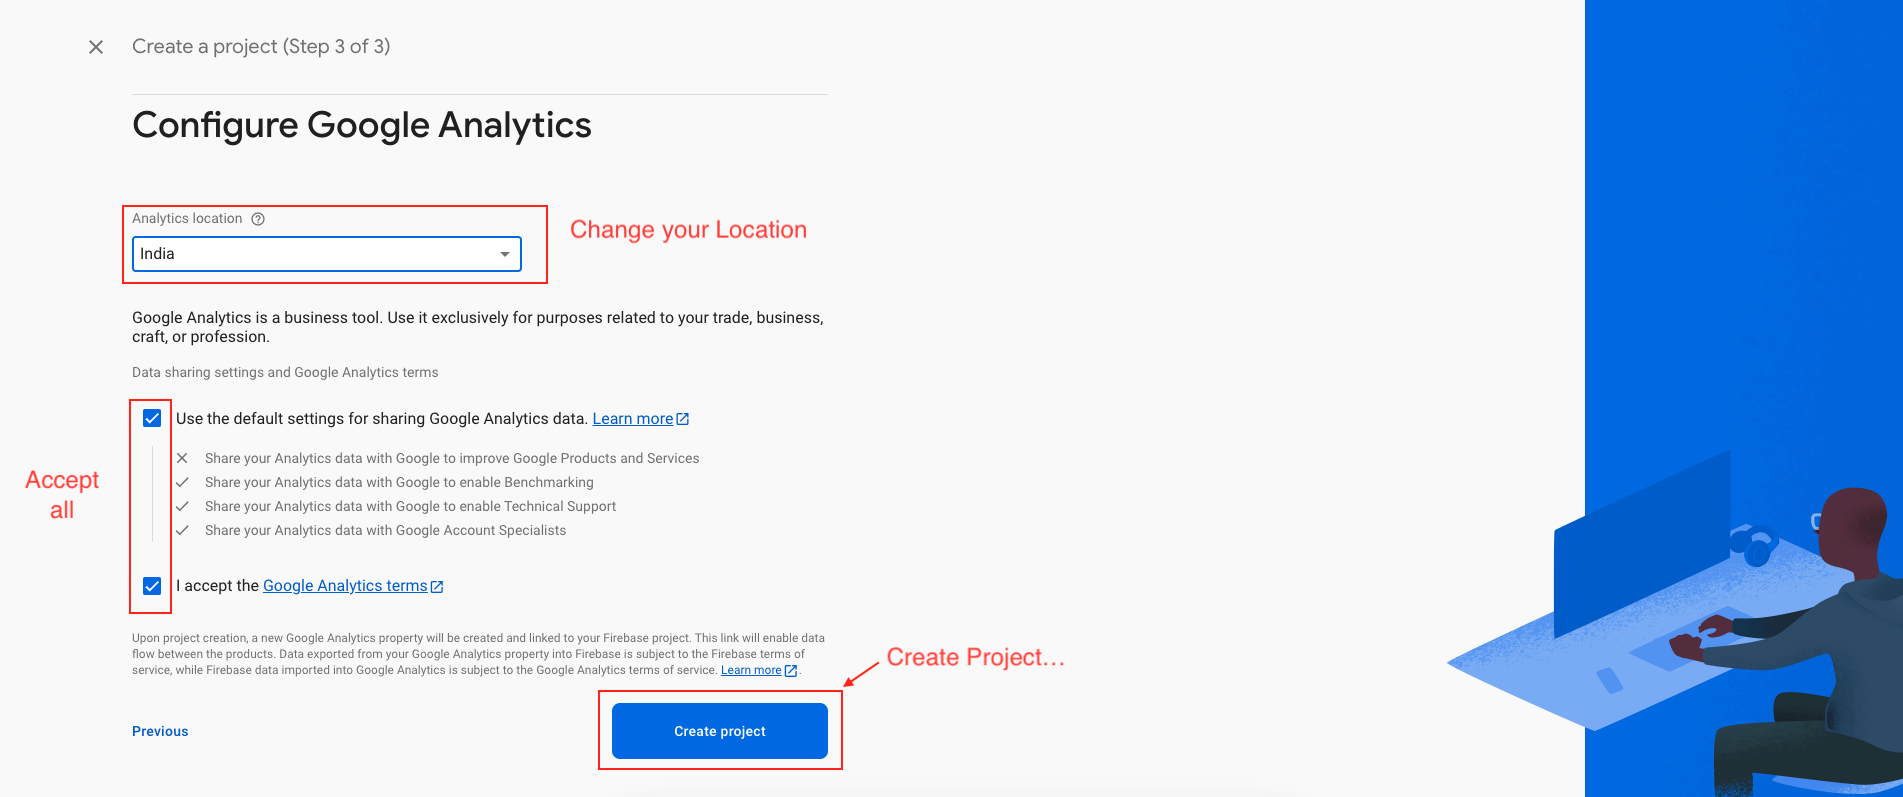
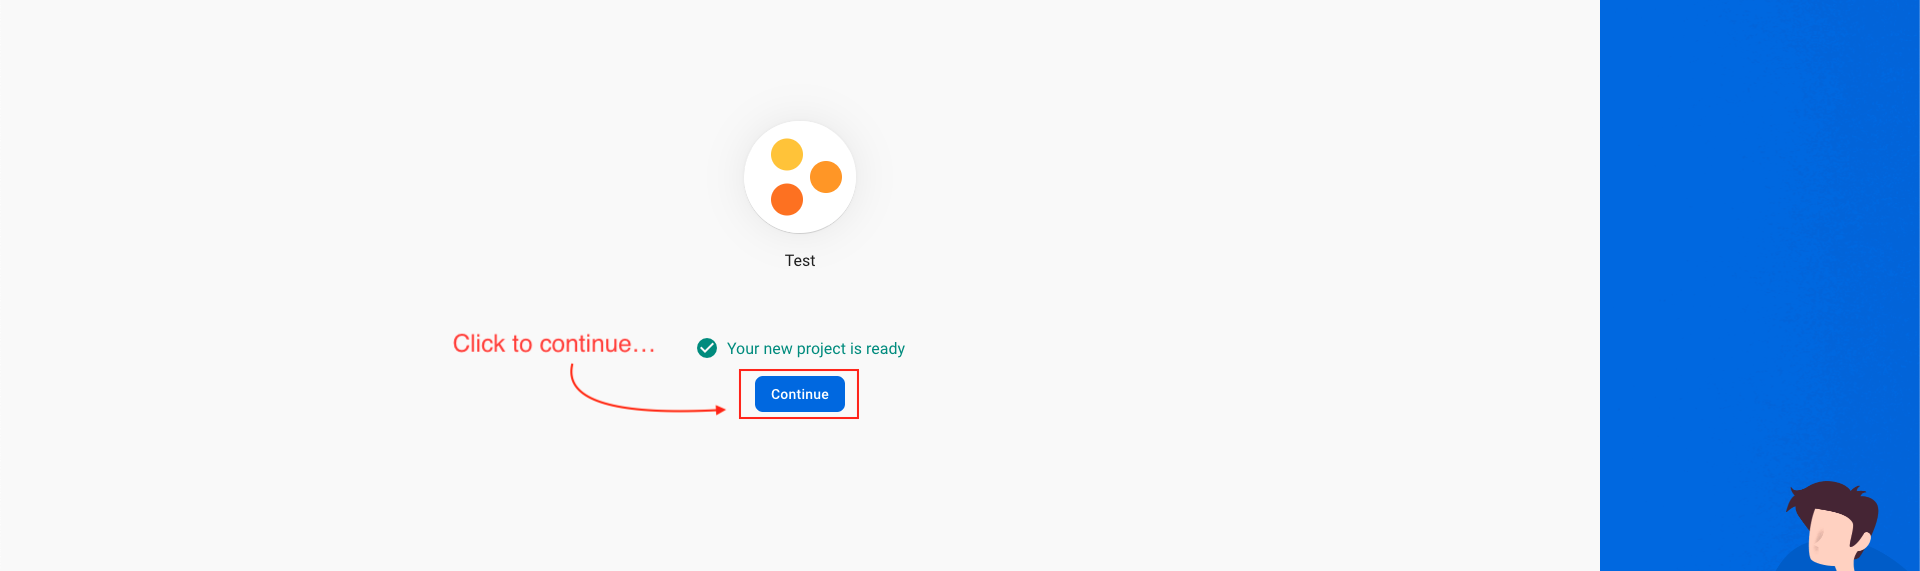
Now, we have to give a name and id to the project, enable Google Analytics for the project, set an analytics location, and accept all the terms and conditions. Firebase console automatically creates a unique id for the project.
-
Step 1 : Giving a name to the project
-
Step 2 : Enable Google analytics for the project
-
Step 3 : First Choose default Firebase account and then create project

Setup Notification (FCM)
-
Follow This guide and setup project at firebase and collect .json
-
Open .json file in your text editor.
-
Copy content of .json file from your text editor.
-
Create a new file named googleCredentials.json in your backend folder and paste the content in that file.
Storage setting (Optional)
-
AWS S3
-
Follow This guide and create AWS S3 Bucket and get API Keys and other credentials.
-
Once you collected all credentials, open .env file and paste those credentials. you will find something like below.
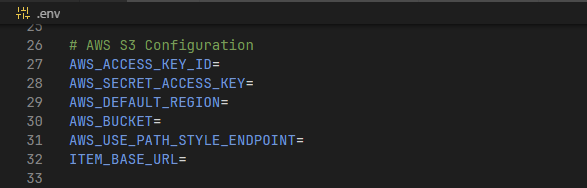
-
DigitalOcean
-
Follow This guide and create Digital Ocean Space Bucket and get API Keys and other credentials.
-
Once you collected all credentials, open .env file and paste those credentials. you will find something like below.
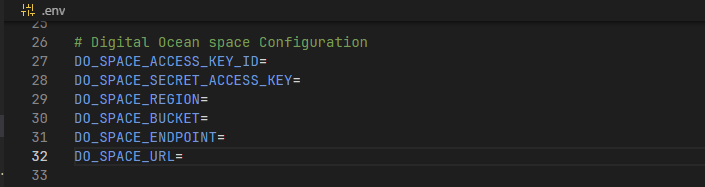
-
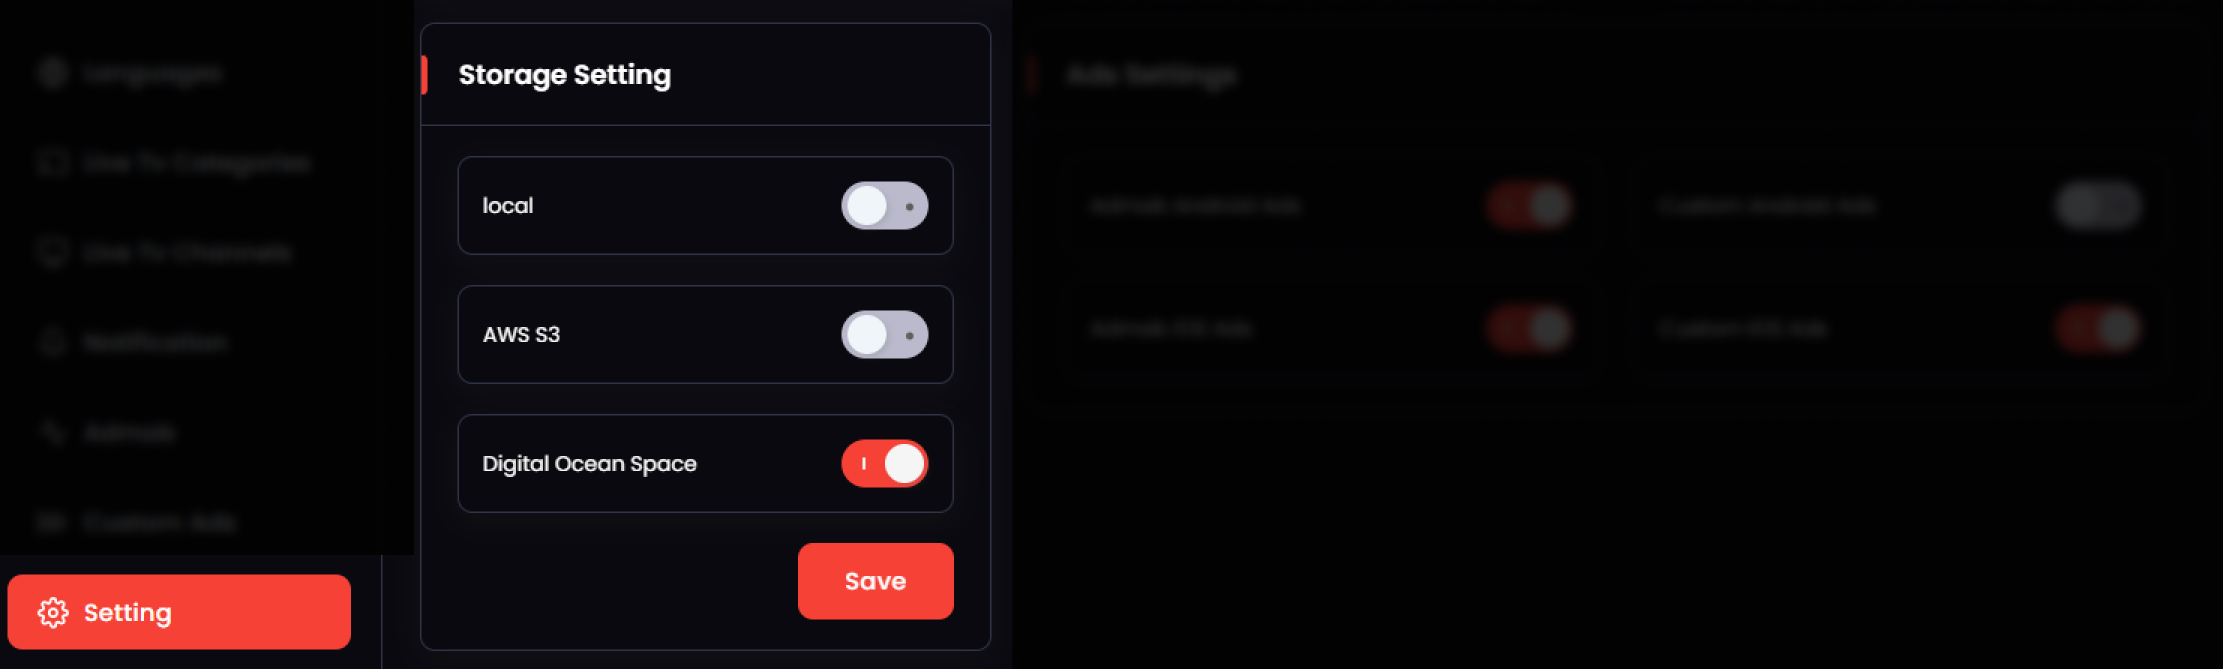
Once you have set the credentials for required storage providers, You can set the required one here on the settings page. Only one at a time works. (So yes, You have to set the credentials only for that which you want to use.)
-
Local storage doesn't require any credentials.
-
Storage will work fine only if you have set the credentials correctly and made required configurations on their dashboards.
import from TMDB (Optional)
-
Step 1 : Go to https://www.themoviedb.org/signup and create account
-
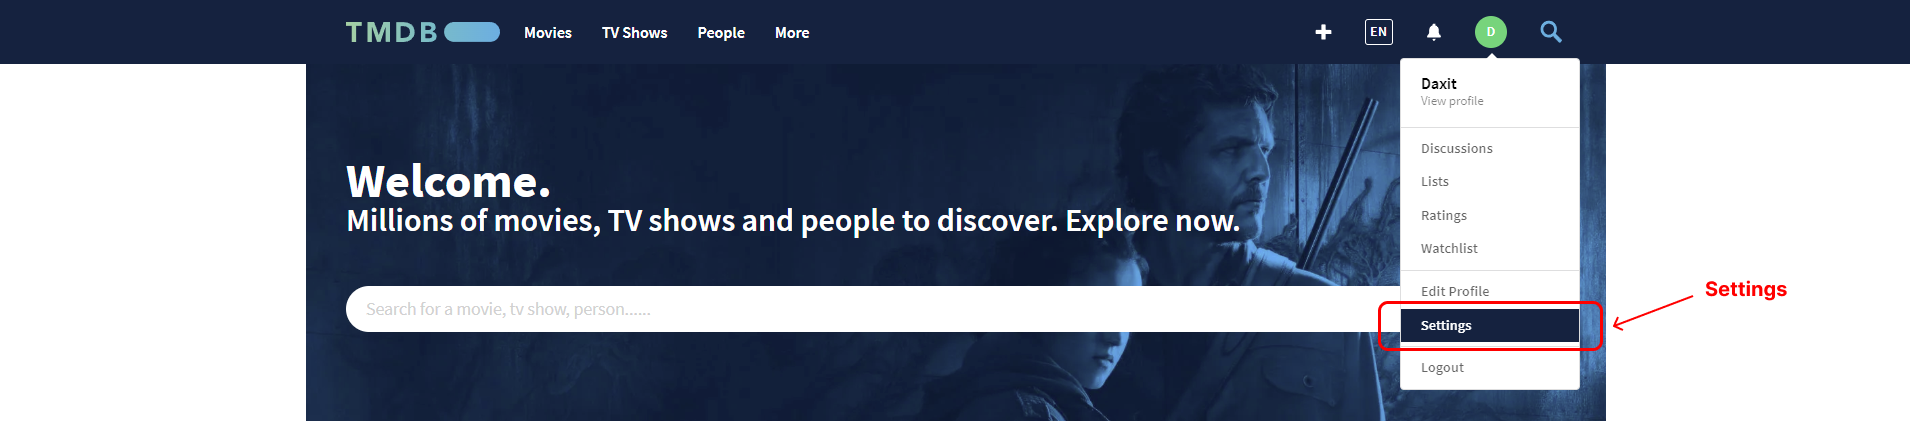
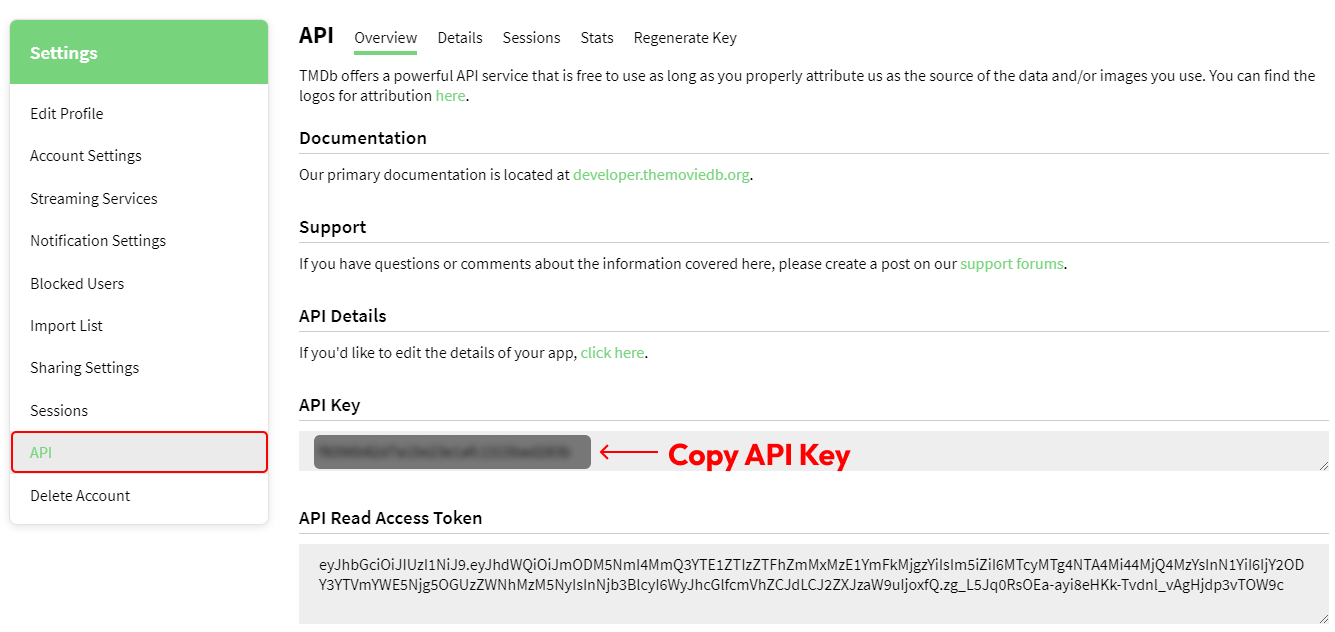
Step 2 : After login go to setting
-
There will be you find you API Key
-
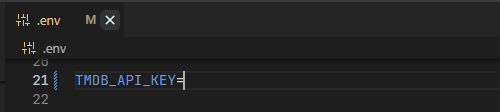
Now open you .env file and paste you API Key
-
Now you can access the TMDB Import function in your Admin panel
-
API_KEY (Optional)
-
Default API_KEY is "123"
-
To change API_KEY : In that folder, you can find .env file, open it with any text editor and change the API_KEY whatever you want.
-
You have to add the changed API_KEY in iOS project and Android project.

Host backend project on server
-
Create a zip of the flixy_backend folder
-
Upload that folder to your domain-targeted directory on your cPanel provided by your hosting provider. and extract the zip file.
-
Make sure that your targeted directory has the project files directly, and not wrapped in a folder
-
Cheers! Now try accessing your domain, the admin panel should be live there on your domain
Getting the credential
Now web setup is completed and let's collect some credentials for the app setup
-
Admin Panel URL : http://yourdomain.com/
-
Admin Panel User Name : admin
-
Admin Panel Password : admin123
-
Baseurl : http://yourdomain.com/api/
-
apiKey : 123
Now save these credentials somewhere and start following the documentation to setup application.
Want to talk with us?
- Telegram (Support Desk) : +91 7990425274
- Email : help.retrytech@gmail.com
- Whatsapp (No Support Here) : +91 7990425274