Introduction
The all in one AI assistant tool to answer any of your questions and generate art.
System Required
-
Gmail Account credentials for Firebase
-
Apple developer account credentials :- Create Account
-
Google developer account :- Create Account
-
Android Studio :- Download
-
Flutter Sdk :- Download
-
Revenuecat :- Create Account
-
OpenAI :- Create Account
-
Xcode (Only Mac Users).
Change package name
-
Android
-
Step 1 : Go to android > app
-
Step 2 : Click to build.gradle
-
Step 3 : Here, change the only applicationId And it's done.

-
iOS
-
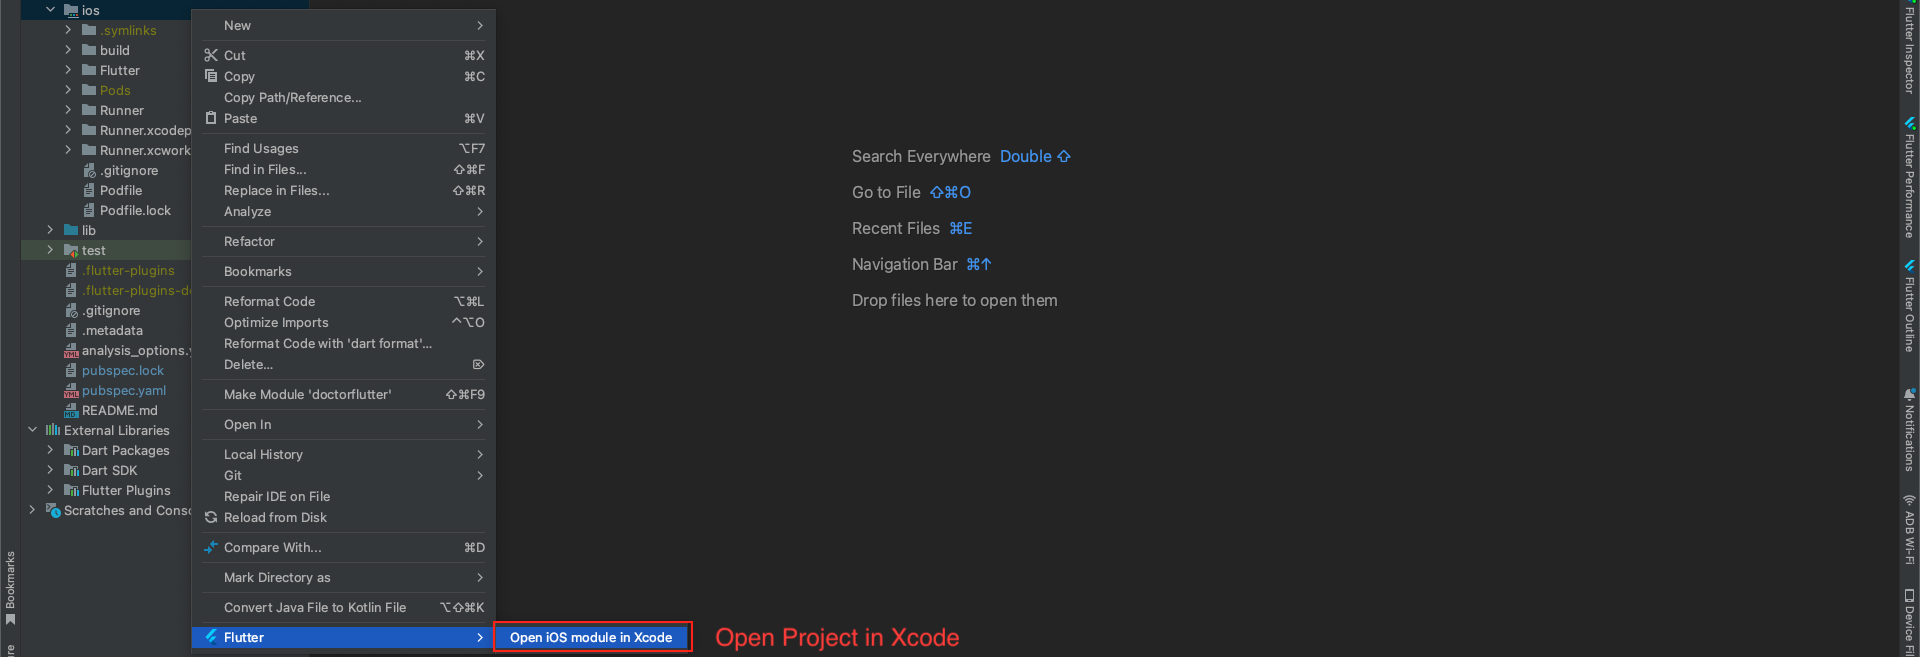
Step 1 : Now right click on iOS directory, flutter > Open iOS module in Xcode
-
Step 2 : Go to runner > Signing & Capabilities
-
Step 3 : Change your bundle identifier as you want, and it's done.
Once the project gets opened in Xcode successfully, follow the steps below.

Change app name
-
Android
-
Step 1 : Go to android > app > src > main > AndroidManifest.xml and make changes shown in the below image.

-
iOS
-
Step 1 : Now right click on iOS directory flutter > Open iOS module in Xcode
-
Step 2 : Now go to Runner > General > Display Name, change it as you want.

Change app color
-
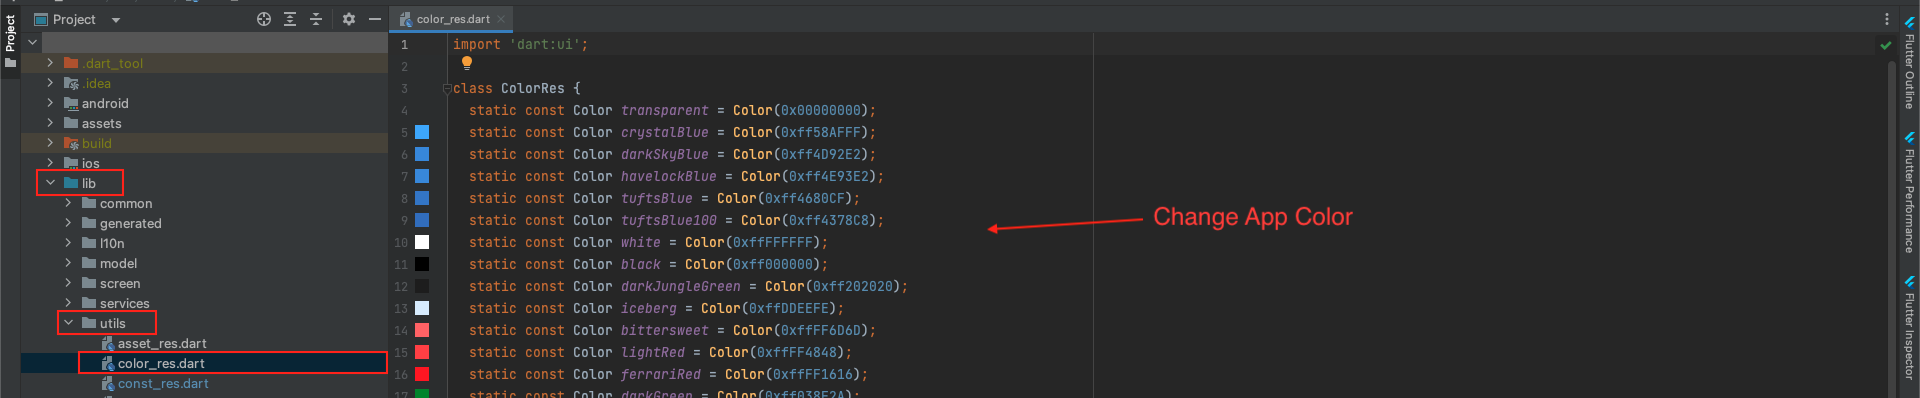
Step 1 : Now go to your project lib > utils > color_res.dart as shown in the below image.
Change app font family
-
Step 1 : Select any font from google font
-
Visit the https://fonts.google.com/
-
Search for your font.
-
Once you find it, click to open.
-
Click on the Download Family button on the top right side of your screen.
-
Extract the compressed file.
-
Step 2 : Import the Font into Project
-
Copy-Paste [font].ttf file into the fonts folder.
-
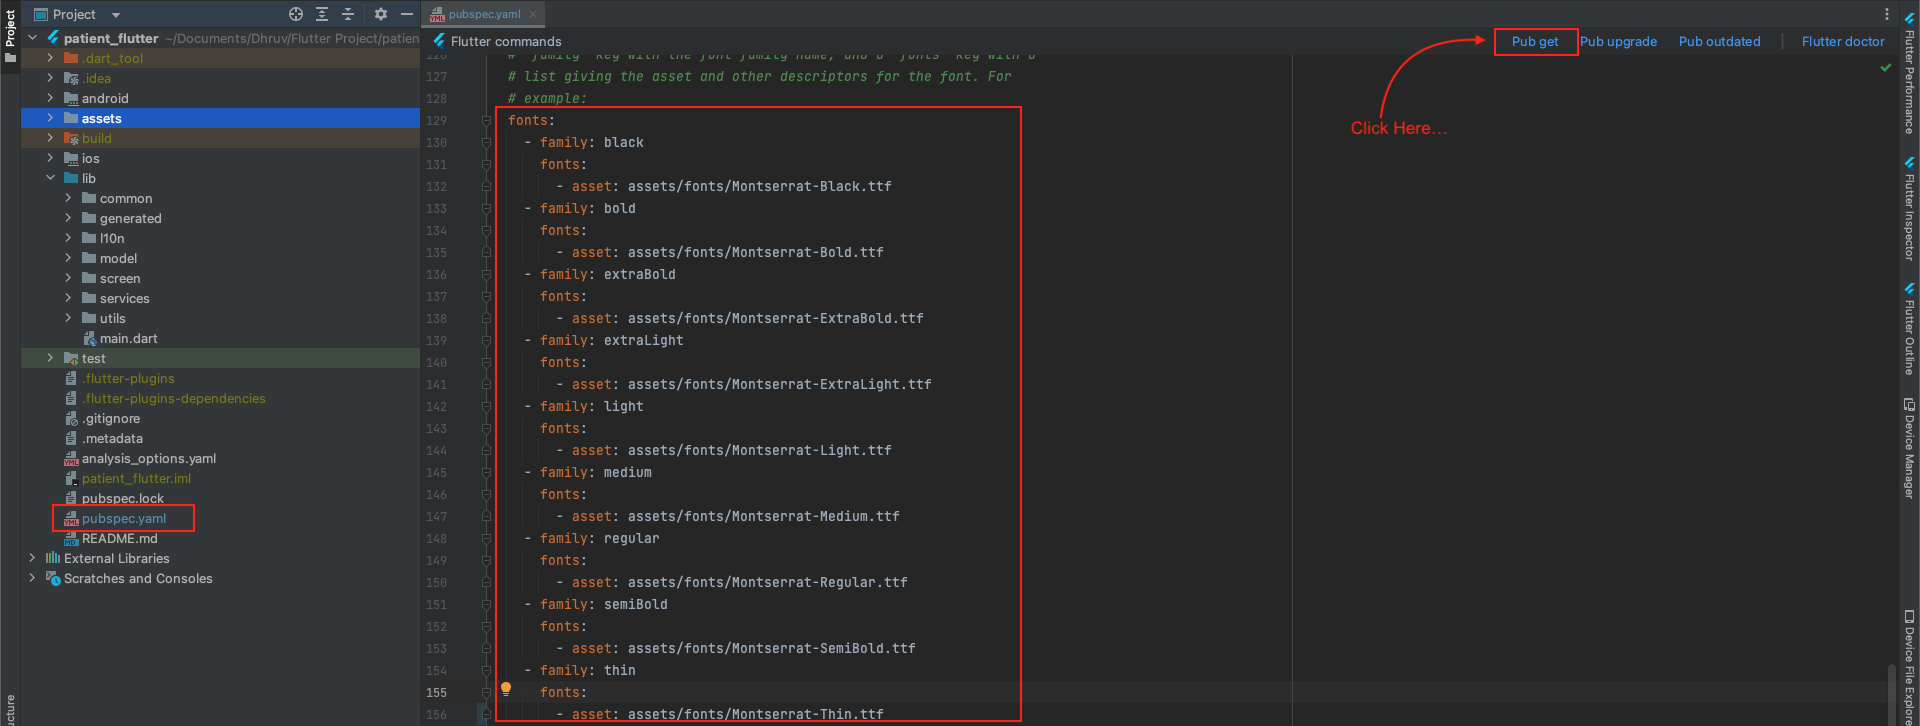
Step 3 : Add Font to Pubspec.yaml
-
Replace the family name with your font family. To get the family name, simply take the first part before the dash sign (-). For example, if the downloaded font name is Montserrat-Regular , take the Montserrat as your family name
-
Go to pubspec.yaml file:
-
Replace the asset path with the path where your font is residing.
-
Then pub get to successfully load your font
Here’s how you download the font:

To import the Font in your project:

To add Font to pubspec.yaml file:
Change app icon
-
Step 1 : Generating Different Sized Icons
-
Step 2 : Adding Icons in Android.
-
Step 3 : Adding Icons in IOS
-
Step 4 : Run the Application
Go to https://www.appicon.co/ and upload the icon image and tick the iPhone and Android options and click on Generate. This site generates different sized Icons for both android and IOS at the same time.
It will Download the Zip file named AppIcons with the android and Assets.xcassets named folders along with images for appstore and playstore which can be directly uploaded as an icon in both the stores
Now, open your Project in Android Studio.
Navigate to android/app/src/main/res and right-click on res folder and click "open in Finder". Now delete all the mipmap folders in res folder and paste the mipmap folders from AppIcon/android folder which you have downloaded.
Now navigate to the ios/Runner/Assets.xcassets. Now after you are in Runner folder, right-click on Runner folder and click “open in Finder”. Now delete the Assets.xcassets folder and paste the Assets.xcassets folder from AppIcon/Assets.xcassets which you have downloaded.
After manually changing the images in android and IOS folders now go to lib/main.dart and run the flutter project using the below command in the flutter console.
flutter run
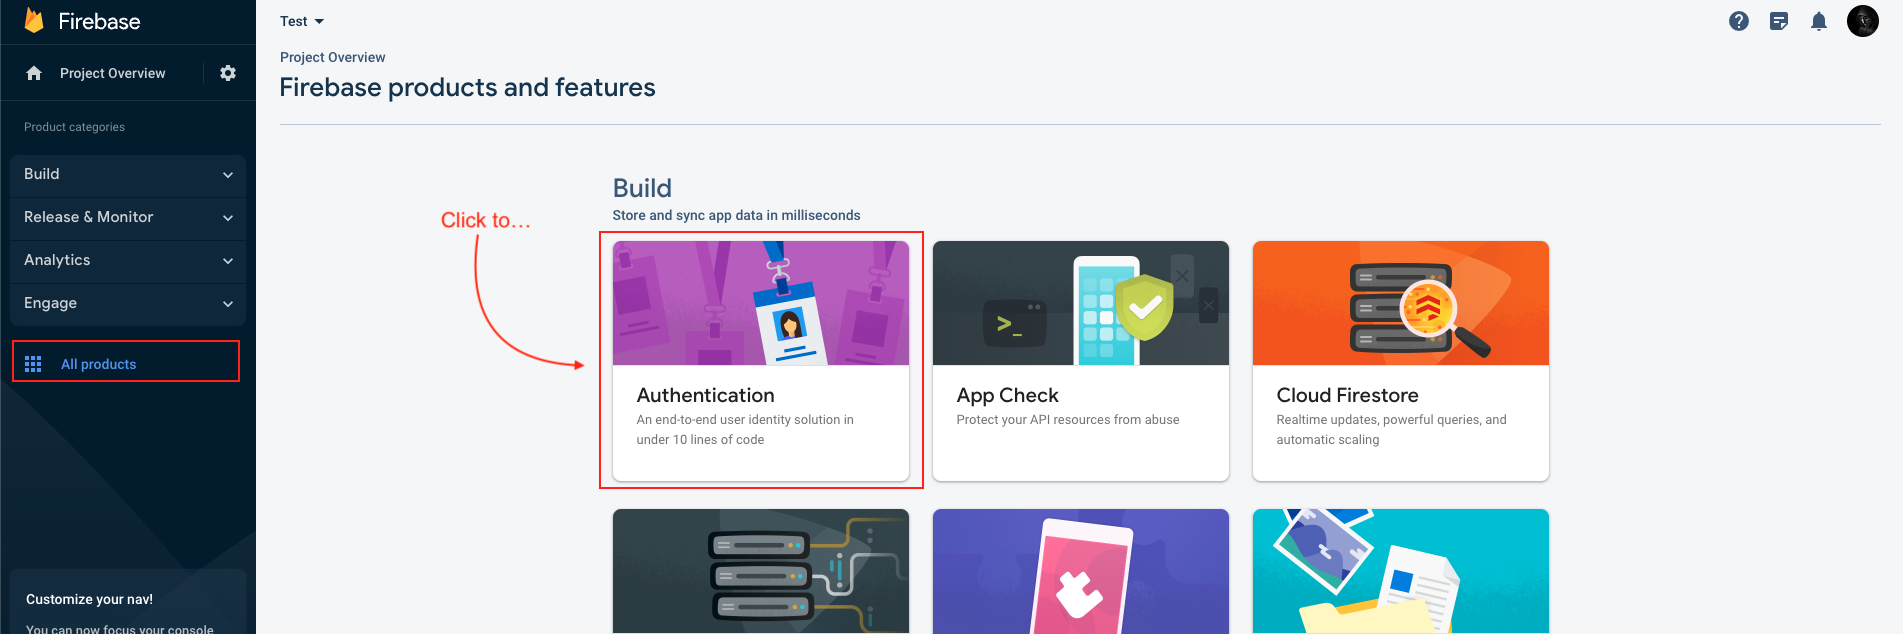
Configure Firebase
-
Go to the firebase project you might created while following backend documentation.
-
If you don't have, follow the steps below and create one project.
-
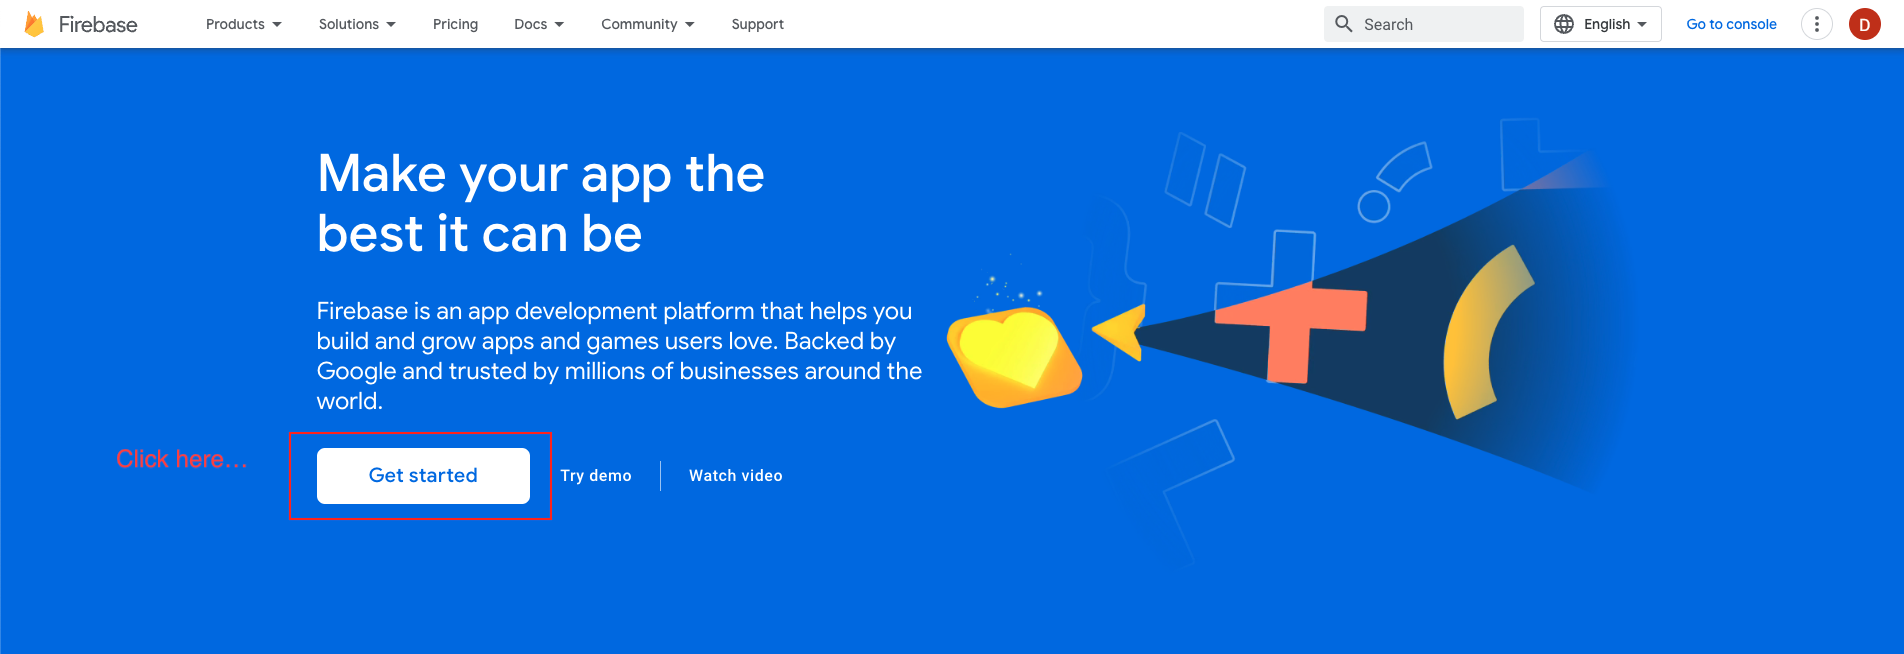
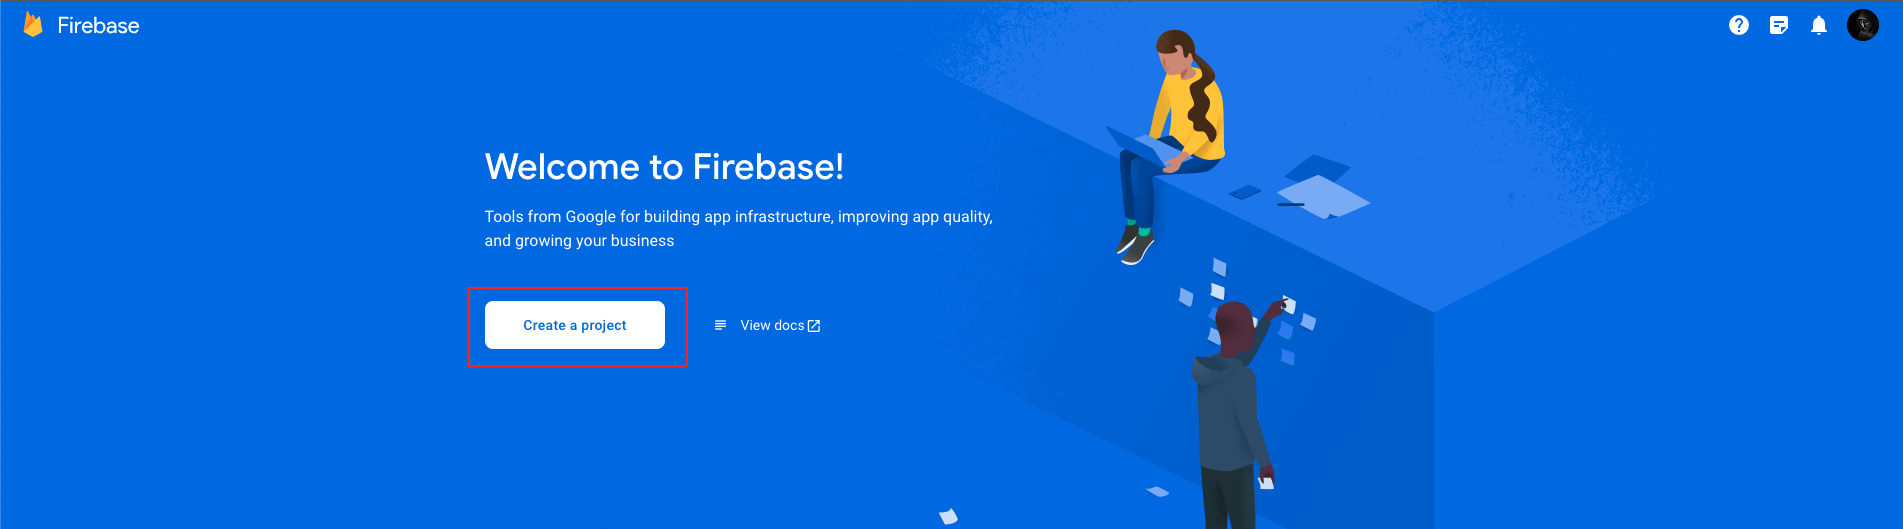
At first, follow this link https://firebase.google.com/
-
Now, we first have to create a Firebase project. Firebase project will go through and describe what it is. This allows us to add an app to that project. It can have many projects inside of Firebase.
-
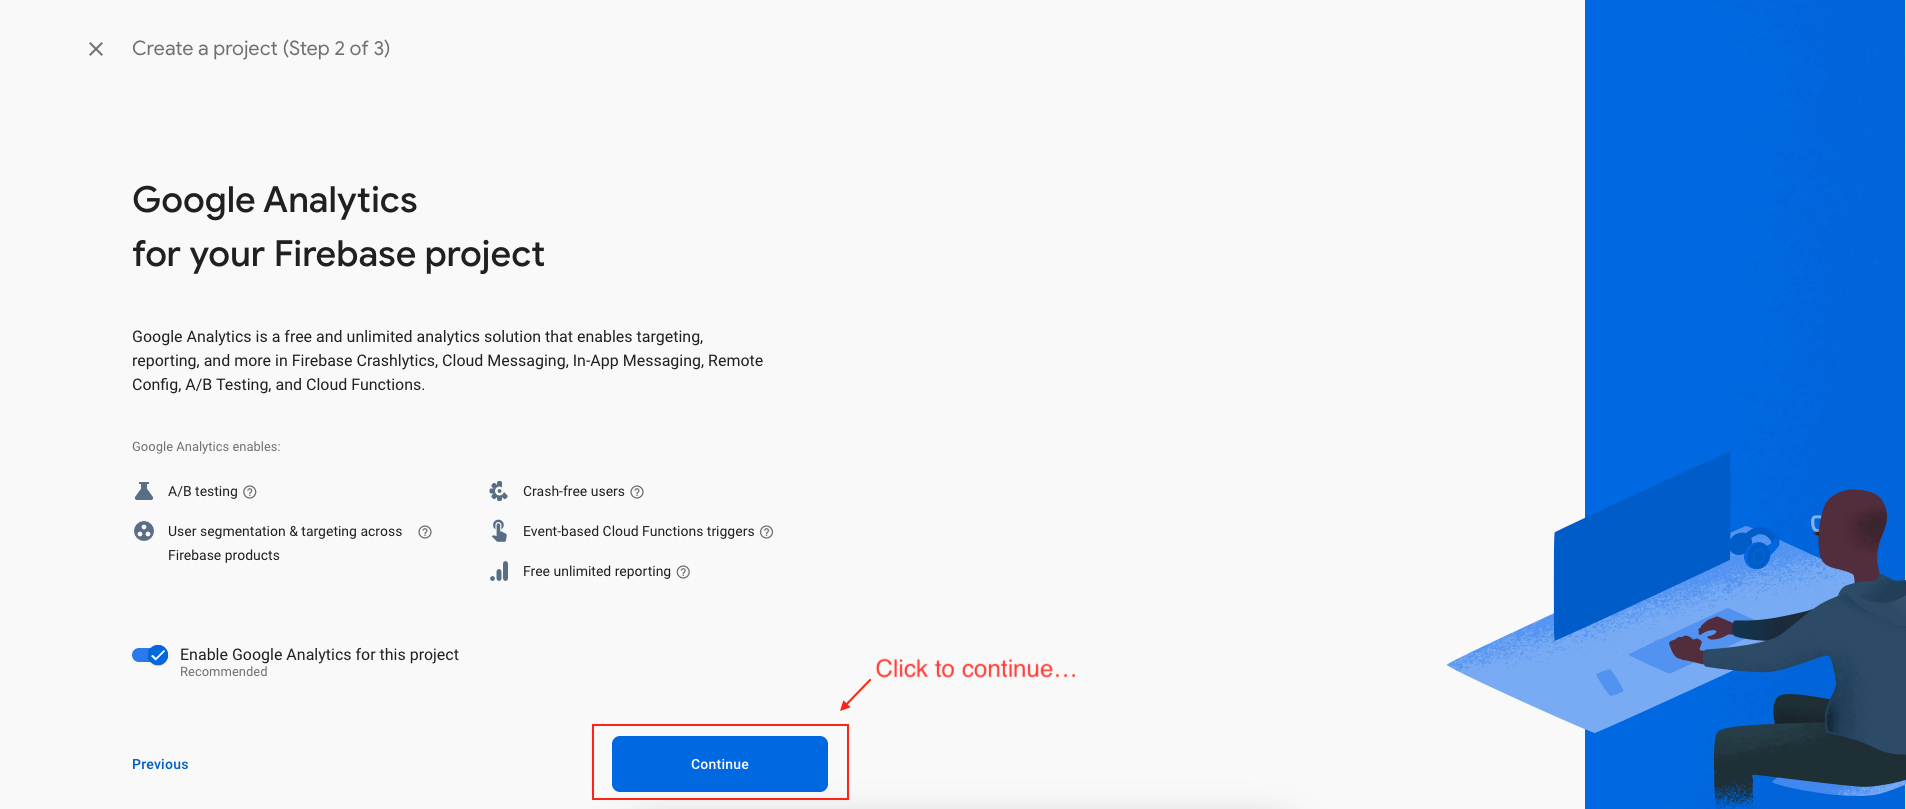
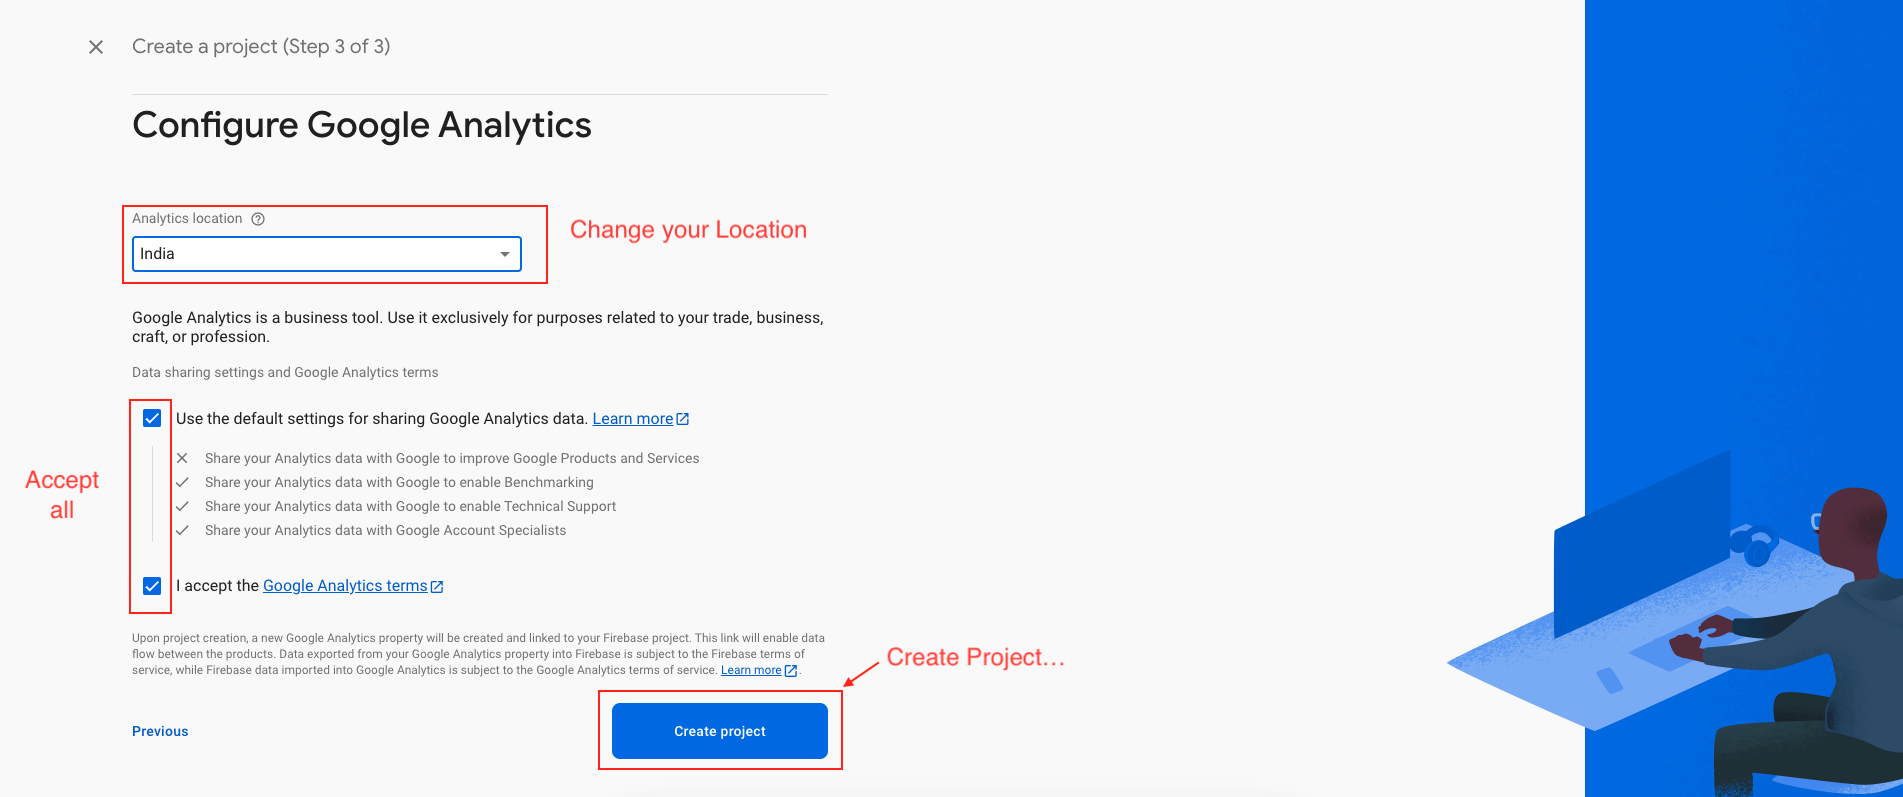
Now, we have to give a name and id to the project, enable Google Analytics for the project, set an analytics location, and accept all the terms and conditions. Firebase console automatically creates a unique id for the project.
-
Step 1 : Giving a name to the project
-
Step 2 : Enable Google analytics for the project
-
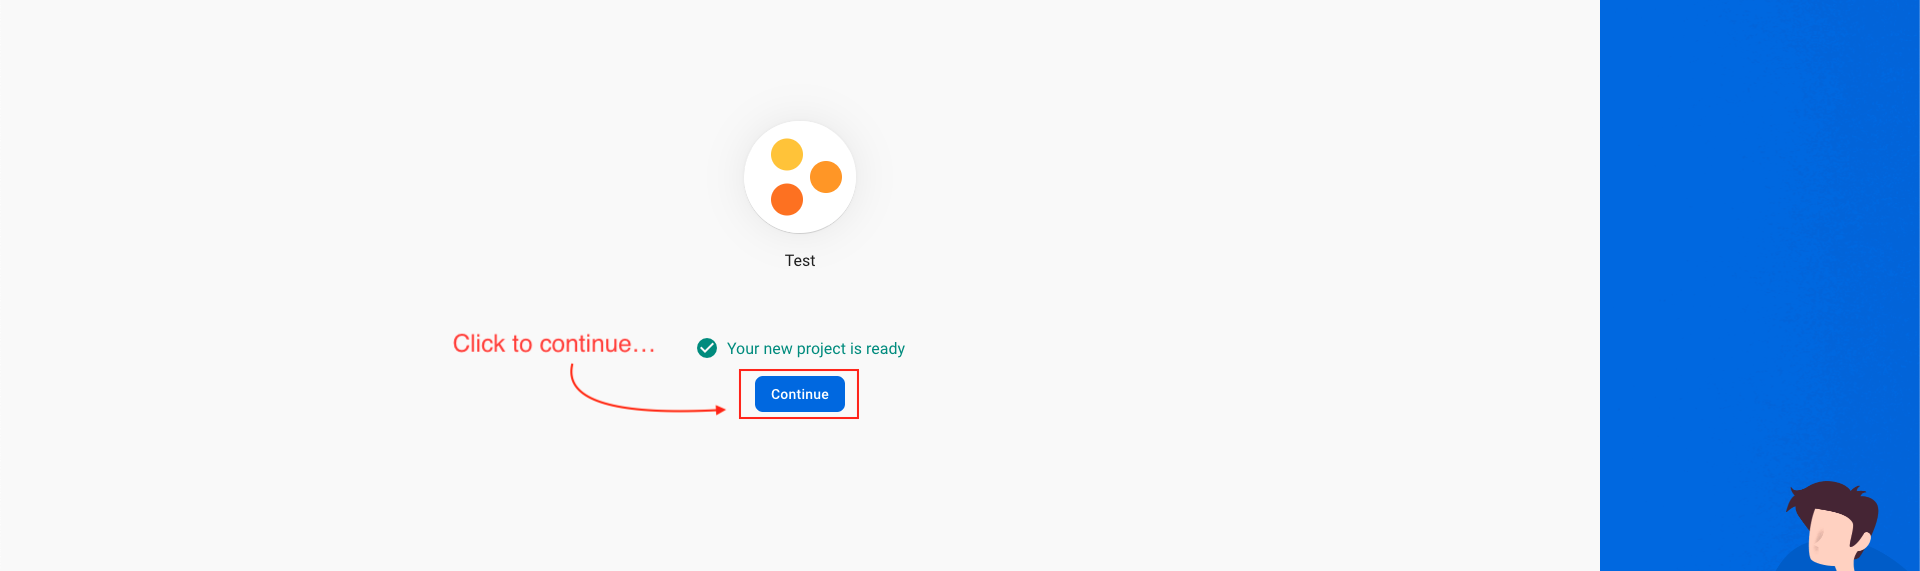
Step 3 : First Choose default Firebase account and then create project

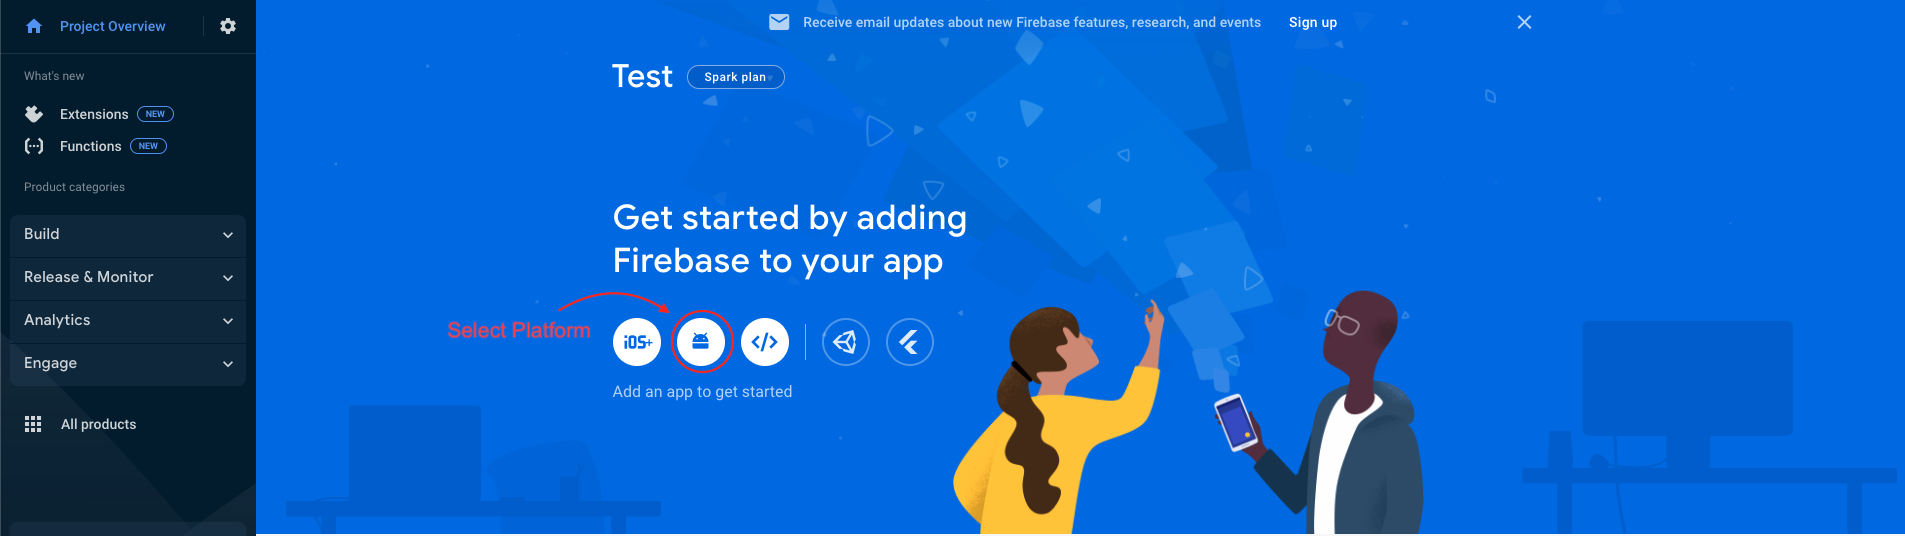
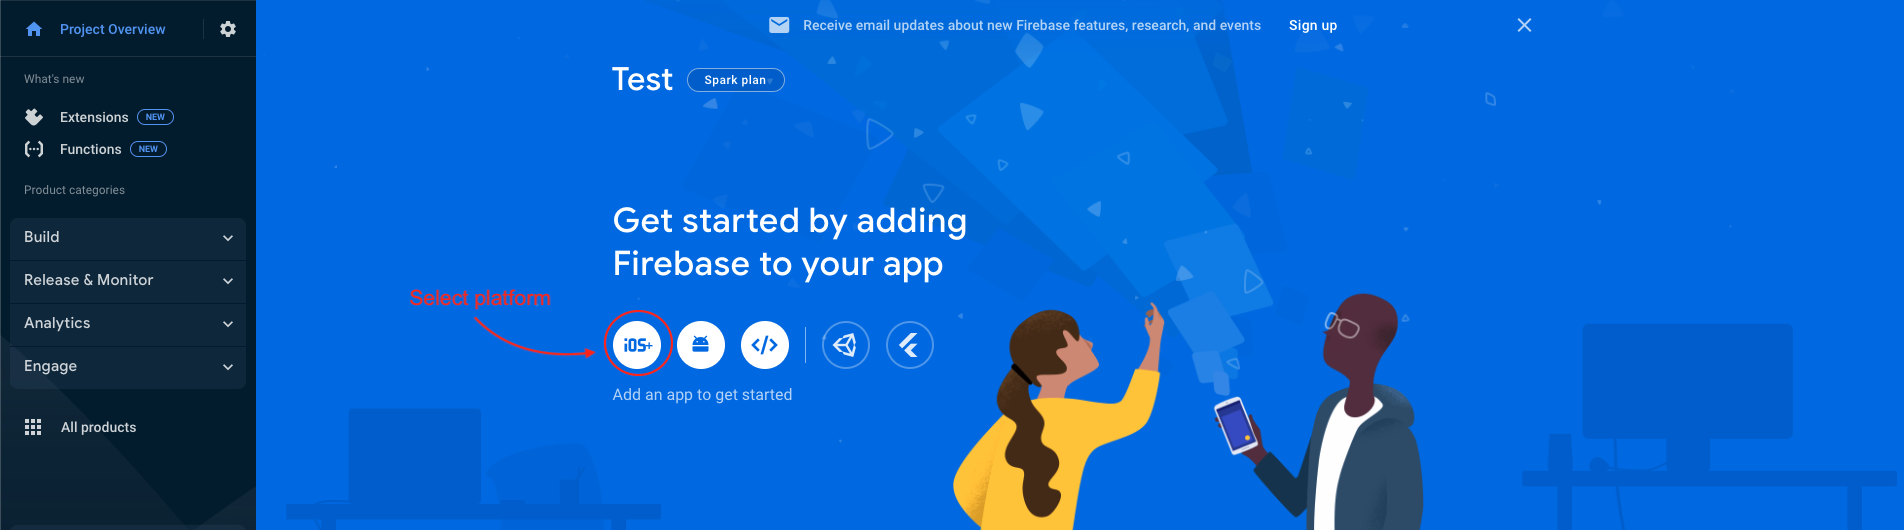
Add Android app to Firebase
-
In the next step, we have to choose the platform to add Firebase to our application. The platform can be Android, iOS, Web etc..
-
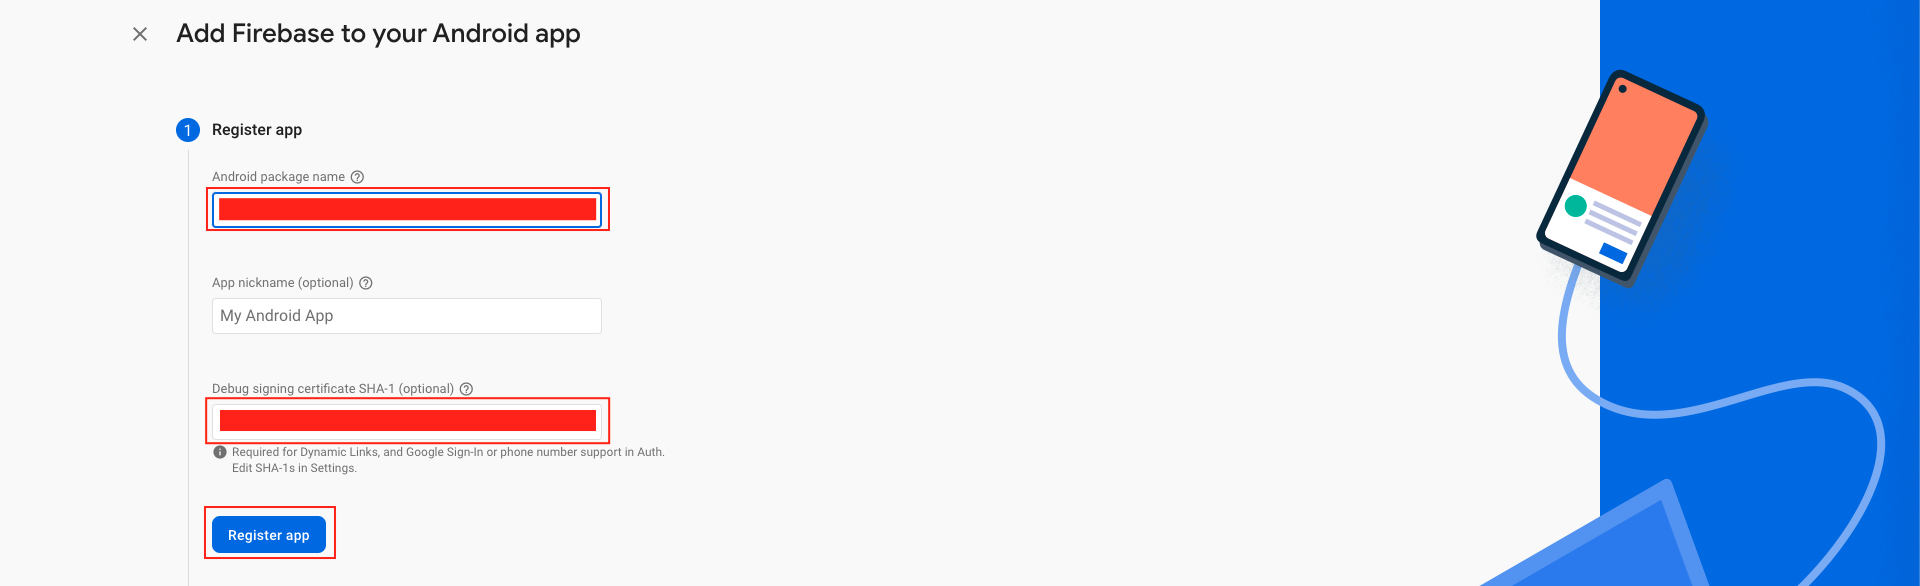
Your package name is generally the applicationId in your build.gradle (app-level) file
-
See this page for information on using keytool to get the SHA-1 hash of your signing certificate
-
Add your applicationid in the first field and SHA-1 to the third field as shown in the image below.
-
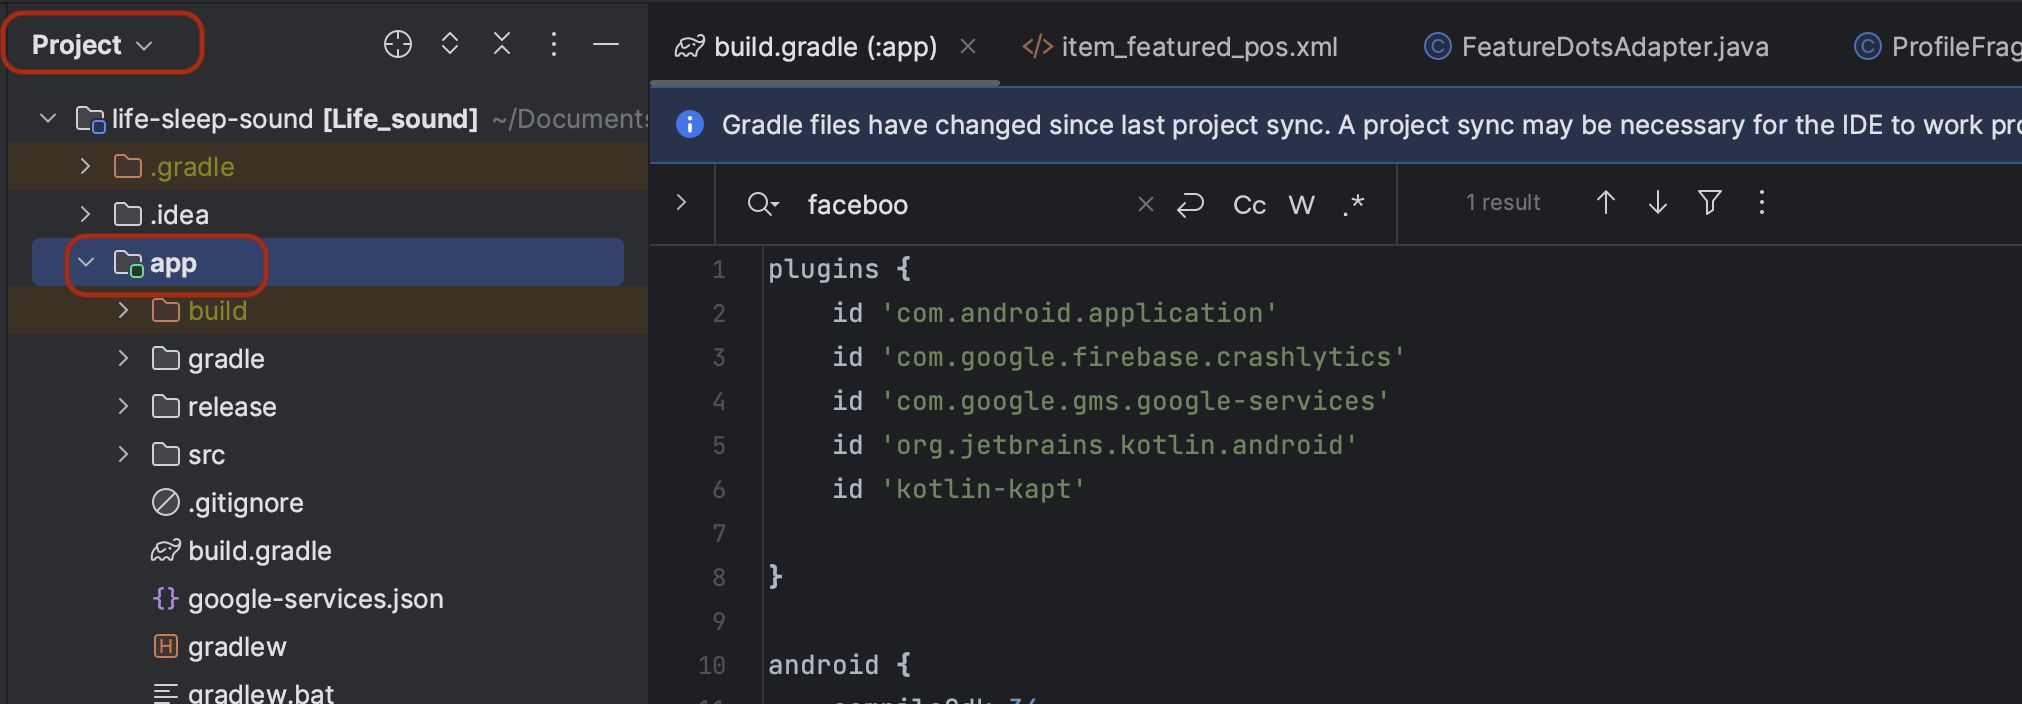
Download the google-services.json file & place it in your project's app root directory.
-
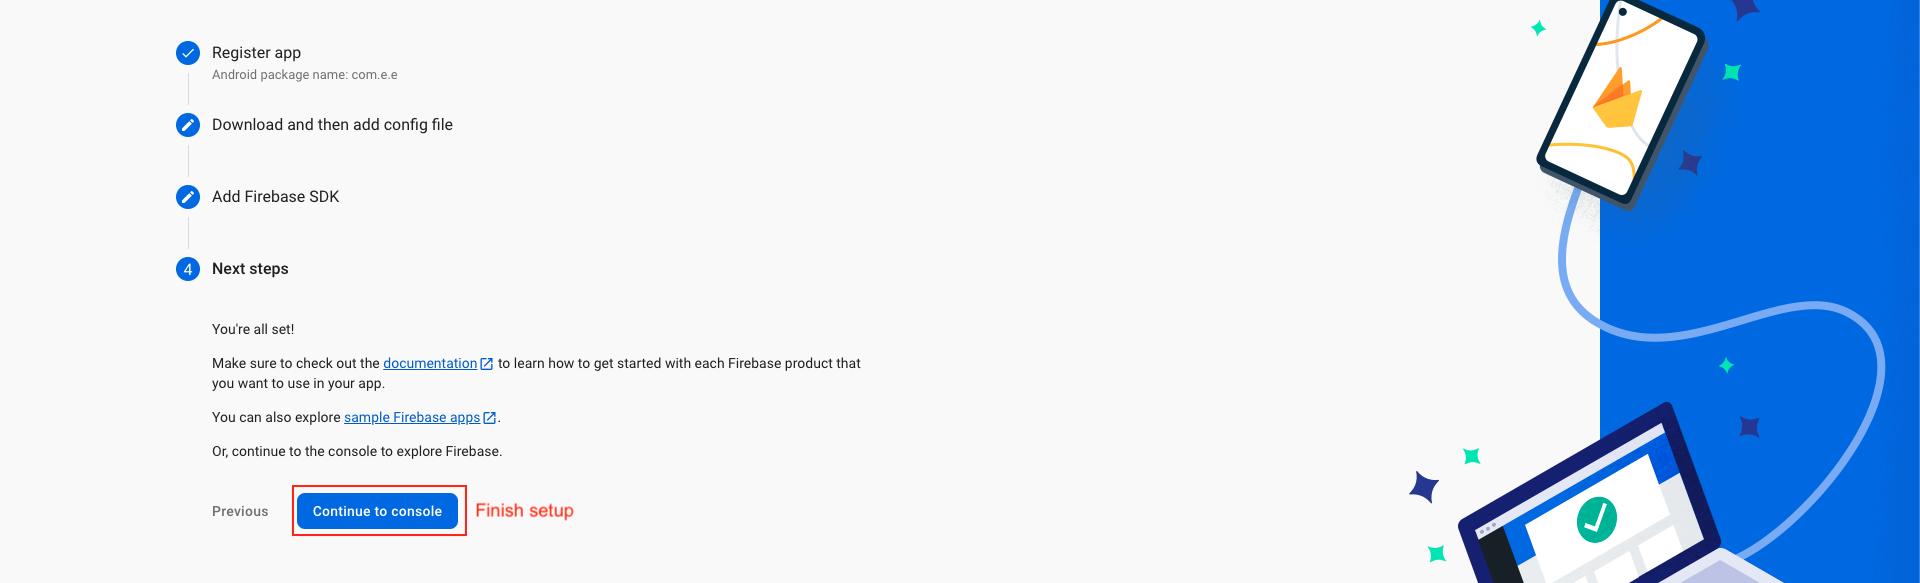
Back in the Firebase console-setup workflow, click Next to skip the remaining steps and then finish and complete

Add iOS app in Firebase
-
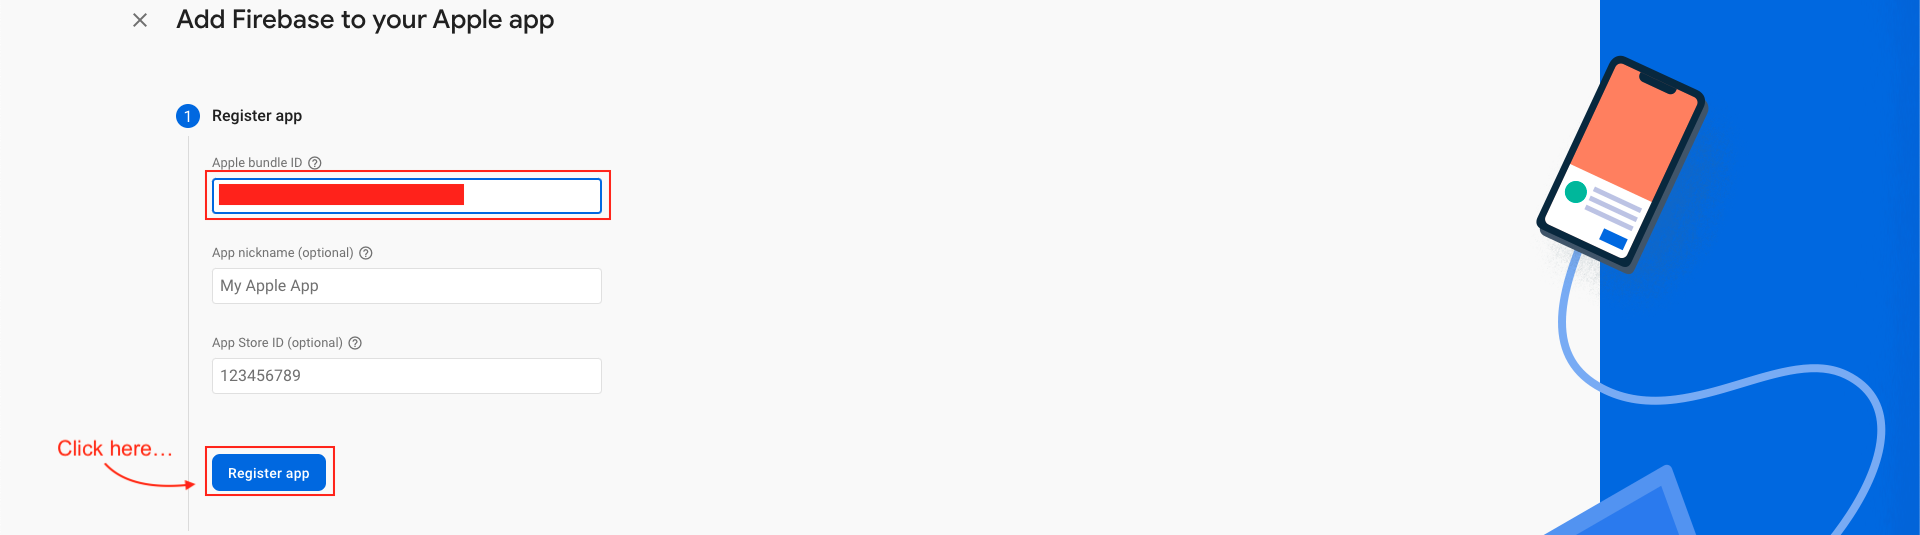
We have to choose the platform to add Firebase to our application. Click on iOS.
-
On the next screen, enter your iOS bundle ID & App nickname and click on Register App. You can find your bundle ID in the General tab for your app's primary target in Xcode. If specified, the app nickname will be used throughout the Firebase console to represent this app. Nicknames aren't visible to users.
-
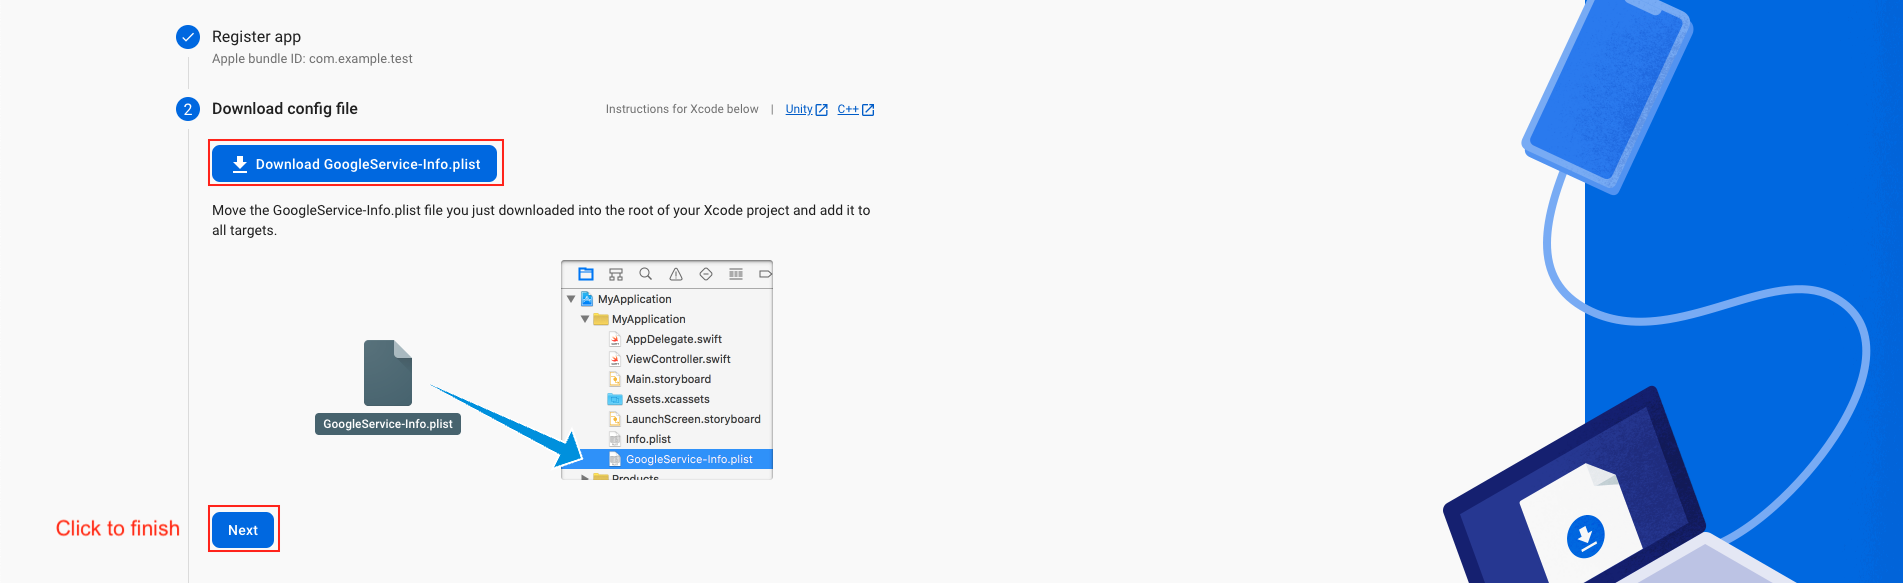
Download the GoogleService-Info.plist file & move the GoogleService-Info.plist file you just downloaded into the root of your Xcode project and add it to all targets. Make sure the config file is not appended with additional characters, like (2).
-
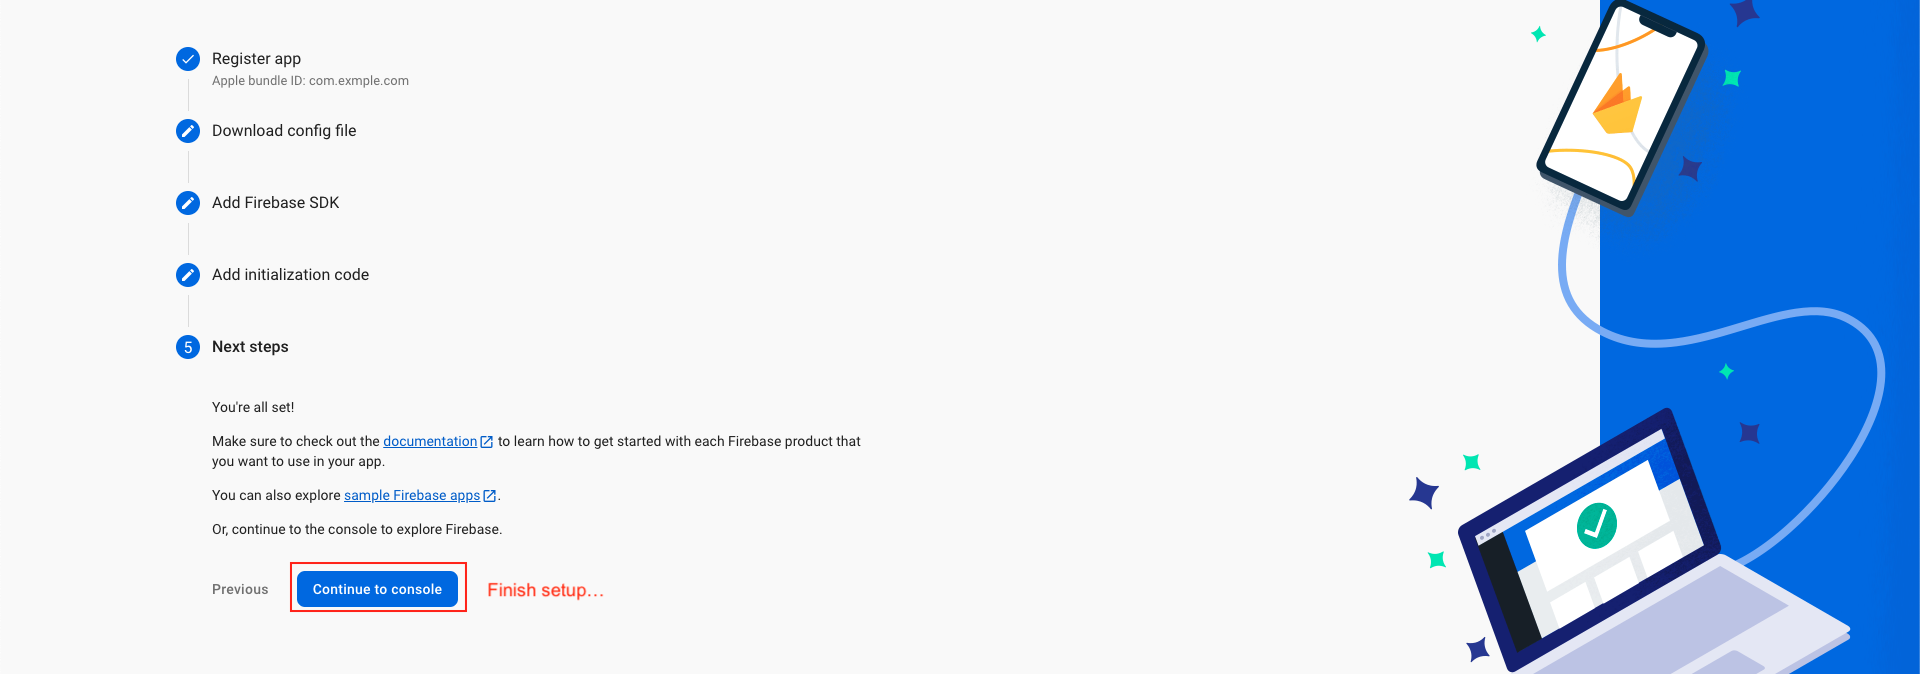
Back in the Firebase console-setup workflow, click Next to skip the remaining steps and the finish.
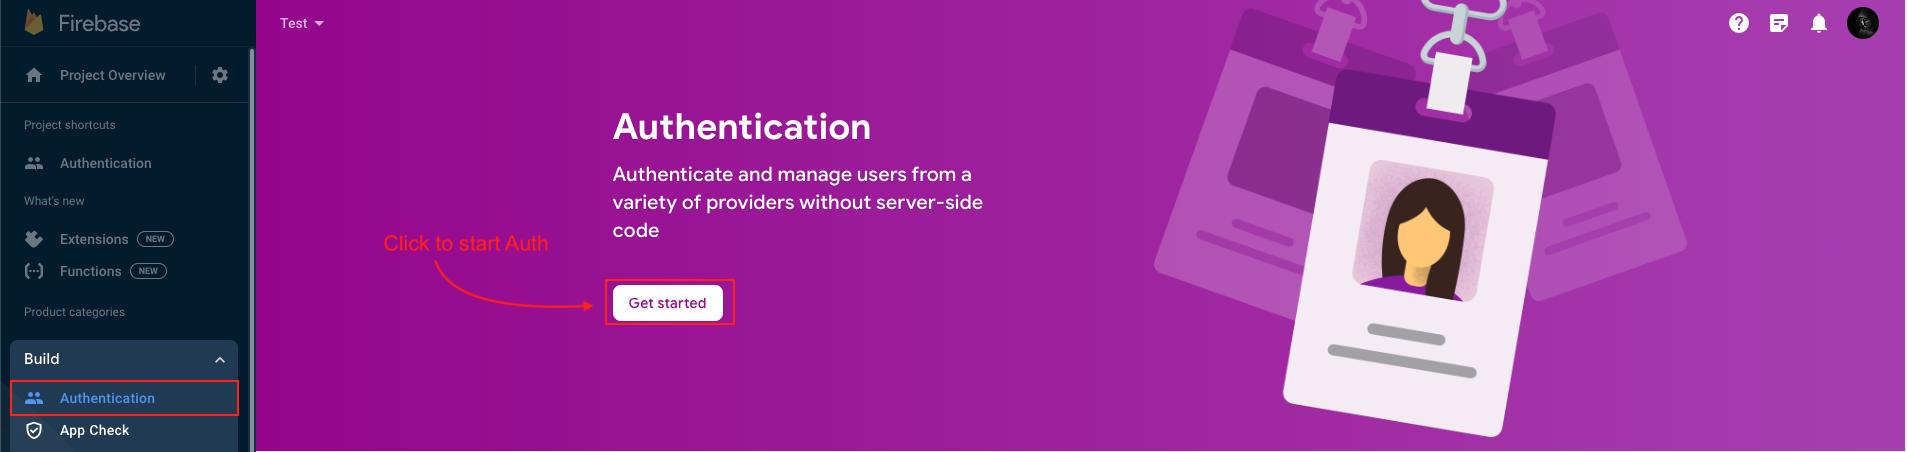
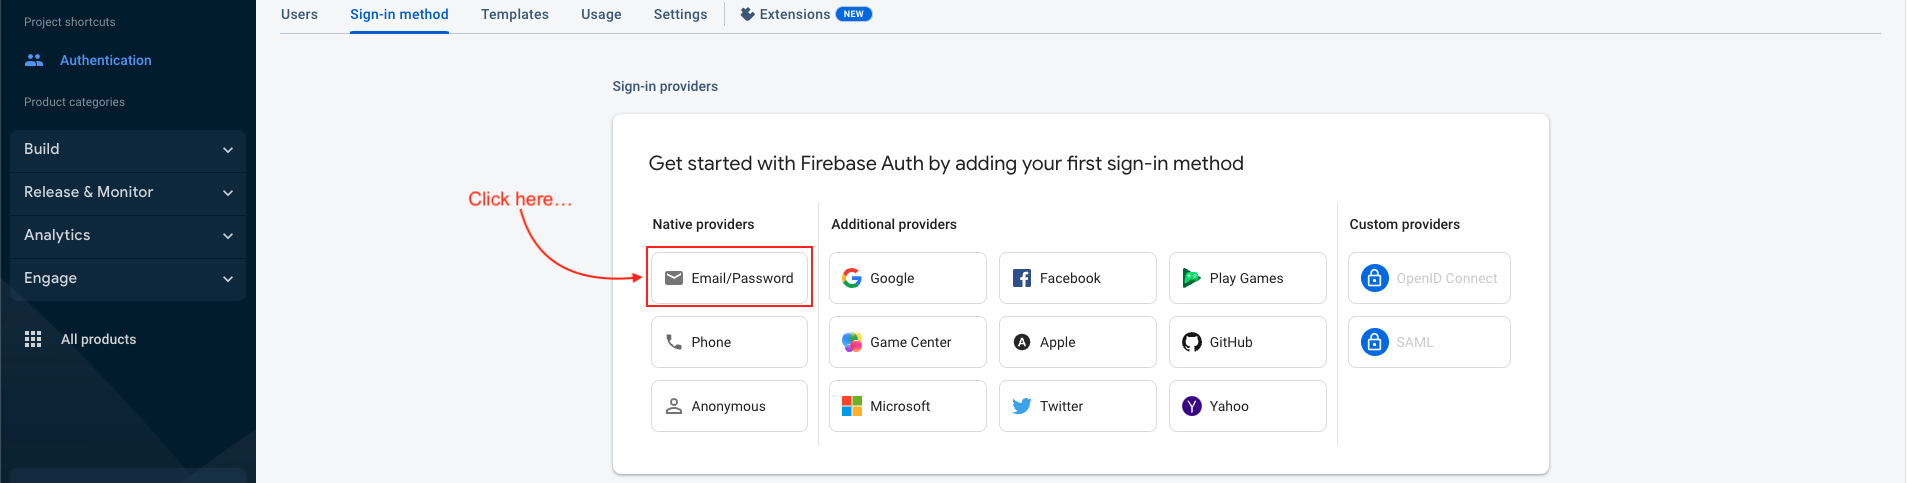
Email sign in
-
Click to Authentication and sign in mathod tab
-
Then click on email/password provider
-
Then both button switch to enable and save
-
Your email and password successfully Enable


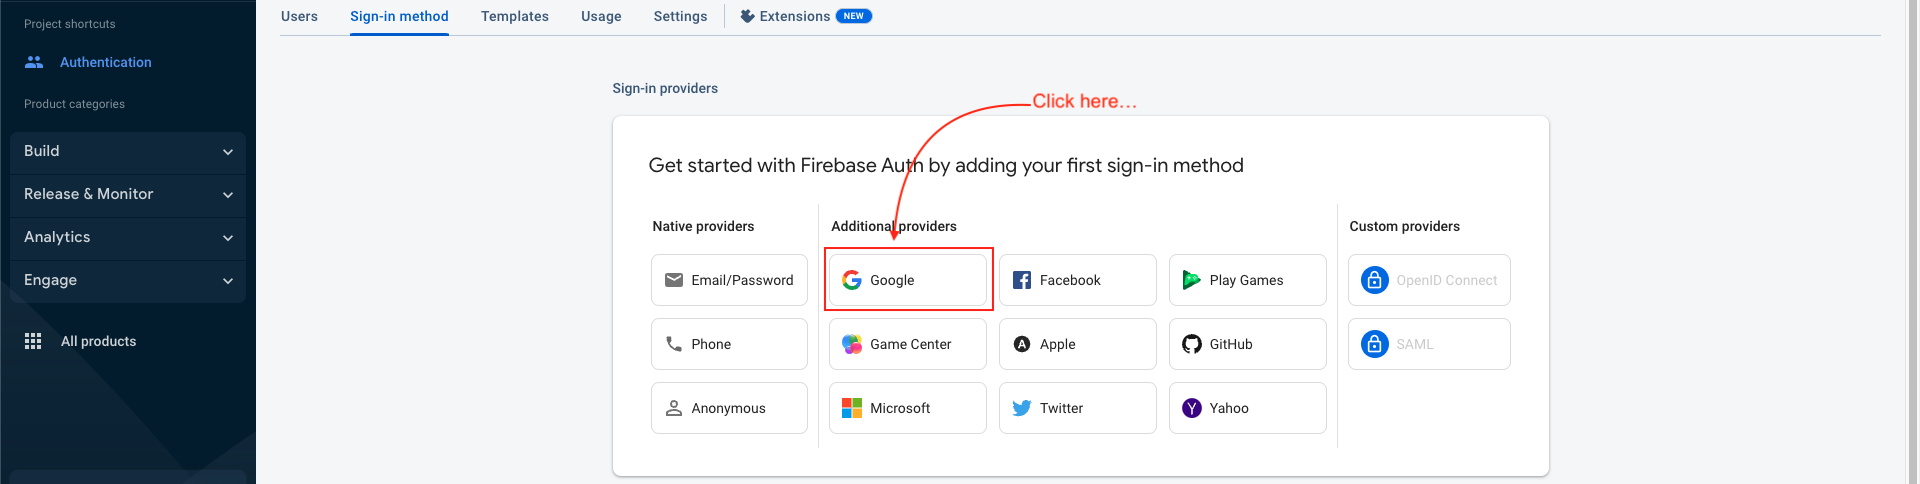
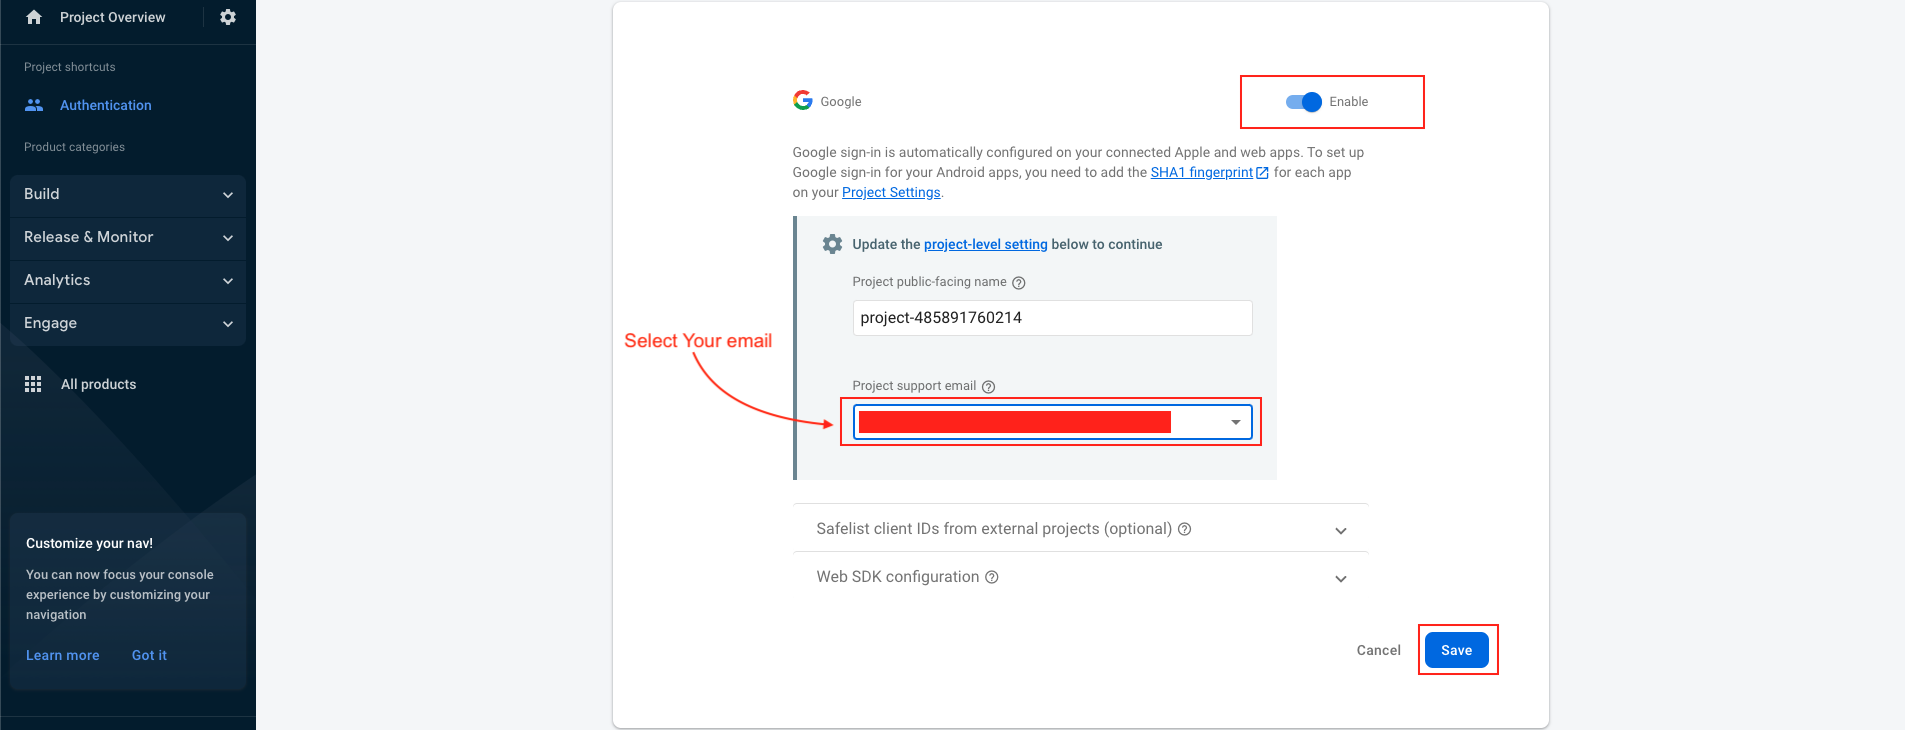
Google sign in
-
Click to Authentication and sign in mathod tab
-
Click to Enable
-
Select your support email and save
-
Successfully Enable google sign in method
-
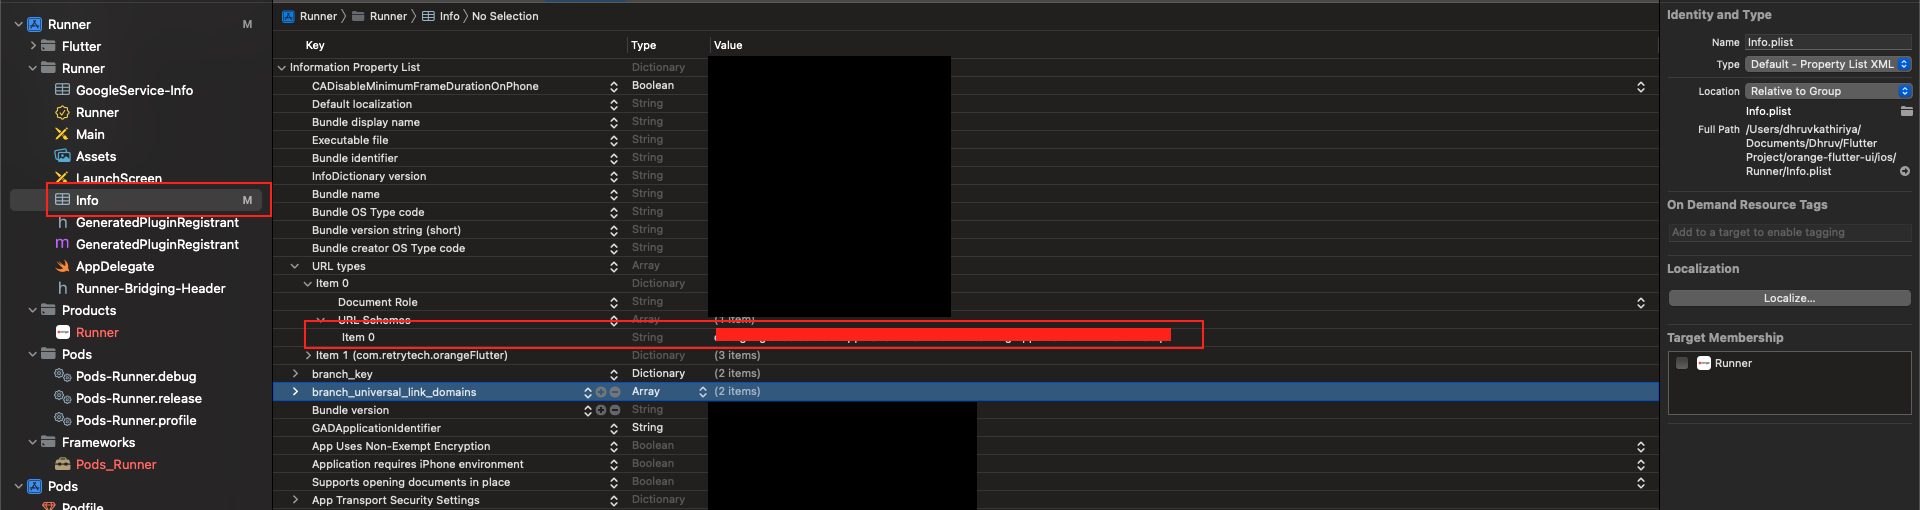
Set Google ‘REVERSED_CLIENT_ID’
-
Open GoogleService-Info.plist file and find ‘REVERSED_CLIENT_ID’ and Copy it.
-
And paste it in project > target > info > URL Types

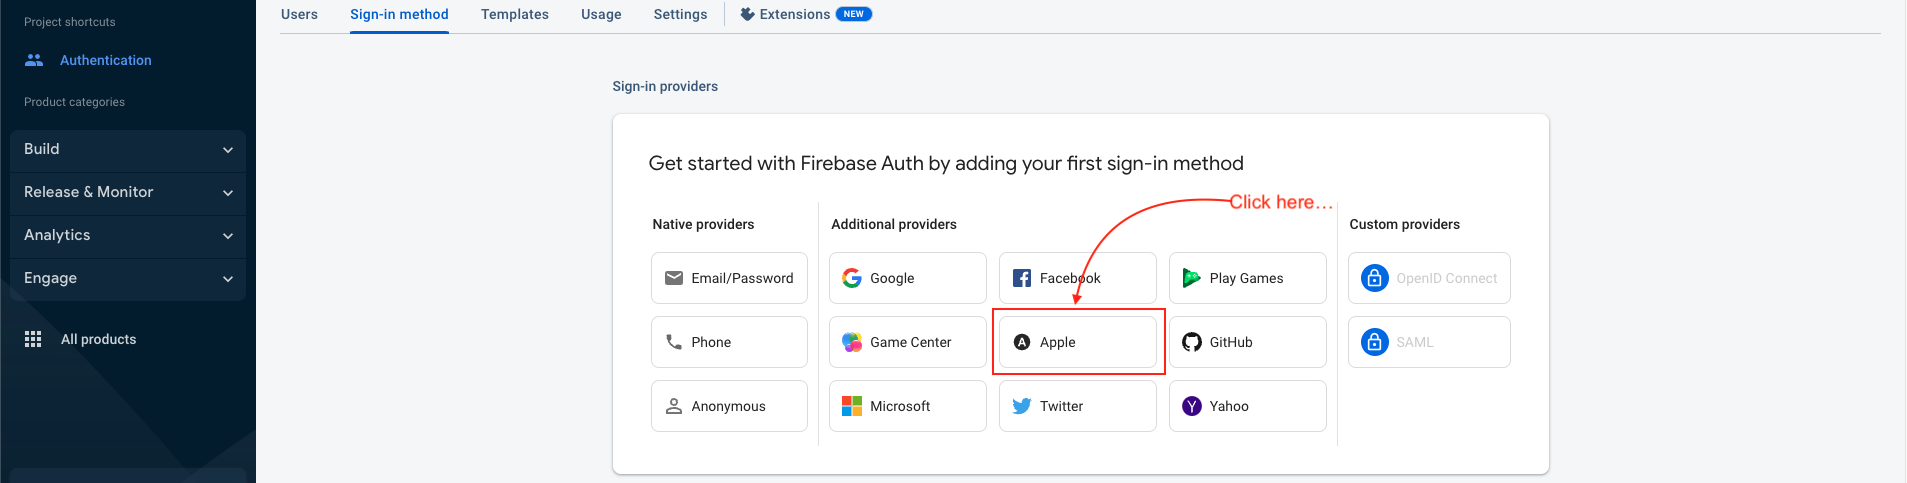
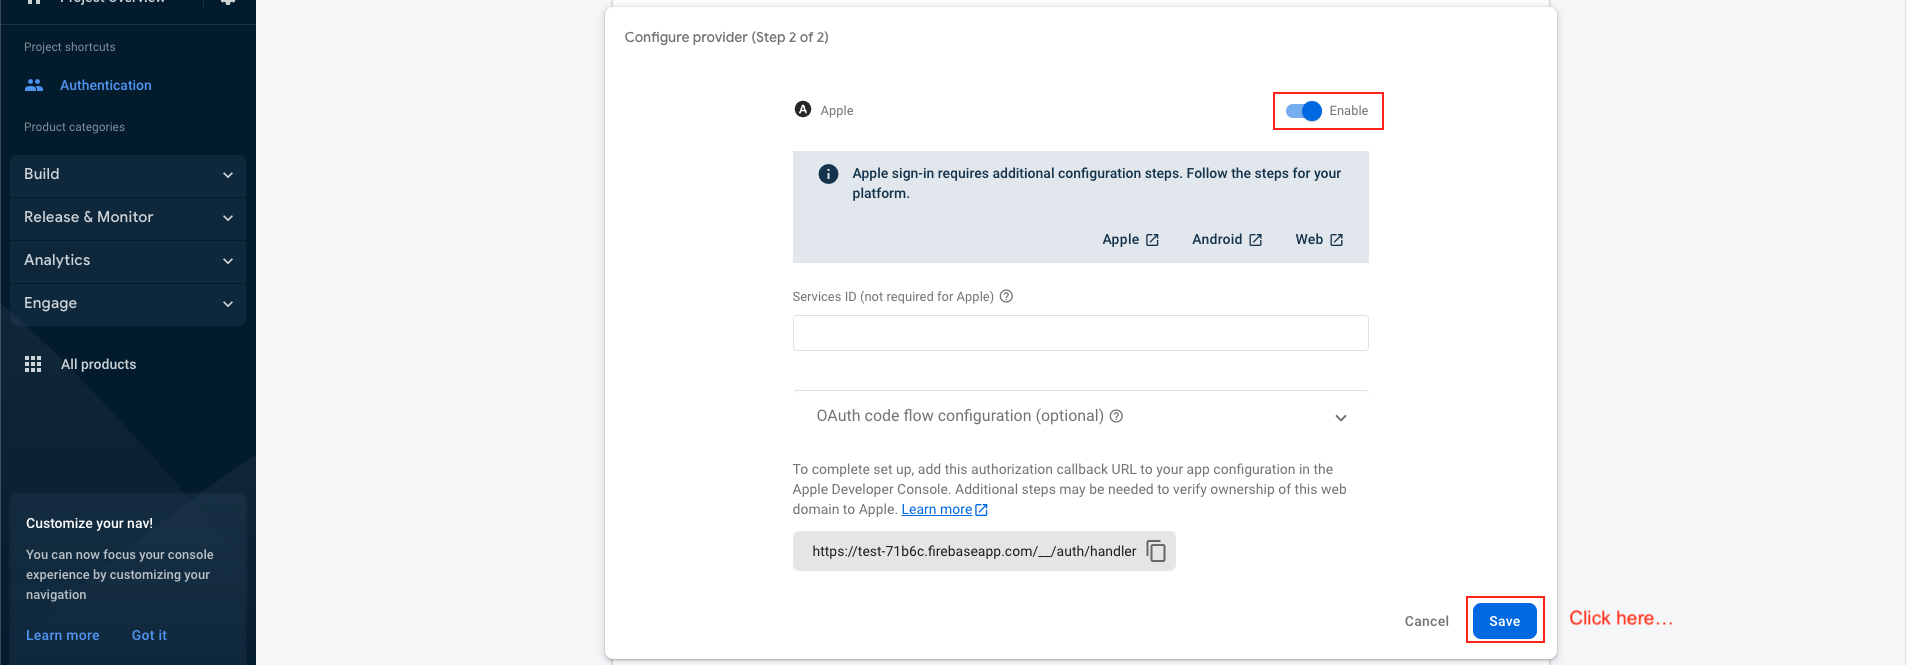
Apple sign in
-
Click to Authentication and sign in mathod tab
-
Then click to apple provider
-
Click to Enable and save it
-
your apple provider Successfully Enable

Revenuecat
-
Setup subscriptions
-
You need to define subscriptions on Google Play Console (For Android) and Apple App Store Connect (For iOS) before connecting with RevenueCat.
-
Play Store subscription setup
-
For configuring subscriptions on Google Play Console, follow the steps below:
-
Go to Google Play Console . Log in with your developer account.
-
Select the app in which you want to add subscriptions.
-
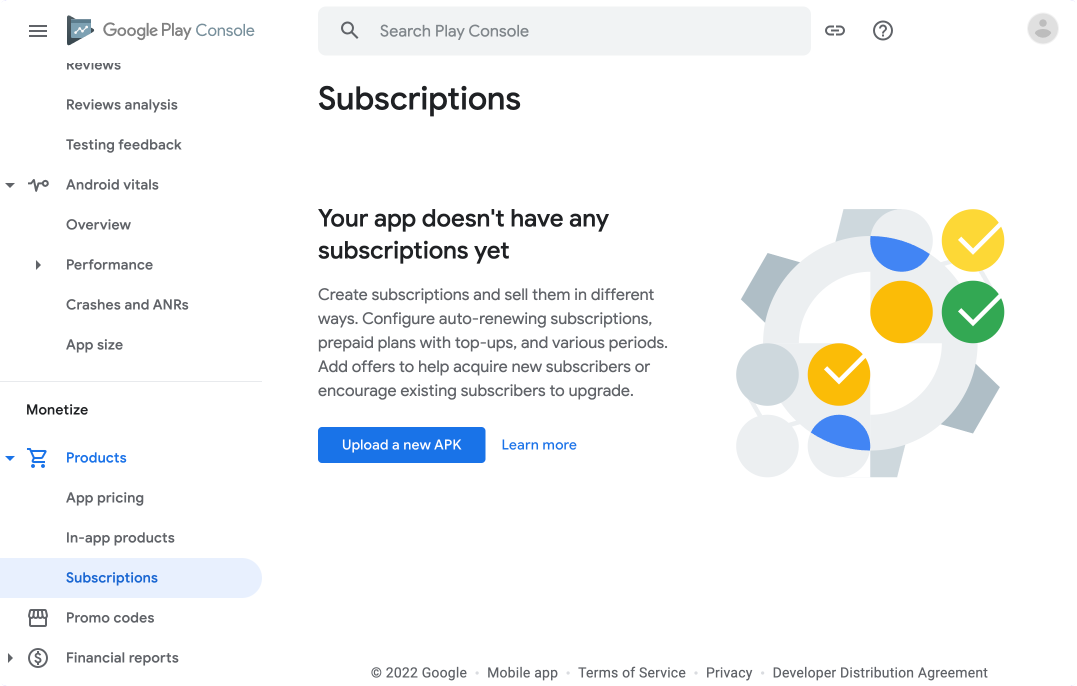
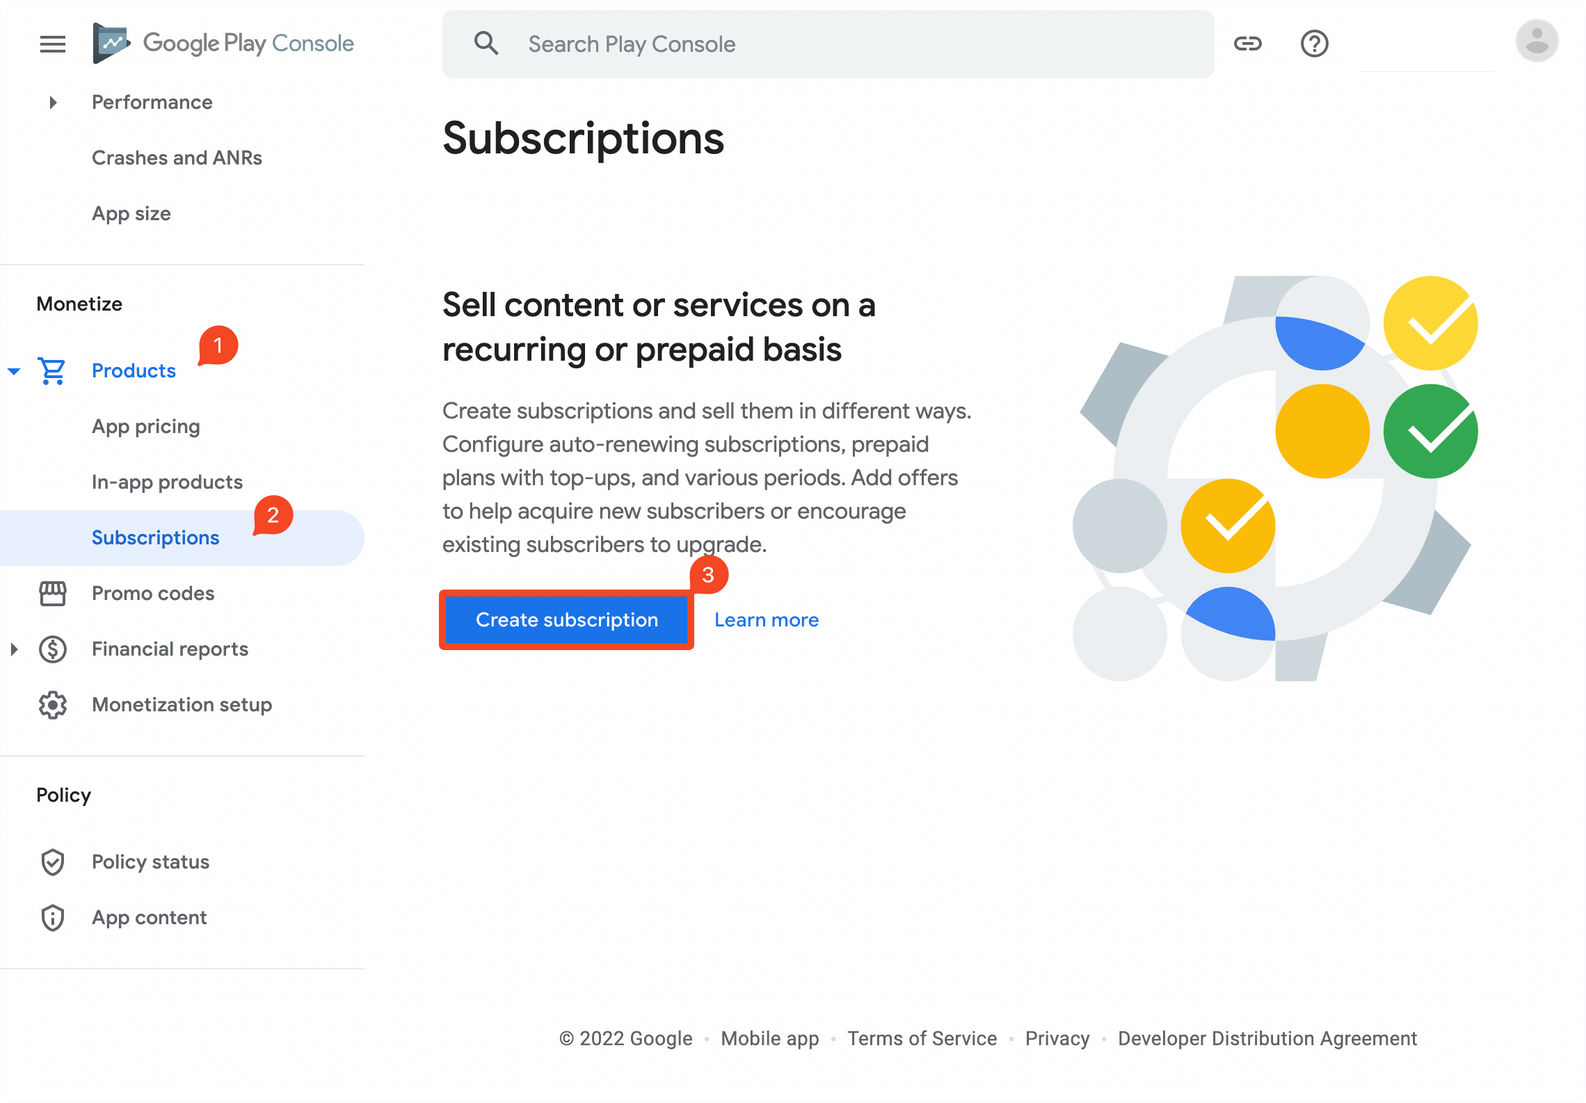
From the left menu, under the Monetize section, expand the Products category. Select Subscriptions.
-
Let's start creating the subscriptions:
-
From the Monetize > Products > Subscriptions page, click Create subscription.
-
Select the app in which you want to add subscriptions.
-
From the left menu, under the Monetize section, expand the Products category. Select Subscriptions.
-
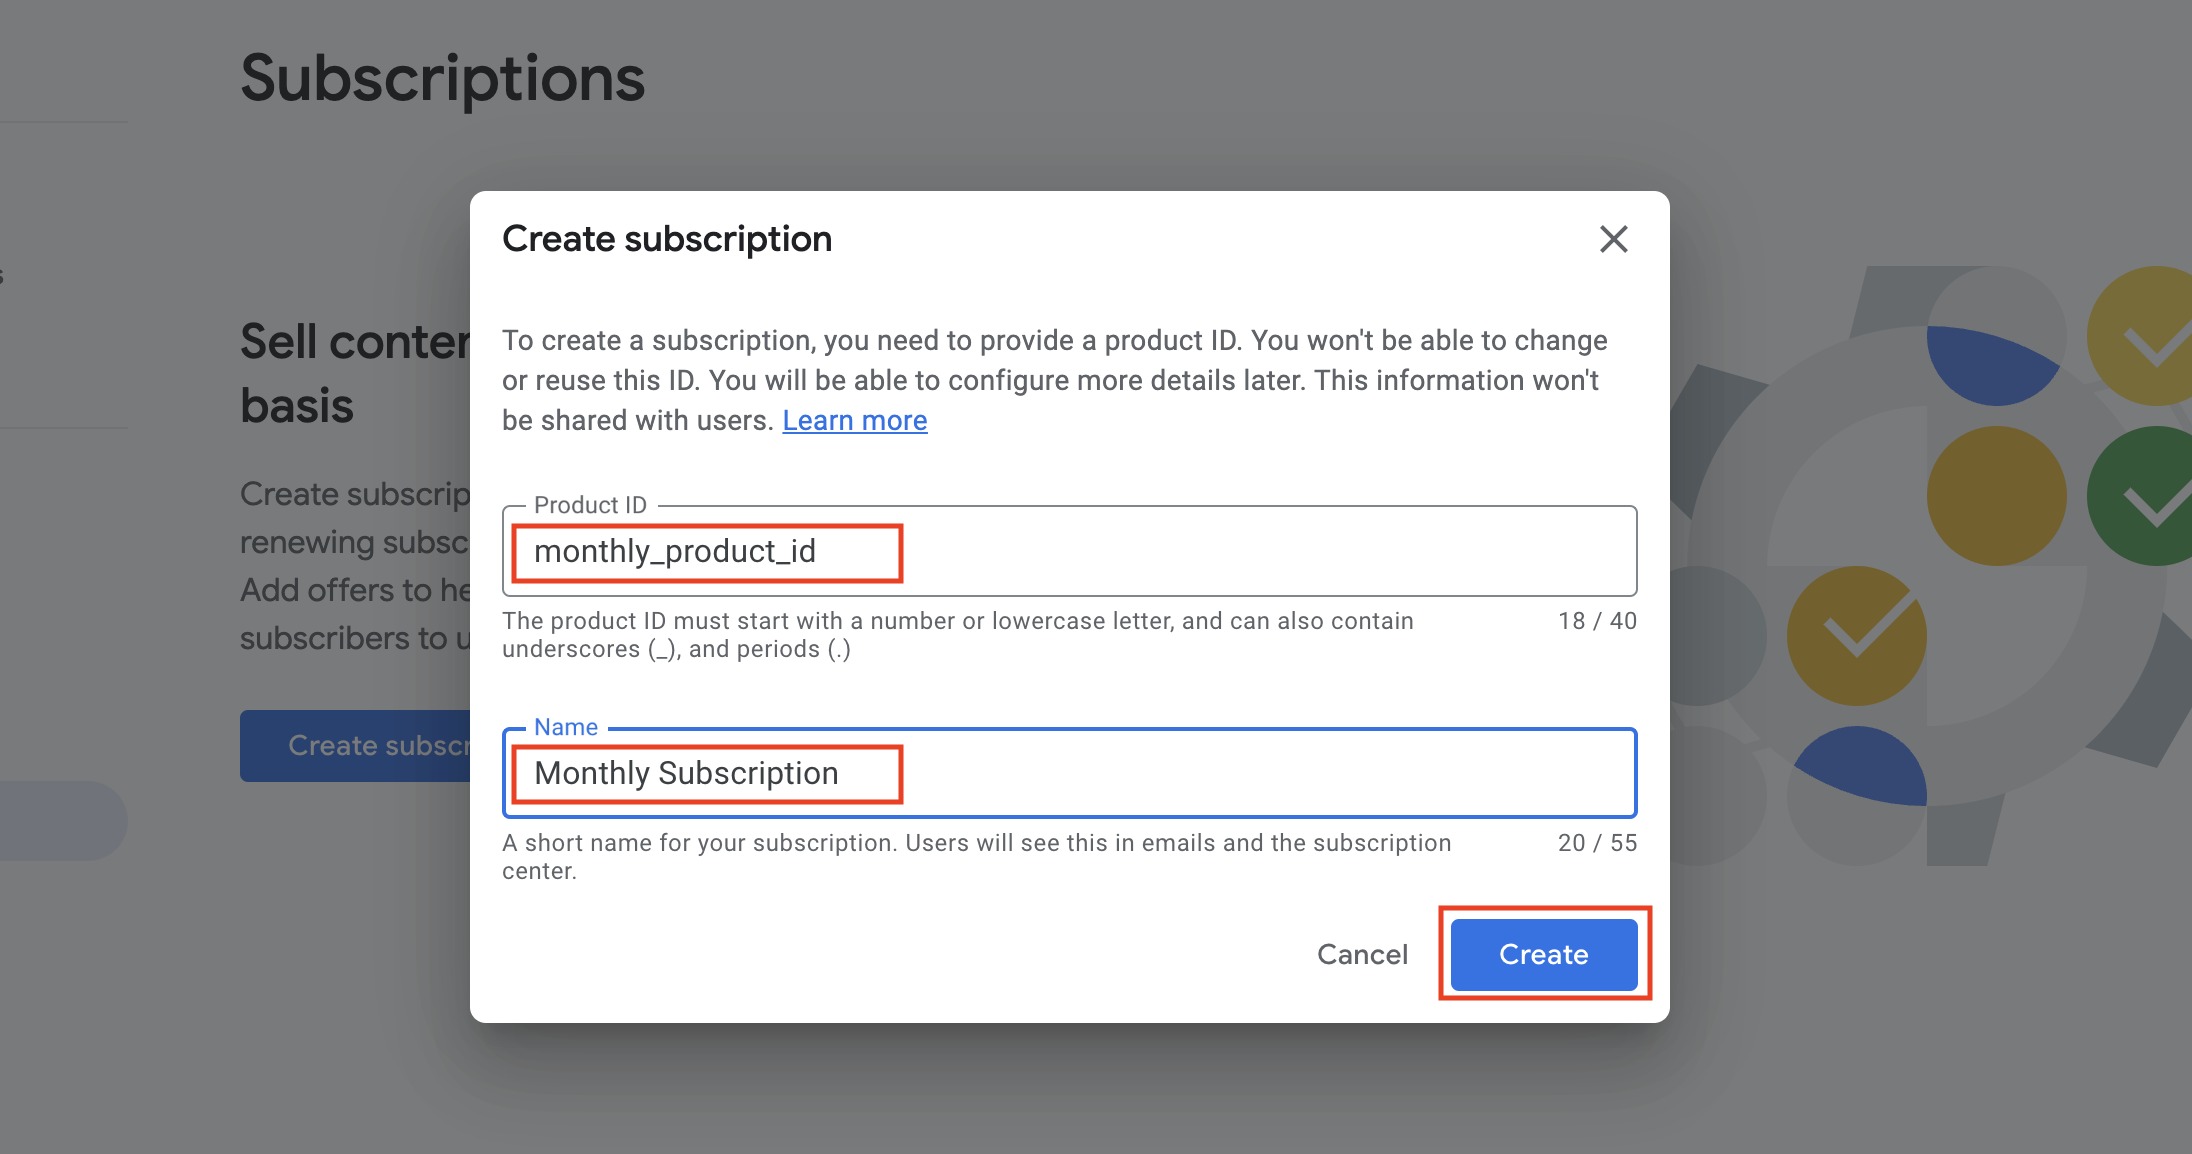
Enter a unique Product ID for your subscription and a publicly viewable Name. Click Create.
-
For example, we will be creating a subscription for 3 months with:
-
Product ID: test_3m
-
Name: Premium - 3 Months
-
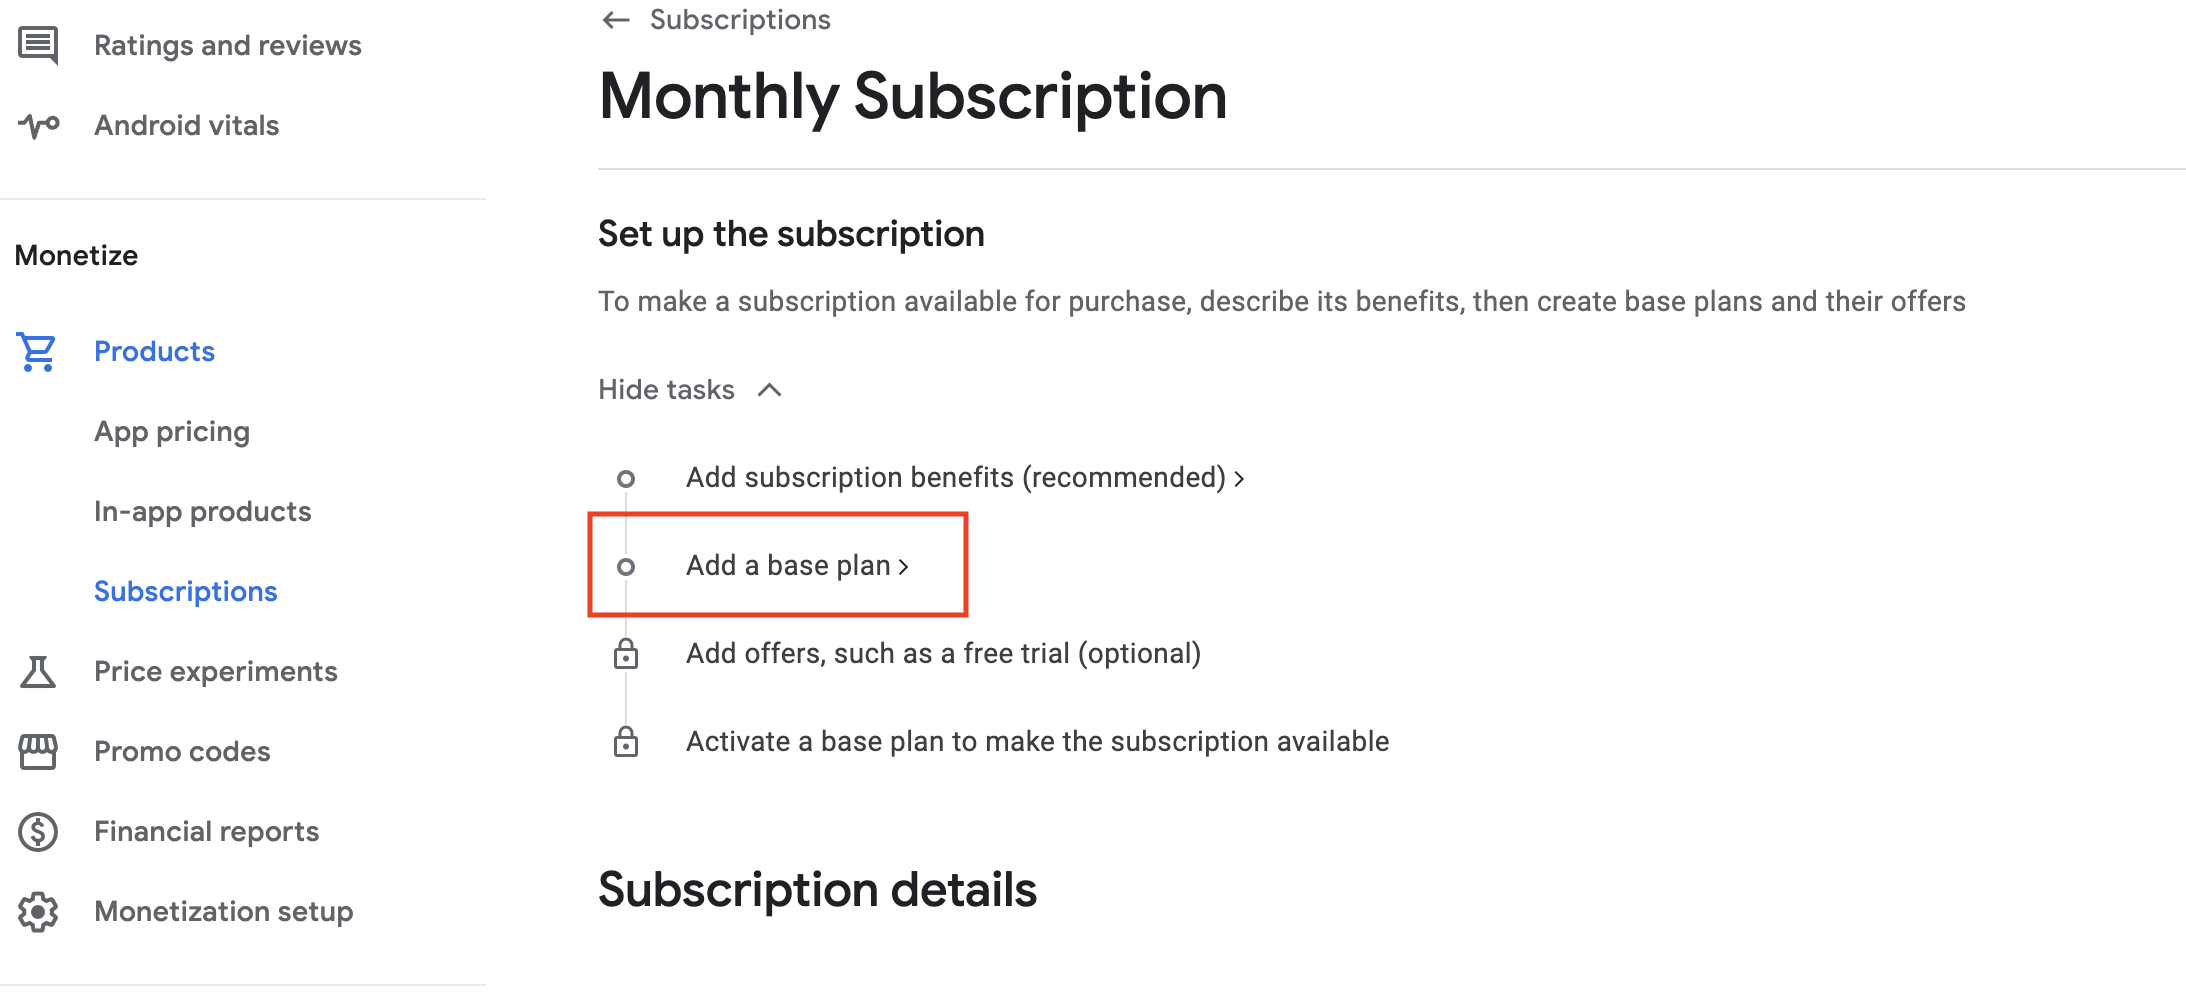
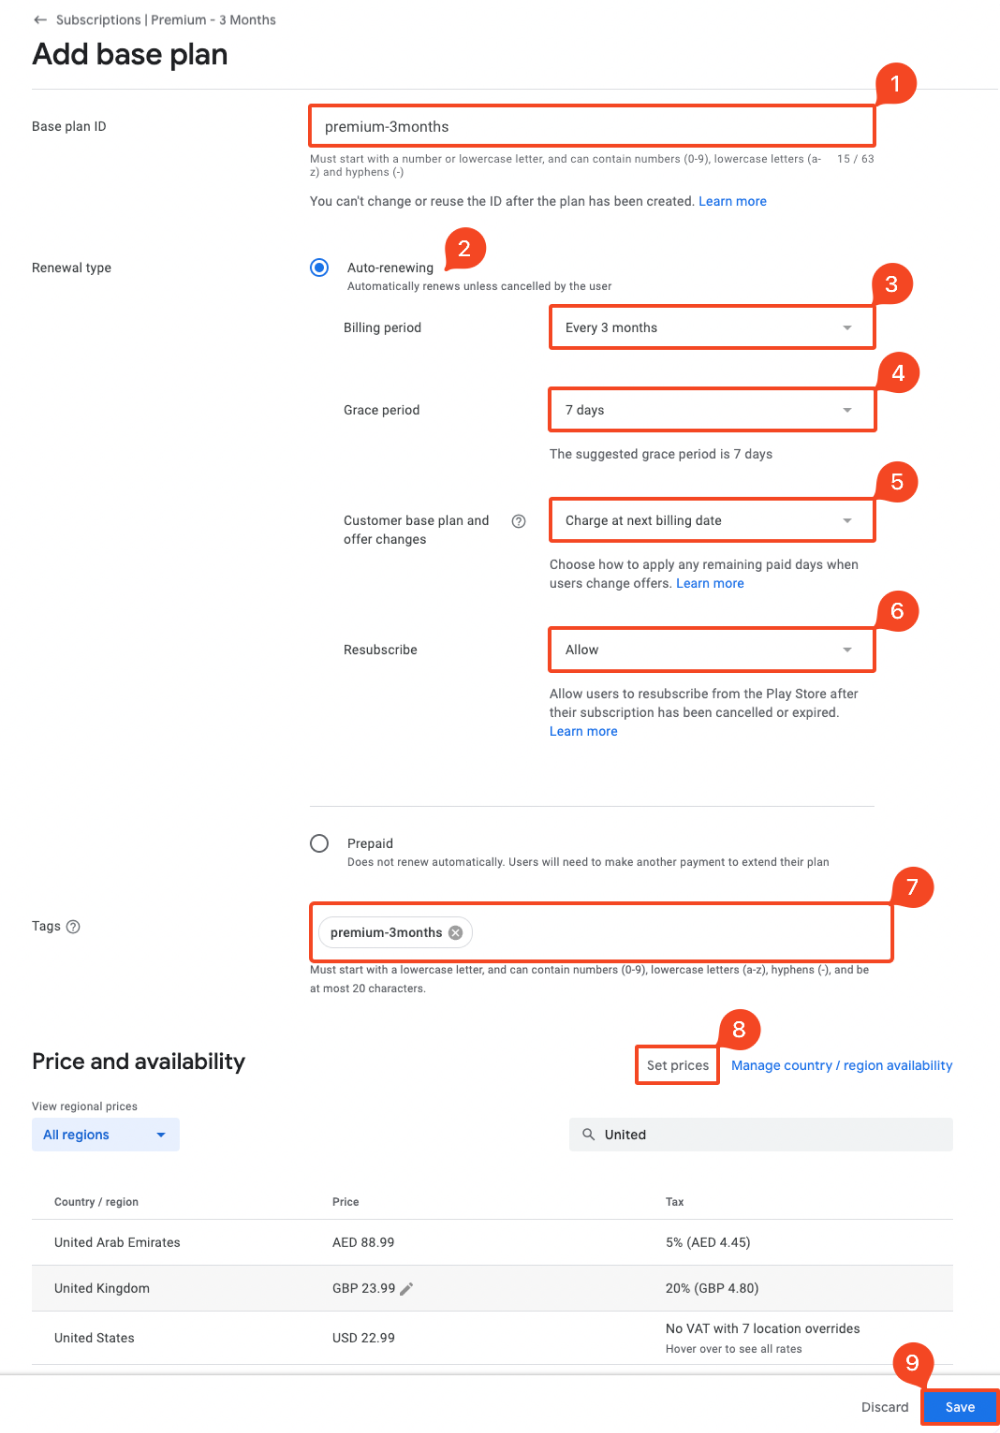
Click "Add a base plan"
-
Enter the Base plan ID, Renewal type (RevenueCat supports only Auto-renewing), Tags , and Price. Click Save.
-
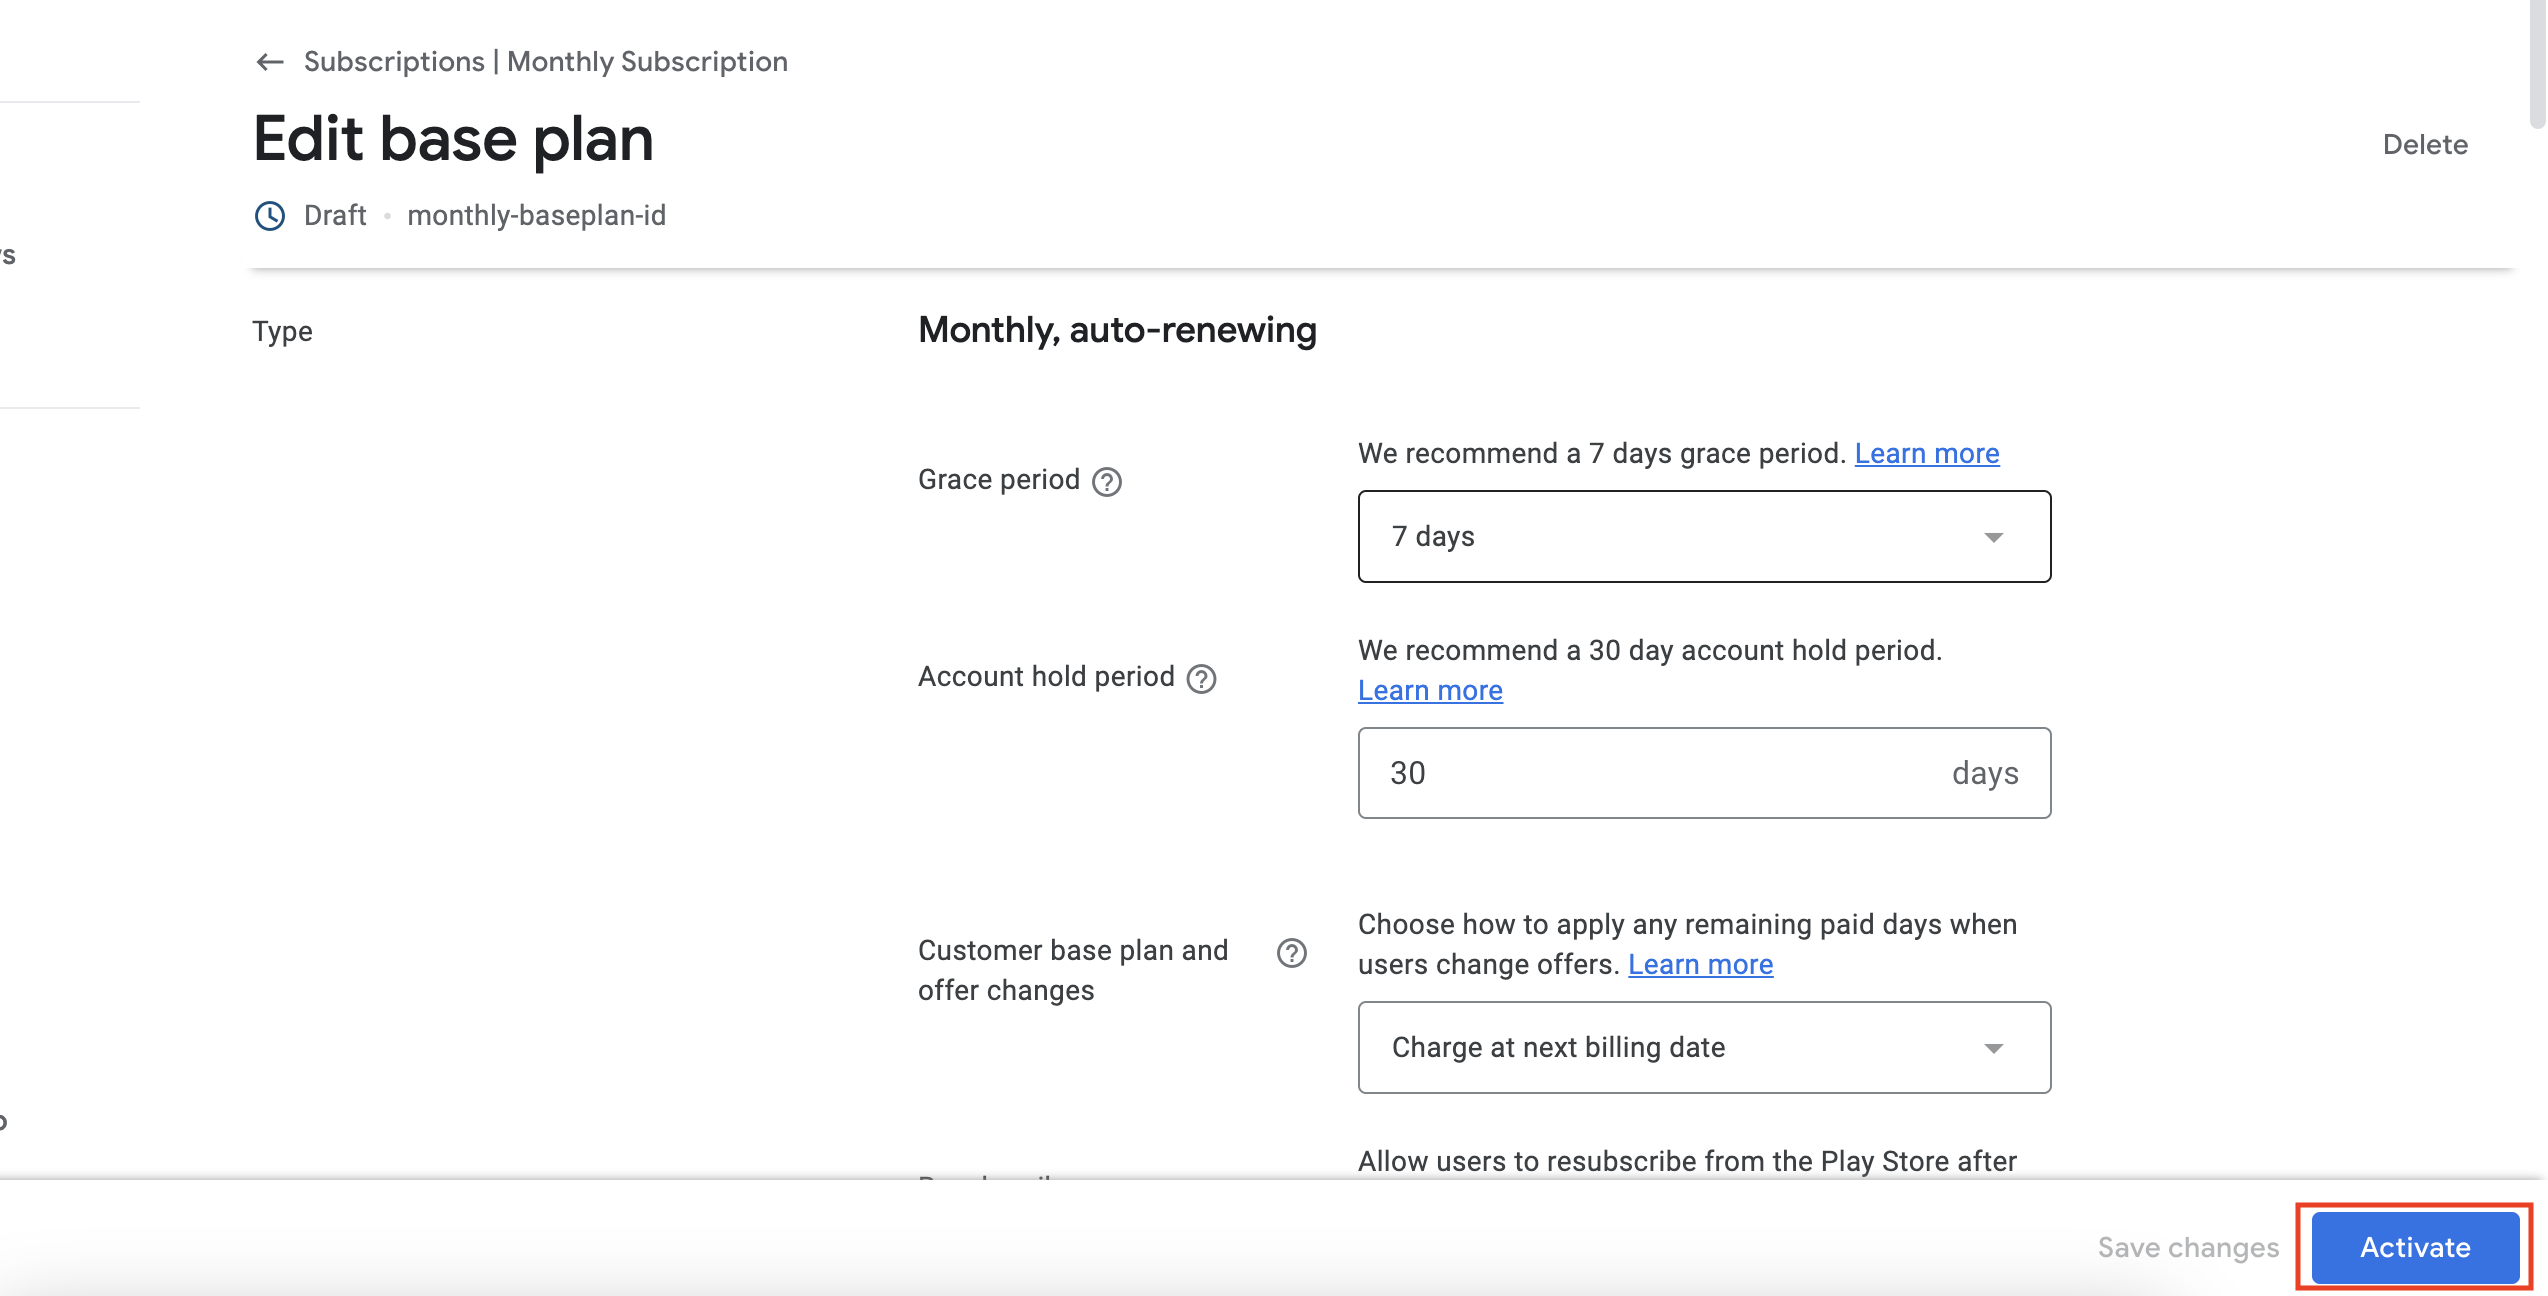
Click Activate
-
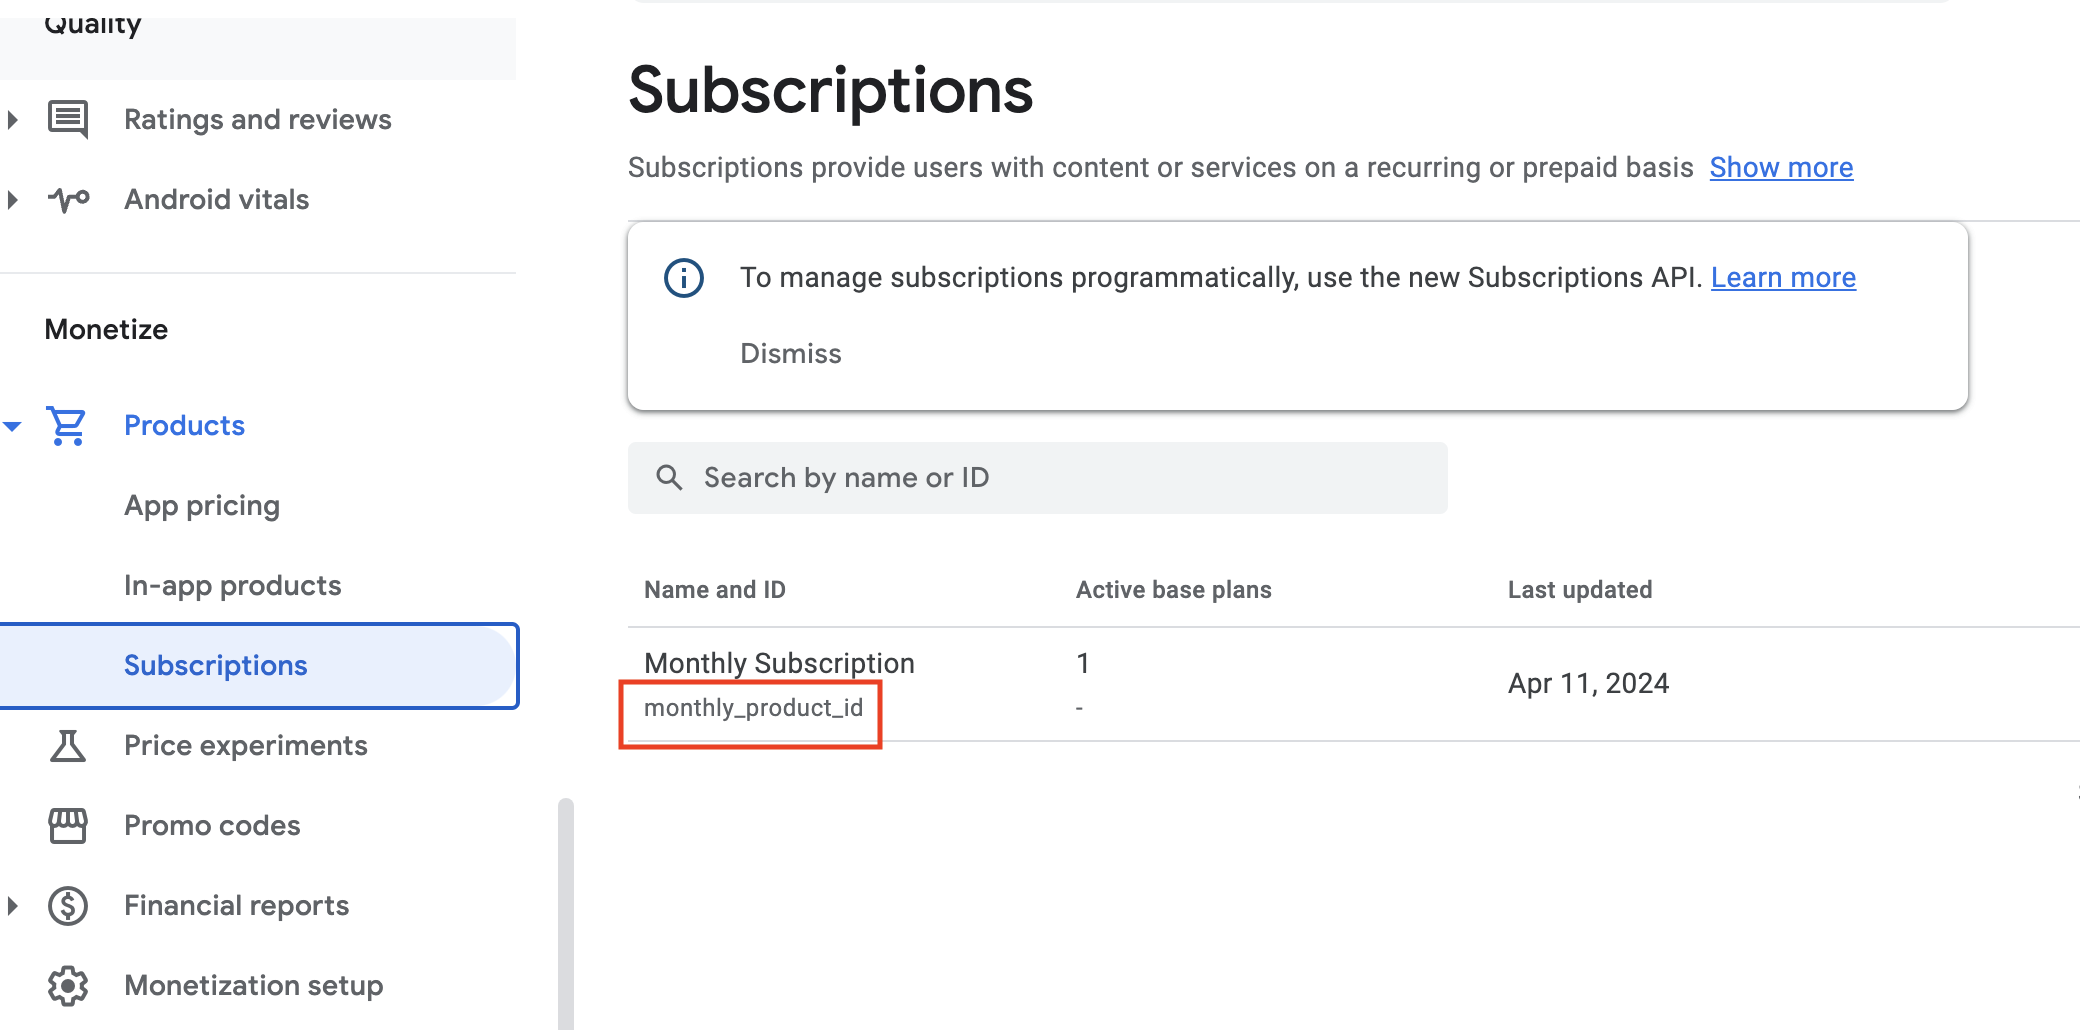
Similarly, add two more subscriptions for 6 months and 12 months .
-
That completes the subscription setup for the Google Play Console. Let's move on to the play Store subscription setup.
-
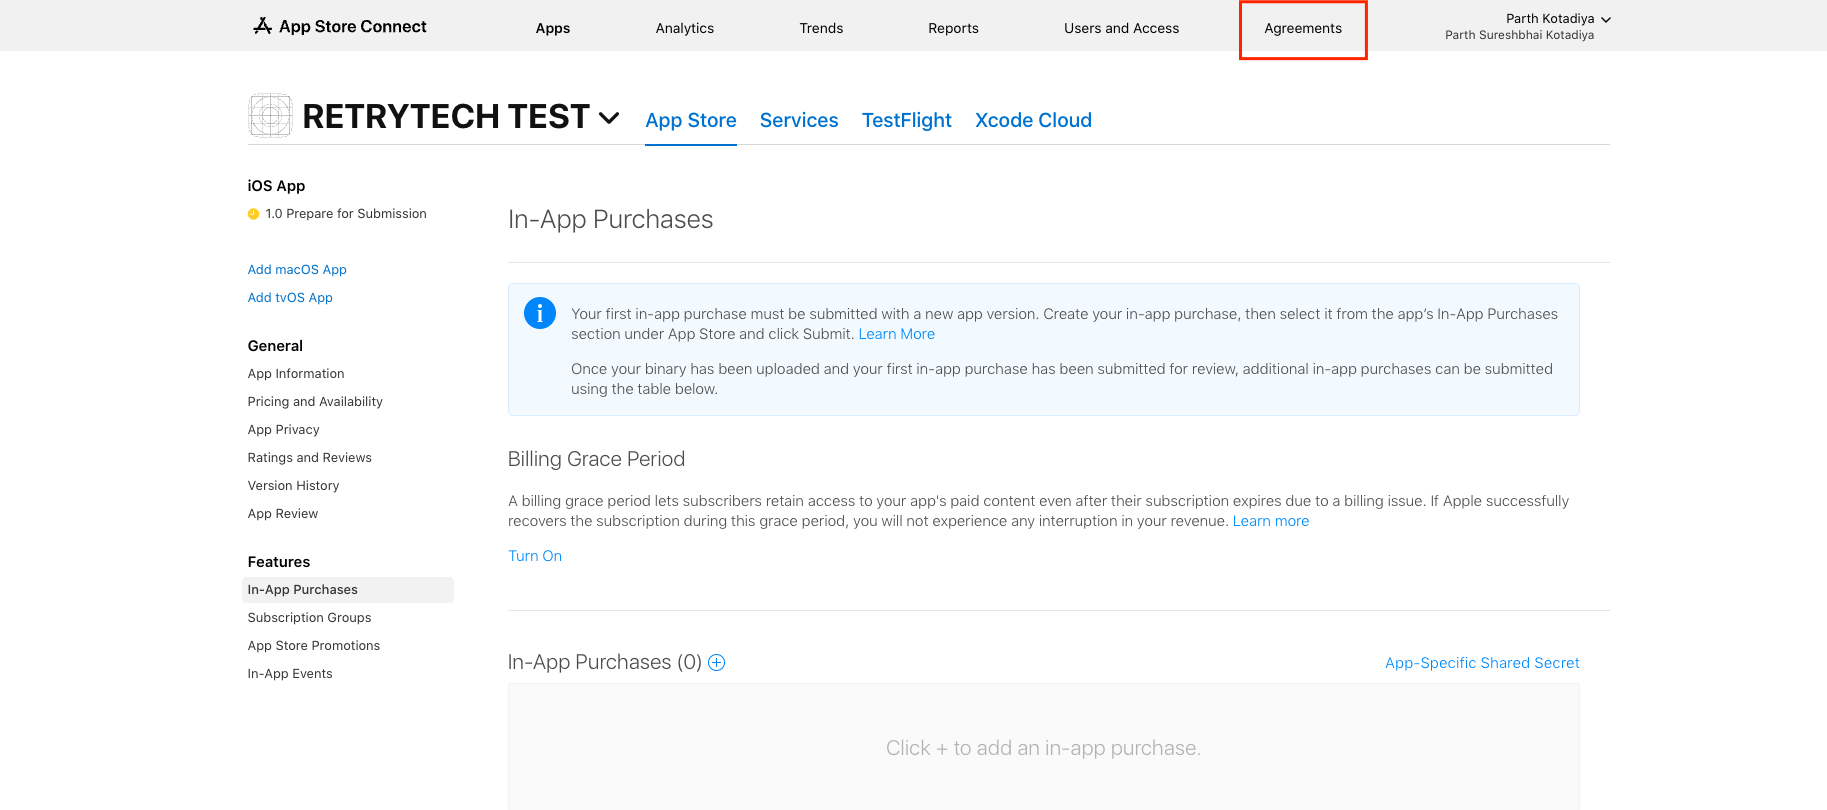
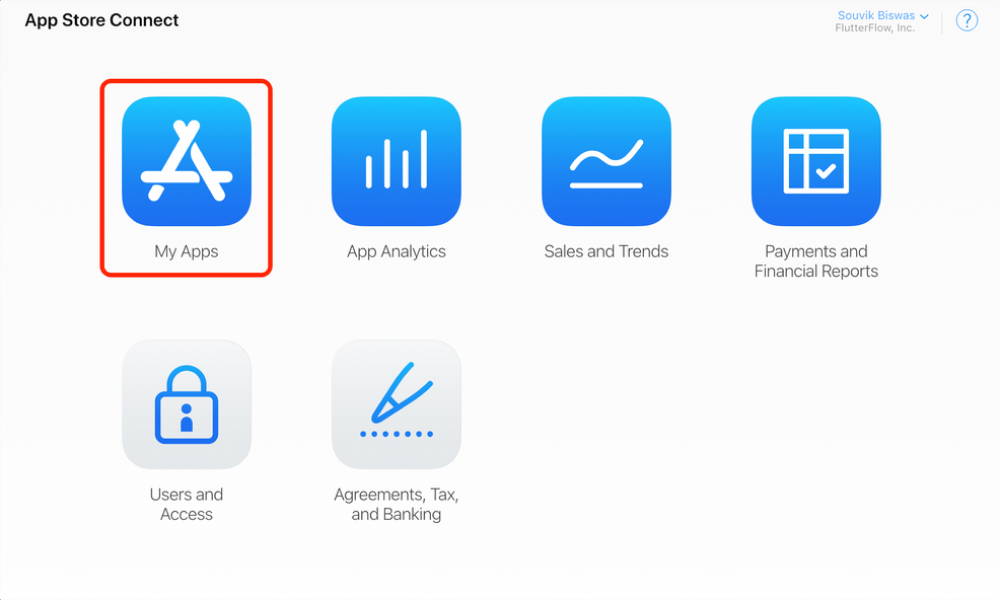
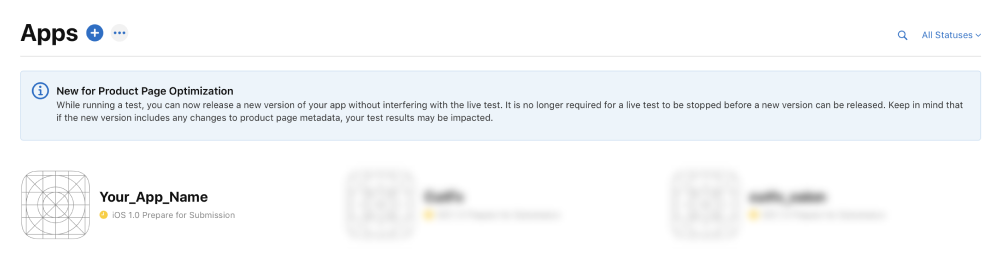
Open App Store Connect And select your app.
-
Note : Make you have agreed and added bank details at Agreements
-
Once you agree this, both status should be active like this
-
Follow the steps below to configure subscriptions on App Store Connect:
-
Go to App Store Connect and log in with your developer account.
-
Select the App
-
Choose the app in which your want to add subscriptions.
-
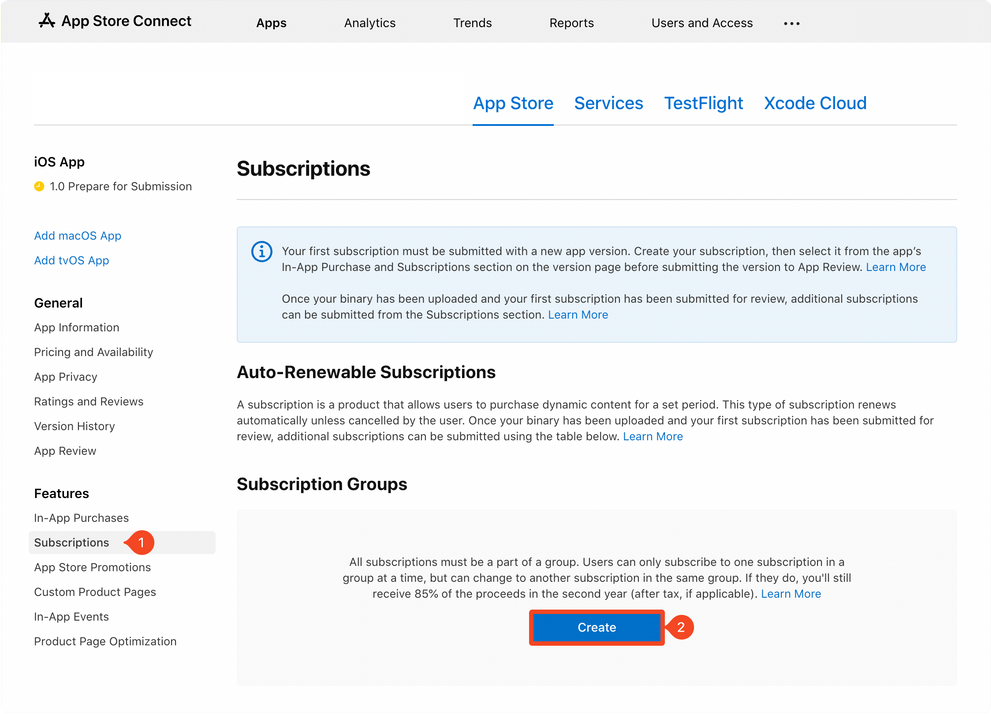
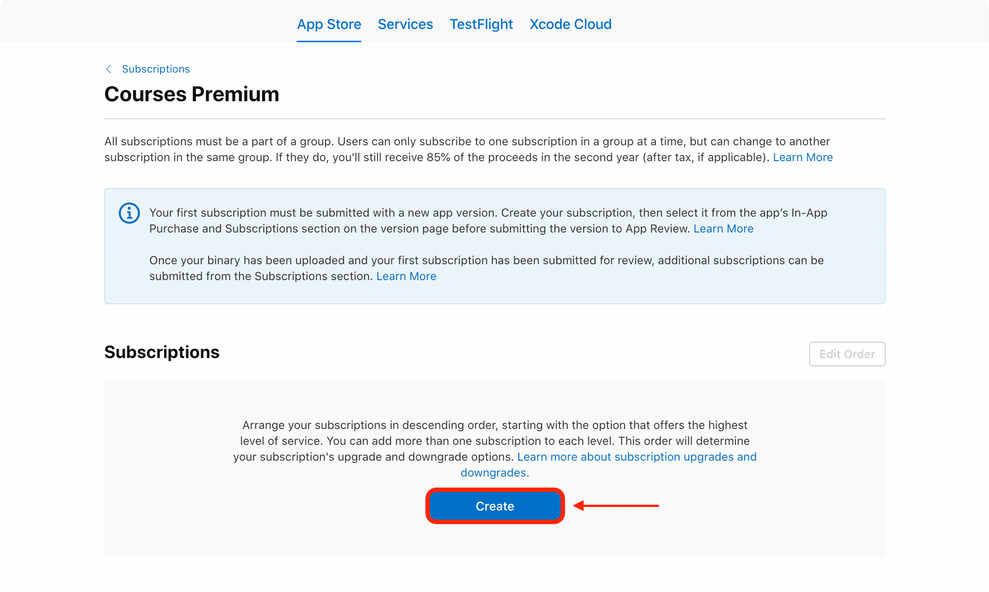
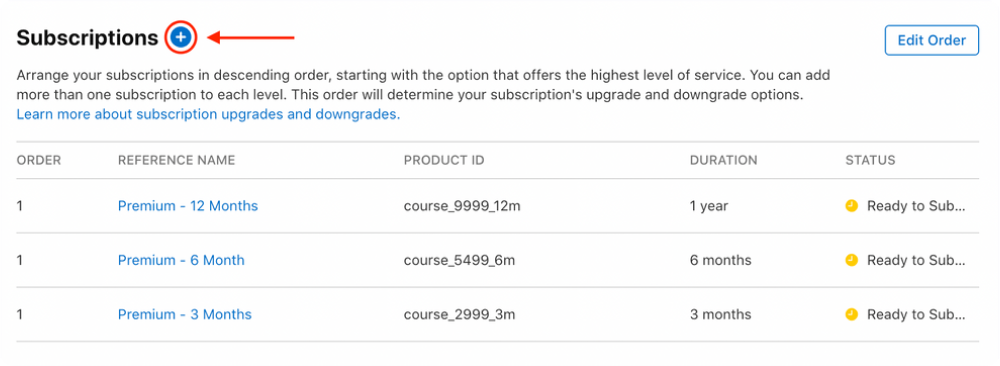
Select Subscriptions from the left menu and click Create under Subscription Groups.
-
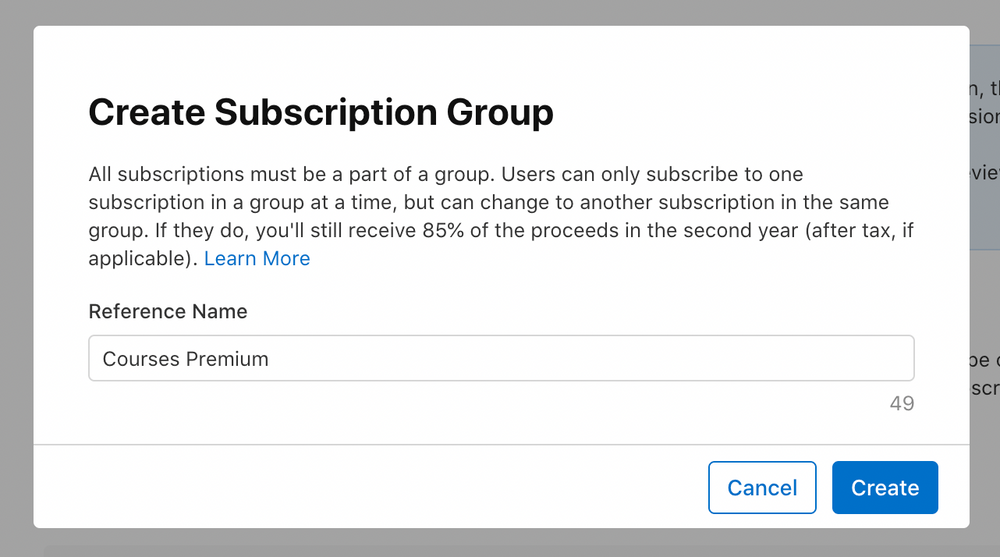
Enter a name for the Subscription Group and click Create.
-
This will create and open the Subscription Group. From this page, you will be able to create subscriptions for your app. Click Create under Subscriptions .
-
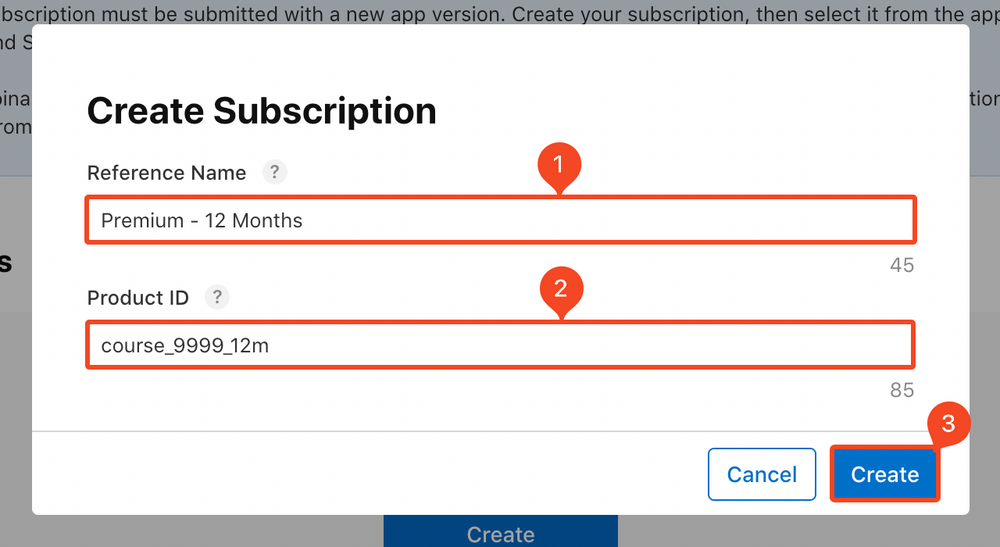
Enter a Reference Name and Product ID for the subscription. Use the same format for the Product ID as we had described earlier. Click Create .
-
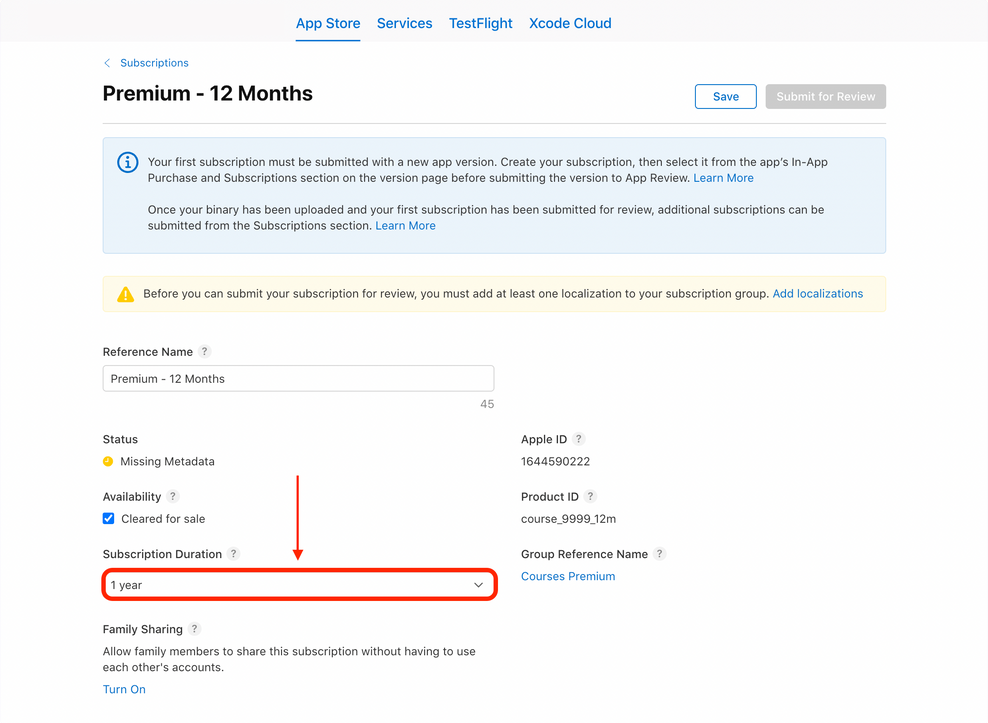
This will take you to the subscription details page. Select the Subscription Duration .
-
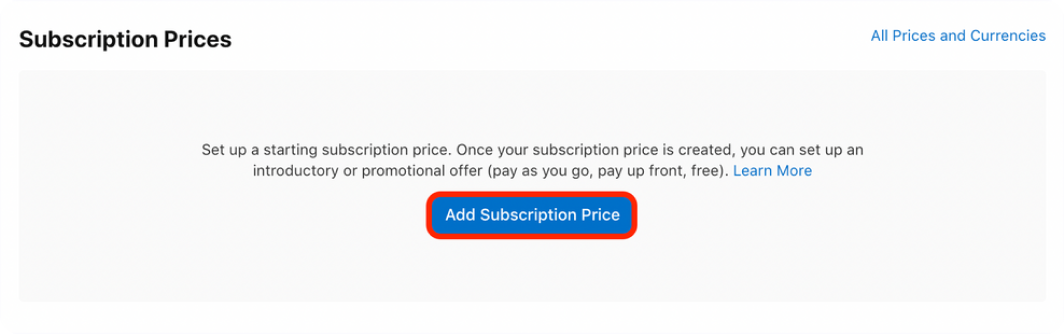
Scroll down to the Subscription Prices section and click "Add Subscription Price" button.
-
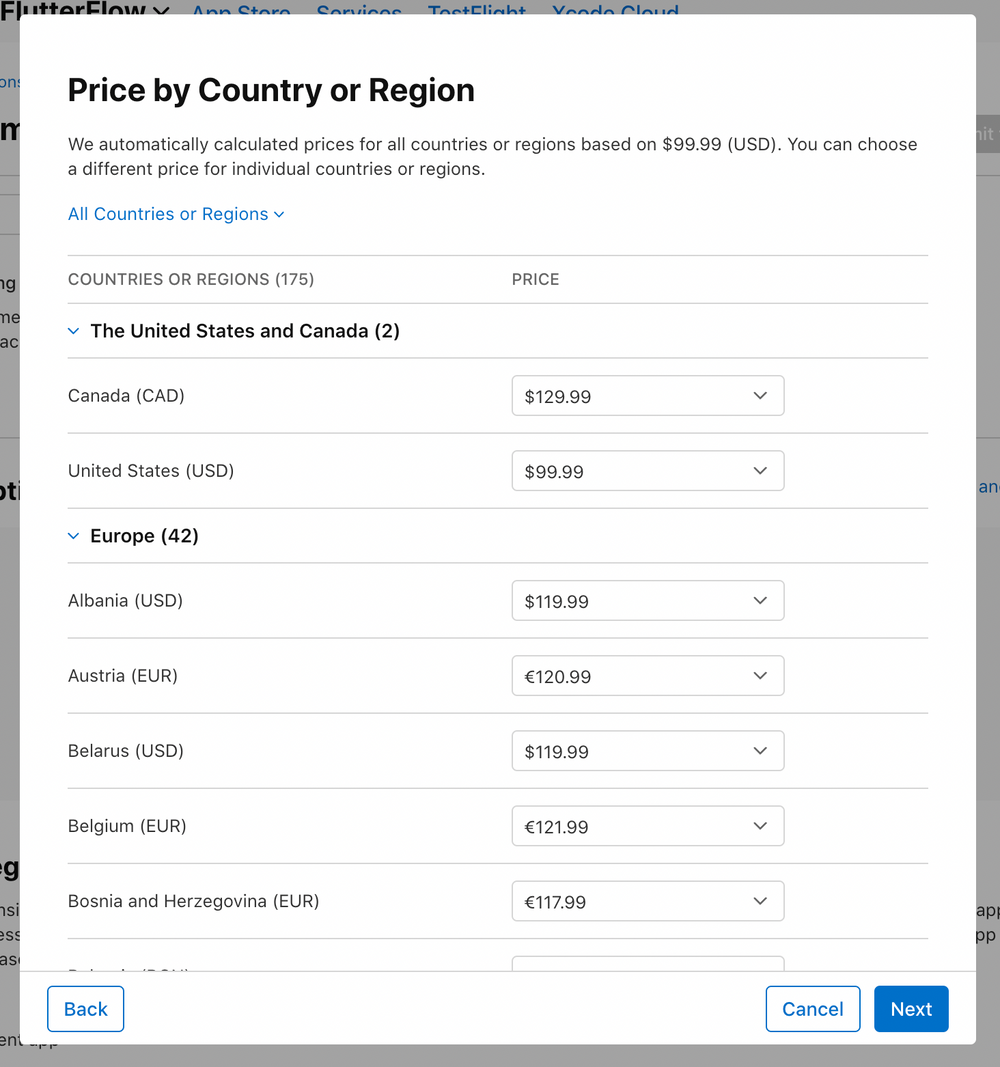
Enter the subscription price in your preferred currency. Click Next.
-
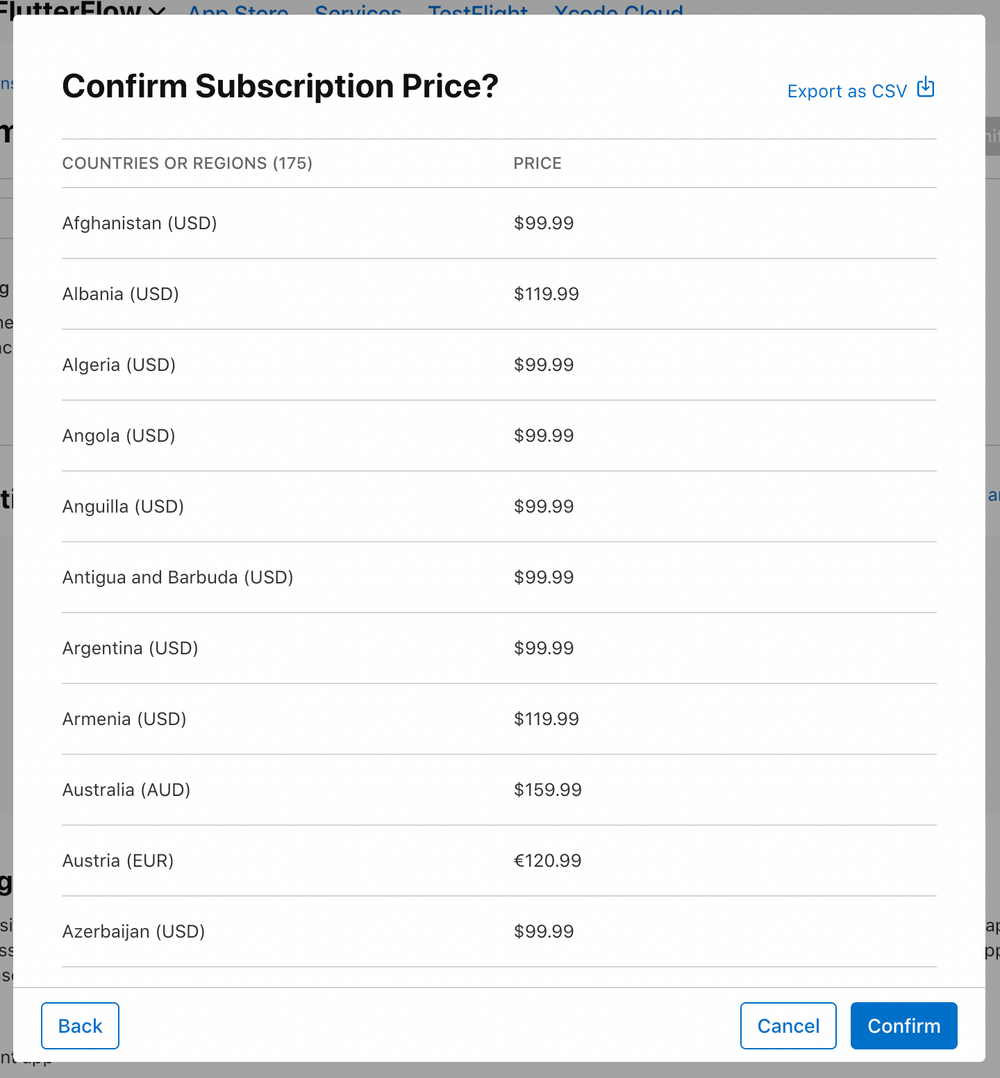
The next page will show you the automatically calculated prices for other countries and regions. Click Next.
-
Click Confirm on the next page.
-
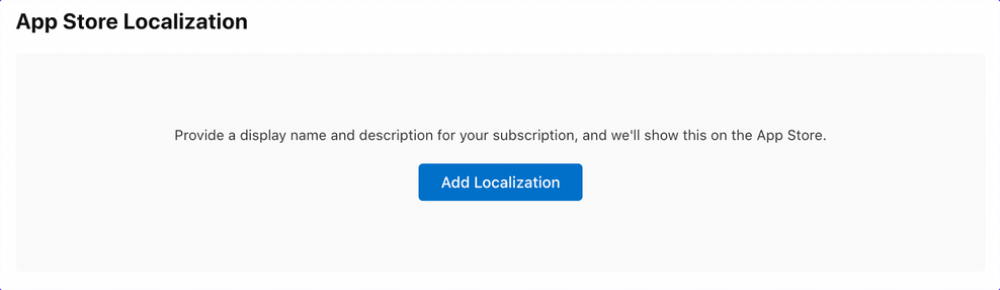
Scroll down to the App Store Localization section. Click "Add Localization".
-
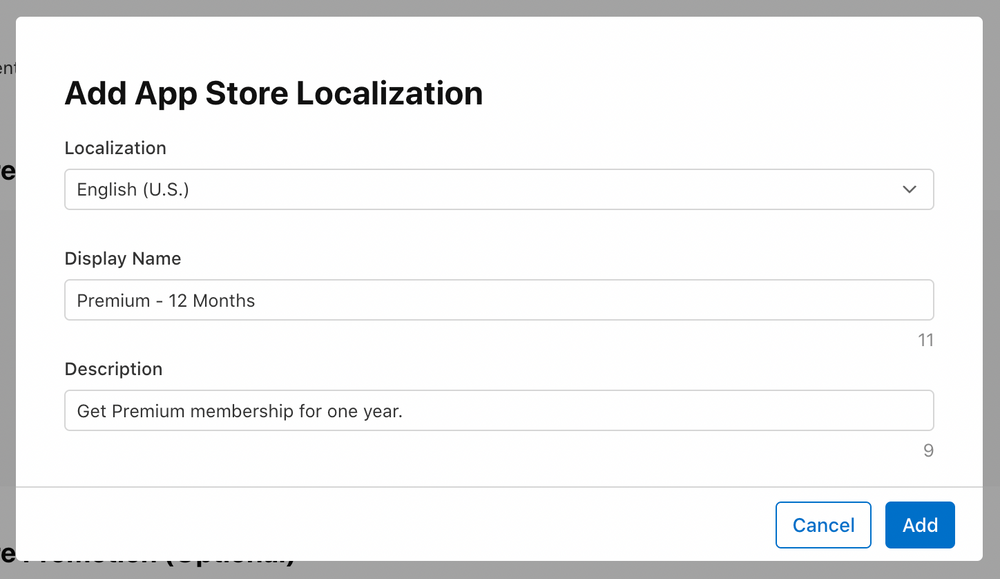
Select your preferred language and enter a Display Name and Description . Click Add .
-
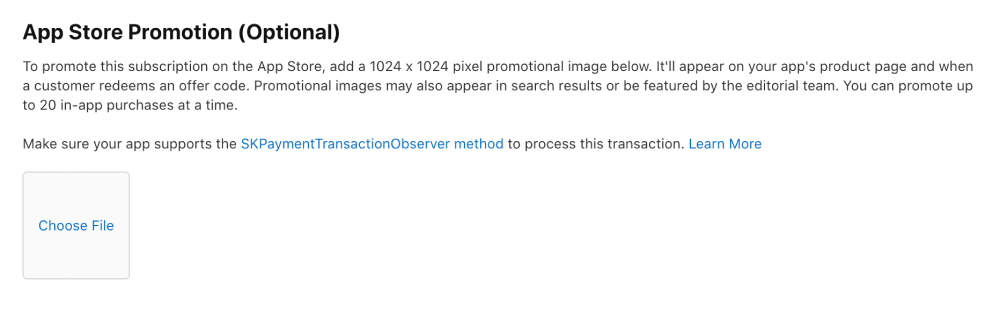
You can skip the App Store Promotion for now as it's optional.
-
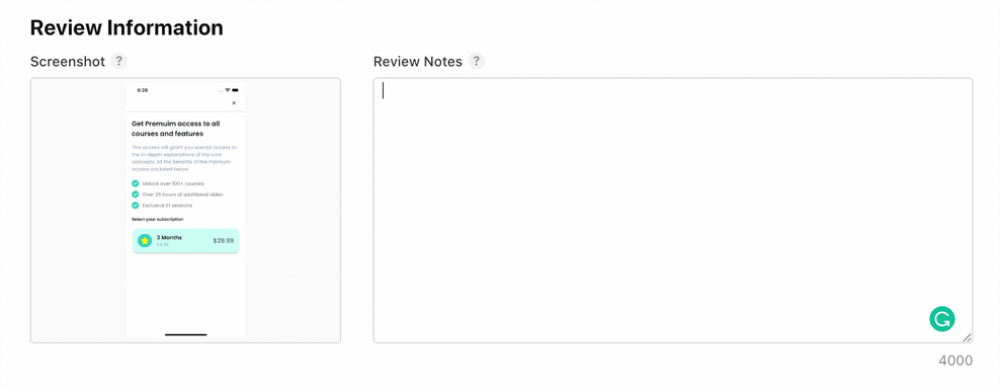
Under the Review Information section, add a screenshot of the subscription screen of your app (you can also add a blank screenshot, having proper size for now, if you haven't yet created the subscription UI).
-
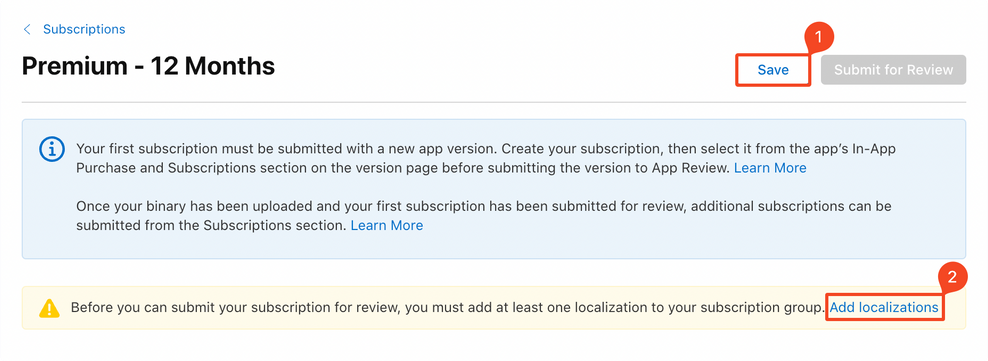
Scroll up to the top of the subscription page, and click Save. You will see a warning message if you haven't yet added localization to your subscription group. Click Add localizations (skip if you have already added).
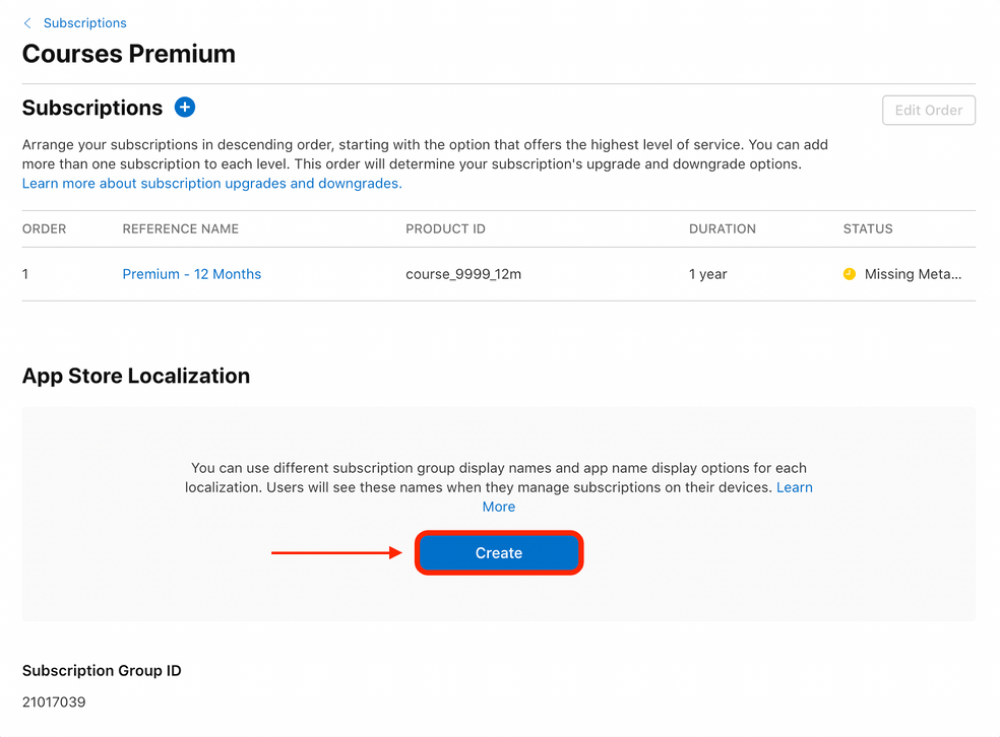
-
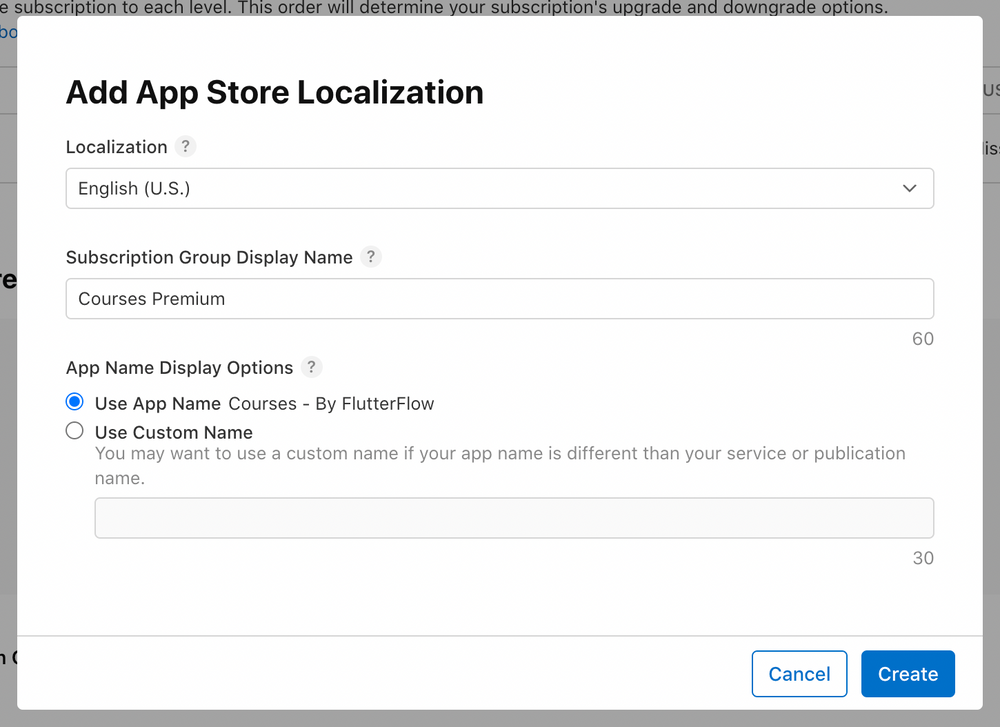
This will take you back to the subscription group page. Click Create under App Store Localization.
-
Select your preferred language, enter a Subscription Group Display Name, and select App Name. Click Create .
-
This completes the addition of a subscription. You can follow similar steps for adding the other subscription plans as well, use the plus ("+") button next to Subscriptions .
-
With all the subscription plans defined on Play Console and App Store Connect, we are ready to connect with RevenueCat.
-
Create an account or log in to RevenueCat from here to get started.
-
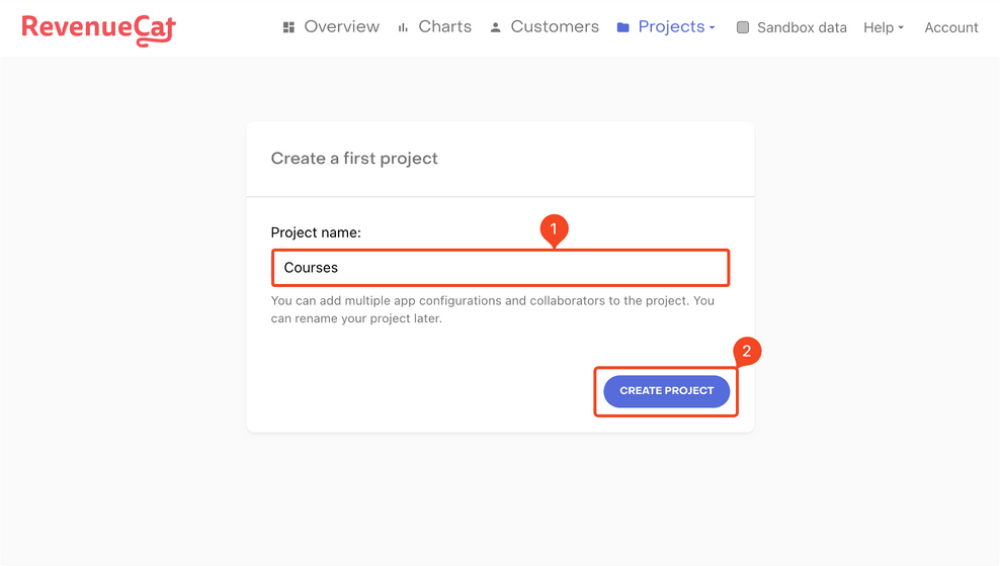
If you have created a new account, you will be automatically prompted to create your first project. Enter a Project name and click "CREATE PROJECT" button.
-
Next, you need to add your Android and iOS apps to RevenueCat in order to use and manage the subscriptions.
-
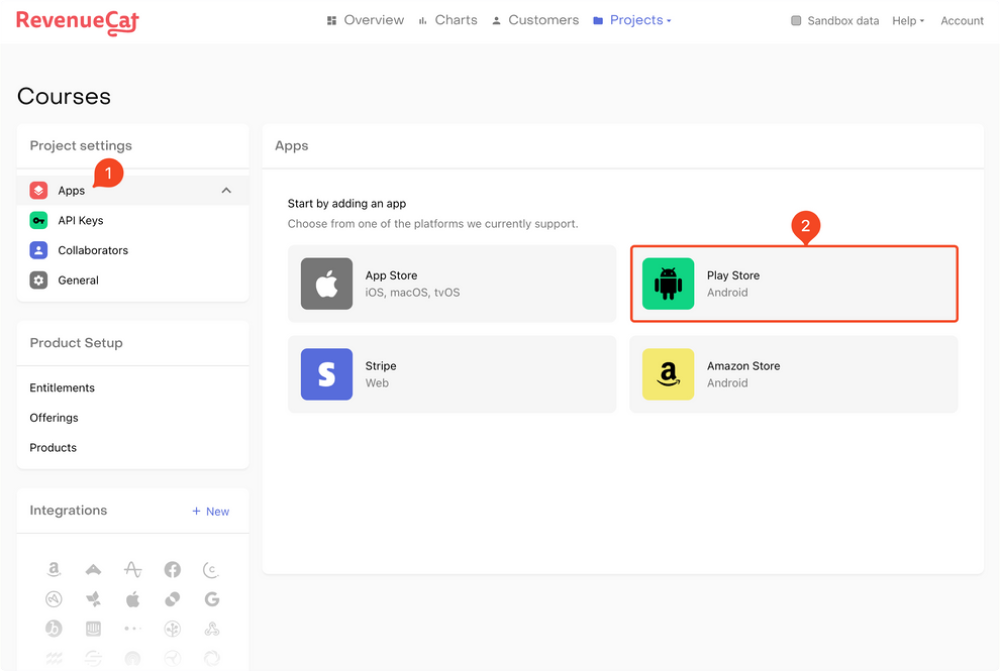
Let's start by configuring the Android app:
-
Go to Apps under Project settings (from the left menu). Select Play Store .
-
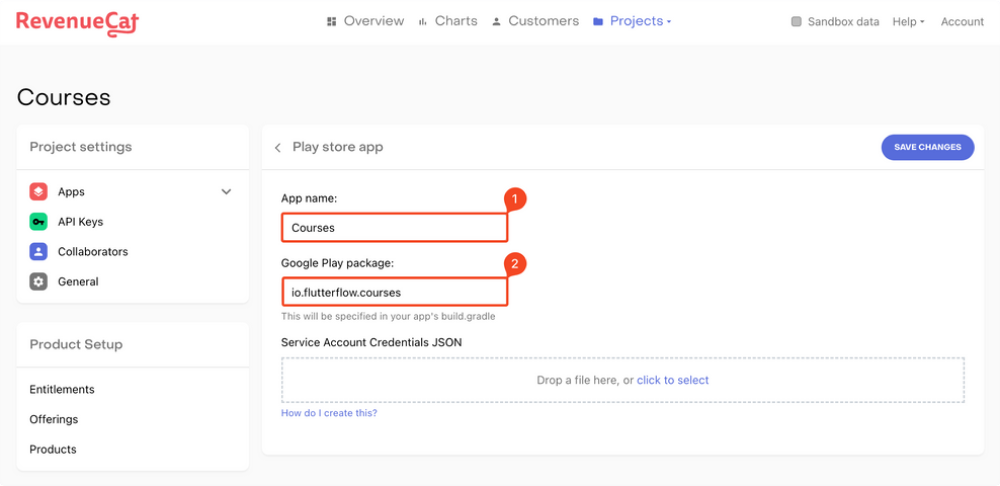
Enter the App name and the package ID.
-
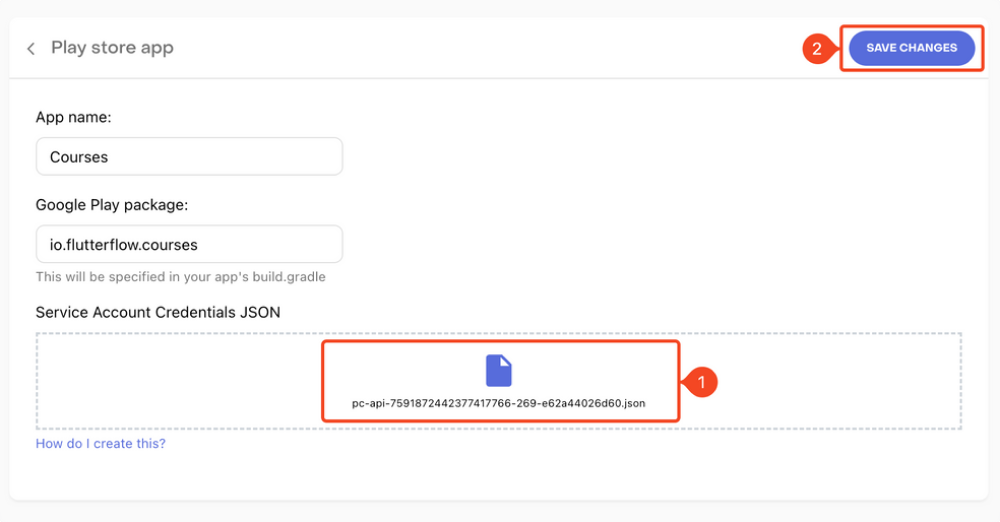
You need to create another Service Account for RevenueCat. Follow This guide to generate the credentials in JSON format. Drag and drop the Credentials JSON file. Click "SAVE CHANGES".
-
This completes the Android app setup on RevenueCat.
-
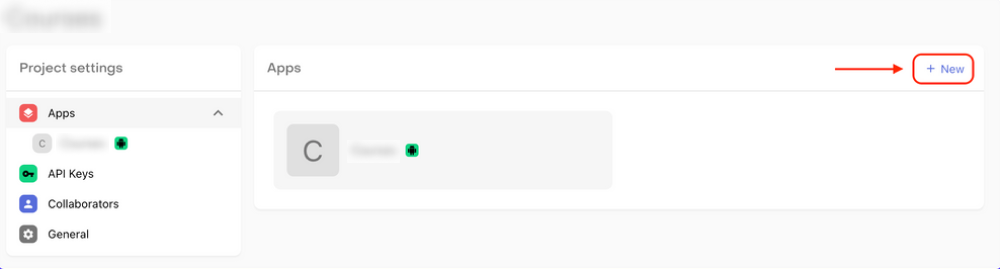
Follow the steps below to configure the iOS app:
-
Go back to the Apps page and click on "+ New".
-
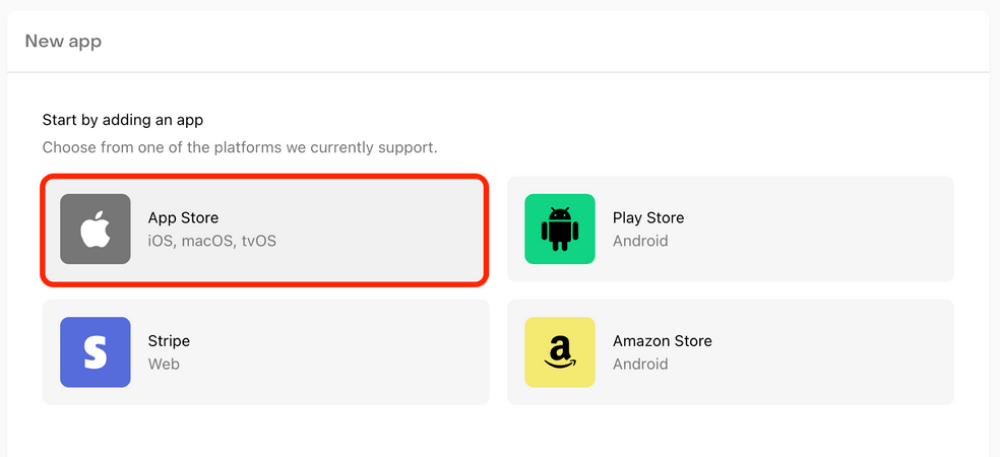
Select App Store.
-
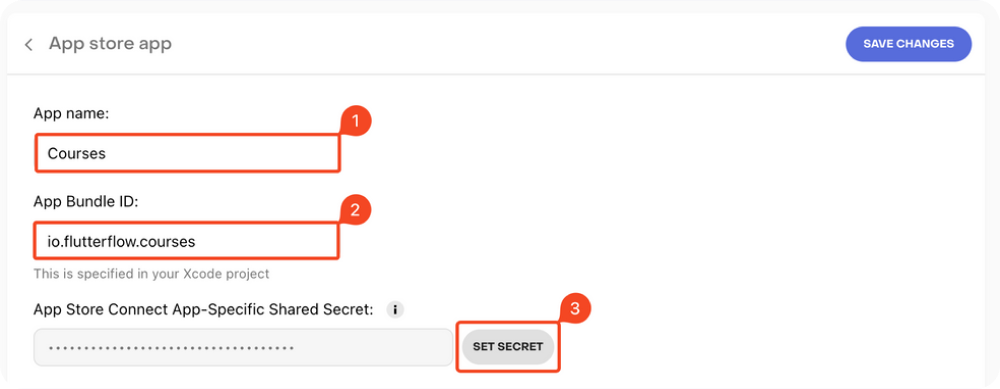
Enter an App name, Bundle ID, and App-Specific Shared Secret. To generate an App-Specific Shared Secret, follow The guide . Once you have the key, click "SET SECRET", enter the value, and click Set. Then click "SAVE CHANGES".
-
This completes the iOS app setup on RevenueCat.
-
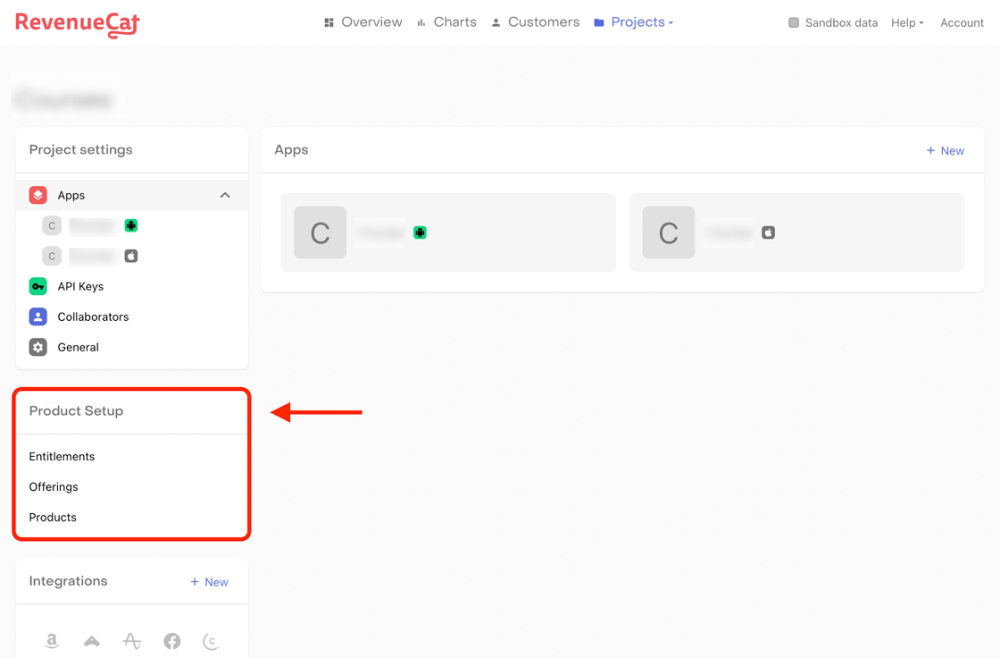
You will find these configuration levels on the left menu of the RevenueCat dashboard under the section Product Setup:
-
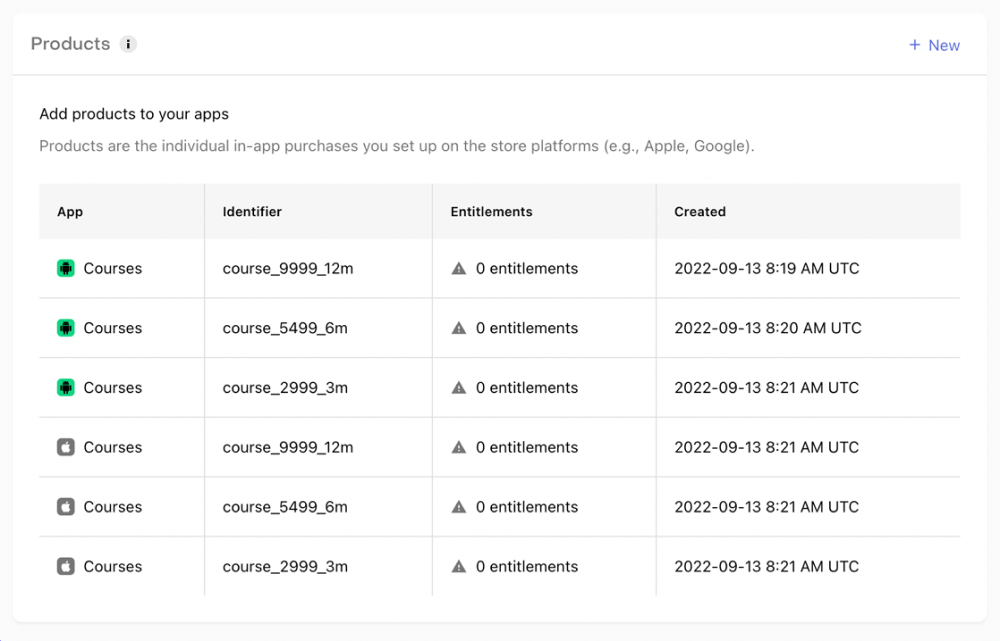
In this configuration, you need to add all the subscriptions for both your Android and iOS app that the user can purchase. This is like a 1-to-1 mapping of the products in RevenueCat that you have already added to the stores (Google Play Store and Apple App Store).
-
To add products, follow these steps:
-
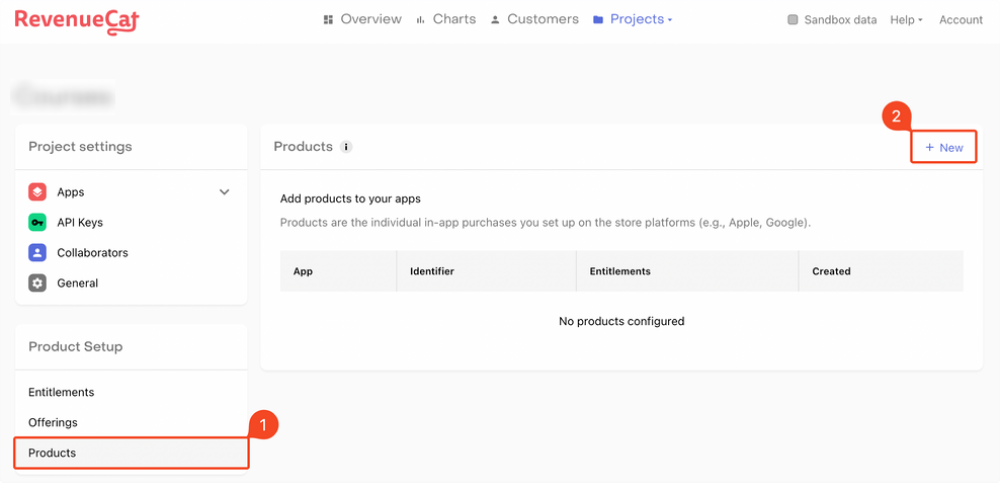
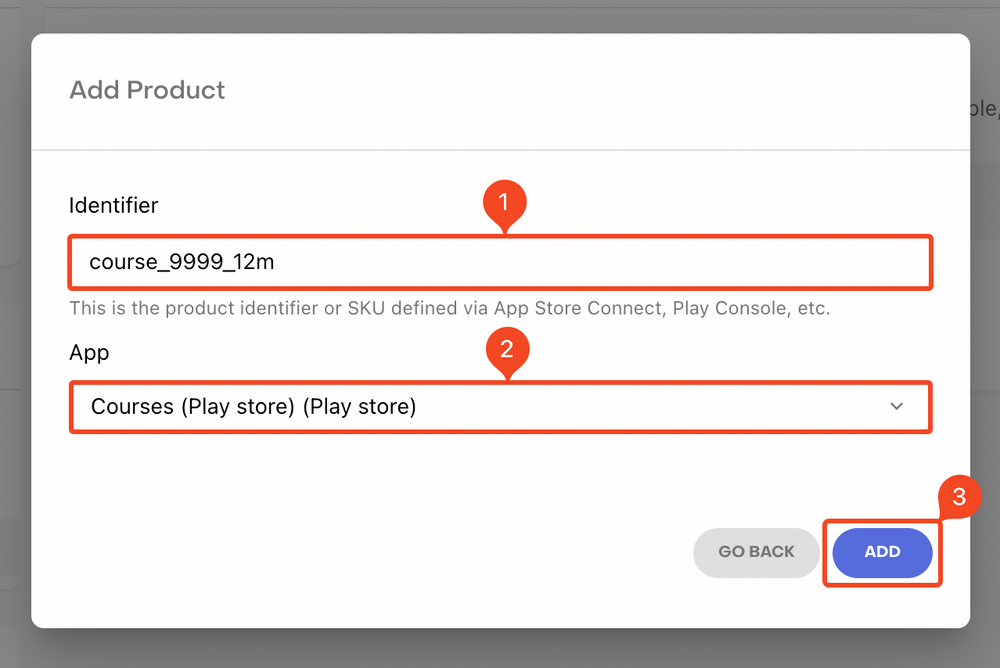
Select Products under the Product Setup section. Click "+ New".
-
You need to enter the product Identifier and the App . Make sure you use exactly the same product ID you used for the Android/iOS subscription. Click ADD .
-
Similarly, add the other subscriptions as well (for both Android and iOS).
-
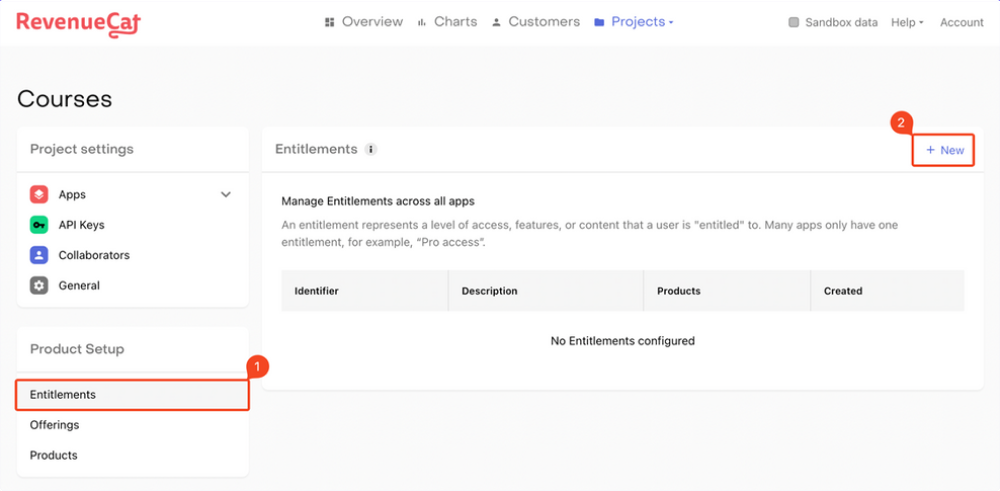
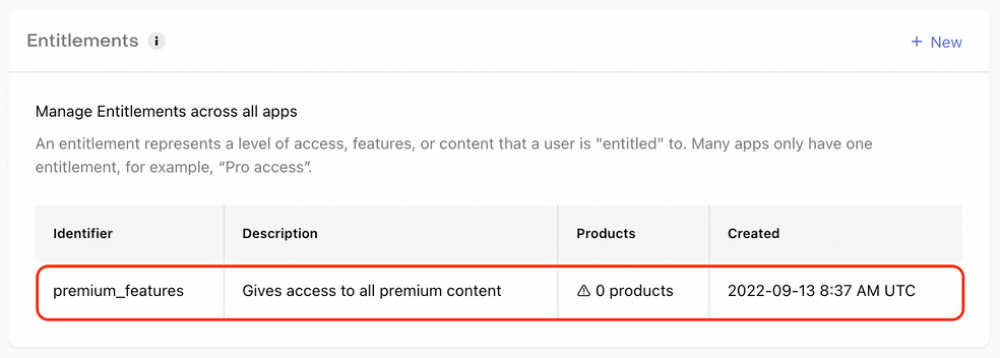
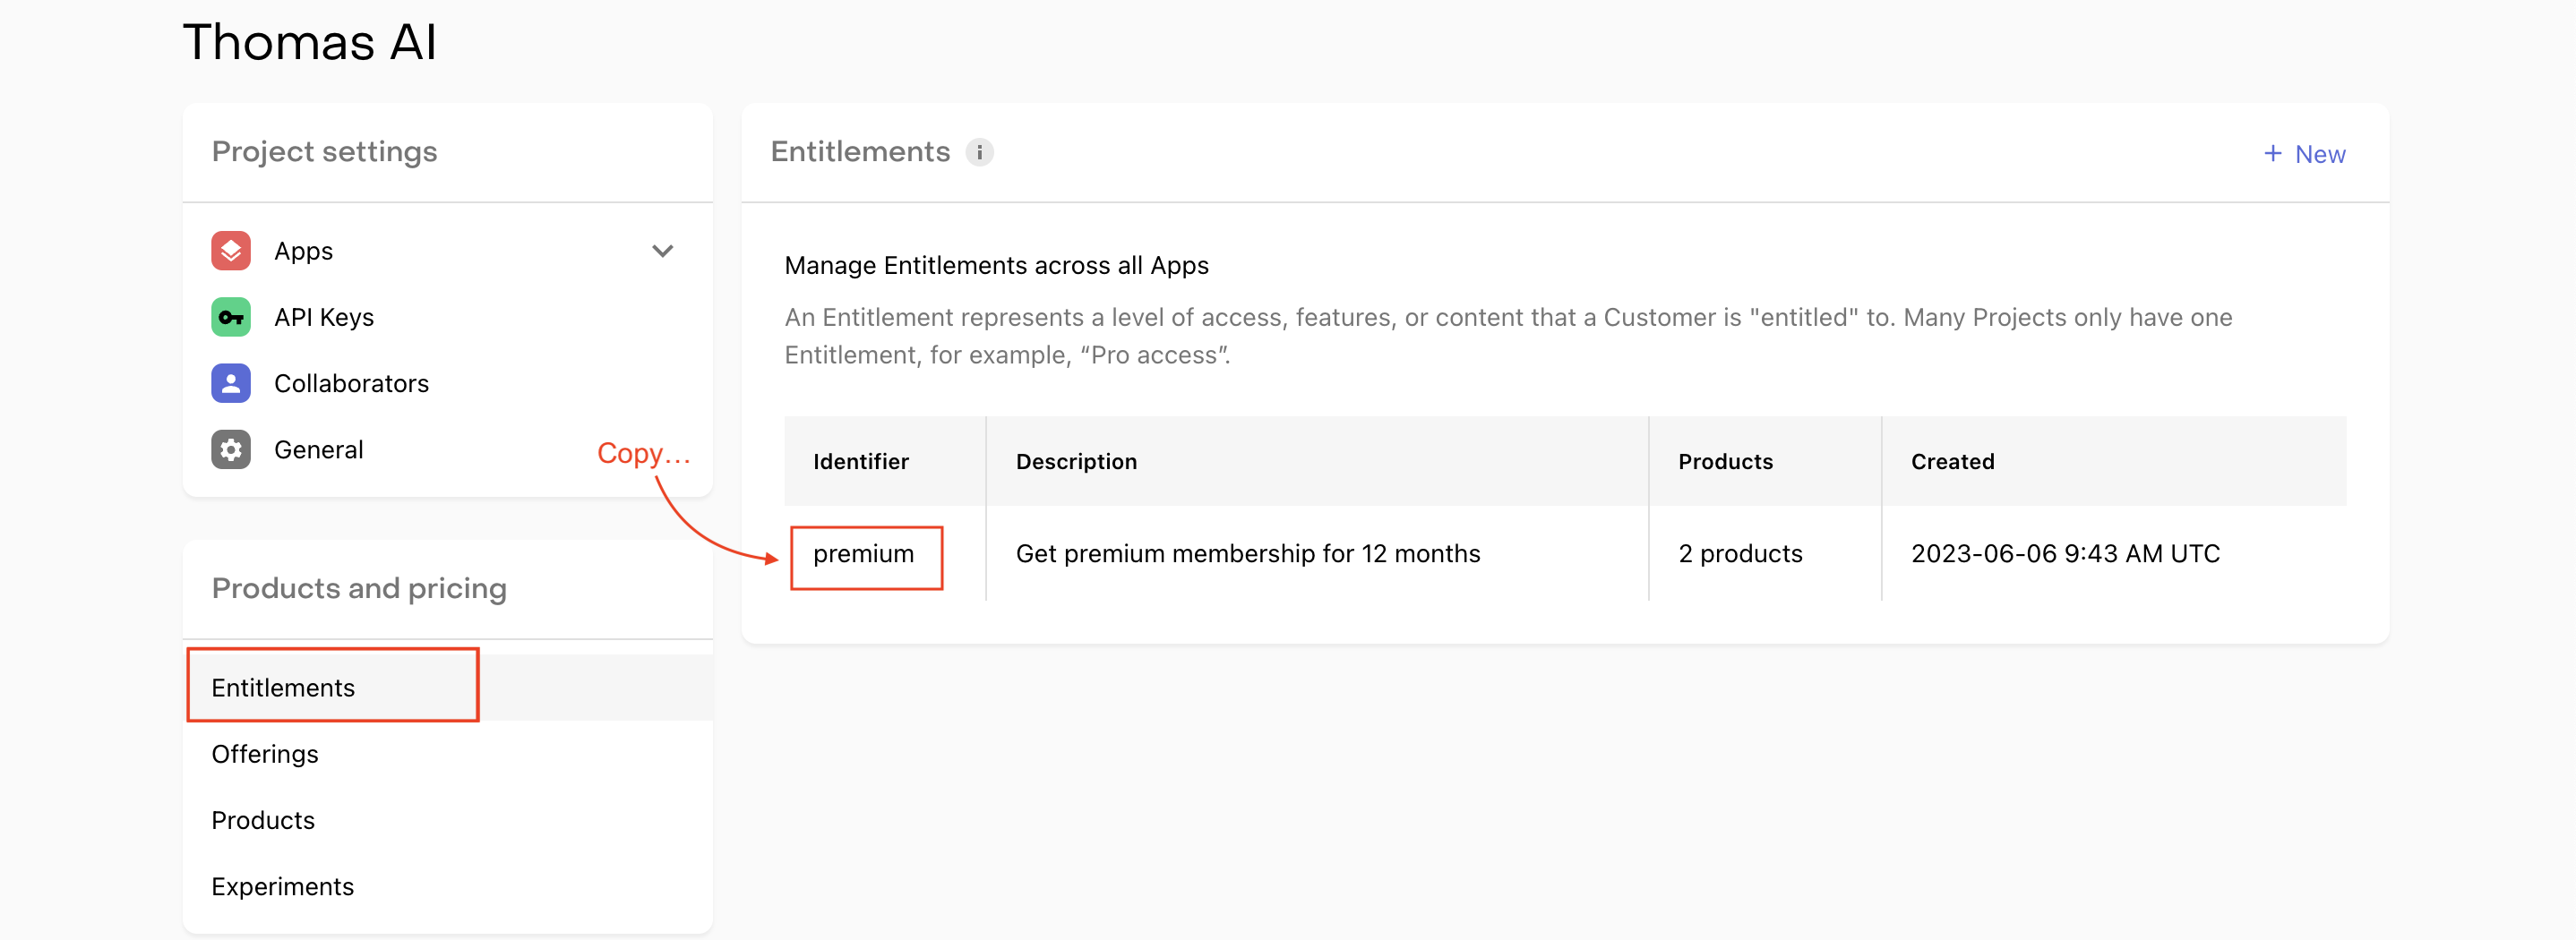
Follow these steps to add an entitlement:
-
Select Entitlements under the Product Setup section. Click "+ New".
-
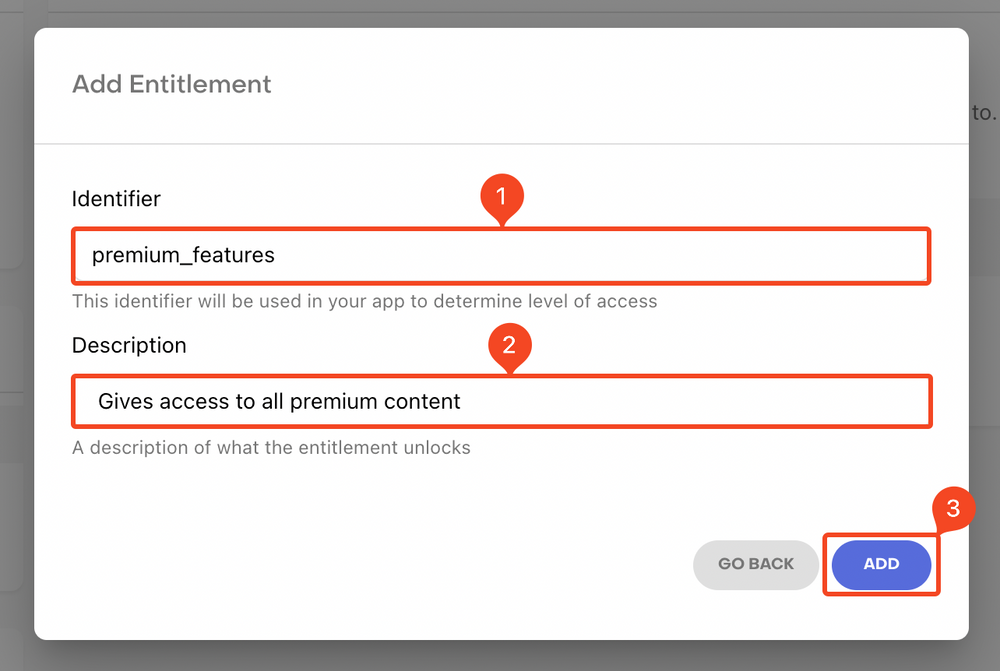
Enter an Identifier and Description for the entitlement. Click ADD.
-
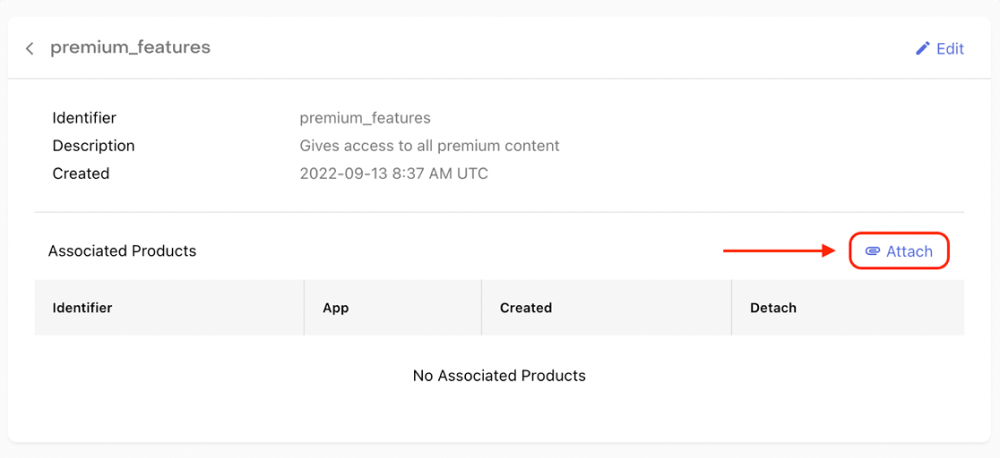
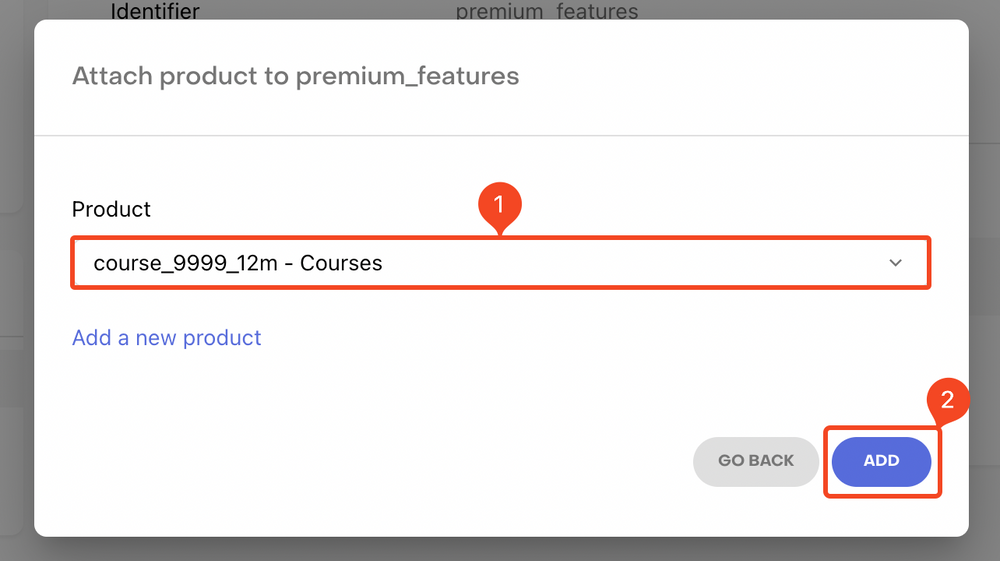
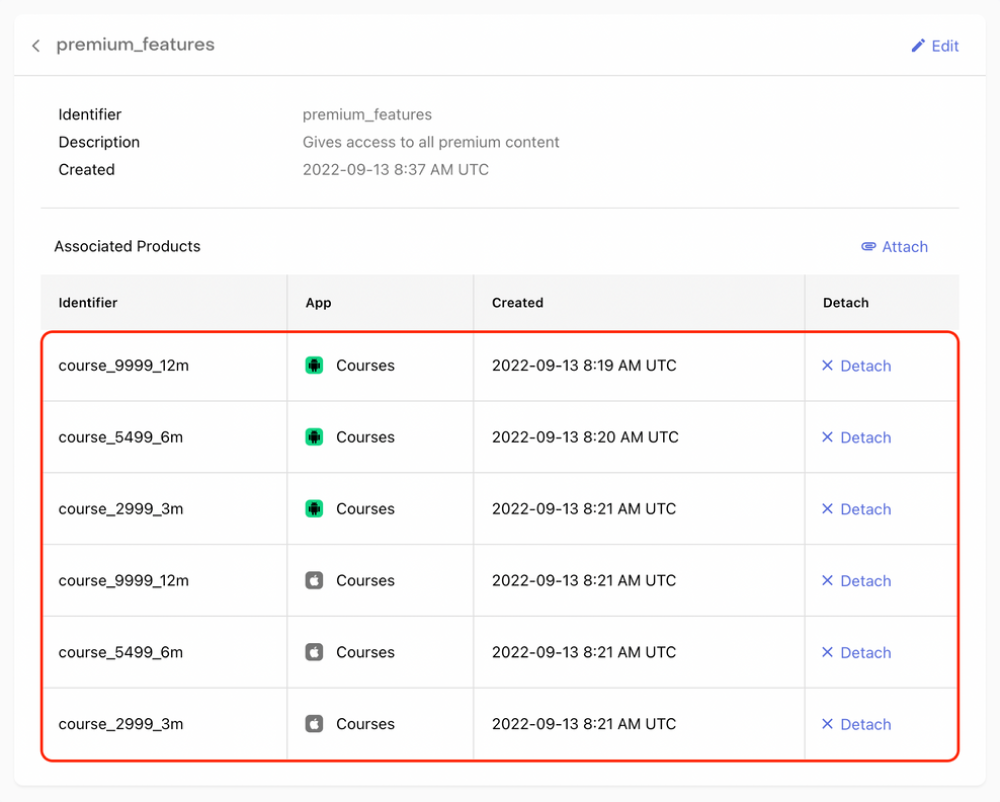
Next, you need to attach the products to this entitlement. Click on the entitlement that you just created.
-
Click on Attach.
-
Select a Product from the dropdown and click ADD .
-
Similarly, attach all the other products to this entitlement.
-
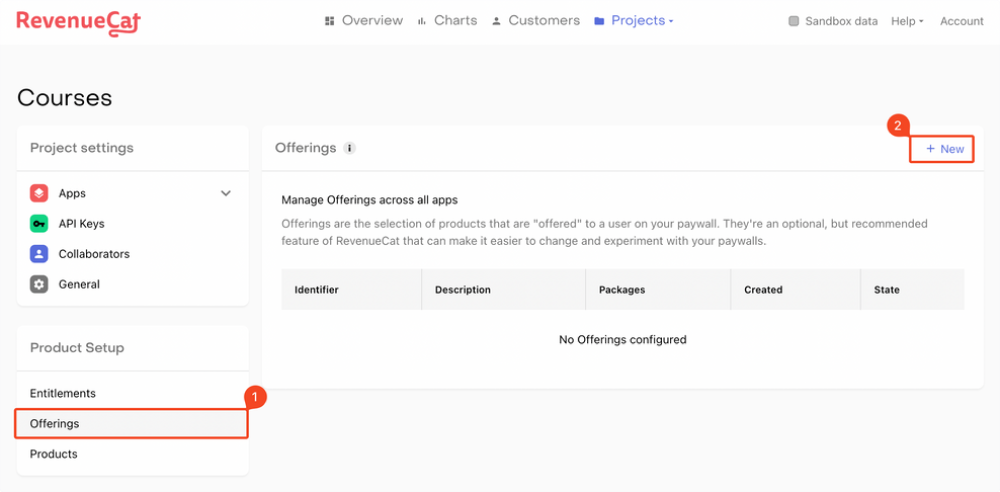
Follow the steps below to add offerings:
-
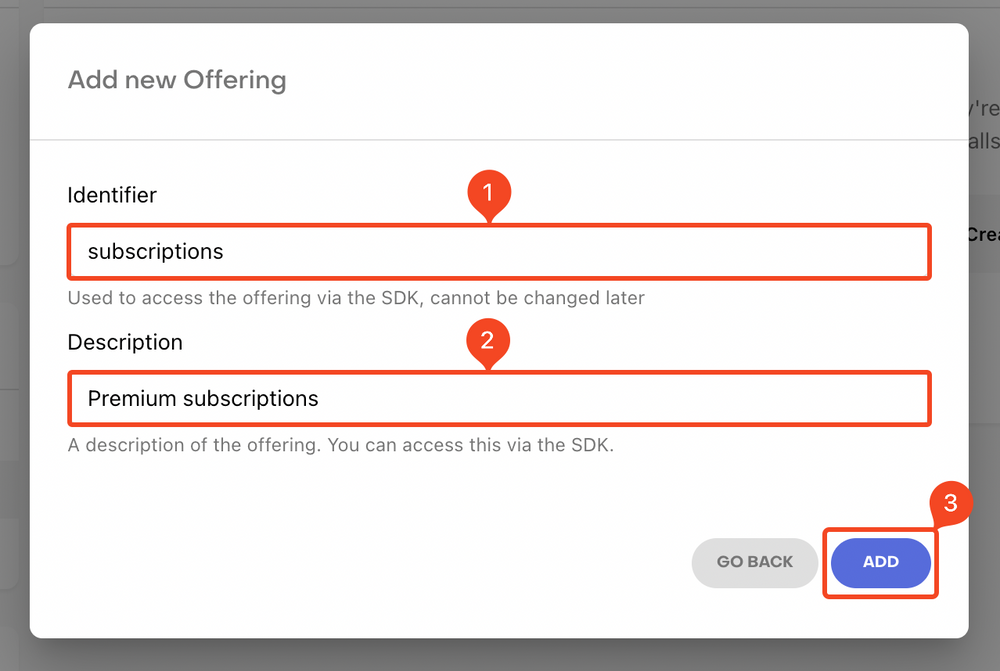
Select Offerings under the Product Setup section. Click "+ New".
-
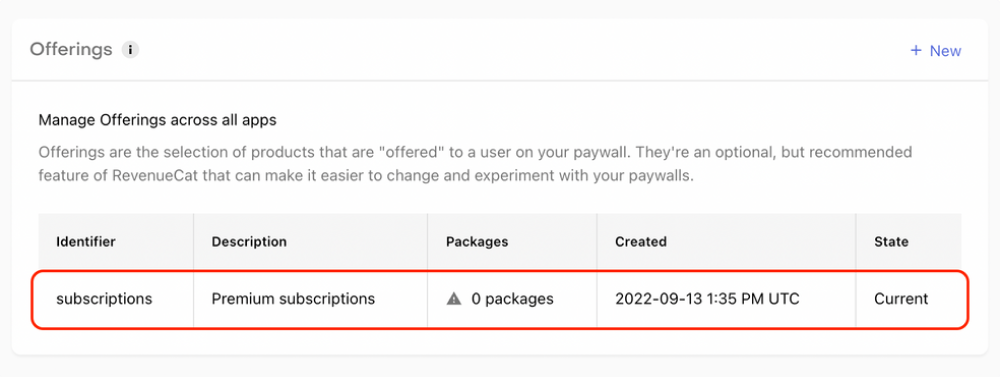
Enter an Identifier and Description for the offering. Click ADD.
-
Click to open the offering that you just created.
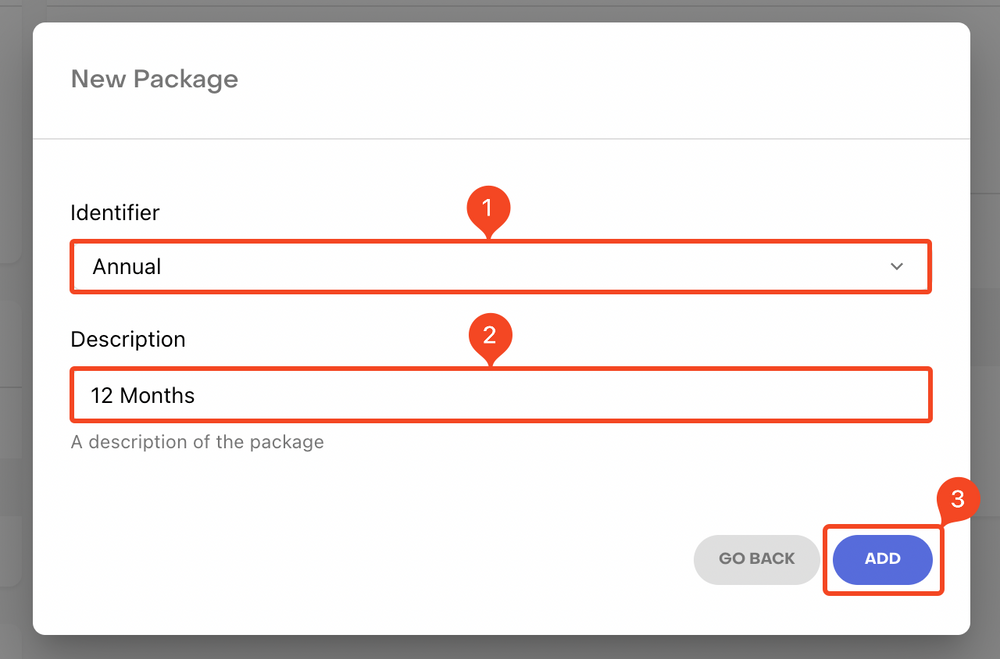
-
Click on "+ New" beside the Packages.
-
Enter an Identifier for the package from the dropdown and add a Description . Click ADD.
-
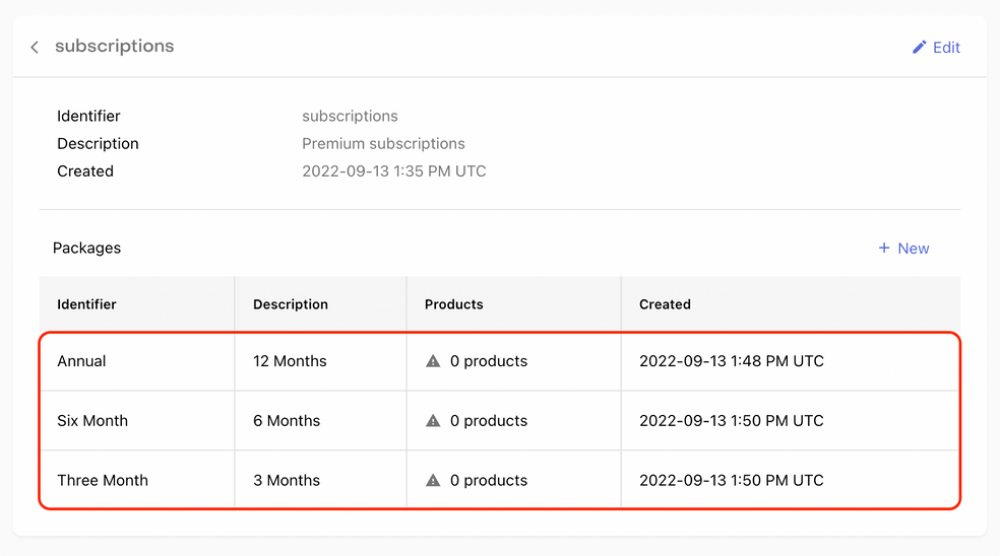
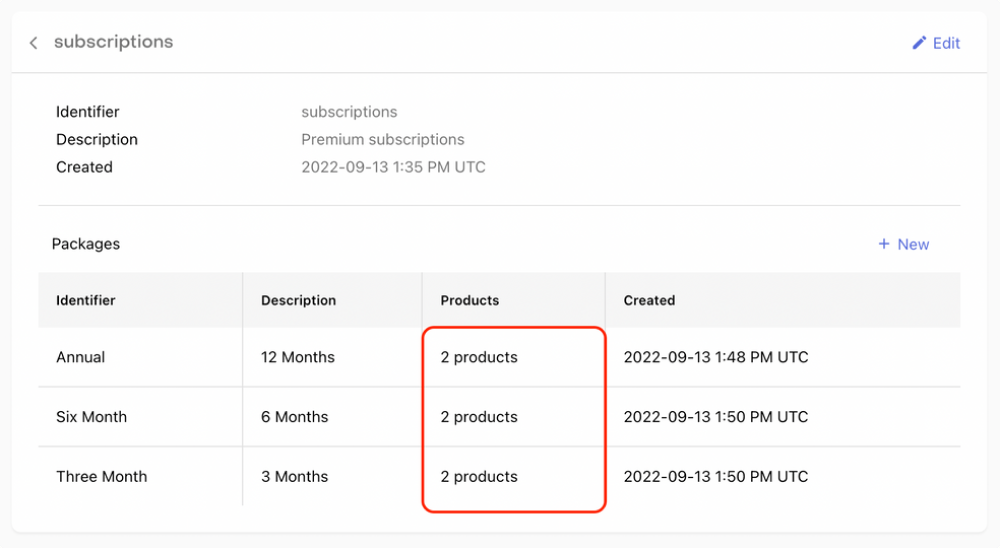
Similarly, add the other packages as well.
-
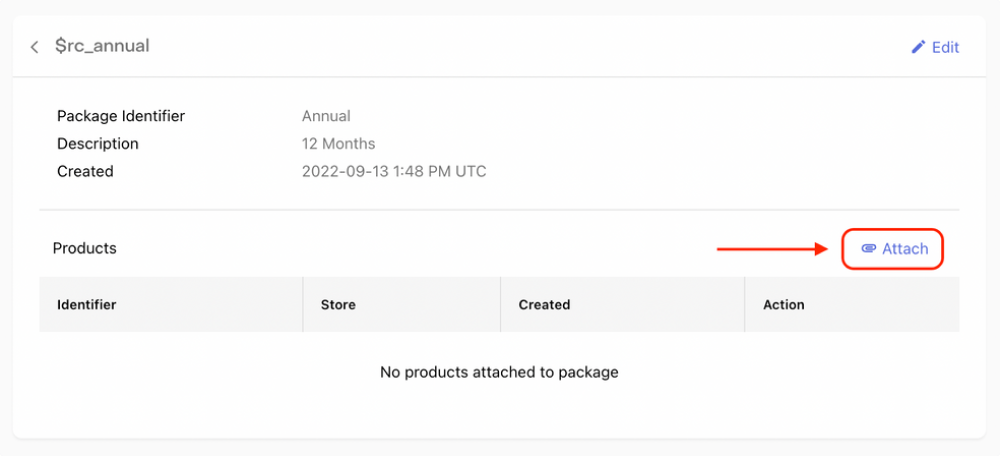
Click to open a package. Then click Attach.
-
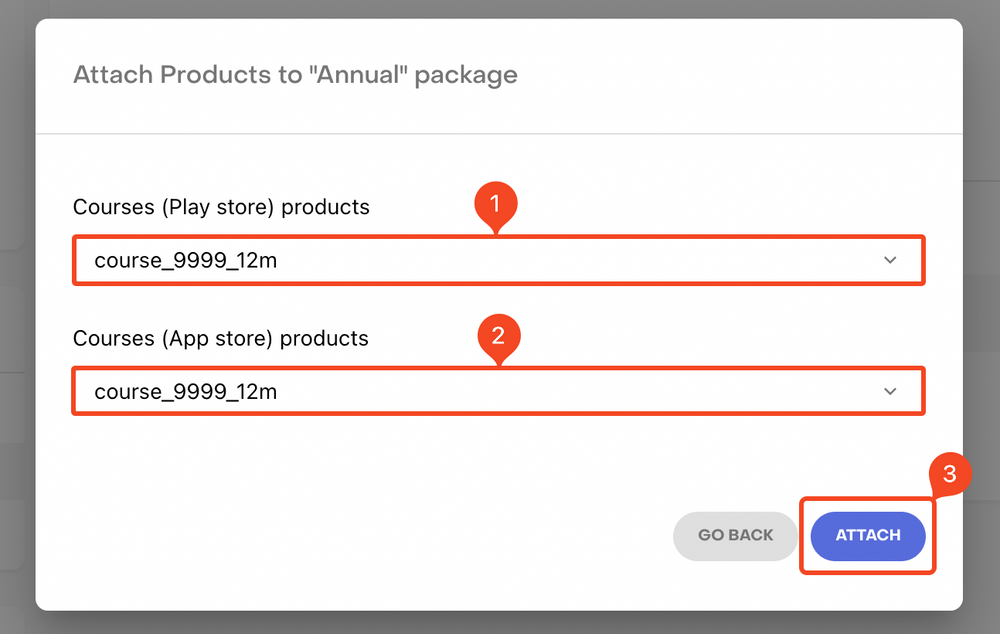
Select the respective Play Store and App Store products from the dropdown. Click Attach.
-
Similarly, attach the correct products to the other two packages as well.
-
This completes the three levels of configuration on the RevenueCat.
-
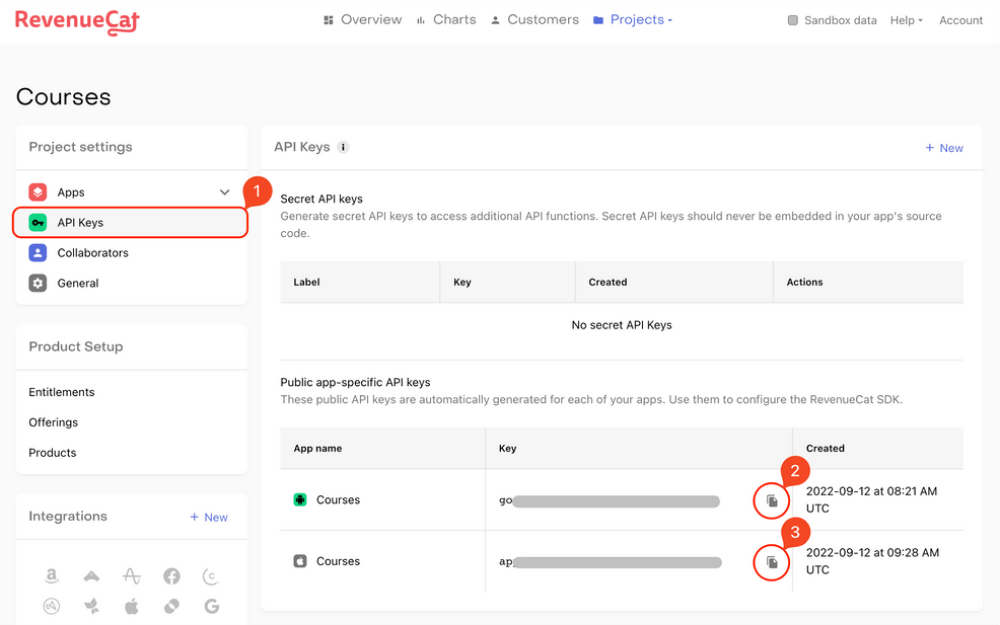
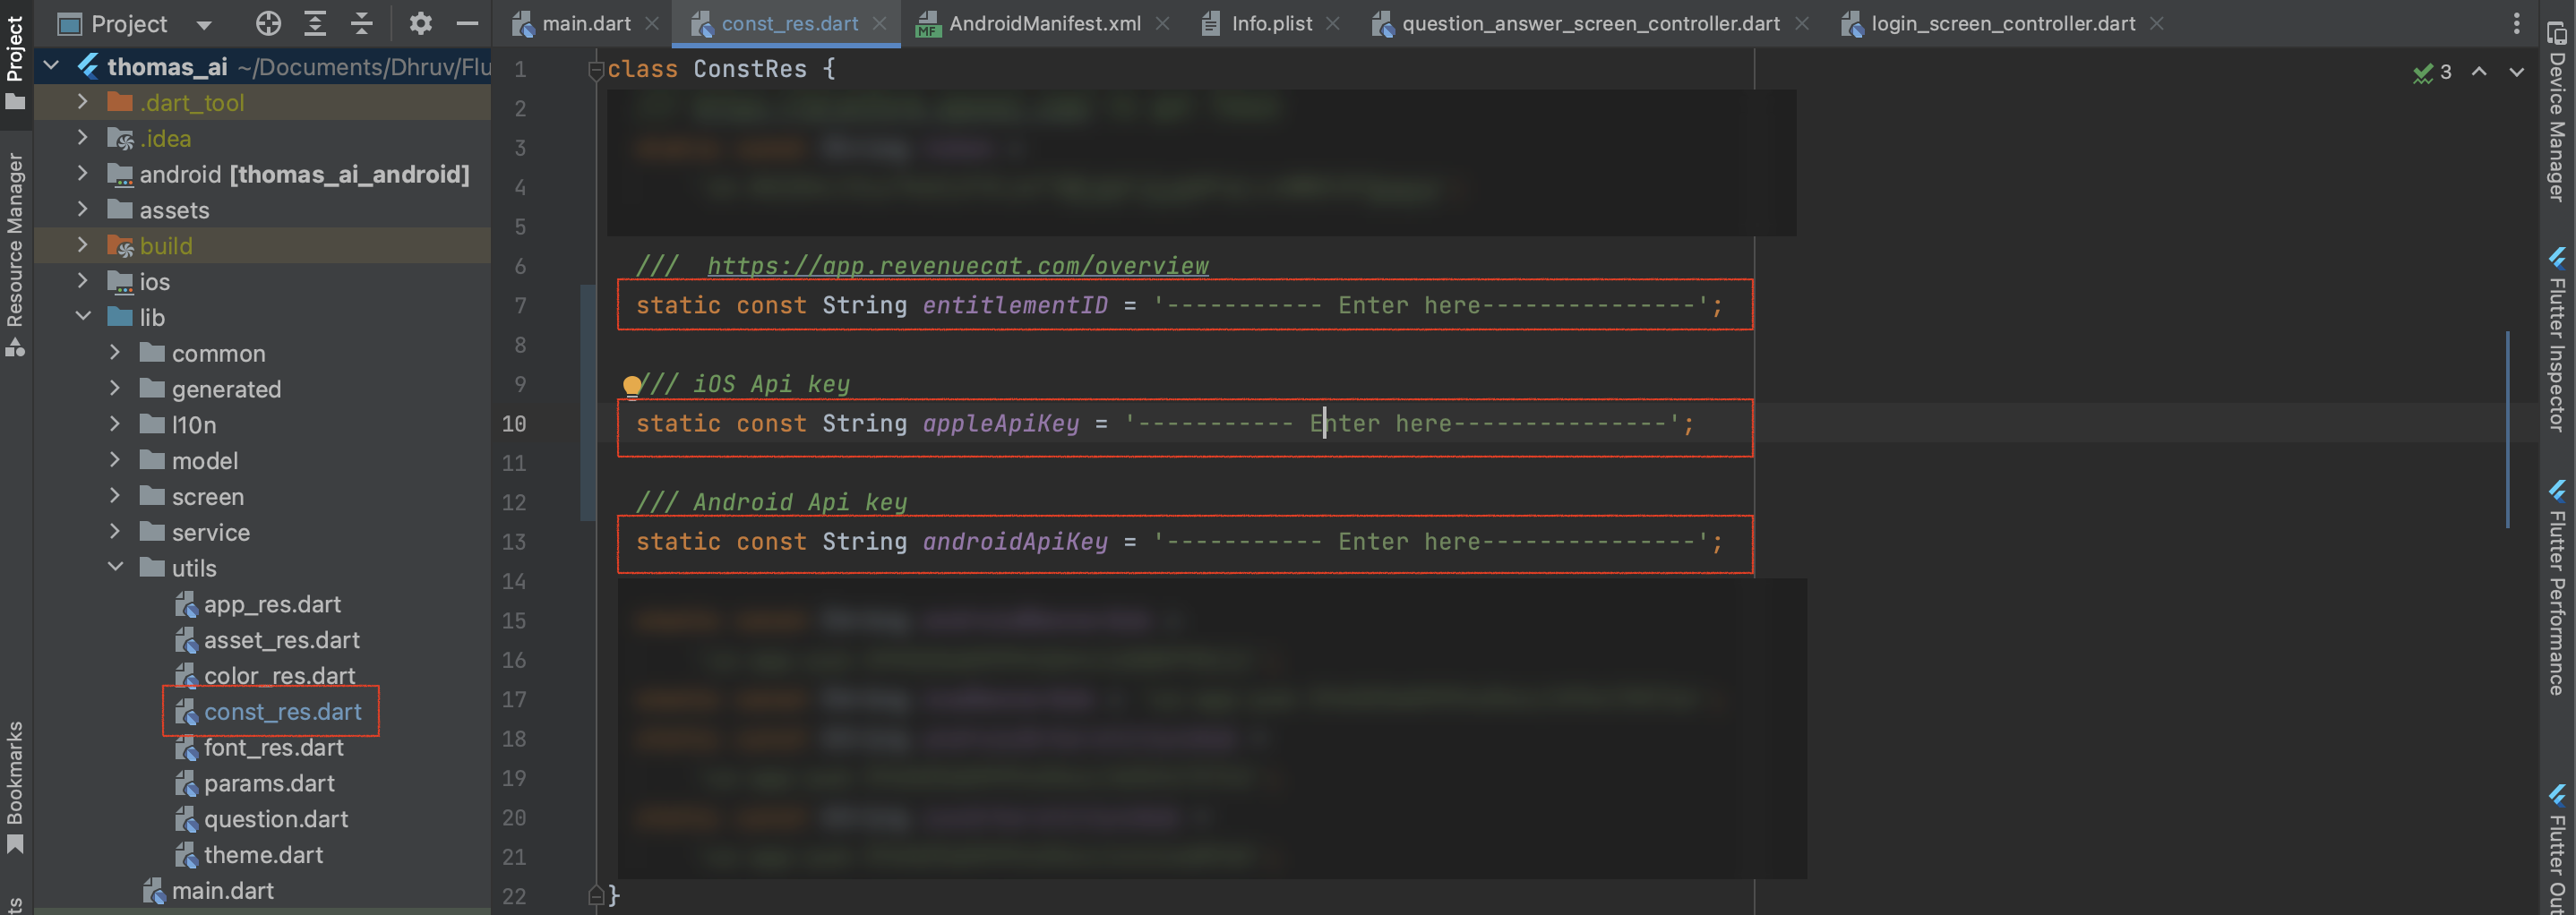
you need to add the App Store Key and Play Store Key to Your project You can get these keys by going to the RevenueCat dashboard > API Keys > Public app-specific API keys. Copy and paste these keys into the respective fields of Project
Android in App Purchase Setup
Note : You won't be able to change or reuse a Product ID across any of your apps, even if the product is deleted.
iOS in App Purchase Setup
Before making products, Let's agree Agreements

App Store subscription setup
Learn in detail about iOS Subscription Groups here .

Connect with RevenueCat
Adding Android app
Adding iOS app
Define subscriptions on RevenueCat
Products
Entitlements
Offerings

RevenueCat Project setup
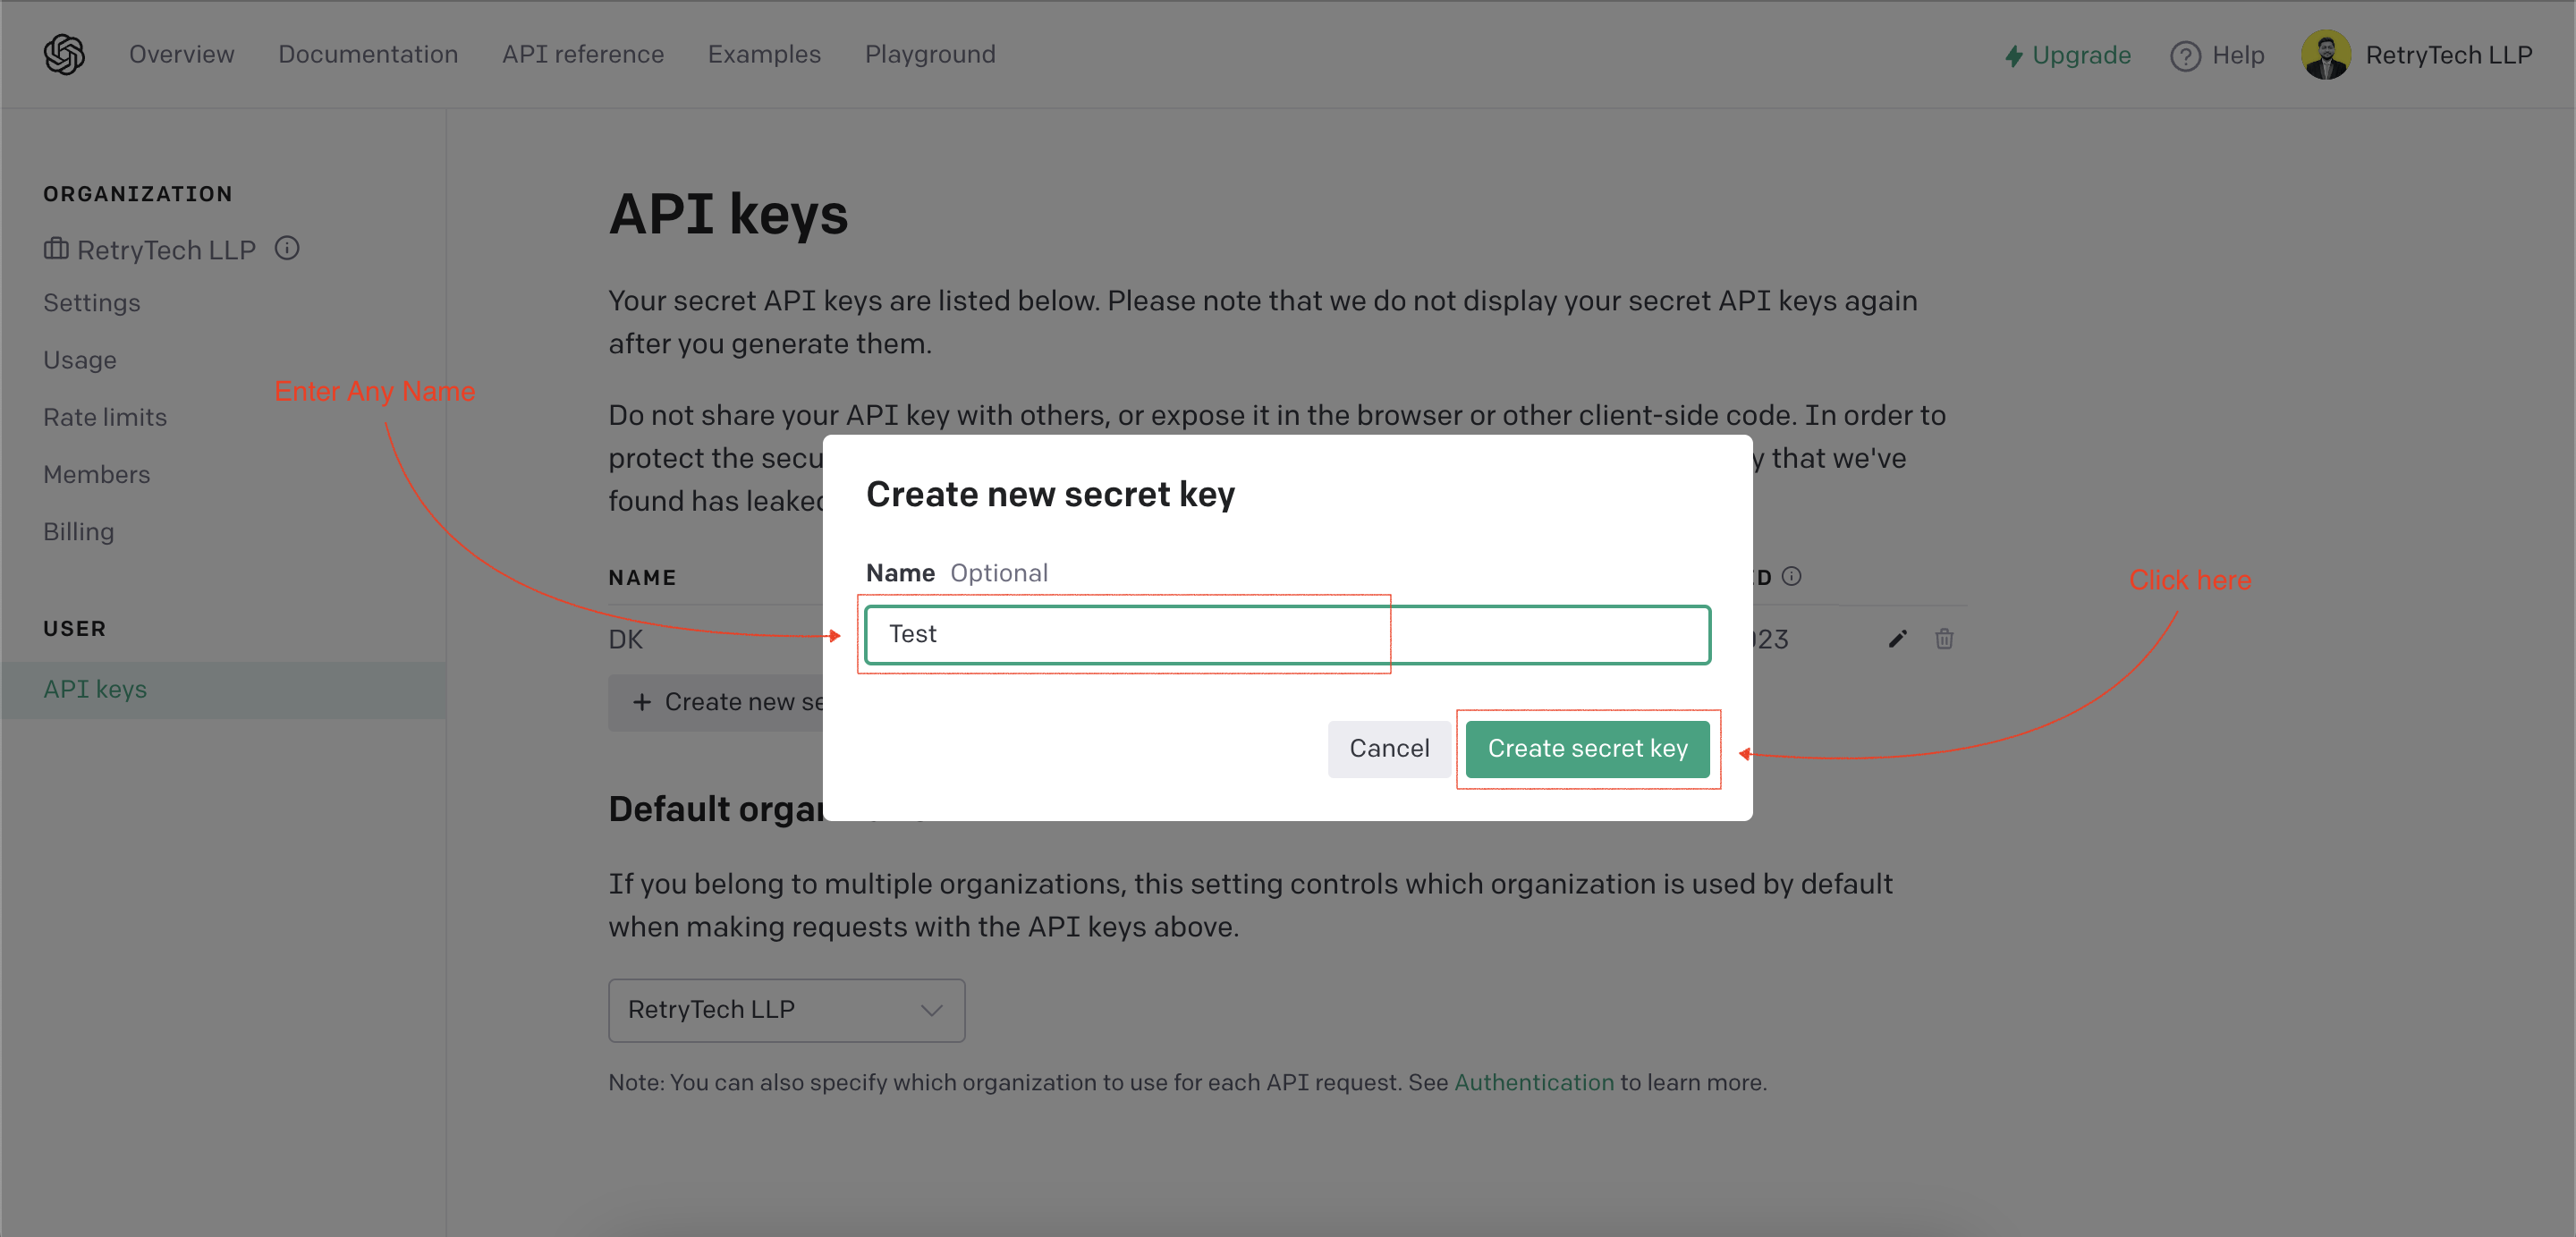
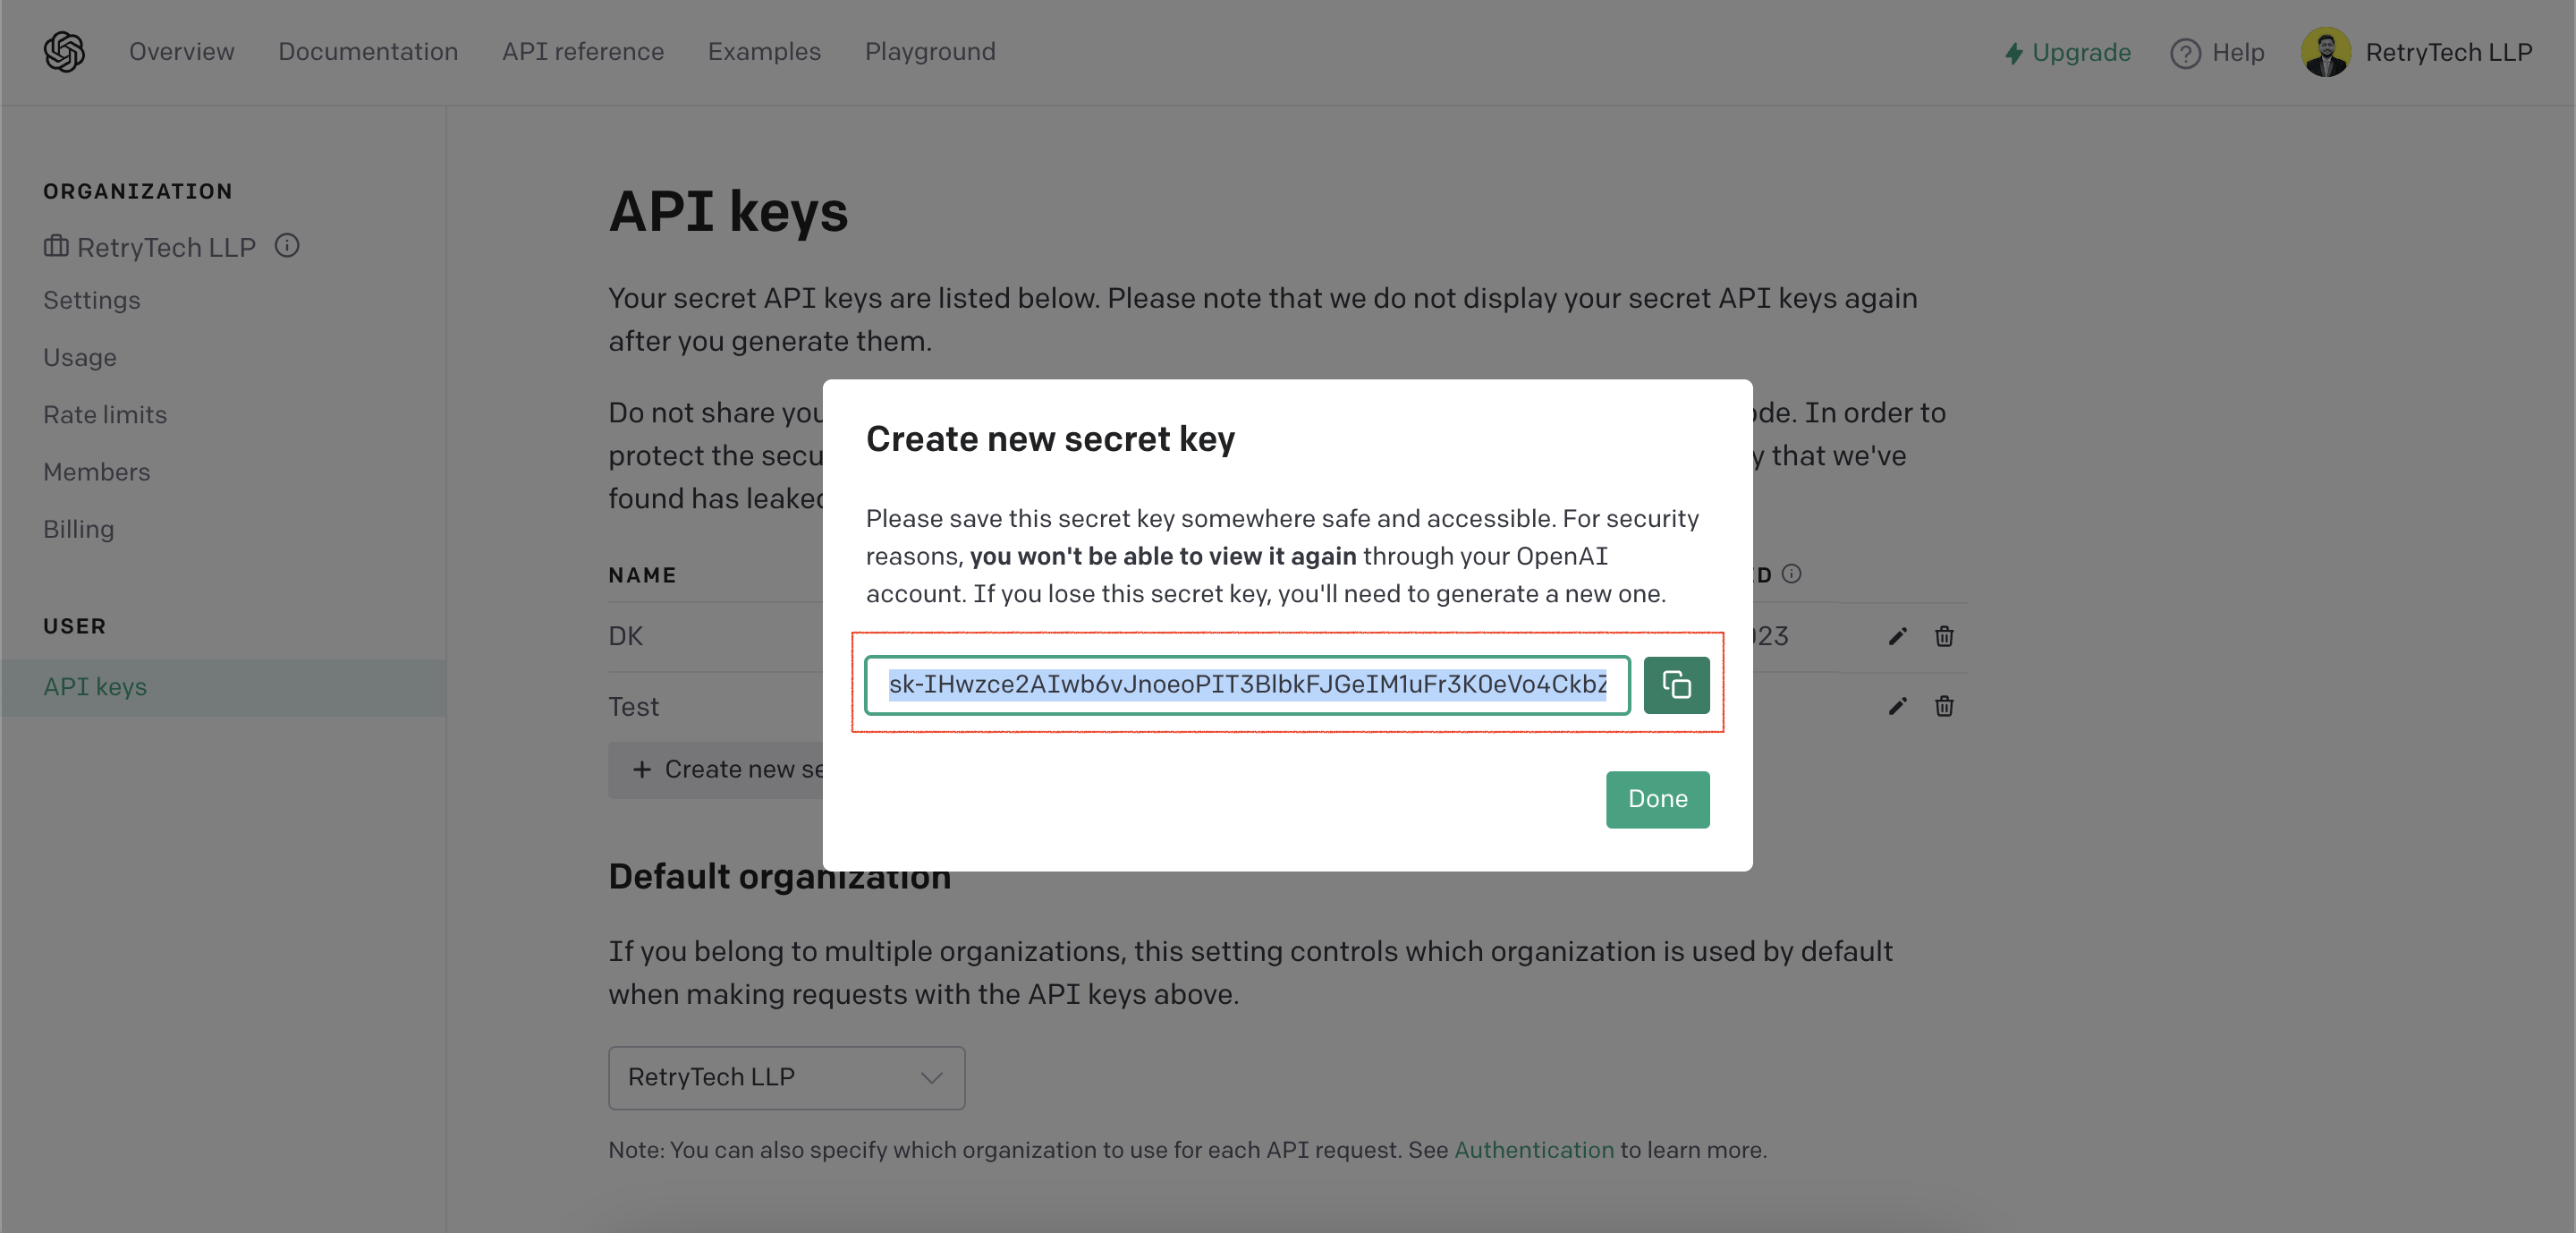
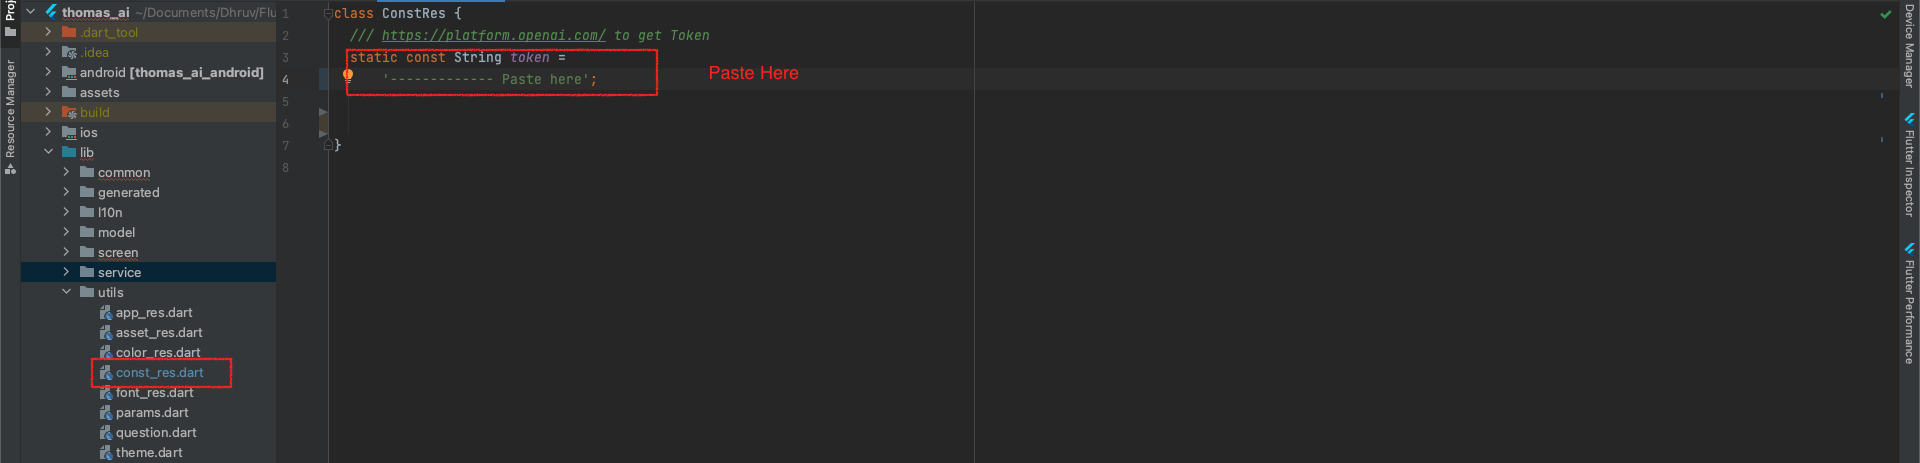
OpenAI
-
At first, follow this https://platform.openai.com/ Create account and then follow the below steps
-
And Copy secret key


Create application build
-
Follow This guide and you can create build for android.
-
Follow This guide and you can create build for iOS.
Want to talk with us?
- Telegram (Support Desk) : +91 7990425274
- Email : [email protected]
- Whatsapp (No Support Here) : +91 7990425274